Liked this recipe?Let us know by giving it a star rating
Focaccia Bread Recipe in 5 simple steps
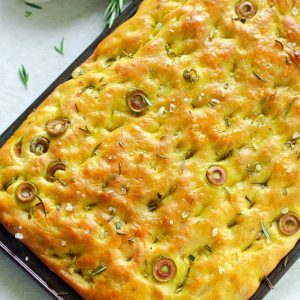
This easy Focaccia Bread recipe comes together in just 5 simple steps. Flavoured with rosemary and olives dipped in good quality Olive Oil this, homemade focaccia makes a rich, flavorful, and soft bread with crispy edges that you're going to love!!!
Servings 1 15x10 inch bread
Ingredients
- 4 cups (500 g) All-Purpose Flour/ Maida/ Plain Flour
- 2 tsp (12 g) Salt
- 1 + 1/4 cups (300 ml) Water
- 2 tsp (10 gms) Sugar
- 2 tsp (8 gms) Instant Yeast
- 2 tbsp (20 gms) Olive Oil
- 100 gms Olives
- 15 gms Rosemary
- About 1/4 cup olive oil, sea salt, rosemary and olives to sprinkle on top
Instructions
Step 1 - Prepare the Dough
- In a mixing bowl, combine together water, yeast and sugar. Give it a stir and add the flour and salt little at a time and mix. Finally, add in the olive oil and combine until it comes together as a dough.
- Transfer to a lightly floured surface and knead for 12-15 mins until you get a soft and elastic dough.
- Add the toppings of your choice to the plain dough and combine. Do not knead too much once you add the toppings.
- Do remember to reserve some to sprinkle on top right before baking
- To make it in a stand mixer - Once it comes together as a dough simply knead for 8 mins.
- Take the dough out of the stand mixer. Add the toppings and combine using hands.
Step 2 - Bulk Ferment (First Proofing)
- Instant Pot Bread Proofing: Brush some oil in the inner pot. Transfer the dough into it and apply some oil on top of the dough as well.
- Cover with a lid and bulk ferment for 30 mins.
- After 20 mins knock back the dough to remove any air bubbles and allow it to proof for the remaining time which would be 10 mins.
- How to proof on a counter-top: Oil the bowl in the which you kneaded the dough. Transfer the dough into it and tap the remaining oil from your hands on top of the dough.
- Cover with a tea towel and allow it to proof for 45 mins and knockback at 30 mins.
Step 3: Intermediate Proofing
- After the first proofing, take the proofed dough on to a clean worktop and knead again to avoid the formation of air pockets in the bread once baked.
- Simply spread the dough out into a rectangle and then fold it into thirds.
- Give it a round shape, put it back into the bowl or pot, cover with a tea towel and allow it to rest for further 10 mins.
Step 4 - Shaping
- Grease the baking tray (15x10 inches) with some olive oil.
- Transfer the rested dough into it and push it to all the four corners of the tray in order to take the shape of the baking tray.
- Loosely cover with a cling wrap and allow it to rise for the second time.
- Second Proofing - 30 mins.
Step 5 - Baking
- After 30 mins, press some dimples on top of the bread. Don't be shy or afraid to press really deep dimples such that your hands are literally touching the base of the pan.
- Pour in a generous amount of oilive oil on top.
- Sprinkle with sea salt, roughly chopped rosemary and olives that you had reserved from step 1.
- Bake in a preheated oven of 210°C (410°F) for 20-30 mins.
- I like to enjoy it warm with a bowl of hot soup.
Video
Notes
- Do not knead the dough after adding the toppings as you might end up squishing the toppings.
- Make generous dimples on the bread dough deep enough that your fingers touch the pan so that they remain intact while baking.
- Serve the bread warm accompanied with soup of your choice or as an appetizer in a party along with my creamy coconut dip (recipe given in the post).
- Check out the post for more ideas on different toppings that you can use, pictorial step by step recipe and also for the details all the tools and equiments needed to bake the bread.
Did you make this recipe? Tag me today!Tag me @spicesandflavors to get featured on my FB and Insta pages