Liked this recipe?Let us know by giving it a star rating
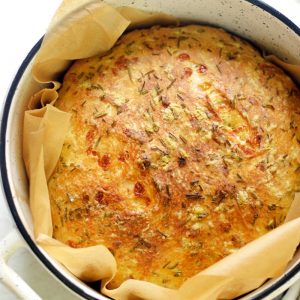
Instant Pot No Knead Bread
This is the easiest no-knead bread that even a 4 yr old can make. Perfect for beginners or even professionals alike. Making artisan bakery-quality bread at home is a cake walk now.
Ingredients
- 3 Cups (approx 375 gms) All purpose Flour
- 1.5 tsp Salt
- 1 tsp Sugar
- 1.5 tsp Yeast
- 1.5 cups Warm Water (refer notes)
Flavour Options
- 1.5 cups Cheese
- 2 tbsp Olive Oil
- 2 tbsp Chopped Rosemary
Instructions
Step 1 : Preparing The Dough
- Combine salt, flour, yeast, sugar in a bowl and give a quick stir
- Add in the cheese, olive oil and rosemary. Mix.
- Finally, add the water little at a time to combine it into a wet shaggy mass of dough.
Step 2: First Proofing
- Grease a bowl with little oil, transfer the wet dough to it, cling wrap, allow it to proof for 8 hours on countertop. Alternatively, grease the inner pot of your Instant Pot. Transfer the dough to it. Set the yogurt mode and time to 4 hours, normal pressure. Proof for the set time.
Step 3 : Shaping the Dough
- Dust the worktop with some flour and tip the proofed dough onto it. Dust the top of the dough as well with some bread.
- Shape it into a boule. Won't take you more than 30 to 40 seconds. Refer the quick video on how to do it the right way or the detailed video included in this recipe card.
- Transfer it to a banneton that has been pre-lined with parchment paper.
Step 4: Second Proofing and Preheating the Oven
- Cover the top with a tea towel and allow it to prove for 30 mins.
- Meanwhile, place the dutch oven in the oven. Preheat the oven to 230°C which is 450F degree for the same time which is 30 mins.
Step 5: Baking the Bread
- After 30 mins take the dutch oven out of the oven. Caution: It would be super hot so make sure to use oven mittens.
- Carefully lift the parchment paper with the dough from the banneton and place it in the dutch oven.
- Brush the top with some olive oil, sprinkle some chopped rosemary on top and make 2 cuts on top of the bread. (Do not spend much time at this stage).
- Put the lid back on the dutch oven and off it goes into the hot oven for 30 mins.
- After 30 mins, take the lid off the dutch oven and cook it uncovered for additional 15 mins to get the golden crispy crust on top.
- So a total time of 45 mins is what you need to bake the bread, 30 mins with lid on and final 15 mins without the lid.
- After the baking time take the bread immediately out of the dutch oven and place on a cooling rack to cool for 10 to 15 mins. Then slice and enjoy.
Video
Notes
- The no-knead bread dough has to be wet, shaggy and sticky mass. Just feel the dough, add water little at a time and mix. If you feel that it is too wet add some flour and adjust.
- Even though the recipe calls for 1.5 cups of water, I was left out with nearly 3 tbsp of water so add little water at a time to bind the dough, as the water content also depends on climatic conditions, how old the flour is etc.
- I would recommend you to add flavouring of your choice while making the bread as I find the plainer version to be a little bit bland. For the flavouring variation option check the post above the recipe card. You can keep it as simple as you like.
- Shaping the Dough: Do not add too much flour while shaping the dough - you need just 2 to 3 tbsp at the max because you do not want to end up with the dry dough. The moisture content of the dough is the key when it comes to making this easy no-knead bread recipe.
- Try to make use of a banneton or a bowl similar to it to get that bakery-style shape, well honestly the messier this bread gets the more artistic it looks once baked.
- Skip brushing the top with olive oil before baking if you like really crusty bread.
- Using a sharp knife to cut the bread is the key. You do not want to drag it too much. Be gentle but quick at the same time while making cuts on the dough for that artistic look. Oh please do not miss this step as it is not just for looks but instead, this also helps the bread to increase in volume and expand under the heat. :D
- High heat to bake this Dutch Oven No-Knead Bread is another key factor. So make sure that your oven is hot when you place the bread for baking. It takes nearly 30 mins to reach to that high heat so do keep that in mind. :)
- The final 15 mins are what makes the bread crusty. So the longer you bake the more the crustier your top will be ultimately yielding a golden brown, thin, crusty top with a soft, chewy and flavourful interior.
- Always use a glass lid or a plate to cover your Instant Pot and not the regular lid as if accidentally you allow it to prove for longer there are possibilities that the dough would rise and get stuck to the sealing pin from within and it would become too tough to open the lid.
- You can use a 3qt, 6qt or even a 10qt Instant Pot to prove the bread.
- One can bake this bread without a dutch oven too. Have mentioned it in the above paragraph or if you would like to see a separate post on it then do let me know in the comments below.
- For Breakfast: Toast a slice of bread, spread some hummus, salad leaves and sunflower or pumpkin seeds on top.
For Lunch: I like to serve it with a simple onion tomato gravy
Dinnerr: Practically goes well with any kind of soup.
Did you make this recipe? Tag me today!Tag me @spicesandflavors to get featured on my FB and Insta pages