Liked this recipe?Let us know by giving it a star rating
Hokkaido Milk Bread
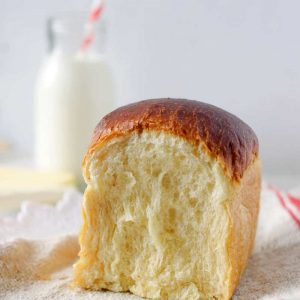
This Japanese style Hokkaido milk bread with a light, fluffy, tender crumb is so delightful to eat that you will get obsessed with it.
Servings 14 slices
Calories 141kcal
Ingredients
Tangzhong Starter
- 2 tbsp (14 g) Bread Flour
- 3 tbsp (43 g) Milk
- 3 tbsp (43 g) Water
Ingredients to make the Bread Dough
- 30 ml Milk (cold)
- 45 ml Cream (cold)
- 1/2 tsp Salt
- 275 gms Bread Flour
- 6 gms Instant Yeast
- 40 gms (2 tbsp) Sugar
- 18 gms (1.5 tbsp) Milk Powder
- 43 gm (1) Egg
- 56 gms (1/4 cup) Butter
Instructions
Step 1 - Prepare the Roux
- In a saucepan, dissolve the flour in milk and water (mentioned under the roux ingredients). Place it on the gas stove and cook till until the flour thickens whilst stirring continuously.
- Once thickened, take it off the flame and immediately add the remaining milk and cream. This is done to reduce the temperature of the roux quicker.
Step 2 - Prepare the Dough
- In the bowl of your stand mixer, add rest of the ingredients (except for butter) - salt, flour, yeast, sugar, milk powder and egg.
- Add the roux.. before adding the roux make sure that it is slightly cooled and not hot as if it is too hot it would kill the yeast.
- Attach the dough hook and combine everything on med. speed for 2 mins until it comes together as a dough.
- Then start feeding the dough with butter a little at a time. Once incorporated knead the dough for 8 mins.
- After which take the dough onto a lightly floured surface.
Step 3 - First Proofing
- Give the dough a round shape making the top smoother.
How to Proof on Counter-top.
- Grease a bowl with some oil. You can use the same bowl in which you kneaded the dough
- Place the dough in the bowl and dab the remaining oil from your hands on top of the dough so that it doesn't dry out while proofing.
- Cover it with a tea towel and allow it to proof in a warm place for 1 hour.
How to Proof in an Instant Pot?
- Grease the inner pot of your instant pot with some oil.
- Place the dough into it and dab the top of the dough with the leftover oil so that it doesn't dry out.
- Place the iiner pot into your Instant Pot and choose the Yogurt Setting.
- Set the time to 30 mins.
Step 4 - Shaping
- Once proofed, punch and tip the dough onto your work top and divide into 3 equal portions. Either eyeball or use a kitchen scale and divide it into 3 portions of 205 gms each
- Roll it into a round shape by tucking the sides to the base.
- Cover the 3 balls with a tea towel and allow for an intermediate proofing of 10 mins.
- Meanwhile grease the baking pan with some butter and set aside.
- After 10 mins, take each portion and roll it lengthwise. Fold it into thirds.
- Roll again lenthwise and then starting from the corner near you roll it like we roll for a swiss roll cake. (Refer the step by step pictures in the post from above paragraph or refer the video in the recipe card).
- Place it in the greased baking pan, cling wrap and allow it for second proofing.
Step 5 - Second Proofing
- Allow the dough to rise in the baking pan for around 1 to 1.5 hours.
- What you are looking for is that the bread dough should have doubled in size and reaches the brim of the baking pan.
Step 6 - Baking
- Bake this in a preheated oven of 180°C (355°F) for 30-35 mins until the top is golden brown in colour and the bottom sounds hollow.
- Allow the bread to cool in the pan itself for 5-8 mins then transfer to a wire rack to cool completely.
Video
Notes
- Do whisk the roux (step 1) continuously to avoid the formation of lumps and also from it getting burned.
- Make sure that the Tangzhong culture or Tangzhong starter is cooled down before you add it to the rest of the ingredients or else the yeast would die due to the heat from the starter.
- To cool the starter quickly add the rest of the milk+cream immediately and mix.
- You can use active dry yeast in place of instant yeast. Just make sure to activate it first before proceeding with the recipe.
- It is always advisable to check for the expiry of the yeast before beginning to make the bread.
- For baking cakes and breads, it is always advisable to weigh out the flour and other ingredients. However, if you do not have a scale yet (though I highly recommend investing in one if you plan to bake regularly; doesn’t cost much and lasts a lifetime) just watch this video on Focaccia Bread recipe where I show you how to measure the ingredients the right way.
- Start feeding the butter after 2 mins, that is, when it forms into a dough (step 2) as the fat might retard the yeast activity and we do not want that so adding at a later stage is advisable.
- Greasing the baking pan with some oil helps in easy unmoulding of the bread once baked. Though I would recommend a 9×5 inches bread pan for this recipe.
- Do remember to keep the dough covered at all times to avoid drying of the dough.
- Please note the first proofing time is Either 30 mins in the Instant Pot or 1 hour on the Counter-top and not 1.5 hours.
- Once baked, leave the bread in the baking pan itself for 5-8 mins as the bread bakes in the cooling process too. So don’t rush to take it off from the pan immediately.
- Check out the post for additional details on how to store the bread, the right tools and equiments that can help you master bread baking, tips on how to perfect your bread baking skills, the right Instant Pot settings and much more.
Can I substitute All Purpose Flour for Bread Flour?
Yes you can but the bread won't be as tall as the one made with bread flour. Read the post for additional details on this concept.Can I skip Milk Powder?
In this recipe both milk and milk powder is a vital ingredient so unfortunately you cannot skip.Is it possible to make this Hokkaido Milk Bread recipe without yeast?
No you would need yeast for this recipeCan I use this recipe to make Milk Bread Dinner Rolls?
Yes absolutely. Instead of dividing the dough into 3 like we did for this recipe, divide the dough into 16 equal portions. Please feel free to refer to our dinner rolls recipe for a detailed instructions.Nutrition
Calories: 141kcal | Carbohydrates: 19g | Protein: 4g | Fat: 6g | Saturated Fat: 3g | Cholesterol: 26mg | Sodium: 97mg | Potassium: 52mg | Fiber: 1g | Sugar: 4g | Vitamin A: 181IU | Vitamin C: 1mg | Calcium: 25mg | Iron: 1mg
Did you make this recipe? Tag me today!Tag me @spicesandflavors to get featured on my FB and Insta pages