Liked this recipe?Let us know by giving it a star rating
Homemade Ciabatta Bread recipe
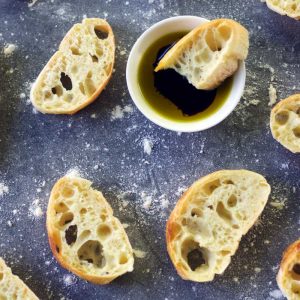
Wonderfully chewy, light, porous with irresistible big holes on the inside; crusty and crackling golden brown on the outside vegan CIABATTA BREAD is all about its unique flavor and texture. Learn how to make this easy Italian no knead homemade Ciabatta bread recipe that makes a perfect rustic bread to dip in soups, make bruschetta and sandwiches.
Servings 3 ciabatta loaves
Ingredients
- 360 gms Bread Flour/Strong Flour
- 288 gms Water
- 4 gms Instant Yeast
- 36 gms Olive Oil (optional)
- 1 tso Salt
Instructions
Step 1 - Preparing the Dough
- In a large container, add the water followed by the yeast. Stir to dissolve the yeast.
- Add olive oil, flour and salt. Usnig a wooden spoon combine everything into a dough.
Step 2 - Bulk Fermenting
- Once everything is combined into a dough, cover the container with the lid or tea towel and allow it to bulk ferment for 3 hours at room temperature on the counter-top
How to Bulk Ferment in an Instant Pot?
- If you have an Instant Pot with Yogurt setting, you can use that to bulk ferment and cut the time to half.
- So Bulk Ferment in an Instant Pot for 1.5 hours.
Step 3 - Folding
- Wet your hands and lift the dough from one side stretching it gently so that it doesn't tear apart and fold it back on itself.
- Repeat the steps on all the four sides of the dough - North, South, East and West
- Do it twice and let it rest for 30 mins.
- After 30 mins repeat the stretch and fold once. Let the dough rest again for 30 mins.
- Come back, repeat strech and fold once and this time rest for 60 mins.
- Basically you are stretching and folding the dough for 3 times in a time interval of 30 mins.
- PS NOTE: If you are using an Instant Pot for this step, then you can reduce the time to half. So stretch and fold for 3 times in a time interval of 15 mins in the pot using the Yogurt Setting. And after the last fold let it rest for 30 mins again choose the Yogurt Setting.
Step 4 - Shaping
- Dust some flour on top of the dough as well as on your worktop.
- Invert the pan onto your worktop and enjoy the sight of seeing the dough releasing itself from the contianer and tipping on to the work top :)
- Gently stretch the dough a bit to form a rectangle. Be careful to not pop any air pockets.
- Then divide the dough into 3 parts to make 3 loaves.
- Lift each dough using 2 bench scrapers quickly (please watch the video) and place it on a well floured tea towel.
- Cover with a greased cling wrap loosely and allow it to rest for one final time - 45 mins.
Step 5 - Baking
- Preheat your oven to 250°C (500°F) . In the middle rack, place an inverted cookie tray and a baking tray on top of it
- Cover a cardboard or foamboard with aluminium foil and grease it.
- Tilt the tea towel a bit so that the loaf is now transferred to your greased foam board with seam side facing up.
- Place it on a baking tray lined with parchment paper with the right side now facing you.
- Your loaves are now ready to be baked.
- Place a baking pan with boiling hot water on the lower rack of the oven.
- Gently and carefully slide the parchment paper with the loaves onto the preheated pan in the oven.
- If you have a spray bottle, immediately spray mist of water 6-7 times on top of the bread loaf and immediately shut the oven lid off.
- If you do not have a spray bottle, add 5-6 ice cubes to the base of the oven to create steam immediately and shut the lid.
- Bake in the oven at 500°F (250°C) for 15 mins and then lower the temperature to 230°C (440°F) and bake for another 12-15 mins until you get a nice crackling, golden brown crust and the bottom should sound hollow once baked.
Video
Notes
Notes:
- This bread recipe has an 80% hydration, 10% oil and 2% salt if calculated in terms of Baker's percentage.
- Oil is an optional ingredient, you can skip it if you do not have it handy.
- Bread Flour is preferred due to the high protein content of the flour which helps to hold the structure of the bread. If All-purpose flour is the only flour you can find at the moment certainly use that if need be.
- I highly recommend using a weighing scale for this recipe since the dough is highly hydrated and also calculating the dough in terms of cups won't give a precise measurement and you might not get accurate results.
- Yes, I understand it is a lot of steps but note that most of the time the dough is just resting and your active time of handling would hardly be much between each folding. So plan your day and do Multitasking which I know you are best at!!!
- Do not skip the folding steps. Since this is a no-knead bread you definitely need all those stretching and folding to build the structure of the bread.
- If at any point it gets too sticky and you are not able to handle the dough, wet your hands and proceed. The dough will not stick to your wet hands 😉
- Be quick while transferring the dough to the tea towel at step and back to the baking tray at step 4 and avoid handling the dough with hands too much.
Did you make this recipe? Tag me today!Tag me @spicesandflavors to get featured on my FB and Insta pages