Liked this recipe?Let us know by giving it a star rating
Beginners Sourdough Sandwich Bread
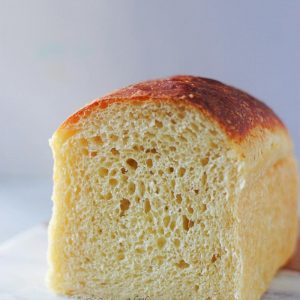
This Sourdough Sandwich Bread Loaf is my go to bread recipe for making sandwiches, toast and also to dunk in soups. Made with no yeast; from homemade starter this bread has a caramalized brown crust with soft and light crumbs
Servings 1 9x5 inch loaf
Ingredients
Levain
- 35 gms Mother Starter
- 35 gms Bread Flour
- 35 gms Whole Wheat Flour
- 70 gms Warm Water
Bread Dough
- 252 gms Warm Milk
- 28 gms Butter
- 140 gms Active Starter
- 360 gms Bread Flour
- 28 gms Sugar
- 1.5 tsp Salt
Instructions
Step 1 - Build the Levain
- Mix all the ingredients mentioned under the levain and allow it to double in size. This would take anywhere between 8-12 hours.
Step 2 - Prepare the Dough
- Once your levain is ready (starter is active): in a mixing bowl add in the warm milk, butter and required amount of starter (140 gms) and stir together.
- Add in the flour, sugar and salt and combine it into a dough.
- Take it out on to your worktop, lift the dough using a bench scraper and thump it back. Repeat this for 3-4 mins until the dough becomes supple and smooth comparatively.
- Place it in a bowl, cover with a tea towel and forget for 30 mins.
- If you want to use your Instant Pot: Then transfer the dough into the inner pot. Cover with a lid and chose the Yogurt mode and set the time to 15 mins.
Step 3 - Slap and Fold Technique
- After 30 mins, wet your hands, lift the part of the dough across you, stretch it and fold it over to the centre. Repeat this on all four sides of the dough.
- Then give it a round shape again, place it in the bowl and forget for 30 mins.
- Reoeat this 3 more times. So we would be doing the slap and fold technique for a total of 4 times in an interval of 30 mins.
- If using an Instant Pot: The steps would remain the same just that the time interval would be reduced to 15 mins.
- After the final folding, let the dough rest for 1 hour on your counter-top. If using an instant pot then the timing here would be 30 mins.
Step 4 - Shaping
- After 1 hour, take the dough out on to your worktop, and then start builing tension in the dough by pushing the dough away from you and then pulling it back towards you.
- Repeat this until the dough tightens and becomes smooth.
- Cover with a tea towel and let it rest fo10 mins.
- After 10 mins, flatten the dough to form a rectangle and then roll it from one end to form a log shape.
- Transfer the dough to bread pan (9x5 inches) and allow this for a final proofing. This would take around 3-6 hours. The bread dough must reach 1 inch below the brim of the pan.
Step 5 - Baking
- Once proofed, bake it in a preheated oven of 180°C for 35-45 mins. The top must have a nice golden crust and the bottom of the bread sounds hollow.
- Once baked, apply some butter on top of your bread to soften the crust.
- Let it sit in the pan itself for 5 mins then invert the pan to release the bread and allow it to cool completely.
- Once cooled, slice and enjoy it plain, as a toast, as a sandwich or use to dunk in soups too.
Video
Notes
- Please be patient when it comes to making sourdough bread. It takes a really long time from building the levain, to proofing and baking. But each step is so rewarding and the end result is a healthier and tastier loaf of bread.
- Note that the timings mentioned in the recipe do not include the time taken to build the levain (that is the active starter) and also the proofing time, that is because each starter is different and would act in a different way so it is not possible to provide the exact time taken.
- This is a 70% hydrated dough. You can make this bread with 68% hydration too, in that case, the quantity of water to be used would be 245 gms and at the same time you can also increase the hydration to 75%, in that case, the quantity of water to be used would be 270 gms. I have tried all the three hydrations and got successful results with all of them.
- Do not skip the slap and fold step that is what builds the gluten structure and also makes the dough elastic. You can add additional slap and fold in case you find that the dough is still not ready.
- Create tension in the dough while pre-shaping that helps to rise the dough while baking
- Brush the top of the bread with butter while it is still warm, this ensures that the crust remains soft.
Some Useful Resources:
- How to make your own Sourdough Starter using just 2 ingredients.
- How to feed the starter for any recipe (building the levain)
- When to use the starter
- Sourdough Terminologies
Did you make this recipe? Tag me today!Tag me @spicesandflavors to get featured on my FB and Insta pages