Liked this recipe?Let us know by giving it a star rating
Dilpasand Recipe | Dilkhush | Coconut Buns
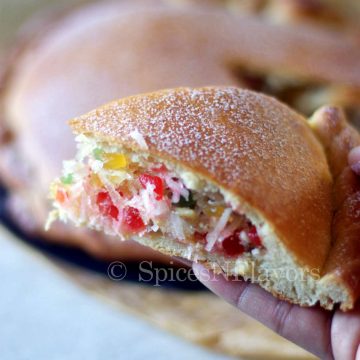
Rose to fame by a bakery chain in India, this Dilpasand is an Indian Pie filled with a moist coconut-y and fruity filling that hits the right sweet notes in your tongue leaving you behind with a desire to have more!!!
Servings 8 slices
Calories 335kcal
Equipment
- Mixing Bowls
- Spatula
- Measuring Cups and Spoons
- Knife
- Cookie Cutter
Ingredients
For the Dough
- 1/2 cup Lukewarm Milk
- 3 tbsp Sugar
- 1 tsp Yeast
- 2 cups APF/Maida
- 1/4 tsp Salt
- 3 tbsp Butter, softened
For the Filling
- 1.5 cups Shredded Coconut Fresh or Frozen
- 1/2 cup Tutti Fruity
- 2 tbsp Cashew Nuts
- 4 tbsp Icing Sugar
- 3 tbsp Melted Butter
- 1/2 tsp Pineapple Essence optional but recommended
Instructions
Step 1 - Preparing the Dough
- In a bowl, combine together Lukewarm Milk, Sugar and Yeast. Stir to mix. (Ps Note: Cover it with a plate and let the yeast activate for 15 mins until it becomes bubbly and foamy)
- Since I am using Instant Yeast I am proceeding to the next step which is to add the flour and salt to the bowl.
- Stir to combine everything to a dough. At some point you will have to ditch the spatula and switch over to your hands to get everything into a dough.
- The dough will be a bit dry at this stage. Add 1 to 3 tsp of additional lukewarm milk if need be at this stage and start kneading. I added about 2 tsp of Milk in total.
- So after 6 mins of kneading add the butter and knead well for another 10 mins.
- It is going to be a messy job once you add the butter, but in just few mins you will observe that the dough starts coming nicely and is turning into a smooth and luscious dough. Once kneaded it would be so soft and bouncy.
How to knead the dough in stand mixer?
- Add all the ingredients except for the butter in the stand mixer. Knead for 6 mins. Then add the butter and knead for another 3 to 4 mins until the dough starts leaving the sides. Once kneaded proceed to step 2.
Step 2 - First Proofing
- Once kneaded, grease a bowl with some oil. Transfer the dough into it, coat the dough with oil, cover with a tea towel and let it proof for 1.5 hours. Proceed to Step 3
Instant Pot Bread Proofing
- If you have an Instant Pot you can proof the dough in the pot too instead of proofing on the counter top.
- Grease the bowl of your pot with some oil. Place the dough into it. Coat it with oil too.
- Put it in the pot. Choose the Yogurt Setting. Proof for 45 mins.
Step 3 - Prepare the Filling
- While the dough is proofing, in a separate bowl combine all the ingredients - coconut, tutti fruity, cashew-nuts, icing sugar, melted butter and essence and set it aside.
Step 4 - Shaping
- Once proofed, punch it down and divide the dough into 3 parts each weighing 183 gms, 183 gms and 80 gms.
- Take one dough (183 gms) and roll it into a circle of 8 inch diameter. (Meanwhile keep the other two dough covered) Place it on a baking tray lined with parchment paper.
- Add all of the filling on top.
- Take another dough (183 gms) and roll it into a circle of 9 inch diameter. Use this to cover the top of the filling. Press the two circles at the end to seal properly so that nothing opens up while baking.
- Run a knife to give a proper circular shape.
- With the remaining dough (80 gms one) make the roses, leaves and the circular border design.
How to make Roses?
- Roll the circle to even thickness, using a cookie cutter cut out 5 small circles. Place it on top of each other as seen in the image below covering just half of the previous circle. Roll from the top like a swiss roll. Cut it in the centre with a knife to reveal two small roses. Adjust the petals to give a proper look.
How to make Leaves?
- Take a small portion of the dough and press it on the silicon fondant mould to shape it into a leaf. Press from the bottom to release the moulded dough.
- Alternatively you can also free hand draw the leaf and cut it.
How to make the Border Braids?
- Roll the remaining dough into thin cylinders. Use two such cylinders and overlap it on each other to make a braid. Patch it on the outer end of the pie using some bater at the base to stick them well.
- Add the roses and leaves too following the same method as per your choice.
Step 5 - Second Proofing
- Cover with a tea towel and let it proof for 15 mins.
Step 6 - Baking
- Once proofed and right before baking give the dough a milk wash to get that golden colour.
- Bake in a preheated oven of 180°C for 30 mins
- Once out of the oven brush some butter on top to get the shiny glossy effect and also to soften the crust. Allow it to cool completely before slicing and enjoying.
Video
Notes
- Use lukewarm milk in the recipe. Too hot would kill the yeast and too cold will not activate the yeast in first place.
- I recommend using Instant Yeast. But if you are using Active Dry Yeast make sure to activate it before proceeding with the recipe.
- Do not use desiccated coconut for this recipe. Fresh or Frozen Shredded Coconut works best for the recipe.
- Pineapple Essence is optional if you do not have it you can use cardamom powder instead.
- Making the roses, leaves and the braided border for Dilpasand is totally optional. You can skip that step totally. In that case simply divide the dough into two equal halves instead of 3. Roll one dough into 8 inches diameter. Add the filling. Cover with the other dough that would be rolled into 9 inches diameter. And then follow the step for Second Proofing and Baking.
- If you are making the roses and leaves: As the dough rests during the second proofing, some of the designs might come out or lose its shape, ensure to press it down well before proceeding with the recipe.
- Instead of making it into one large pie, you can make small stuffed coconut buns out of this. For shaping into small buns please follow the technique that has been shared in the laadi pav aka Dinner Rolls recipe.
- In some bakeries instead of just mixing the filling with a spoon, they mix it using the paddle attachment of the stand mixer. That way the tutti fruity and the glazed cherries if using releases their juice and binds everything into one sticky mass. You can follow that method too if you prefer or do what I have done today.
Nutrition
Calories: 335kcal | Carbohydrates: 42g | Protein: 5g | Fat: 17g | Saturated Fat: 11g | Cholesterol: 24mg | Sodium: 163mg | Potassium: 141mg | Fiber: 2g | Sugar: 17g | Vitamin A: 287IU | Vitamin C: 1mg | Calcium: 27mg | Iron: 2mg
Did you make this recipe? Tag me today!Tag me @spicesandflavors to get featured on my FB and Insta pages