Liked this recipe?Let us know by giving it a star rating
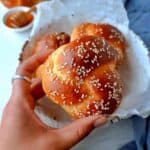
The best Challah Rolls (Challah Buns) Recipe
Tender crumb with a sweet crust, totally egg-free, these Challah Rolls are so fluffy, soft and chewy
Servings 12 rolls
Calories 218kcal
Ingredients
- 4.5 cups (540 gms) Plain Flour/APF/Maida
- 1/2 cup (120 ml) Water
- 1/2 cup (120 ml) Milk cold
- 1.5 tsp (9 gms) Salt
- 2 tbsp (14 gms) Milk Powder
- 2 tsp (8 gms) Instant Yeast
- 2.5 tbsp (40 gms) Sugar
- 3 tbsp (45 gms) Yogurt (refer notes)
- 3 tbsp (40 gms) Butter, softened (refer notes)
- milk for brushing the top
- sesame seeds for sprinkling
Instructions
Step 1 - Preparing the Roux
- To a saucepan add 4 tbsp flour out of the measured out 4.5 cups and all of the measured out water. Dissolve the flour completely. Then switch on the flame and cook till it thickens.
- Once thickened switch off the flame and whisking continuously add the cold milk. Set this aside
Step 2 - Preparing the Challah Dough
- In a mixing bowl combine the dry ingredients starting with salt, the rest of the flour, milk powder, yeast and sugar. Mix them and create a well in the centre.
- Add the yogurt and all of the prepared roux into it. Just make sure the roux is warm to touch and not hot as that would kill the yeast. Then combine into a shaggy mass of dough.
- Oil your workspace. Transfer the dough and start kneading.
- After 10 mins, start incorporating a little butter at a time into the dough and then knead again for another 10 mins to form a soft and elastic dough.
- How to Knead in a Stand Mixer: Make sure that the roux is warm to touch and then dump all the ingredients except butter in the stand mixer and knead for 8 mins and then add the butter and knead again for another 3 to 4 mins.
Step 3 - First Proofing
- Grease a bowl with oil. Place the kneaded dough into it. Grease the top of the dough with oil too.
- Cling wrap and let it proof for 1.5 hours.
- How to Proof in an Instant Pot: Grease the inner pot with some oil. Transfer the well kneaded dough into it. Choose the yogurt mode and set the time to 45 mins.
Step 4: How to knot a Challah Bread (Shaping)
- Once proofed, punch down the dough gently to release the gas bubbles then divide the dough into 12 equal portions.
- Take one portion at a time, roll it into a rope of roughly 15 cms in length. Always keep the dough covered while you work on rolling the rest.
- Take the first rope that you made, stretch and roll to form a 30 cms long rope.
- Hold it at the centre and cross over the ends one over the other just like tying a shoe lace.
- Take the rope from below, pull over and pass it through the gap in the centre to tuck behind.
- Now pull the other end to the back and join both the ends at the back to seal so that they do not open up while second proofing. This is how you make challah knot rolls.
- Line 6 shaped buns in a tray that is pre-lined with a parchment paper. Cover with a tea towel and allow for second proofing.
- Proof the dough for roughly 40 mins. The dough should have doubled in volume and should resemble a soft and bouncy dough.
Step 5 - Baking
- Once proofed, give the dough a milk wash gently taking care not to deflate them.
- Sprinkle some sesame seeds on top and bake in a preheated oven of 180°C for 25 mins
- You would know your challah is done when you get a characteristic yellow tint around the knots and dark golden brown colouration on top and the bottom of the bread sounds hollow. And it would have visibly doubled in volume and would bounce back on touch.
- Let it sit in the pan for another 3 mins, then transfer to a wire rack and wait for a at least 7 to 10 mins before enjoying the challah dinner rolls.
Video
Notes
- The Jewish Origin Challah Bread is a type of kosher, meaning there is no use of dairy in it. However in this challah rolls recipes, being egg-free I have done some modification to achieve the classic yellow tint and the softness and texture of a regular bread.
- The classic recipe uses eggs, so in place of yogurt you can use 2 eggs. Vegetable Oil in place of butter and water in place of milk. The quantities remains the same. You can also skip adding milk powder if it is not handy.
- Make sure that the roux is lump-free or else it won't bind properly with the dough.
- The roux should be warm when you mix it with the rest of the ingredients specially the yeast, as hot roux can kill the yeast and your bread won't rise.
- Since the dough takes a really long time to knead, if you get tired in between then cover the dough with a tea towel and leave it for 5 mins and then come back and knead again.
- Oiling the worktop as opposed to adding dry flour while kneading would ensure that your dough does not become dense.
- If you are finding it difficult to knead the dough, then feel free to grease your hands with little oil and then continue kneading.
- Don’t forget to pinch the ends of the knotted dough under itself that is on the back of the dough while shaping. Doing that prevents the shaped challah rolls from unraveling while baking.
- Your oven must be pre-heated before baking. If you put the dough in a cold oven the bread would remain under-cooked and smell yeasty.
- Once the bread is cooled completely, you can store them in an air tight container for up to 2 days at room temperature. This bread freezes well for up to 3 months.
- Watch this video on bread baking queries to troubleshoot common bread problems that you might be facing.
Nutrition
Calories: 218kcal | Carbohydrates: 38g | Protein: 7g | Fat: 4g | Saturated Fat: 2g | Trans Fat: 1g | Cholesterol: 10mg | Sodium: 329mg | Potassium: 108mg | Fiber: 2g | Sugar: 1g | Vitamin A: 121IU | Vitamin C: 1mg | Calcium: 38mg | Iron: 2mg
Did you make this recipe? Tag me today!Tag me @spicesandflavors to get featured on my FB and Insta pages