Liked this recipe?Let us know by giving it a star rating
Buttercream Frosting for Cutout Cookies that hardens
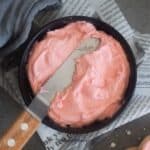
This is the perfect recipe for making buttercream frosting for cutout cookies that sets and hardens well making it easier to stack and transport the cookies
Servings 24 cookies
Calories 51kcal
Ingredients
- 56 gms (1/4 cup) Unsalted Butter
- 210 gms (1.5 cups) Icing Sugar
- 2 tsp Warm Milk
- 1 tsp Vanilla Extract
- Few drops of Gel food colour of choice optional
Instructions
- In the bowl of your stand mixer start by adding cubed butter and beat it on medium-high speed until pale in colour and turns creamy. This would take around 8 to 10 mins. Make sure to stop the bowl in between, scrape the sides and beat again to ensure even mixing of the butter. (You can also use a hand mixer at this stage. It would take a little longer to beat the butter say about 13 to 14 mins.)
- Meanwhile sieve the icing sugar atleast twice.
- Once the butter is pale and creamy, gradually add your icing sugar. Do not rush through this process. Add about quarter cup of sugar. Beat till the sugar is dissolved completely about 3 mins. Start at low speed then gradually increase to medium speed and finally mix at high speed to dissolve the sugar. Do remember to scrape the sides and bottom of the bowl before proceeding with the next addition.
- After adding about 1/2 cup of sugar add a tsp of warm milk and beat again for another 3 mins.
- Repeat the process till you finish incorporating all the ingredients. Beat the buttercream for 3 more mins and voila it is all ready to be frosted on top of the cookie.
- It also pipes beautifully, just fill a sturdy piping bag with 1M nozzle and start making rosettes.
Notes
- The time duration does not include the time taken for the cookie to harden up once frosted as that would depend upon the weather conditions of where you are from. However, refrigerating the cookie does speed up the process. I also feel that upon refrigeration the frosting on top of the cookies are totally smooth to bite.
- Recipe ingredients are perfect enough to frost 24 smaller size cookies like the ones made in the Air Fryer. The quantity would vary depending upon the size and design of the cookies you are frosting.
- Definitely use either a stand mixer or a hand-held electric mixer. I recommend using a stand mixer with a paddle attachment. Do not use a whisk attachment as you do not want the butter to get stuck in the whisk which would make the process of making this frosting unpleasant.
- As for the ingredients use room-temperature butter - not too soft. The butter should be firm enough to slice with your fingers. Too soft means you would end up adding way too much sugar making the frosting overly sweet. And of course, melted butter is a big NO-NO.
- Use clear vanilla extract to get that almost white color. If using a regular one then add the vanilla extract right at the beginning so that it has time to whip up with the butter incorporating well to give maximum flavor and also fade down the brown coloration. Another great pointer is to add a little almond extract along with vanilla as it gives a more complex and mind-blowing flavour. I do this when I am making the recipe for some special occasions like kids' birthdays or especially for holiday baking.
- Adding sugar in bits and pieces is key. Add about a quarter cup. Wait till it is completely incorporated and only then add the next set. This makes sure that the sugar dissolves completely without giving out a gritty or grainy texture.
- Warm Milk for the win!! I figured out that one way to avoid the grittiness in your buttercream is by using warm milk which helps dissolve the sugar while mixing.
- Always and always gel food colors for colouring your buttercream. A little goes a long way. Oil or water-based colours would thin down the consistency which you do not want. Check out our buttercream frosting 101 to know more about how to colour buttercream.
- Frosting a lot of cut cookies? Make sure that you are covering the unused sugar cookie buttercream frosting with a damp cloth. As this frosting hardens up and forms crust you do not want it to come in direct contact with air.
- The cookies can be stored at room temperature in an air tight container for up to 2 days and in the refrigerator for up to a week
Nutrition
Calories: 51kcal | Carbohydrates: 9g | Protein: 1g | Fat: 2g | Saturated Fat: 1g | Polyunsaturated Fat: 1g | Monounsaturated Fat: 1g | Trans Fat: 1g | Cholesterol: 5mg | Sodium: 1mg | Potassium: 2mg | Sugar: 9g | Vitamin A: 59IU | Calcium: 1mg | Iron: 1mg
Did you make this recipe? Tag me today!Tag me @spicesandflavors to get featured on my FB and Insta pages