Liked this recipe?Let us know by giving it a star rating
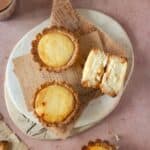
Best Baked Japanese Hokkaido Cheese Tart recipe
This Hokkaido Cheese Tart recipe features a buttery, crisp crust that perfectly complements its creamy, velvety filling, delivering a balance of rich, tangy, and subtly sweet flavors in every bite.
Servings 11 tarts
Calories 282kcal
Ingredients
For Tart Crust
- 180 gms (1.5 cups) Flour
- 113 gms (1/2 cup) Butter chilled and cubed
- 50 gms (1/4 cup) Sugar
- 1/4 tsp Salt
- 1 tsp Vanilla
- 2-3 tsp Chilled Water as needed
For Creamy Filling
- 60 ml (1/4 cup) Hokkaido or Full-fat Milk
- 2 tbsp Cornflour or Cornstarch
- 150 gms Cream Cheese softened
- 50 gms Mascarpone cheese softened
- 20 ml Cream
- 30 gms Parmesan Cheese grated
- 50 gms (1/4 cup) Sugar
- 2 tbsp Unsalted Butter
- 1 tsp Vanilla
Instructions
Step 1: Prepare the Tart Crust
- In a mixing bowl, combine the flour, caster sugar, and salt.
- Add the cold, cubed butter to the dry ingredients. Use a pastry cutter or your fingers to rub the butter into the flour until it resembles coarse crumbs.
- Gradually add 1-2 teaspoons of cold water, 1/2 teaspoon at a time, mixing gently until the dough just comes together. Avoid overmixing to keep the crust tender. (I used only 1/2 tsp water).
- Roll out the dough between 2 parchment paper to little more than 1/4 inch thickness, ensuring it's even. Chill the rolled dough in the refrigerator for 30 mins.
- Use a cookie cutter to cut out rounds and fit them into tart molds. Prick the bottom of the crusts with a fork to prevent puffing. Chill the prepared tart shells in the refrigerator for 30 minutes (second time) to prevent shrinkage during baking.
- Preheat the oven to 180°C (360°F). Bake the tart shells for 13-15 minutes or until golden brown. If the shells seemed to have puffed while baking just press it down gently using a tea towel while they are still warm.
- Once baked, remove the tart shells from the oven and allow them to cool completely.
- After cooling, gently tap the bottom of the shell and release the sides. Invert the mold to easily remove the tart shell from the mold.
Step 2: Prepare the Filling
- In a small bowl, mix the cornstarch with 2 tablespoons of milk to form a smooth slurry. Set aside.
- In a separate mixing bowl, whisk the cream cheese, mascarpone, and cream together until smooth and lump-free.
- Transfer the smooth mixture to a saucepan over medium heat followed by parmesan cheese, sugar, butter and vanilla. Stir continuously to combine all the ingredients into a smooth mixture.
- Cook until the mixture is lump-free and silky. (If any lumps remain, pass the mixture through a fine sieve for a smooth consistency.)
- Add the cornstarch slurry. Cook over medium heat, stirring constantly, until the mixture thickens and coats the back of a spatula. Test by running your finger along the spatula; the line should remain clear.
- Transfer the prepared filling to a clean bowl. Cover the surface of the filling with cling wrap, ensuring it touches the surface directly to prevent a skin from forming. Allow the filling to cool to room temperature before using.
Step 3: Assemble and Bake
- Pour the prepared filling into the cooled tart crusts.
- Prepare a milk wash by mixing 1 tablespoon of milk with 1 teaspoon of sugar until dissolved. Lightly brush this mixture over the surface of the filling to promote a caramelized, golden color during baking.
- Bake in the preheated oven at 200°C (400°F) for 7-8 minutes, or until the tops are lightly golden.Let the tarts cool slightly before serving.
Video
Notes
- For a flaky and buttery texture, always use cold butter and rub it into the flour mixture until it resembles wet sand.
- Chill the dough twice, once after rolling the dough and then before baking to ensure that the shells do not shrink while baking.
- When rolling out the dough, use parchment paper to avoid excess flour and make it easier to transfer the dough to tart pans. Rolling the dough between two sheets of parchment paper prevents it from sticking.
- Ensure that all the cheese ingredients (cream cheese, mascarpone) are at room temperature before whisking them together. This helps avoid lumps and ensures a smooth, creamy texture.
- When cooking the filling, keep the heat on low to medium to avoid curdling the cheese and ensure a smooth consistency. Stir constantly to prevent the mixture from sticking to the pan.
- Once the filling is ready, remove it from the heat and let it cool completely before filling the tart shells. This ensures the filling sets well and doesn't melt into the crust.
- Store in the refrigerator for up to 2-3 days to maintain the creamy texture and buttery crust. You can freeze the fully baked tarts for up to 1 month. Place them in a single layer on a tray to freeze initially, then transfer them to a freezer-safe container or ziplock bag.
Nutrition
Calories: 282kcal | Carbohydrates: 24g | Protein: 4g | Fat: 19g | Saturated Fat: 12g | Polyunsaturated Fat: 1g | Monounsaturated Fat: 4g | Trans Fat: 0.4g | Cholesterol: 50mg | Sodium: 211mg | Potassium: 56mg | Fiber: 1g | Sugar: 10g | Vitamin A: 624IU | Vitamin C: 0.01mg | Calcium: 68mg | Iron: 1mg
Did you make this recipe? Tag me today!Tag me @spicesandflavors to get featured on my FB and Insta pages