Liked this recipe?Let us know by giving it a star rating
How to make Coconut Roll Recipe
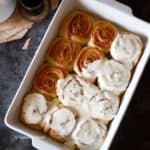
This coconut roll recipe creates soft, fluffy rolls filled with creamy coconut and topped with a smooth glaze for a deliciously irresistible treat.
Servings 12 rolls
Calories 508kcal
Ingredients
For Bread Dough
- 1/2 tsp Salt
- 3.5 cups (420 gms) APF/Maida
- 1/3 cup Sugar
- 1 tbsp Milk Powder
- 2 tsp Instant Yeast
- 1 cup (240 ml) Coconut Milk
- 1/3 cup Butter softened
Coconut Roll Filling
- 1 tbsp Butter
- 1+1/3 cup Desiccated Coconut
- 1/3 cup Condensed Milk
- 1/2 tsp Vanilla Extract
Creamy Glaze
- 4 oz (113 gms) Cream Cheese
- 1/4 cup Condensed Milk
- 1/2 tsp Vanilla Extract
- 1.5 tsp Lemon Juice
- 2-3 tbsp Milk
Instructions
Step 1 - Prepare the Bread Dough
- In a large mixing bowl, combine salt, all-purpose flour, milk powder, sugar, and instant yeast.
- Gradually pour in coconut milk, mixing until a dough begins to form.
- Transfer the dough to a lightly floured surface and knead for 3-5 minutes until it becomes smooth and elastic. Avoid adding any extra flour during kneading.
- Incorporate softened butter into the dough, kneading until fully absorbed and the dough is soft and pliable.
- Place the dough in a greased bowl, cover it with a kitchen towel, and let it rise in a warm area for an hour, or until it has doubled in size.
- Alternatively you can prove the dough in Instant Pot as well. Grease the inner pot with some oil. Place the dough. Choose the Yogurt Mode and set the timer to 30 mins.
Step 2 - Coconut Filling
- In a medium saucepan, melt butter over low heat.
- Stir in desiccated coconut, condensed milk, and vanilla extract until well combined.
- Cook the mixture on low heat, stirring constantly, until it thickens and starts to pull away from the sides of the pan.
- Remove from heat and transfer the filling to a bowl. Let it cool to room temperature before using.
Step 3 - Shaping
- Punch down the risen dough and place it on a floured surface.
- Roll the dough into an 18x20-inch rectangle using a rolling pin.
- Spread butter evenly over the surface of the dough, then layer the coconut filling on top.
- Starting from one long side, roll the dough tightly into a log. Cut the log into 12 equal pieces.
- Arrange the pieces in a greased baking dish, cover with a kitchen towel, and allow them to rise for 30 minutes.
Step 4 - Baking
- Preheat the oven to 380°F (190°C). Bake the risen rolls for 20-25 minutes, or until golden brown. Allow the rolls to cool slightly.
Step 5 - Glazing
- In a bowl, beat together softened cream cheese, condensed milk, vanilla extract, and lemon juice until smooth.
- Gradually add milk, a tablespoon at a time, until the glaze reaches your desired consistency. If the glaze thickens over time, you can add a bit more milk before glazing.
- Drizzle the glaze over the slightly cooled rolls.
Notes
Pro Tips
- The first step is to thoroughly grease your baking pan to prevent sticking and ensure easy removal of the rolls. Preheat your oven to the temperature specified in the recipe to guarantee even baking from the start.
- Use lukewarm coconut milk to avoid killing the yeast. The milk should be warm to the touch but not hot. If the milk is too hot, it will kill the yeast and prevent the dough from rising.
- Add softened butter to the dough at a later stage. This technique helps develop gluten, making the rolls tender and fluffy. Cold butter won't incorporate well, and melted butter will make the dough too sticky. Use room-temperature butter for kneading.
- Use unflavored dental floss to cut the dough log into perfect circles during the shaping stage. If you prefer using a knife or bench scraper, gently reshape each piece into a circle before placing it on the greased tray.
- Choose a baking tray that provides enough space for the rolls to rise without crowding. A 9x13-inch baking tray is ideal. Overcrowded dough can rise unevenly and form a peak in the center. I am using an 11x7-inch ceramic baking tray.
- For the second rise, don’t just rely on time. Check the dough’s appearance and texture. The rolls should be soft and touching each other. Avoid overproofing to prevent uneven baking.
- Keep your dough covered with a clean kitchen towel at all times; while proving or shaping; to prevent it from drying out. This helps maintain moisture and ensures a smooth rise.
- Use ceramic or aluminum baking trays for even heat distribution. Glass trays tend to conduct more heat, which can cause the rolls on the edges to brown too quickly.
- Apply the glaze when the rolls are warm, not hot. This allows the glaze to seep into the rolls without melting and pooling at the bottom.
Nutrition
Calories: 508kcal | Carbohydrates: 49g | Protein: 9g | Fat: 32g | Saturated Fat: 25g | Polyunsaturated Fat: 1g | Monounsaturated Fat: 4g | Trans Fat: 0.2g | Cholesterol: 32mg | Sodium: 211mg | Potassium: 321mg | Fiber: 6g | Sugar: 16g | Vitamin A: 364IU | Vitamin C: 1mg | Calcium: 78mg | Iron: 2mg
Did you make this recipe? Tag me today!Tag me @spicesandflavors to get featured on my FB and Insta pages