Liked this recipe?Let us know by giving it a star rating
Christmas Butter Cookies recipe using 1 basic dough
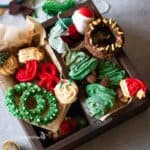
These homemade Christmas butter cookies are rich, buttery, and melt-in-your-mouth delicious, with festive designs and easy-to-follow piping instructions, making them the perfect treat for the holiday season.
Servings 30 cookies
Calories 76kcal
Ingredients
- 170 gms Unsalted Butter softened
- 70 gms Icing sugar
- 1 tsp Vanilla
- 210 gms Flour
- 1/4 tsp Salt
- 1-2 tbsp Milk as needed
- 1 tbsp Cocoa Powder
- Gel food colours
Instructions
- In a large bowl, beat softened unsalted butter and powdered sugar together on medium speed for about 2 minutes, or until the mixture is smooth and creamy. Scrape down the sides of the bowl to ensure even mixing.
- Add vanilla extract (or any preferred flavor) and beat again until fully incorporated.
- Mix a pinch of salt into the all-purpose flour. Gradually fold the flour into the butter mixture in two batches, beating just until combined. Be careful not to overmix.
- Add milk 1 teaspoon at a time, adjusting the dough’s consistency to make it pipeable but not too soft.
- Divide the dough into portions, then add food coloring as desired (red, green, or leave plain) and mix in thoroughly. For a chocolatey flavor and color, mix in 1 tablespoon of cocoa powder to one portion of the dough.
- Transfer each colored dough portion into a separate piping bag fitted with your desired nozzles. Use a French tip nozzle for the cocoa trunk and cocoa rings, a 2D nozzle for Christmas trees and rosettes, and a small star nozzle for shapes like socks, bows, and Santa hats.
- Pipe festive shapes onto the prepared baking sheet lined with parchment paper using the appropriate nozzles for each design, such as Christmas trees, wreaths, cocoa rings, Santa hats, and rosettes. For detailed piping instructions, check the blog post.
- Bake in a preheated oven at 170°C (340°F) for 10-12 minutes, or until the edges of the cookies turn golden brown. Allow the cookies to cool on the baking sheet for 10 minutes before transferring them to a wire rack to cool completely.
- Once cooled, decorate as desired with sprinkles, icing, or melted chocolate.
Video
Notes
Nutrition
Calories: 76kcal | Carbohydrates: 8g | Protein: 1g | Fat: 5g | Saturated Fat: 3g | Polyunsaturated Fat: 0.2g | Monounsaturated Fat: 1g | Trans Fat: 0.2g | Cholesterol: 12mg | Sodium: 20mg | Potassium: 12mg | Fiber: 0.3g | Sugar: 2g | Vitamin A: 142IU | Calcium: 3mg | Iron: 0.3mg
Did you make this recipe? Tag me today!Tag me @spicesandflavors to get featured on my FB and Insta pages