Liked this recipe?Let us know by giving it a star rating
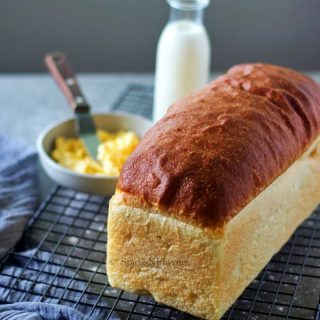
100% Semolina Bread Recipe
With a crusty top and soft interiors, this 100% Semolina Bread is going to blow your mind with its texture.Use it for toast, grilled sandwiches, bruschetta or croutons.
Servings 14 slices
Calories 189kcal
Ingredients
- 3.5 cups Semolina Refer Notes
- 3 tbsp Milk Powder
- 1.5 tsp Salt
- 1 tbsp Sugar
- 1 tsp Instant Yeast
- 1.5 cups Warm Water
- 3 tbsp Olive Oil
Milk and Butter for brushing the bread
Instructions
Step 1 - Prepare the Dough
- In a mixing bowl combine together, semolina flour, milk powder and salt. Give a quick mix.
- Add in the sugar and yeast. Mix that through. Finally combine everything into a dough by adding the water.
- Grease the worktop with some oil and transfer the dough on to your worktop.
- Adding little oil at a time, start kneading the dough until it forms a soft, supple and bouncy dough. If kneading by hands this would take nearly 20 to 25 mins of your time.
- Alternatively, you can dump all the ingredients in the order - Salt, Semolina, Milk Powder, Sugar, Yeast and Water into your mixing bowl of the stand mixer. Knead for 6 mins. Add the oil and then knead again for another 6 mins until the dough starts leaving the sides of the bowl.
Step 2. - First Proofing
- Oil the container in which you kneaded the dough and once the dough is ready put it into the bowl and turn around to coat the dough with the oil too.
- Cling wrap and cover with a tea towel and allow it to proof for 1.5 hours until double in volume on your countertop.
How to Proof in an Instant Pot?
- Alternatively you can also choose to use your instant pot to proof the dough.
- Grease the inner pot with some oil. Put the prepared dough into it and coat the dough with oil too. Cover with a glass lid if you have one
- Choose the Yogurt setting and set the time to 45 mins.
Step 3 - Shaping
- Once proofed and double in volume, deflate the air bubbles by punching the dough and then transfer it to a work top.
- Spread it out into a rectangle according to the size of your pan.
- Then start rolling it from the end nearest to you making sure to seal it properly. Press the seams really well so that they do not open up while baking.
- Grease your baking pan (I recommend a 9x5 inches loaf pan) with some oil and then transfer the dough now shaped as a log into the bread pan with the seam side down.
Step 4 - Second Proofing
- Loosely cover with a cling wrap and a tea towel on top and allow it to rise till it reaches the brim of the bread pan by leaving it on your counter top itself.
- Do not go by the clock here but instead observe your dough. (It took me nearly 45 mins for the second proofing when I first tried this recipe in 7x5 inch pan and around 1 hour for a 9x5 inch pan)
- The timing would vary depending upon the climatic conditions of where you are living.
Step 5 - Baking
- Once proofed, brush the top of the bread with some milk taking care not to deflate the beautiful rise you have got.
- Bake the bread in a PRE-HEATED oven of 200°C (392°F) for 35 to 40 mins until the crust is golden brown and the bread sounds hollow when tapped.
- Upon baking, immediately brush the top of the bread with some butter - this softens the crust.
- Let it cool in the pan itself for 5 mins then invert it onto a wire rack to cool completely before slicing and enjoying it.
Video
Notes
- I used a 9x5 inch loaf pan for this bread recipe and got 14 slices from it.
- Use fine semolina for this recipe also known as "Chiroti Rava" easily available in Indian Stores. But if not then use any semolina of choice just make sure to pulse it to make Semolina Flour and then use. You can also look for "Durum Flour" in the stores.
- Milk Powder here is option you can skip that if you do not have it handy. It does softens the dough. So to replicate the effect you can substitute some portion of warm water with warm milk.
- I have used Instant Yeast (which is what I recommend for baking breads) so added it directly to the flour. If you are using the Active Dry ones or any other ones then make sure to activate it first with some sugar and water and then use in the recipe.
- The amount of water required for you might vary depending upon the brand of flour you are using, the weather conditions at your place etc so take this as a guide and adjust the water quantity by a tbsp or two here and there if need be.
- Greasing your work top with oil would help you knead the dough easily without having the need to add extra flour which may cause the bread to become dry.
- This bread dough would take little extra time to knead using hands nearly 20 to 25 mins. So be patient or consider kneading using a stand mixer.
- While rolling the bread to shape it into a log make sure that you are pressing and sealing the edges well so that the bread does not open up while baking and lose its shape. Also ensure to place it seam side down.
- Semolina bread tends to get an amazing oven spring, so allow it to proof it till the bread reaches the brim and keep enough space for it to rise in the oven or else the top of the bread might touch the rods of the oven and burn.
- Once baked immediately apply some butter on top to soften the crust of the bread.
Substitutions/Variations:
- Vegan Semolina Bread: Simply skip the milk powder in the recipe to make it vegan. Also avoid brushing the bread with dairy based milk before proofing and butter after baking
- Water: Substitute whole of the water or a portion of it with Milk to get even softer bread slice.
- Sesame Seeds/Oats : Right before baking consider sprinkling the top of the bread with sesame seeds, whole oats, poppy seeds, sunflower or pumpkin seeds if you prefer.
- Shaping: You can choose to shape the bread into rolls (like a Laadi Pav or Dinner Roll) to make Semolina Rolls or even braid them to make braided bread.
- Cinnamon Bread/Nutella: Once shaped into rectangle or before beginning to roll the bread, apply some cinnamon sugar mixture or spread some nutella and then roll to make cinnamon roll semolina bread.
How to Store and how long does this bread last?
Once cooled, store the bread in an air tight container for upto 3 days at room temperature. You can also freeze this bread for 3 weeks.Nutrition
Serving: 0.5inch thick | Calories: 189kcal | Carbohydrates: 32g | Protein: 6g | Fat: 4g | Saturated Fat: 1g | Cholesterol: 2mg | Sodium: 257mg | Potassium: 102mg | Fiber: 2g | Sugar: 1g | Vitamin A: 15IU | Vitamin C: 1mg | Calcium: 23mg | Iron: 2mg
Did you make this recipe? Tag me today!Tag me @spicesandflavors to get featured on my FB and Insta pages