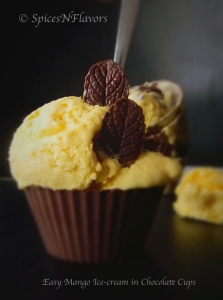
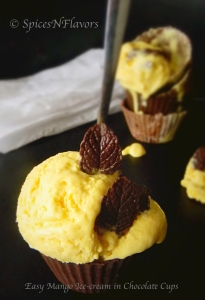
Mango Ice-cream is a perfect summer ice-cream with flavours of mango bursting in every bite
I scream.. You scream.. Na Na.. Lets all scream for ice-cream!!!
Ab har mausam aam(Now you can enjoy mangoes in all season).. Yes.. if you are a Indian by birth then love for mangoes is something that is born with you.. The only best thing about summer is MANGOES!!! Breakfast, lunch, tea time or dinner whatever it may be mango has to be in the menu..
This is one such easy and simple recipe for my love.. I mean for my love towards mango.. Easy Mango Ice-cream in Edible Chocolate Cups garnished with chocolate leaves..
In today's world the way you present yourselves is what matters.. Be it going to your college, to a movie, to office or even to the shop next to your home; it is mandatory that you present yourselves. Proper dress up, branded clothes and cosmetics, fossil watches or gucci perfumes; everything has to be branded. These days even a school going kid demands for an i-phone..
Why do we need all those things?? You might be thinking why am I drafting so much on a food blog???
So presentation is important to attract, to make your space amongst so many other people. And so is the food presented onto your plate. Now that I have started blogging I could relate to the efforts put behind each and every picture that we willingly gaga go over..
To get the mouth watering click, or the awe moment; a lot of efforts goes behind the scene..

Also tried my hands on chocolate leaves.
Ice-creams are everyone's favourite. Mangoes are my personal favourite and I know most of you are a big fan of it. Chocolates goes without saying; everyone from 5 to 50 years enjoys it. So a combination of the three has to be mind-bobbling..
Summers call out for some chilled desserts. The very thought of frozen creamy mango ice-cream lying in my freezer to set gave me a sleepless night. The silky creamy smooth texture of the mango ice-cream hits the right cord in my tongue to give way to the heavenly melt in mouth delight. Listening to the tune of my latest favourite song, licking the dripping cream from my spoon with my eyes closed leaving me mesmerised with the burst of flavours in my mouth.
This is a must try recipe as it is that simple and easy to make. Present it in the chocolate cups like I did and serve it with chocolate leaves and I am sure you will win over your guest's heart.
Here is what you need to make them..
Ingredients:
For the Ice cream:
- 2 cups mango pulp
- 1 cup sweetened condensed milk
- 1 cup milk
- 300 ml cream
For the Chocolate Cups and Chocolate leaves:
- 1 cup dark/white/milk chocolate of your choice
- silicon cup cake moulds
- some mint leaves
Method:
For the ice-cream:
- In a blender, blend together the mango pulp and condensed milk. Do a taste-test, add more condensed milk for more sweetness. Then add milk and blend well.
- Whip the cream until stiff peaks form. (This would take about 3-4 minutes).
- Add the mango pulp mixture to the whipped cream and mix well.
- Transfer them to freezer safe containers and freeze until set preferably overnight.
Tip/s:
- Whenever you are whipping cream, make sure to place your hand mixers and the bowl in which you are whipping in the freezer for at least half and hour and make sure that the cream is also chilled. This helps in easy whipping of the cream.
- To avoid the ice crystals from being formed in an ice-cream, what you can do is every two to three hours just mix the ice-cream well with the help of a spoon while it is setting in the freezer. You can do this 1-2 times.
Notes:
- To make the mango pulp, peel and remove the seeds of two mangoes and blend them to a smooth paste in the mixer or blender. And use this as your mango pulp.
- I have used store bought mango pulp which already has some sweet to it. So I started by adding 1/2 cup condensed milk and then adjusted it to 1 cup to suit the sweet buds of my family. You can adjust it depending upon the sweetness of the mangoes you are using. But adjust it in the blender itself.
- The colour of the ice-cream will depend upon the quality of the mangoes you are using. Most of the time you will get a gorgeous yellow colour but if you are not satisfied with it add 2-3 drops of yellow colour if you wish to. I got a beautiful yellow colour with this store bought mango pulp.
- If you do not have a container and wish to freeze it in a loaf tin or any other vessel, make sure to cling wrap it and also the plastic should touch the ice-cream part to avoid ice-crystals from forming on the top
For the Chocolate Cups and Leaves:
- Melt the dark/white/milk chocolate whichever you are using by double boiler method or in microwave until smooth.
- Take two spoonful of the melted chocolate and place it in the centre of the silicon moulds. Then with the help of a paint brush or kitchen brush just coat the sides of the mould with the chocolate brushing it from the centre to the sides. Coat it from all the sides.
- Place it in the freezer for 5 minutes. Till then chocolate will be set. Remove and do a second coating the same way like you did the first time. This will make sure that the mould is coated completely from all the sides with chocolate.
- Place it in the refrigerator for at least half an hour. Once completely set remove it from the fridge and de-mould it.
- While de-moulding first release it gently from the top from all sides then slowly and carefully push it from the bottom and de-mould like the way you will do for your cup-cake or muffin.
- And your chocolate cups are ready.
Update: Instead of two coatings with chocolate now I just give one. Thats because some guests find the chocolate cups to be too thick and hence are unable to enjoy it with the ice-cream. However just one coating of chocolate makes the cups thinner and easy to eat
Chocolate leaves:
- For the leaves, take any non-toxic leaf. I have used mint leaves.
- Apply chocolate on the back side of the leaf and let it set in the freezer for 5 minutes.
- Remove it from the freezer, slowly and very gently pull the leaf from the chocolate and you will get a nice chocolate leaf.
Very simple isn't it!!
Notes:
- Be very careful while de-moulding both the cups and leaves or else you may break it if you are not gentle.
- If you do not wish to buy silicon mould, you can line your muffin tray with parchment cup-cake liners and follow the same procedure.
- You can also use plastic cups instead of muffin moulds for making the chocolate cups.
- Any non-toxic leaf can be used to make the chocolate leaves.
- For the marble effect, add 1 spoon of dark chocolate and 1 spoon of white chocolate onto the mould and randomly brush up the sides with the chocolate.
This summer do not buy an ice-cream make one. And enjoy it in your homemade edible chocolate cups.
You can use these cups in various ways.. Serve mousse in these cups. Check out my Beetroot and White Chocolate Mousse. Or serve some fruits topped with whipped cream. Or a plain sponge cake. The list is just endless.
Happy Cooking!!
Sushma.


Sowmya says
Hi .lovely recipe..i just have a query ..incase I'm just doing a single coating of chocolate for the cups ..how long should I keep them in the freezer .. can i apply a single coat and keep them for half an hour straight in the freezer before I de- mould ?
sushma iyer says
Yup just do a single coating and place it in the freezer for 15-20 mins or a max of 30 mins(chocolate will be set by then) and then de-mould by trimming off any excess from the top and then slowly removing the mould.
Glad that you liked it.. Thanks dear.. <3
Sonali says
HELP!!
Hi.. I just followed your recipe.. but made a mistake, I mixed in all of the mango pulp when the whipping cream formed soft peaks.. and then continued to beat for another minute.
I was afraid, if I continue to beat it further, the cream would form butter, as from my previous experience of whipping cream.
Would the ice cream turn out well, with the soft peak whipped cream or should I beat it further? How much more?
Sushma Balasubramanian says
Hi Sonali..
Do not beat it any further. Since you feel that you have beaten to a stage where you feel it might turn into butter then please do not beat it any further..
Now just transfer it to a container and freeze it.. You will definitely get a ice-cream like texture as I suppose you have beaten it for around 3-4 mins.
But I am sure you will definitely get a good taste. IF not ice-cream then a milkshake.. :D.. Just kidding but freeze it; do not beat it any further.
Cross fingers for you. Please let me know what happened.. 🙂
nehi18 says
Lovely blog... tempting recipes and photographs ! I am a fan 😀
Sushma Balasubramanian says
Nehi.. I am on top of the world now.. Thank you so much dear.. You made my day.. 🙂
simran says
Sushma, the pictures are so tempting and the recipe is so descriptive and simple! I'll definitely try this over the weekend!! Thanks much!
Sushma Balasubramanian says
Thanks a bunch Simran.. I am so glad that you liked it..
Do try it over, will wait for your feedback.. 🙂
Freda @ Aromatic essence says
This is gorgeous dear 🙂
Sushma Balasubramanian says
Thank you Freda.. But swirl ice-cream is on my to do list the next time I make ice-creams.. 🙂
Freda @ Aromatic essence says
🙂
sangeeta says
Lovely and such an easy recipe ...:)
Sushma Balasubramanian says
Thank you Sangeeta.. 🙂 Do give it a try and I am sure you will love it.. 🙂
swatipareek says
Love the cups n the leaf...nice presentation !!
Sushma Balasubramanian says
Thank you so much Swati.. 🙂
Rafeeda says
Looks so beautiful... lovely presentation! 🙂
Sushma Balasubramanian says
I am glad that you liked it.. Thank you so much..
prettypolymath says
yummm chocolate and mango---nothing is better!
Sushma Balasubramanian says
Very true.. Thank you prettypolymath.. 🙂
Framed Recipes says
Gorgeous! Send me some of those cups. Loved the mint leaves chocolate garnish.
Sushma Balasubramanian says
I would love to host for you sreelatha.. someday.. sometime.. 😉