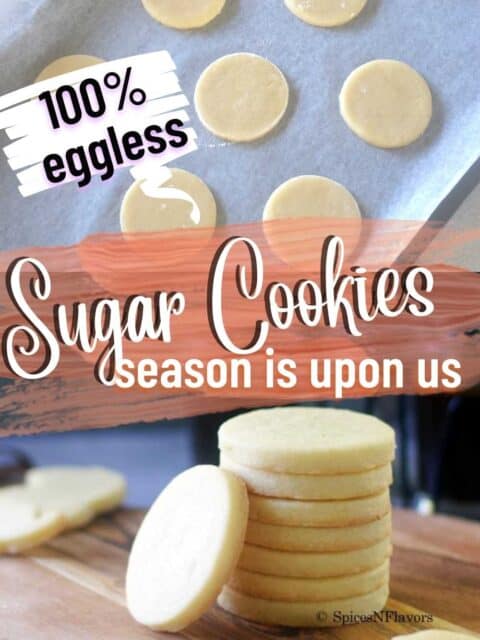
Your search for the perfect eggless sugar cookies recipe ends here!! Yes using just 5 ingredients and 15 mins of your prep time you will have an amazing sugar cookies - that retains its shape perfect to be iced later on!!
One basic sugar cookies recipe that every HOMEBAKER must know.
The worst thing about following a Sugar Cookie Recipe to the T is to just find it spread in the oven upon baking.
And I assure you if you follow the tips and avoid the mistakes that I had made in my trials you will have a Cookie that has
- Crisp, well defined edges
- Holds its shape perfect for icing on top
- Soft and not hard
- Makes perfect sugar cookie cut outs, every single time, I bet.
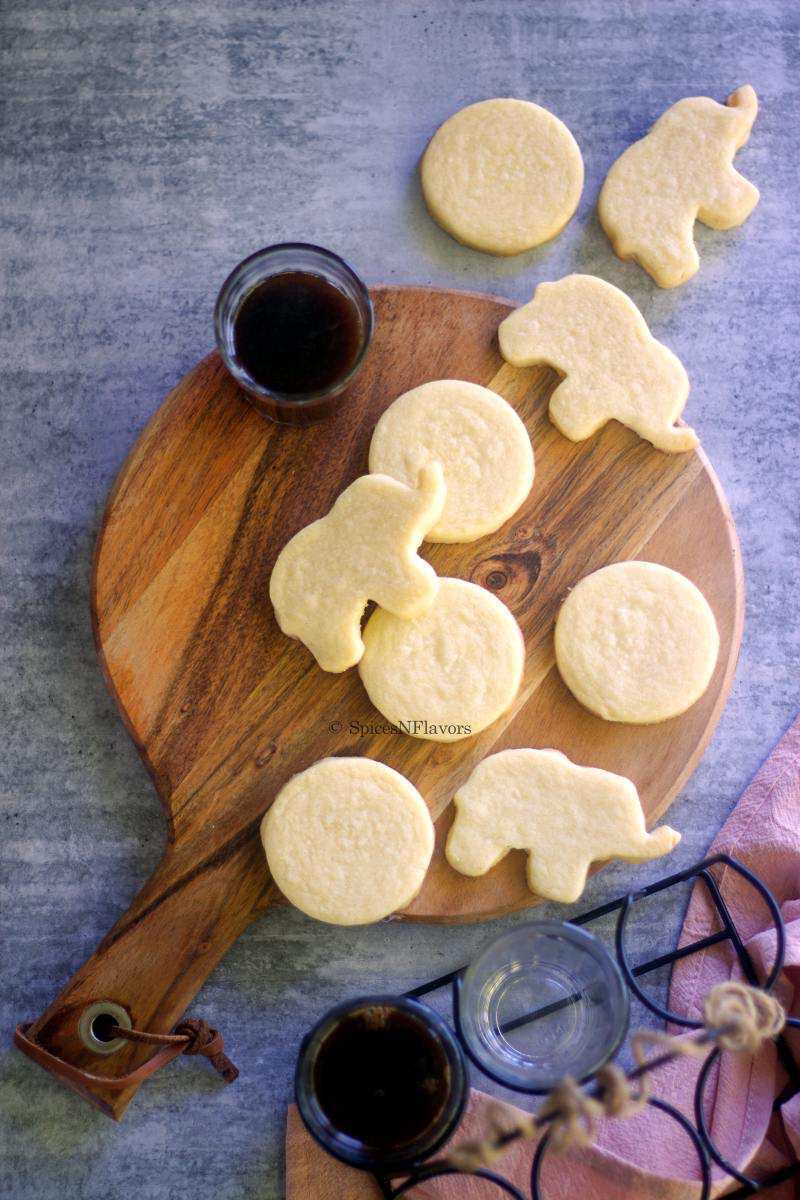
These cookies not only have the perfect shape, but they are absolutely addicting.
What is a Sugar Cookie?
Sugar Cookie is made using a very basic cookie dough - Butter, Sugar, Flour and Eggs (no fancy ingredients) and is known for its unique characteristic of holding its shape whilst baking making it ideal to be used as a base cookie perfect for icing!
Today we are making the eggless version of the classic Sugar Cookie recipe.
Sometimes it is the simplest of the recipe is what needs some technique in place to make it stand out.
Here I am sharing with you all the ONLY EGGLESS SUGAR COOKIES RECIPE you need after 3 Failed Attempts.
My Failed Attempts
Trial 1: Reverse Creaming Technique
The key to ensure that the cookies do not spread while baking is to avoid incorporating too much air into the batter.
One way to achieve that is by using the Reverse Creaming Technique as there are no beaters involved and everything is done using your own hands so you can control the air incorporated.
The other reason is that the cookies would remain tender as there would be absolutely no gluten formation.
However once baked the cookies developed cracks on top - My assumption that the cookie dough was too dry as there was no creaming involved.
TRIAL 2 - Regular Sugar Cookie Technique
I adapted the recipe from our Eggless Stained Glass Cookie recipe with few changes. Everything went well.
However post baking I figured out that the cookies were too soft and even this batch did not get the classic smooth surface on top that usually a sugar cookie will have.
My Assumption - Too much Cornflour which is making the cookie super tender, dry and causing it to break.
I might be wrong but somewhere I felt a basic eggless sugar cookies recipe should not have too many ingredients right. And 1/2 cup Cornflour seemed way too much.
TRIAL 3 - No Cornflour
So in my next trial:
- I skipped the addition of Cornflour
- Used the regular Creaming technique
The dough seemed right.
And finally I could nail the smooth top cookie dough.
However..
My Sugar Cookies turned out lumpy, it had this bubble on top.
It clearly indicates that I had not creamed the butter well and there was some bits of butter that was not incorporated well. So while baking the butter converts into steam and these show up on the surface as a bubble causing the cookie to take an uneven lumpy surface on the top.
Trial 4 - Finally Nailed IT!!!
Yes so finally this time I did it all right
- Creaming the butter well.
- Used Cold Butter to avoid lot of air incorporation.
- Skipped the addition of Cornflour.
- Used Double Pan Method.
And here is the final outcome:
- The cookies did not spread
- Has a smooth surface perfect for icing on top.
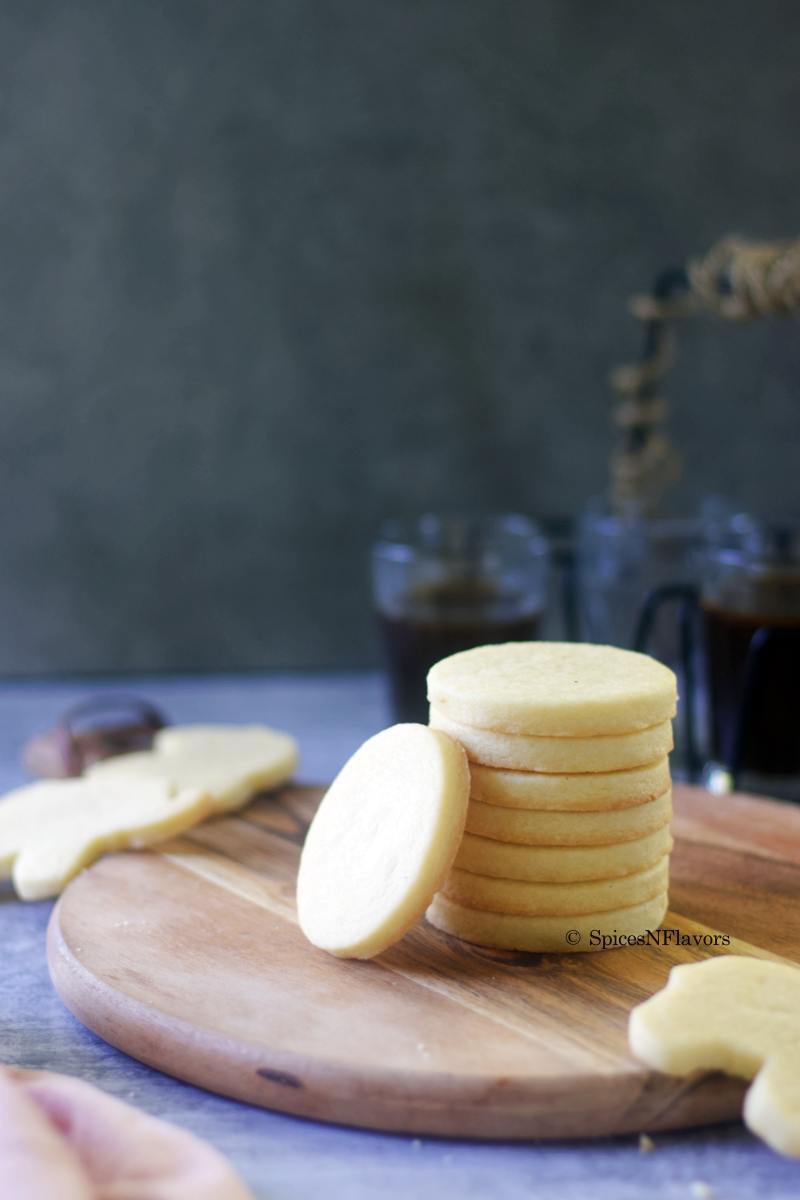
- Pale coloured cookies with crispy edges and soft centre with crumbly texture.
My Perfect Eggless Sugar Cookies Recipe just for you guys!!
Ingredients Needed:

Ingredient Notes:
- Butter - Using Unsalted Butter gives the ability to control salt in the recipe. I like the addition of salt because it cuts the sweetness however you can skip salt altogether or even use Salted Butter. No matter which butter you are using make sure that it is chilled and cubed.
- Sugar - It is important to use Caster Sugar for this recipe. If not you can use Powdered Sugar too. But do not use granulated sugar as it would take a long time for us to dissolve the granulated sugar which means creaming the butter sugar for a long duration which would incorporate too much air in the dough causing the cookie to spread while baking.
- Vanilla Bean Paste - Since we are using very basic ingredients I highly recommend using a good quality flavouring agent to amp up the flavour quotient.
Step by Step Tutorial:
Step 1: Prepare the Cookie Dough
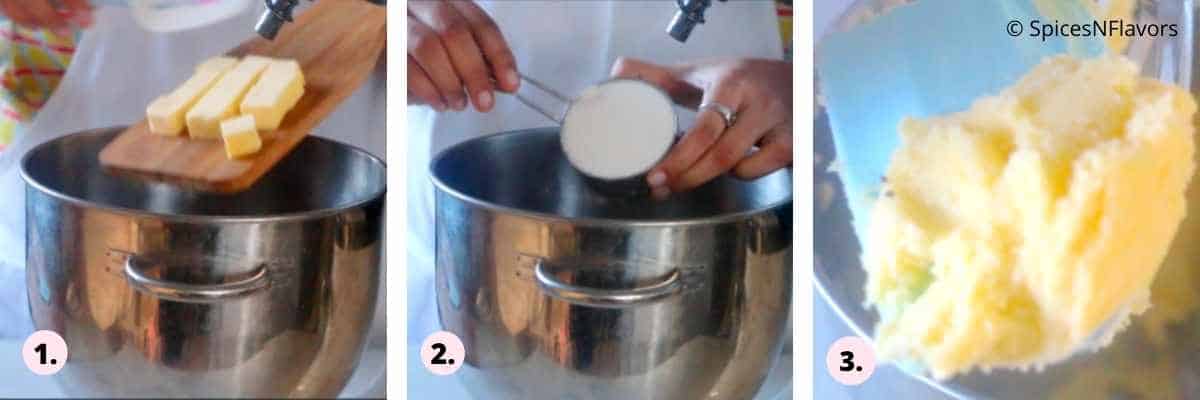
Place the chilled and cubed butter alongwith Caster sugar in the bowl of your stand mixer (image 1-2).
Using a paddle attachment beat the butter and sugar for around 4 mins, stopping in between to scrape down the sides.
Once the butter and sugar is combined add water and vanilla bean paste and beat again until just combined (image 3).
Too much beating would incorporate air into the dough which we want to avoid so just keep a note of that.
Add the salt to the flour and give it a quick mix. Transfer to the stand mixer in 3 batches. Stopping to scrape down before every addition.
This is another step to note. Once you add the flour beat the dough just until it comes together.
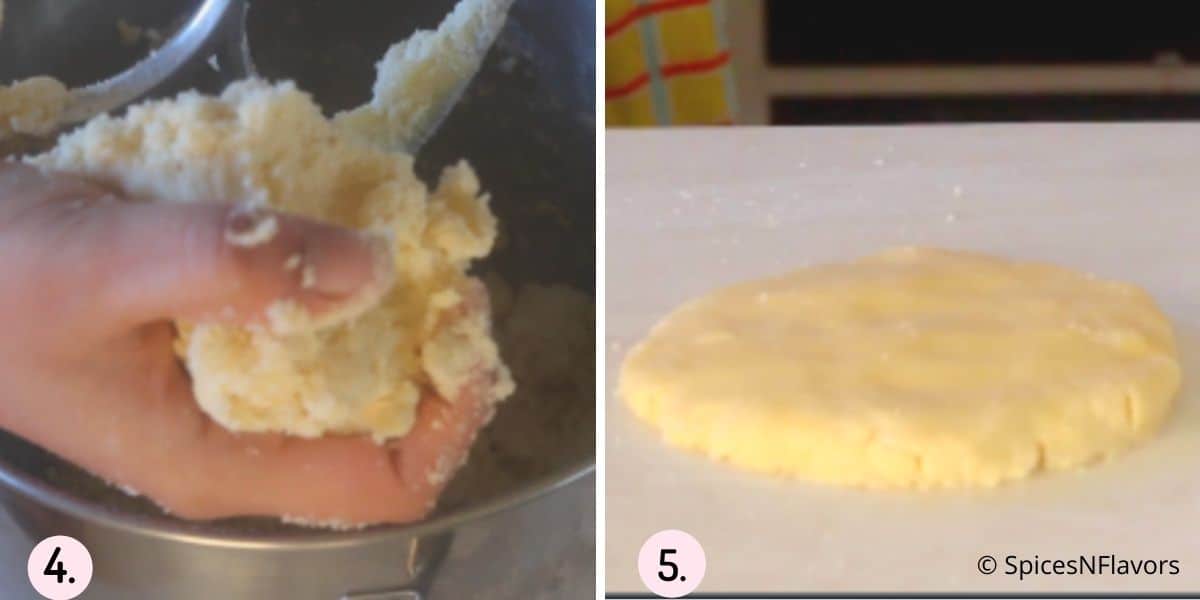
If you take a small amount and gently press in your hands you will see that the dough doesn't fall apart (image 4).
At this stage, switch over to make the dough using your hands instead of the stand mixer.
Just combine it into a dough. DO NOT KNEAD.
Tip: Your cookies turn rubbery and tough? Towards the end ditch your stand mixer and combine everything into a dough using your hands to avoid kneading the dough resulting in a tough, rubbery and chewy cookie.
Flatten the dough to a disc, cling wrap and refrigerate for 15 to 30 mins (image 5).
Step 2 - Cut out Cookie Dough
What should be the thickness of the cut out cookies?
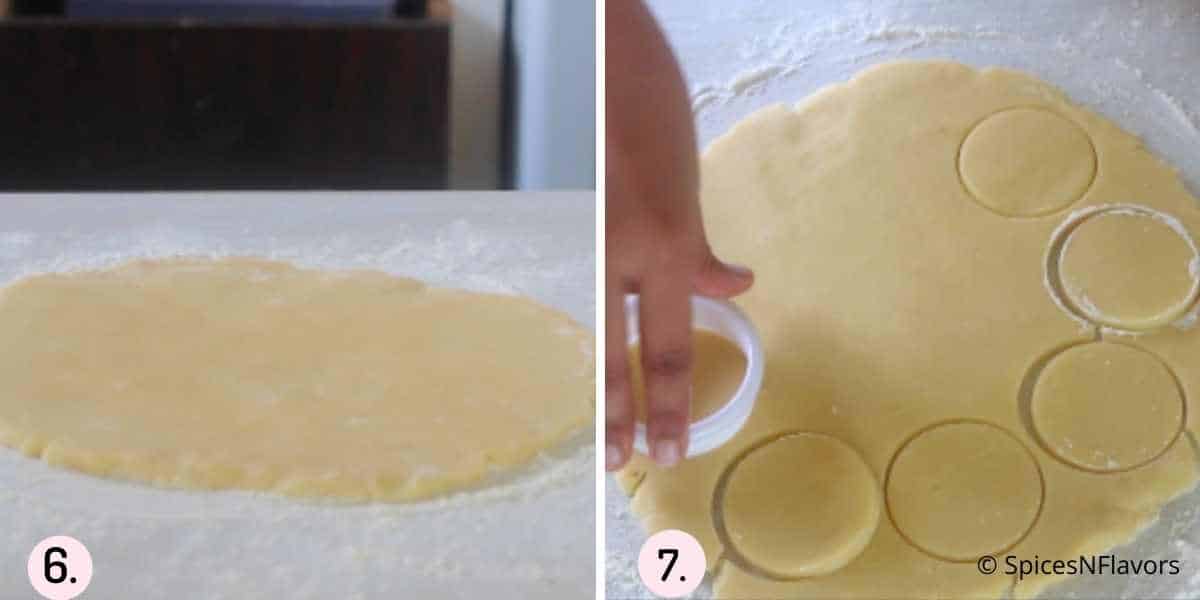
Once chilled roll the dough to 1/4 inch to 1/3 inch thickness (image 6).
Do remember to dust the worktop with some flour and also keep moving the cookie dough every now and then so that nothing sticks to your worktop.
Remember rolling it too thin would make your cookie go hard and too thick would leave. you with an under baked soft cookie.
So be gentle while rolling, do not press too hard and take your time to roll it evenly.
Using the cookie cutter of your choice, start from the ends and then working towards the centre to cut the cookie dough (image 7).
This way you can cut more number of cookies from the rolled out dough.
Insider TIP: If the cookie cutter is becoming sticky, you can also dip it in dry flour and then cut the dough.
It is also important to cut the dough immediately once rolled out or else the butter will soften and turn sticky and tough to handle and you wont be able to cut out the shapes properly.
And in case it happens pop the tray back into the fridge for the butter to set again and then re-start.
Once rolled out, lift the cookies using an off-set spatula and carefully place them in a baking tray lined with a parchment paper.
You can re-roll the scraps and cut out cookies from them.
Step 3 - Baking
Pre-heat the oven to 180°C.
Tip: If you find that your oven is not pre-heated and your cookie tray is standing at room temperature then do yourself a favour by putting the tray into your fridge till the time the oven is pre-heated. This would prevent the cookies from spreading in the oven.
Place a cookie tray upside down in the middle rack and then place your tray with the cut-out cookie dough on top of it.
This would ensure that your cookies do not get too brown while baking from the bottom.
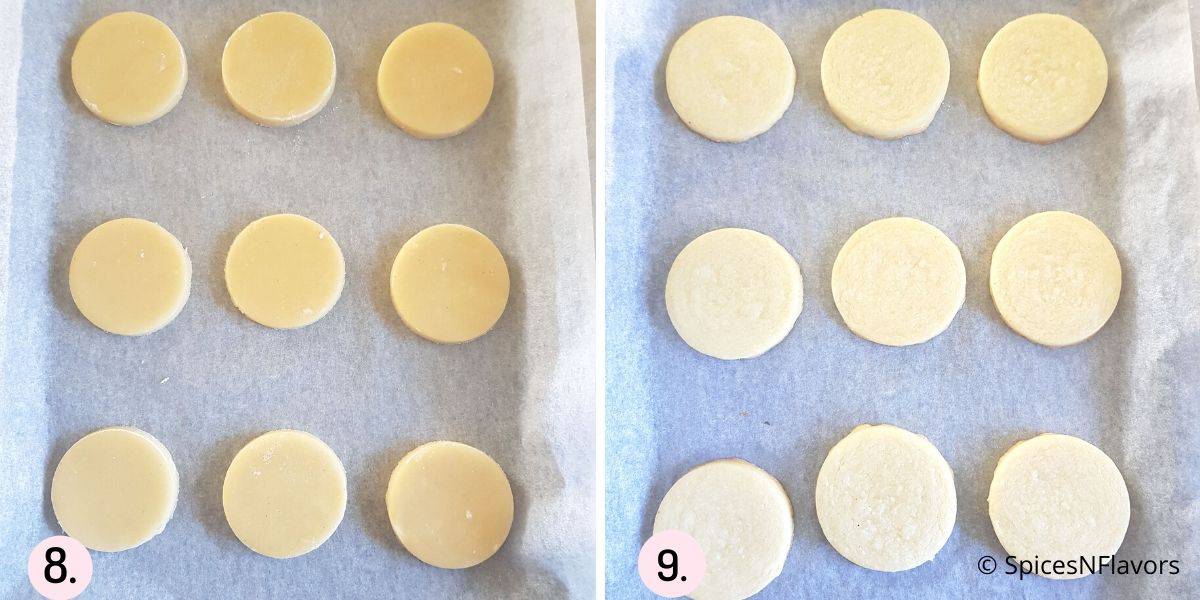
Bake them for 10-12 mins until the base of the cookies turn light golden brown but the top remains pale in colour.
Here is an amazing tip I learned from about smoothening the top of your freshly baked eggless sugar cookies.
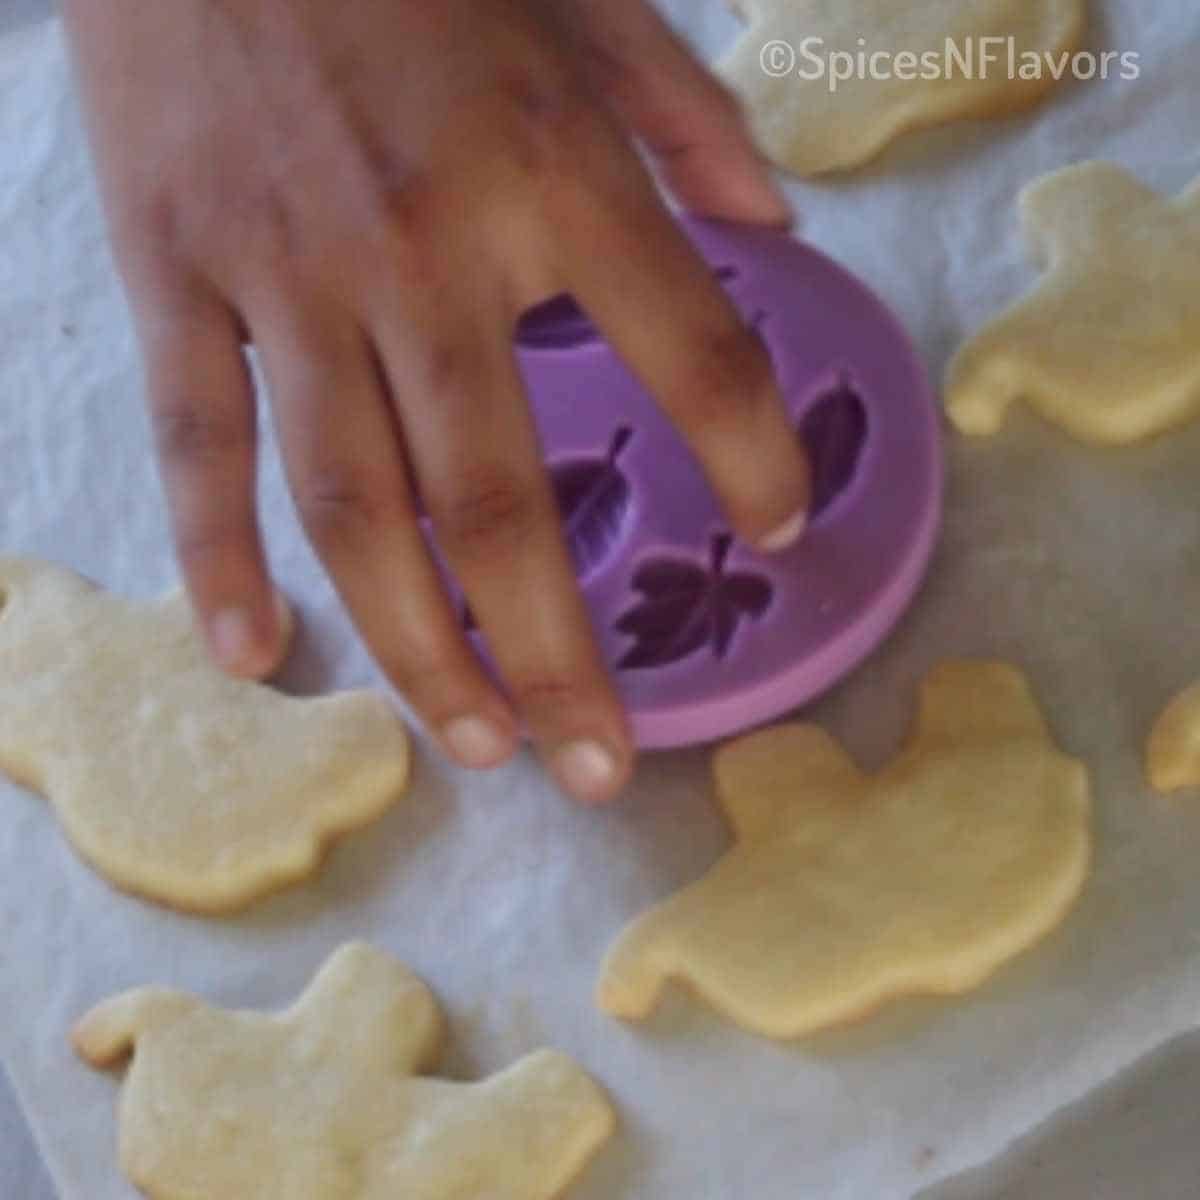
So immediately out of the oven, press a silicone mould with a flat surface as seen in images or you can also use fondant smoother basically something with a smooth surface and then press it ever so gently on top of the cookie for a smoother finish.
This trick would only work when the cookies are straight out of the oven and still warm.
Once baked let it sit in the cookie tray for another 5 mins and then transfer to a wire rack to cool completely.
Either store it in the air-tight container or use an icing to decorate the cookie or you can also use buttercream to do the decoration part.
Storage Instructions
Once cooled, stored the cookies in an air tight container for up to 8 to 10 days at room temperature.
You can also freeze this eggless sugar cookies. Cling wrap individually then place in a zip lock bag and freeze. This would last for 3 months.
How to Store Eggless Cookie Dough?
After Step 1, once you cling wrap the dough, you can store it in the refrigerator for 1 to 2 weeks.
Can you Freeze Cookie Dough?
Absolutely. In fact this is the best way to make these cookies ahead of time. The procedure remains the same. After Step 1, cling wrap and freeze the cookie dough for 3 to 6 months.
PRO-TIPS:
- Butter: Use cold and cubed butter that way you would not incorporate too much air into the batter.
- Never over-mix or knead the cookie dough. Once your flour is incorporated stop and just combine everything into a dough using your hands.
- It is important to chill the dough once mixed for at least 15 mins.
- You can also dip your cookie cutter into flour and the cut the cookie dough if you find that it is sticking way too much to the cookie dough.
- Line the baking tray with a parchment paper: It not only prevents the sticking of the cookies to the base and makes lifting them easier but also prevents the butter from spreading while baking.
- Double Pan Method: If you find that your cookies brown too much in your oven specially from the base, consider placing a cookie tray upside down in your oven and then place the tray with cookies on top of the other tray. So basically you use two pans in the oven and this would prevent the over-browning of the cookies.
- Use a silicon mould or a fondant smoother on top of the warm cookies to get an even and smoother finish.
- These eggless cookies would make an excellent addition to Diwali Hamper Box or Christmas Hamper Box. And if you are wondering how to price them then check out our Cake Pricing Guide post.
Recipe FAQ's
A sugar cookie spreads if you have creamed the butter and sugar for long thereby accidentally incorporating air into the dough which escapes while baking causing the cookie to spread. So make sure to cream it until just combined. It can also spread if the oven temperature is too hot or there is not enough flour in the recipe to balance the butter.
1. Use Cold Butter
2. Remember to chill the dough
3. Avoid using the same hot or warm cookie tray for second batch of baking.
4. Make sure to measure the flour correctly.
5. No leavening agents should be added.
You might have over-baked the cookies. The cookies should have a pale top and the bottom should be lightly golden brown. As they cool they cook further, so do not be tempted to keep it in the oven thinking that the cookies are not baked.
Generally eggs act as a binding agent in cookies. So one can easily replace the same with plain water in most of the cookie recipes. Water also provides the required moisture and keeps the cookies form drying out.
Yes absolutely. These eggless sugar cookies are sturdy enough to be iced on top with royal icing or buttercream. Consider checking my Eggless Royal Icing 101 post followed by decorating cookies with icing for a detailed tutorial.
Related Recipes
Wish to Join US for the love of BAKING? Subscribe to our newsletter and Youtube channel. Follow along on Facebook, Instagram, and Pinterest for all the latest updates!

Eggless Sugar Cookies
Ingredients
- 1/2 cup (113 gms) Butter, cold and cubed
- 1/2 cup + 2 tbsp (145 gms) Caster Sugar
- 1/2 tsp Vanilla Bean Paste
- 1/4 cup (50 gms) Water
- 2 cups (240 gms) APF/Maida
- 1/2 tsp Salt
Instructions
- Place the chilled and cubed butter alongwith Caster sugar in the bowl of your stand mixer. Using a paddle attachment beat the butter and sugar for around 4 mins, stopping in between to scrape down the sides.
- Once the butter and sugar is combined add water and vanilla bean paste and beat again until just combined
- Add the salt to the flour and give it a quick mix. Transfer to the stand mixer in 3 batches. Stopping to scrape down before every addition.
- Once you add the flour beat the dough just until it comes together. If you take a small amount and gently press in your hands you will see that the dough doesn't fall apart
- At this stage, switch over to make the dough using your hands instead of the stand mixer. Just combine it into a dough. DO NOT KNEAD.
- Flatten the dough to a disc, cling wrap and refrigerate for 15 to 30 mins
- Dust your worktop with flour and once chilled roll the dough to 1/4 or 1/3 inch thickness.
- Using the cookie cutter of your choice, start from the ends and then working towards the centre to cut the cookie dough
- Once rolled out, lift the cookies using an off-set spatula and carefully place them in a baking tray lined with a parchment paper. (You can re-roll the scraps and cut out cookies from them.)
- Chill the cookies one more time for 15 to 30 mins in the refrigerator. Meanwhile pre-heat your oven to 180°C.
- Place a cookie tray upside down in the middle rack and then place your tray with the cut-out cookie dough on top of it.
- Bake them for 10-12 mins until the base of the cookies turn light golden brown but the top remains pale in colour.
Video
Notes
- The recipe makes 23 to 26 cookies depending upon the size and type of cookie cutter used.
- You can easily double or halve the recipe.
- Butter: Use cold and cubed butter that way you would not incorporate too much air into the batter.
- Never over-mix or knead the cookie dough. Once your flour is incorporated stop and just combine everything into a dough using your hands.
- It is important to chill the dough once mixed for at least 15 mins.
- You can also dip your cookie cutter into flour and the cut the cookie dough if you find that it is sticking way too much to the cookie dough.
- Line the baking tray with a parchment paper: It not only prevents the sticking of the cookies to the base and makes lifting them easier but also prevents the butter from spreading while baking.
- Double Pan Method: If you find that your cookies brown too much in your oven specially from the base, consider placing a cookie tray upside down in your oven and then place the tray with cookies on top of the other tray. So basically you use two pans in the oven and this would prevent the over-browning of the cookies.
- Use a silicon mould or a fondant smoother on top of the warm cookies to get an even and smoother finish.
- These eggless cookies would make an excellent addition to Diwali Hamper Box or Christmas Hamper Box. And if you are wondering how to price them then check out our Cake Pricing Guide post.
Jannani M says
I did everything the exact same way but the resulting dough came out very wet like cookie dough. What do i do?
sushma iyer says
Hi Jannani.. I’m sorry to hear that! Sometimes the weather affects how flour absorbs moisture. Try reducing the water and adding just 2 teaspoons at a time until the dough comes together. This way, you can control the consistency without making it too wet. Hope this helps—let me know how it turns out! 😊
Maryam says
very nice Recipe… My brother is allergic to egg so this was perfect to make so he can enjoy too….❣️
sushma iyer says
Hi Maryam.. Thank you so much for your kind words! ❤️ I'm so glad the recipe worked well for your brother and that he could enjoy it too. It's always special to create something everyone can share. 😊
Lyndsay says
Love the recipe, thank you! Cookies came out perfect. We even added 1/2 tsp cardamom and 1/4 tsp cinnamon for a touch of extra flavor
sushma iyer says
Hi Lyndsay.. Thank you so much! I'm so happy to hear the cookies turned out perfect! ❤️ I love the addition of cardamom and cinnamon—what a great idea to enhance the flavor! 😊
Majda says
Hi
Can I use gluten free flour?
sushma iyer says
Hi Majda.. never tried the gluten free version..sorry
Deanne says
such an awesome recipe. going to be a keeper on my bakelist
sushma iyer says
Hi Deanne.. Thank you so much! I’m thrilled you loved it and that it’s earned a spot on your bakelist. Happy baking!
Shwetha Sharma says
Hi Sushma, I tried this recipe and followed all the steps as per instructions. I’m amazed with the way the cookies turned out, they were just perfect. Thank you so much, wish I could share the pictures of my cookies. Thanks again! 😊
sushma iyer says
That sounds amazing Shwetha.. thank you for sharing your feedback with us.. appreciate it 🙂 I would love to see your pictures too.. you can either mail me or dm me on Instagram.. would like to get connected to you 😀
AW says
Can I use an electric mixer instead of a stand mixer?
sushma iyer says
You mean hand mixer?? Yes you can
James DC says
Hello, I love your recipes and instruction videos. Thanks for sharing! Question about this recipe; Can I use vanilla extract instead of vanilla paste?
sushma iyer says
Hi James.. yes you can 🙂