
This is the best white bread recipe for bread machine enthusiasts, perfect for a 2 lb loaf that's both soft and fluffy. With simple ingredients and no hard work, this homemade white bread will make you proud of baking your own bread at home.

Ingredients
- 312 gms (1 cup plus 1/4 cup) Lukewarm Milk
- 2 tsp Salt
- 3 tbsp Sugar
- 56 gms (1/4 cup) Melted Butter
- 480 gms (4 cups) All purpose Flour
- 1.5 tsp Instant Yeast
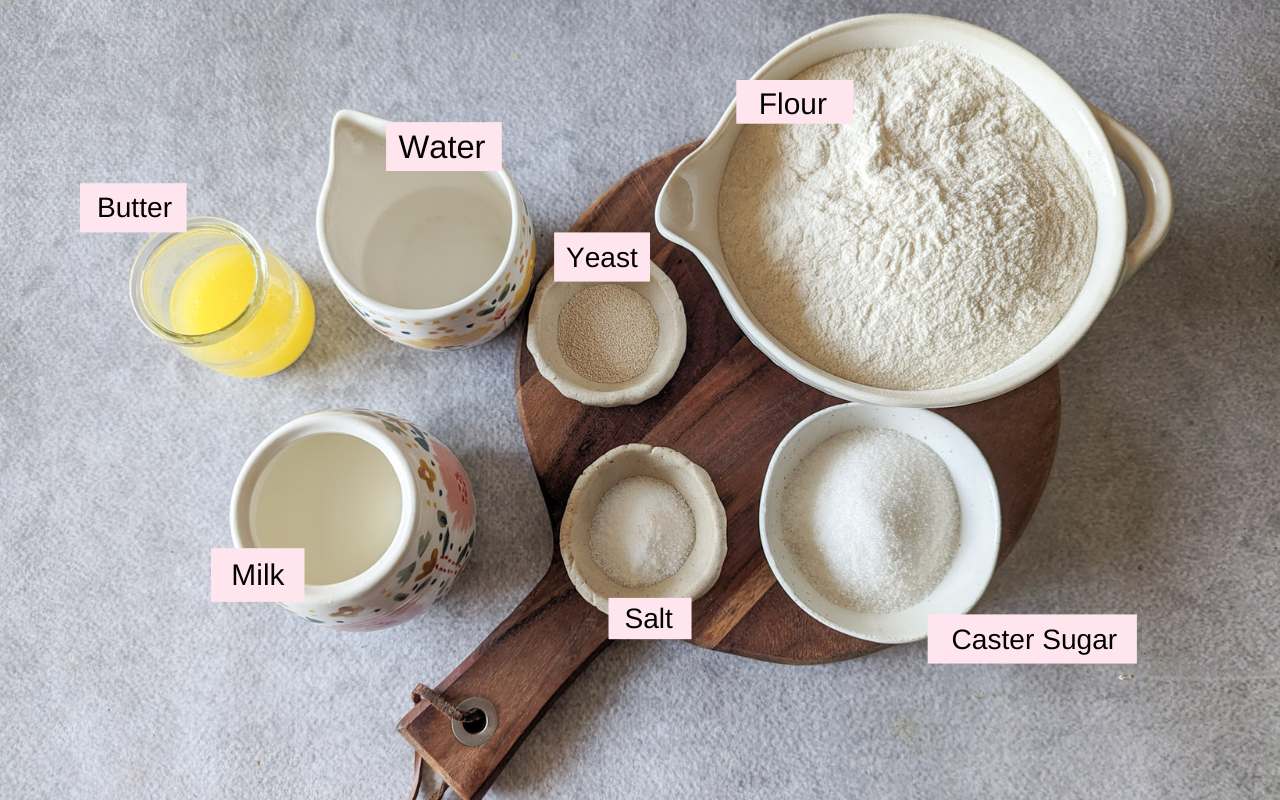
I ran out of milk while shooting this recipe, so I used a combination of milk and water. I used 1 cup of milk and 1/4 cup of water. That's why you can see both water and milk in the image above. Just remember, you need a total of 312 grams (1 + 1/4 cup) of liquid.
Which Yeast to use?
When making successful bread machine recipes, there are two crucial factors to consider: the right amount of liquid and the type of yeast used.
- Bread Machine Yeast - Specifically designed for bread makers, bread machine yeast is the most popular choice for making a loaf in a bread maker due to its consistent performance.
- Instant Yeast - This is my preferred yeast because it can be used in various other regular bread recipes as well. Both bread machine yeast and instant yeast work well as they do not require proofing before use.
- Active Dry Yeast - Avoid using this type of yeast for bread machine bread recipe, as it needs to be activated before adding to the recipe, which may not work well in a bread machine setting.
Ingredient Notes:
- Milk - You can substitute water for milk, but consider adding 2 tablespoons of powdered milk (also known as dry milk or milk powder) to keep the bread soft. Whether using milk or water, ensure the liquid is lukewarm to help activate the yeast.
- Melted Butter - Can also be substituted with any flavorless or odorless oil like vegetable oil, olive oil or even canola oil. Butter gives a superior taste though as compared to oil.
- All-Purpose Flour - You can also use bread flour for a sturdier loaf.
- Instant Yeast - Stick to instant yeast or bread machine yeast for best results.
Pint out the complete list of ingredients from the recipe card shared at the end of the post.
Step by Step Instructions
Step 1: Prepare the Bread Machine
Attach the paddle (dough hook/kneading blade) to the pan of the bread machine.
Step 2: Add the Ingredients

Pour 1 1/2 cups of lukewarm milk (or lukewarm water if using) into the baking pan followed by salt, sugar, melted butter, flour and instant yeast.
If you using powdered milk add it before the melted butter.
Bread Machine Settings
Place the bread pan into the bread machine and close the lid.
- Weight: 2 lbs (1000 gms)
- Color: Medium
- Option: Basic Bread (usually the first option in the menu)
- Press Start and allow the machine to complete the bread cycle.
Step 3: Baking
- About 3-5 minutes into the kneading stage, open the lid of your bread machine to evaluate the dough.
- It should be a smooth, cohesive ball that feels slightly moist to the touch (tacky to the touch).
- If the dough seems too sticky, sprinkle in a bit more flour; if it’s too dry, add a small amount of water.
Remember, you can only check the dough during the kneading phase. After this, once the bread machine begins the resting or proving phase, keep the lid closed.
When the bread machine completes the entire dough cycle, your fresh homemade bread will be ready to enjoy.
The machine handles all the kneading, proving, and baking, making the process straightforward and convenient.

Step 4: Cool the Bread
When the bread machine has finished its cycle, carefully remove the bread pan using oven mitts or pot holders.
Gently take the bread out of the pan by inverting it on to a wire rack to cool completely before slicing.
Slice and enjoy your soft, fluffy loaf of bread!
Storage Instructions:
Let the bread cool completely on a wire rack before storing it to prevent condensation from making it soggy.
- Room Temperature Storage:
- Keep the cooled bread in a plastic bag, bread box, or an airtight container at room temperature. It will stay fresh for about 3-5 days.
- Tip: For a softer crust, wrap the bread in plastic wrap or place it in a plastic bag.
- Freezing Bread:
- Wrap the cooled bread tightly in plastic wrap or aluminum foil, then place it in a freezer-safe plastic bag or container. It can be frozen for up to 3 months.
- To Thaw: Let the bread thaw at room temperature for a few hours, or toast individual slices directly from the freezer.
How to enhance the basic white bread loaf?
You can enhance your white bread with a variety of extras!
Add shredded cheese, or herbs like rosemary during the last few minutes of the kneading cycle, or use the “Add-In” feature if your bread machine has one.
For a touch of sweetness, add raisins, cranberries or dried fruit during the “pause/rest period” after the first kneading cycle but before the second kneading cycle begins.
You can also experiment with different flavors by substituting butter for oil, adding spices, or using buttermilk instead of water.
Just be sure to add these ingredients at the right time for the best results!
Quick Reference for Adding Ingredients
| Ingredient | Amount | When to Add |
|---|---|---|
| Cheese | 1/2 cup | Last few minutes of kneading or use “Add-In” feature. |
| Dried Cranberries | 1/2 cup | During “pause/rest period” after first kneading and before second kneading. |
| Italian seasoning | 1-2 tsp | Last few minutes of kneading. |
| Spices | 1-2 tsp | Along with flour |
| Sweeteners | 1-2 tbsp | Add with liquids for a touch of sweetness. (eg:Honey, Peanut Butter) |
| Fresh Herbs/Vegetables | Finely chopped | Last few minutes of kneading. |
| Seeds | 2 tbsp | Last few minutes of kneading. (eg: Flaxseeds, Pumpkin Seeds, etc) |
Feel free to get creative with your delicious bread machine white bread to achieve delicious new flavors!

Best Tips
- Always use lukewarm milk or water (about 110°F or 45°C) to activate the yeast effectively. Too hot or too cold liquids can affect the yeast’s performance.
- Add liquids first, followed by dry ingredients, and place the yeast on top of the flour. This prevents the yeast from coming into contact with the liquid until kneading begins.
- About 3-5 minutes into the kneading cycle, open the lid to check the dough’s texture. It should form a smooth, cohesive ball. If the dough is too dry, sprinkle in a bit more water; if it's too sticky, add a small amount of flour to achieve the right consistency.
- Each bread machine model might have specific guidelines, such as making a well in the flour for the yeast. Always consult your bread machine’s manual for the correct procedures to ensure the yeast activates properly and the bread turns out well.
- Make sure your yeast is fresh and has been stored correctly. Old yeast can result in flat or dense bread.
- You can add ingredients like herbs, cheese, or seeds for extra flavor. Add these extras during the last few minutes of the kneading cycle or use the “Add-In” feature if available.
- Only open the bread machine lid during the kneading phase. Avoid opening it during the proofing stage, as this can affect the dough’s rise.
- Let the bread cool on a wire rack before slicing to set the texture and avoid fogginess.
- Keep the cooled bread in a plastic bag or airtight container at room temperature for 3-5 days. For longer storage, wrap and freeze the bread, thawing as needed.
- Use bread flour for a sturdier loaf Bread-making takes time.
- This recipe is designed for 2 lb capacity bread machines and unsuitable for smaller machines. Please verify the capacity of your bread machine before starting this recipe.
- If your bread machine only accommodates 1 lb loaves, this recipe will not work. The dough will exceed the pan’s capacity, potentially causing overflow and collapsing the top of the loaf.
- Transform your soft, fresh bread into a variety of delicious dishes! You can make scrumptious toast by topping it with cream cheese, butter, jam, avocado, or goat cheese, or use it for classic sandwiches like BLTs or turkey clubs. This bread also shines as the base for mouthwatering grilled sandwiches and even for french toast.

Frequently Asked Questions
If the dough is too sticky, add a little more flour, one tablespoon at a time. If it’s too dry, add a small amount of water, one teaspoon at a time, until you achieve a smooth, cohesive ball.
Yes, you can baste the top of your bread with melted butter right after removing it from the bread pan. Using a small pastry brush, gently apply the melted butter to the top of the hot bread. This optional step not only enhances the appearance of the loaf but also adds a delicious buttery flavor.
If your bread is coming out dense, there are a few common issues to check:
Is your yeast fresh? Using old or expired yeast can cause the dough to rise poorly. Always use fresh yeast and store it in an airtight container, ideally in the fridge or freezer for long-term storage.
Are your liquids at the right temperature? Using cold liquids can hinder yeast activation. Make sure your liquids are warm but not hot—about 110°F (45°C) is ideal.
Is your kitchen too cold? Yeast performs best in a warm environment. Aim for a room temperature of around 75-80°F (24-27°C) to support proper dough rising.
Dough Consistency? Check the dough’s consistency 3-5 minutes into kneading. The dough should form a smooth, cohesive ball. Adjust with more flour or water as needed.
Here are a few reasons your bread might collapse and how to fix them:
Too Much Liquid: If you added too much water, it can cause your bread to collapse. Start with the minimum water amount listed in the recipe and add more as needed. It’s easier to adjust the water amount gradually than to fix a dough that’s already too wet.
Not Enough Salt: If you used coarse salt, you might not have used enough. Consider adding a bit more salt in future bakes to support proper dough structure.
Yeast Problems: Using too much or old yeast can lead to collapsed bread. Check the activity of your yeast by proofing a small amount, and if it’s good, use a smaller amount in your next recipe.
Our bread machine whole wheat bread explains it in much details. 
Tips for First-Time Users of This White Bread Recipe
If this is your first attempt at white bread recipe for bread machine - 2lbs, here are some helpful tips to ensure a successful bake:
- Check Dough Consistency Early: Around 10 minutes into the kneading cycle, open the lid to check if the dough is forming a smooth ball. The dough should be moist but not sticky, and it should pull away from the sides of the pan. If the dough looks too wet or too dry at this stage, adjust it:
- If too wet: Add 1-2 tablespoons of flour.
- If too dry: Add 1 tablespoon of water.
- Measure Ingredients Carefully: Accurate measurements are key to success in bread making. Use measuring cups for dry ingredients and a liquid measuring cup for liquids. Ensure your flour is spooned into the cup and leveled off, rather than scooped directly from the bag. Invest in a weighing scale if you can.
- Use Lukewarm Liquid: For the best results, make sure you use warm water or milk, around 110°F (45°C). This temperature helps activate the yeast and supports proper dough rising.
- Keep Ingredients at the Right Temperature: Your yeast and ingredients should be at room temperature.
- Add Ingredients in the Correct Order: Follow the recipe’s order for adding ingredients to the bread pan. Generally, add liquids first, followed by dry ingredients, and place yeast last. This method helps avoid direct contact between the salt and yeast, which can inhibit rising.
- Read Your Bread Machine’s Manual: Different bread machines have slightly different functions. Check your machine’s manual for any specific instructions or settings, such as whether to make a well in the flour for the yeast.
- Avoid Opening the Lid During Baking: Once the dough starts the rising or baking stages, avoid opening the lid. This can affect the bread’s texture and prevent it from rising properly.
- Be Patient: Bread making requires time, so let the bread machine complete its cycle without interruptions. Patience will lead to a better outcome, with perfectly baked bread at the end.
Related Recipes:
- Whole Wheat Bread Machine recipe
- Best Sandwich Bread without Bread Machine
- Honey Wheat Bread Machine recipe
Wish to Join US for the love of BAKING? Subscribe to our newsletter and Youtube channel. Follow along on Facebook, Instagram, and Pinterest for all the latest updates!

Best White Bread Recipe for Bread Machine - 2lbs
Ingredients
- 312 gms (1+1/4 cups) Lukewarm Milk refer notes
- 2 tsp Salt
- 3 tbsp Sugar
- 56 gms (1/4 cup) Melted Butter
- 480 gms (4 cups) All Purpose Flour
- 1.5 tsp Instant Yeast
Instructions
Step 1 - Preparation
- Attach the paddle (dough hook/kneading blade) to the pan of the bread machine.
Step 2 - Ingredient Assembly
- Pour 1 1/4 cups of lukewarm milk (or lukewarm water if using) into the baking pan followed by salt, sugar, melted butter, flour and instant yeast. If you using powdered milk add it before the melted butter.
Step 3 - Bread Machine Settings
- Place the bread pan into the bread machine and close the lid.Weight: 2 lbs (1000 gms)Color: MediumOption: Basic Bread (usually the first option in the menu)Press Start and allow the machine to complete the bread cycle.
Step 4 - Baking
- About 3-5 minutes into the kneading stage, open the lid of your bread machine to evaluate the dough. It should be a smooth, cohesive ball that feels slightly moist to the touch (tacky to the touch).If the dough seems too sticky, sprinkle in a bit more flour; if it’s too dry, add a small amount of water.
Step 5 - Cool the Bread
- When the bread machine has finished its cycle, carefully remove the bread pan using oven mitts or pot holders.
- Gently take the bread out of the pan by inverting it on to a wire rack to cool completely before slicing.
- Slice and enjoy your soft, fluffy loaf of bread!
Notes
- Milk - You can substitute water for milk, but consider adding 2 tablespoons of powdered milk (also known as dry milk or milk powder) to keep the bread soft. Whether using milk or water, ensure the liquid is lukewarm to help activate the yeast.
- Melted Butter - Can also be substituted with any flavorless or odorless oil like vegetable oil, olive oil or even canola oil. Butter gives a superior taste though as compared to oil.
- All-Purpose Flour - You can also use bread flour for a sturdier loaf.
- Instant Yeast - Stick to instant yeast or bread machine yeast for best results.
- Always use lukewarm milk or water (about 110°F or 45°C) to activate the yeast effectively. Too hot or too cold liquids can affect the yeast’s performance.
- Add liquids first, followed by dry ingredients, and place the yeast on top of the flour. This prevents the yeast from coming into contact with the liquid until kneading begins.
- About 3-5 minutes into the kneading cycle, open the lid to check the dough’s texture. It should form a smooth, cohesive ball. If the dough is too dry, sprinkle in a bit more water; if it's too sticky, add a small amount of flour to achieve the right consistency.
- Each bread machine model might have specific guidelines, such as making a well in the flour for the yeast. Always consult your bread machine’s manual for the correct procedures to ensure the yeast activates properly and the bread turns out well.
- Make sure your yeast is fresh and has been stored correctly. Old yeast can result in flat or dense bread.
- You can add ingredients like herbs, cheese, or seeds for extra flavor. Add these extras during the last few minutes of the kneading cycle or use the “Add-In” feature if available.
- Only open the bread machine lid during the kneading phase. Avoid opening it during the proofing stage, as this can affect the dough’s rise.
- Let the bread cool on a wire rack before slicing to set the texture and avoid fogginess.
- Keep the cooled bread in a plastic bag or airtight container at room temperature for 3-5 days. For longer storage, wrap and freeze the bread, thawing as needed.
- Use bread flour for a sturdier loaf Bread-making takes time.
- This recipe is designed for 2 lb capacity bread machines and unsuitable for smaller machines. Please verify the capacity of your bread machine before starting this recipe.
- If your bread machine only accommodates 1 lb loaves, this recipe will not work. The dough will exceed the pan’s capacity, potentially causing overflow and collapsing the top of the loaf.
- Transform your soft, fresh bread into a variety of delicious dishes! You can make scrumptious toast by topping it with cream cheese, butter, jam, avocado, or goat cheese, or use it for classic sandwiches like BLTs or turkey clubs. This bread also shines as the base for mouthwatering grilled sandwiches and even for french toast.
Martin Elson says
Your liquid is listed as 1.25 cups in ingredients and 1.5 cups in instructions.
sushma iyer says
Hi Martin.. sorry about the confusion.. I have now edited it.. It is 1 and 1/4 cup of liquid.. Ideally if you can please weight the ingredients for accurate results.. You would need 312 gms..