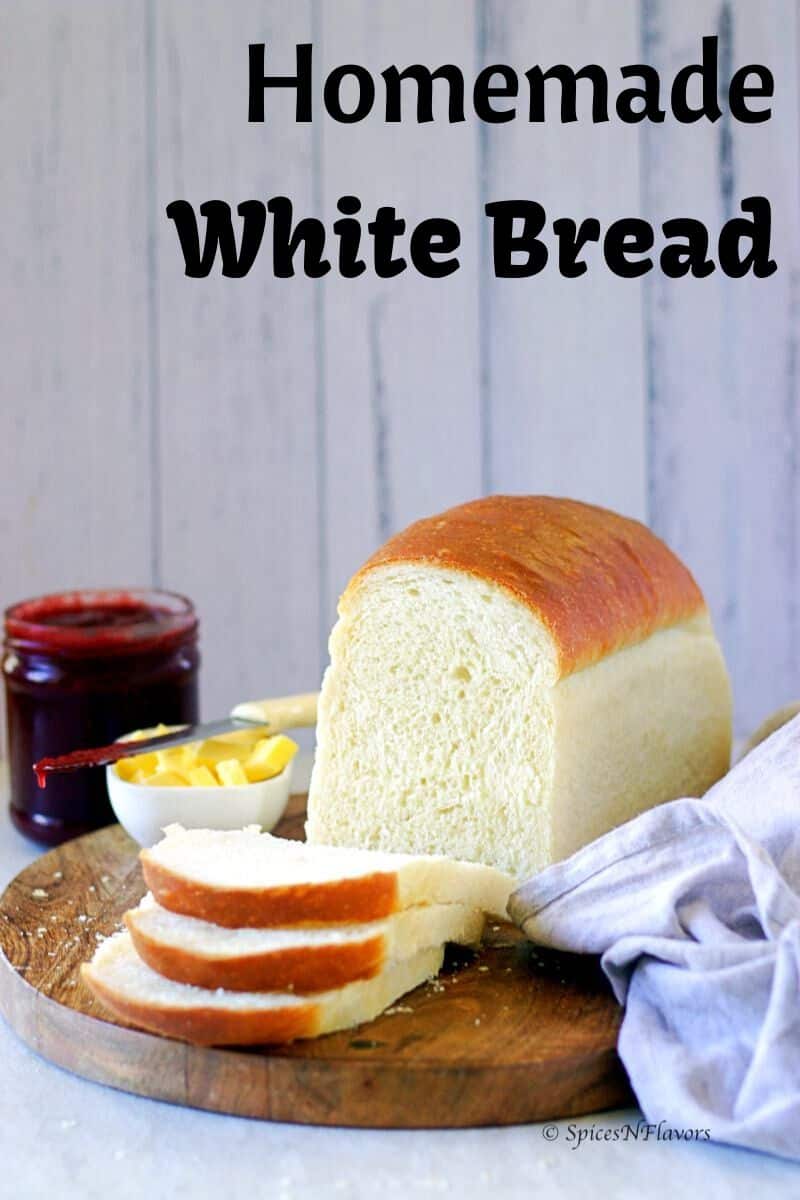
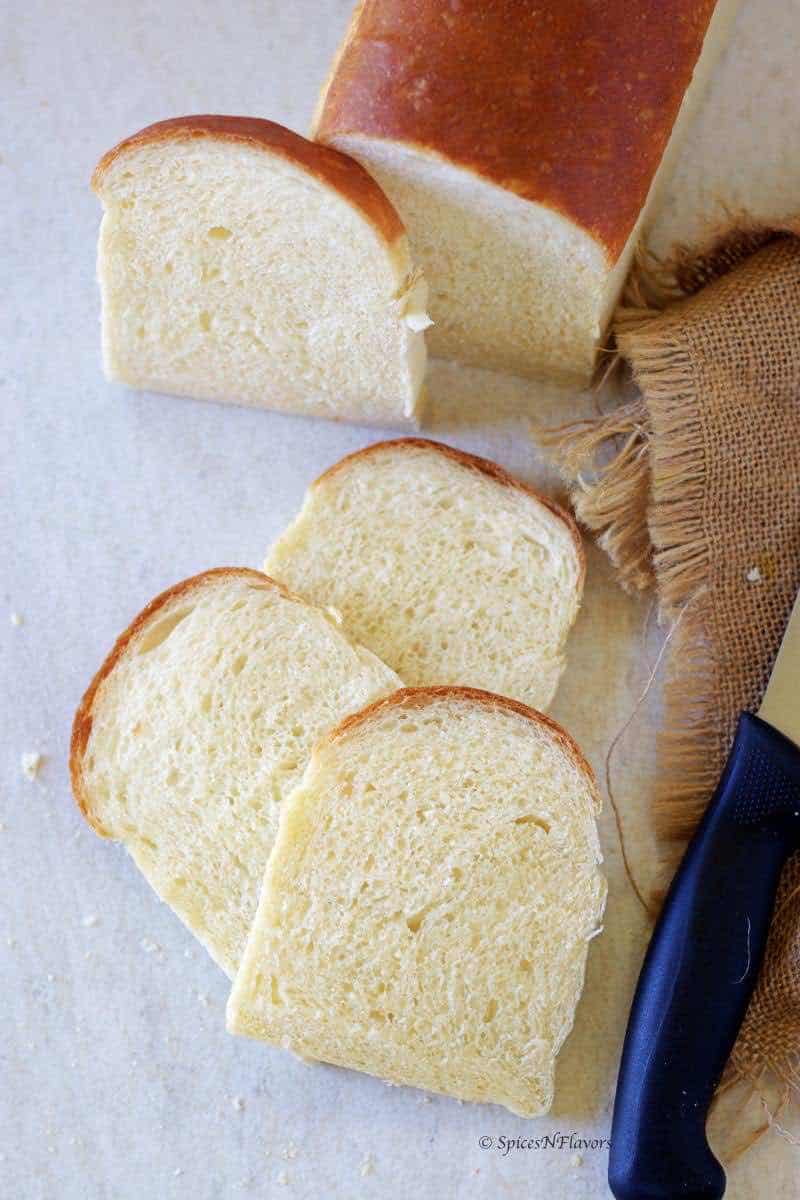
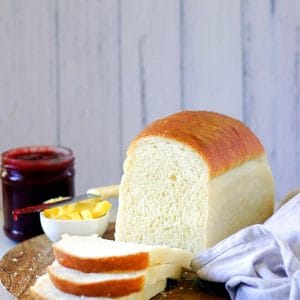
This homemade White Bread recipe from scratch makes a light, fluffy, soft and incredibly tall bread loaf that is perfect for sandwiches, toast, or simply with butter and jam.
All you need is basic pantry ingredients and 5 simple steps to make this Sandwich Bread from scratch right in your own kitchen in just 2 hours.
A Basic Recipe to Note Down:
Now being a really scary time, it is advisable to leave the house only if needed.
Given the circumstance, it is good to know a few basic recipes, that you can make at given point of time with basic ingredients.
One such recipe that I would highly recommend you guys to try right now is to make your own Sandwich Bread.
This White Bread recipe, being a classic you'll want to keep on hand.
It turns out so light, fluffy and incredibly soft. Everyone will think it came right from the bakery!
And you can put this to use in so many ways - make a toast for breakfast, pack it in school lunches, as a snack, dunk in your soups or as a side for dinner.
In case you have any leftovers turn it into croutons and bam it tastes even better.
Here is a detailed step by step recipe with photos for you guys.
How to make Basic Bread at home from scratch:
Step 1: Prepare the Dough
How to make the bread by Hand?
Onto your bowl, add in the water (pic 1), yeast (pic 2) and sugar (pic 3). Stir to dissolve the yeast.
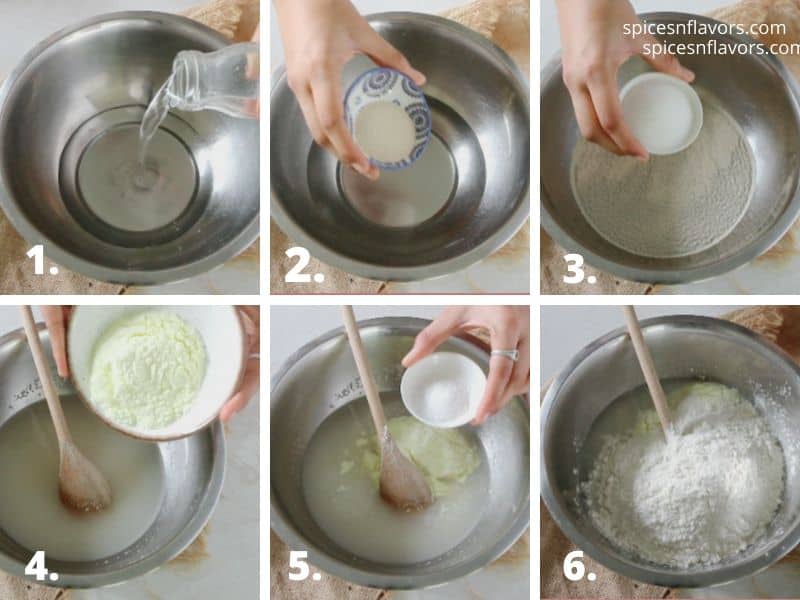
Start by adding milk powder (pic 4), salt (pic 5) and 3 cups of flour (pic 6). Mix and when you see no more dry flour in the bowl, tip into your countertop and start kneading.
The dough is going to be sticky, but that is OKAY. That is how it is meant to be.
Add 1/4 cup of flour at a time and keep on kneading until you see that it is no longer sticking too much onto your hands.
You can refer the video in the recipe card or on Youtube on how to knead the dough for even better understanding.
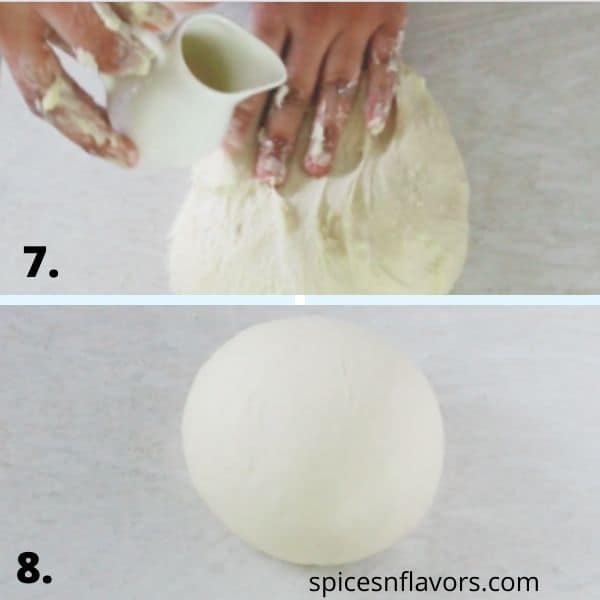
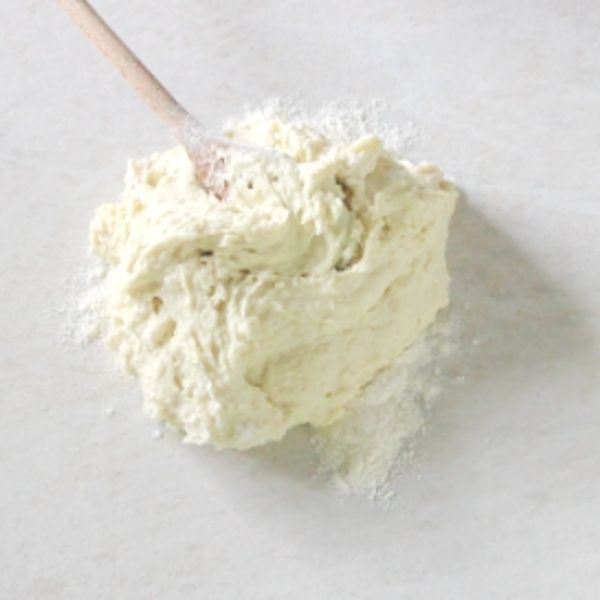
At this stage add the oil (pic 7) and knead until you get a soft smooth, elastic and tacky dough (pic 8).
It would take nearly 15-18 mins to reach this stage.
I would recommend you guys to check the detailed video on Youtube on how I have kneaded the dough and till what stage.
How to knead the dough in a stand mixer?
Even in this case, the procedure remains the same.
To the bowl of your stand mixer add in water, yeast and sugar. Stir to dissolve the yeast.
Add 3 cups of flour and salt.
Start adding 1/4 cup of flour at a time until you see that the dough is starting to come together by leaving the sides of the bowl.
At this stage add the oil and knead it further for 6-8 mins until you get a smooth elastic and tacky dough.
Whenever you are making white sandwich bread you have to be mindful to use the flour amount as a guideline.
The exact amount of flour you use will depend on how you measure it, the climatic and temperature conditions of where you live and several other things.
So always advisable to gradually add the flour.
Step 2: First Proofing
Once kneaded, it is time for First Proofing.
You can use the same bowl in which you kneaded the dough to proof as well.
Simply grease it with oil and transfer the dough to it. Coat the dough also with some oil.
Cover with a cling wrap and let it proof on counter-top for 1 hour.
How to proof the dough in Instant Pot?
By now you guys know that I simply love proofing dough in the Instant Pot.
So much so that I have a separate detailed post dedicated to the why's, how's and FAQ's of proofing the dough in the instant pot.
And recently I made Bagels in my Pot and totally loved it too..
Please feel free to read it if you are interested.
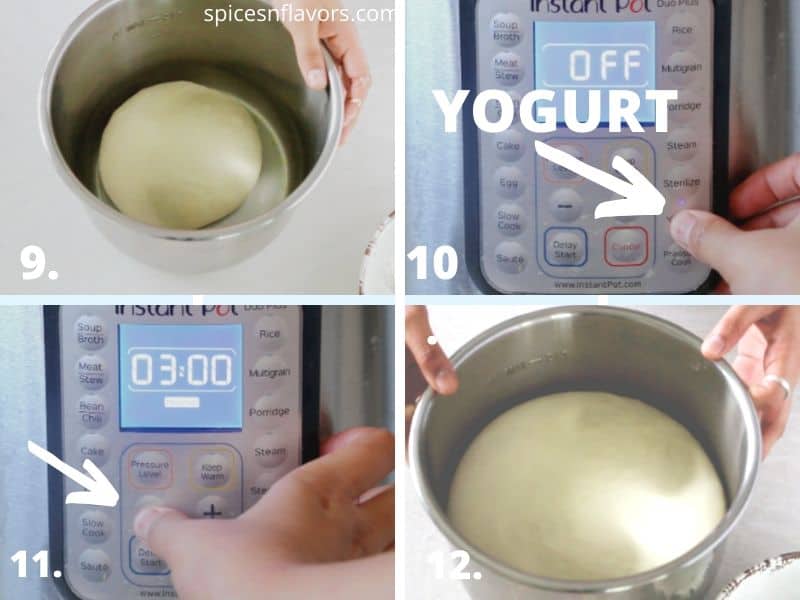
So simply grease the bowl with some oil. Transfer the dough (pic 9). Apply some oil on top of it.
Close the lid.
Choose the Yogurt Button (pic 10) and set the timer to 30 mins (pic 11).
Proofing on the countertop: 1 hour
Proofing in the Instant Pot : 30 mins.
Step 3: Shaping the Dough
This is an important step. Note the pictures or simply follow the video.
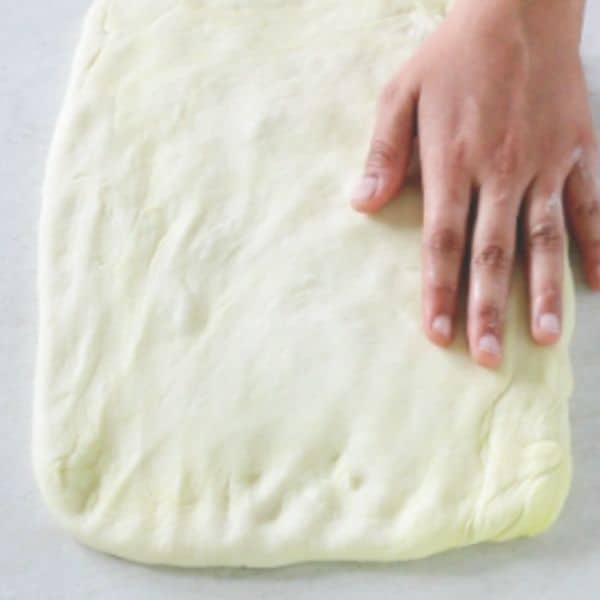
Once proofed, knock down the dough to remove air bubbles and transfer it on to your countertop.
Shape it to a rectangle to the size of your baking pan.
Fold it into thirds pinching the seams really well.
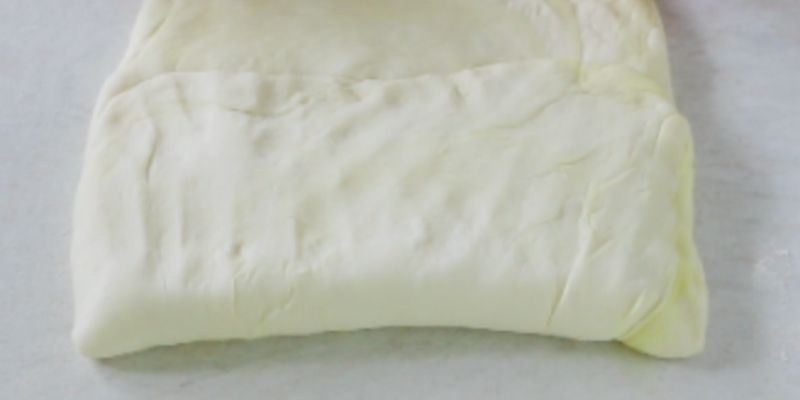

Again fold it such that the ends meet the centres. Pinch well.
Roll it over and place it into your baking pan.
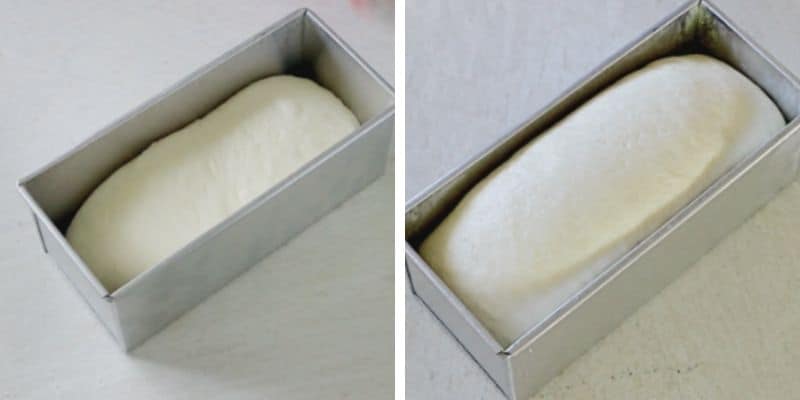
Loosely cover with a cling wrap and let it proof until it reaches the brim of the pan.
Second Proofing : 30 mins
With under-proofed bread dough, you would end up with a smaller bread loaf that is denser and has less volume and also smells yeasty!!
How to check whether the dough has risen enough?
The bread dough will rise with a dome in the centre.
Just look at the sides to check how well it has risen.
When you gently press the dough with your index finger, you will have an indentation and it will remain; indicating that the dough is proofed well.
If it bounces back without an indentation it means the dough is under proofed.
And if the dough collapses, it means the dough is over-proofed and you have to restart from shaping the dough again.
Step 4: Baking the Bread
Once the bread has proofed enough, simply bake it in a preheated oven of for
An easy way to check whether your homemade bread loaf is done is to tap the bread on the bottom for that characteristic “hollow” sound.
However, a fool-proof method to ensure well-baked bread is to use a thermometer. The bread loaf is done when the internal temperature reads 195°F.
To avoid a soggy bread bottom, make sure not to leave the bread in the pan to cool completely.
Leave it in the pan only for about 5-10 minutes and then place it on a wire rack to cool completely.
This is to prevent the formation of condensation on the pan and making the bread soggy.
My top 5 tips to bake the best homemade bread ever:
- Be mindful about the quantity of flour. Take the amount mentioned in the recipe card as a guideline and add little flour at a time until you reach the soft, elastic dough stage.
- The key to soft bread is the gluten formation which is achieved by kneading it well. Follow the video tutorial for a clear picture and different stages of bread kneading.
- Choose the right bread pan to get the desired tall loaf of bread.
- Always keep the bread dough covered to prevent it from drying.
- The usual tips of baking remain the same for this recipe too - preheat the oven, brush the baking pan with oil or butter, do not leave the bread for too long in the pan once baked.
Choosing the Right Bread Pan:
In our step 3 - Shaping the Dough the one thing that determines the size of the dough is the size of the pan.
Shape the dough according to the bread pan.
I like to use my 9x5 inches or an 8.5x4.5 inches bread pan for this particular recipe. And hence I shape my dough accordingly.
Apart from the bread pan, the other tools that would help you to make this loaf would be a bench scraper.
An inexpensive and easily available tool, this is a must for baking bread.
Like I mentioned in Tip 4, kitchen towels come handy and prevent the dough from drying out.
How to store Bread?
Well, honestly homemade white bread won't last long like the store-bought ones as it is devoid of preservatives.
It would stay good in a bread bag or container for 2-3 days.
And in the freezer for up to a month.
However, do not keep your bread in the fridge as refrigeration would dry out the bread.

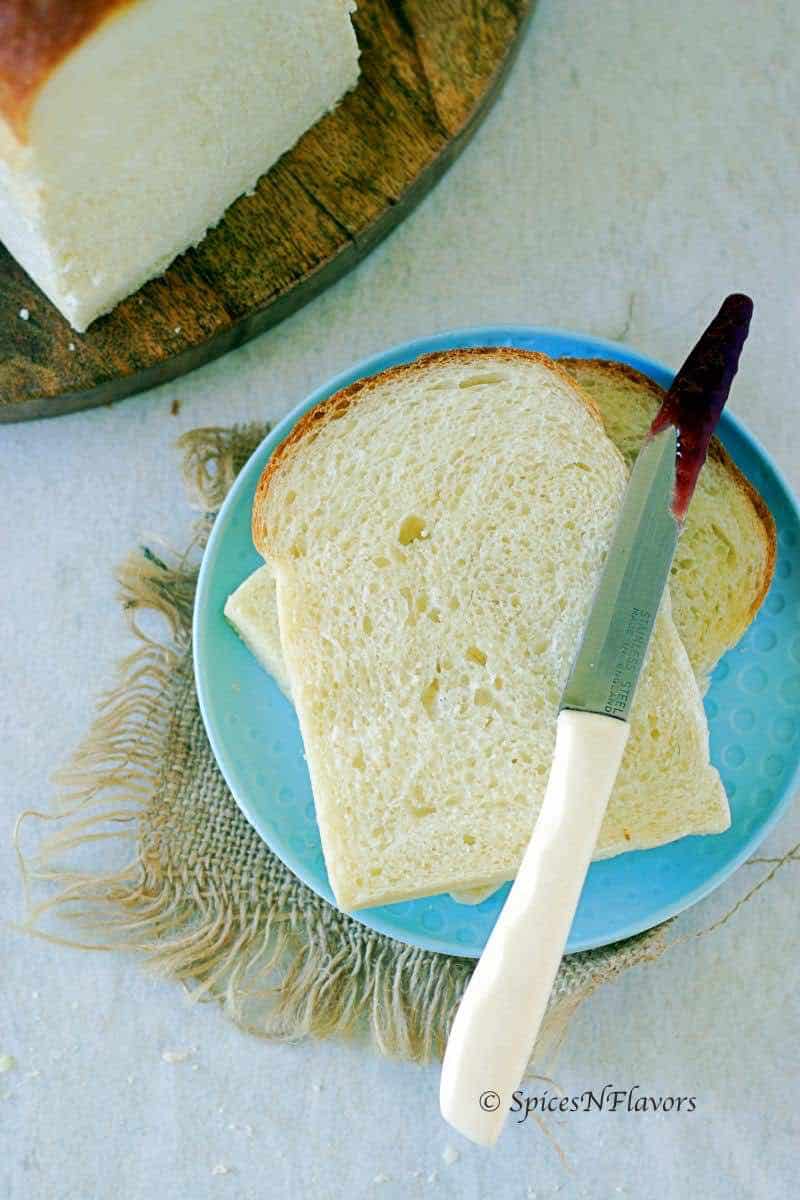
You can use this bread to make any kind of sandwiches, as a toast or simply with butter and jam.
I am enjoying this with homemade Instant Pot Strawberry Jam.. Delicious..
Related Recipes:
Wish to Join US for the love of BAKING? Subscribe to our newsletter and Youtube channel. Follow along on Facebook, Instagram, and Pinterest for all the latest updates!
CONSIDER JOINING THE COMMUNITY OF 100K+ SUBSCRIBERS ON OUR YOUTUBE CHANNEL FOR REGULAR UPDATES.
Pin this for later and check out our Pinterest Profile for everyday updates.

White Bread Recipe from scratch
White Bread Recipe in 5 simple steps
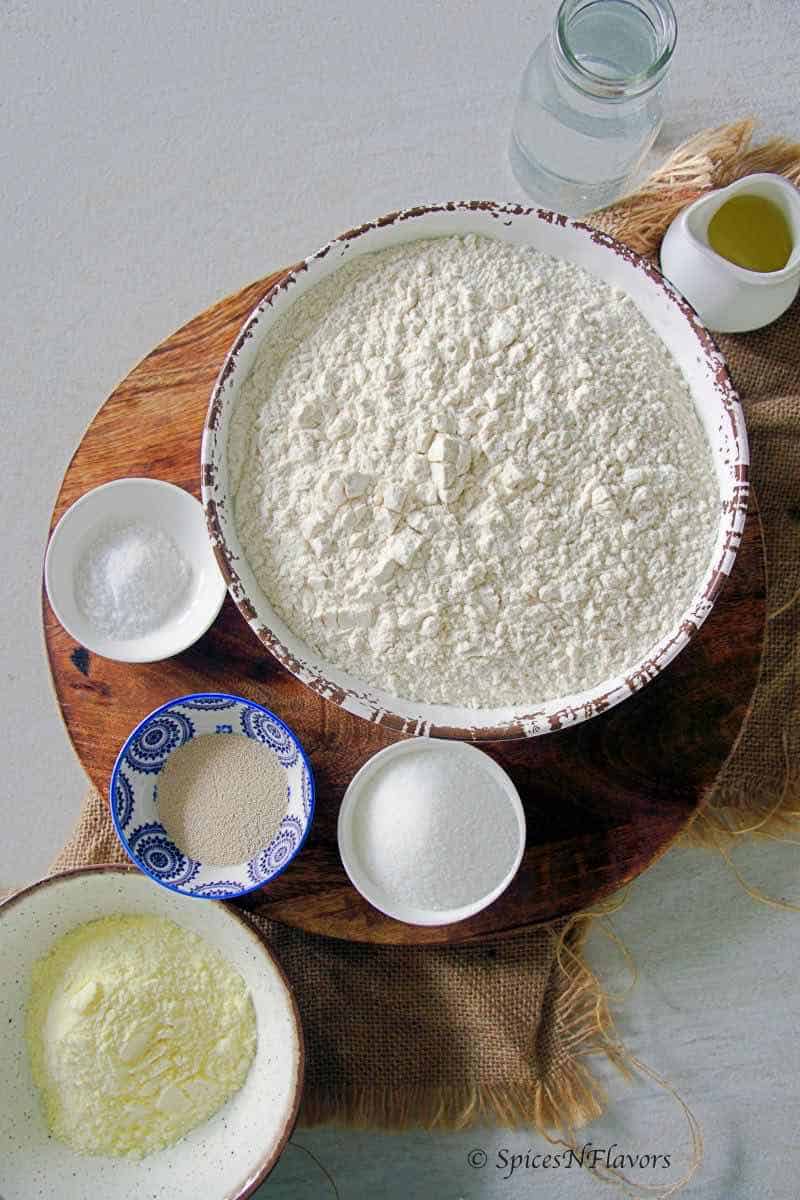
Ingredients
- 3 - 41/2 cups (approx 500 g) All Purpose Flour
- 1 1/4 tsp ( 7 g) Salt
- 2 tbsp (40 g) Sugar
- 2 tsp (8 g) Instant Yeast
- 1 1/4 cup (300 ml) Warm Water
- 2 tbsp (30 ml) Oil
- 1/2 cup (50 g) Milk Powder
Instructions
Step 1 - Prepare the Dough
- In a bowl combine together water, yeast and sugar. Stir to dissolve the yeast.
- Add the dry ingredients - milk powder, salt and 3 cups of flour. Combine till you see no more dry flour.
- Transfer the shaggy mass of dough onto the worktop well dusted with measured out flour. Knead the dough until it no longer sticks to your hand. Add little flour at a time if need be.
- Once the dough is less sticky, add the oil and knead well until you reach the soft, elastic and tacky dough stage. This would take 15-18 mins of your time.
How to knead the dough in a stand mixer?
- To the bowl of your stand mixer add in water, yeast and sugar. Stir to dissolve the yeast. Add 3 cups of flour, milk powder and salt.
- Start adding 1/4 cup of flour at a time until you see that the dough is starting to come together by leaving the sides of the bowl. At this stage add the oil and knead it further for 6-8 mins until you get a smooth elastic and tacky dough.
Step 2 - First Proofing
- Once kneaded transfer it to a greased pot and allow it to proof for 1 hour or until double in size.
How to Proof in Instant Pot?
- Grease the bowl of your pot with some oil. Transfer the dough into it. Coat the dough with oil as well. Place it in the pot. Close the lid
- Choose Yogurt mode. Set the time to 30 mins.
Step 3 - Shaping and Second Proofing
- Once proved, punch the dough and tip it over on to your counter-top. Shape it into a rectangle. Fold it into thirds. Pinch the seams really well.
- Then bring the edges to the centre. (Refer the video in the recipe card or the step by step photos for clear picture) Roll over and place it in the greased baking pan (9x5 inches) cling wrap and allow it for second proofing.
- Let it proof till the dough reaches the brim of the pan around 30 mins.
Step 4 - Baking
- Once proofed, place it in a preheated oven of 350°F (180°C) for 30-35 mins until the bread turns golden brown in colour, sounds hollow or the internal temperature reads (195°F).
- Once baked brush the top with some butter to soften the crust, let it cool in the pan for 5 mins and then turn over and let it cool completely on the wire rack before slicing.
Video
Notes
- The recipe can easily be doubled to make two bread loaves.
- Always gradually add the flour. The exact amount of flour you use will depend on how you measure it, the climatic and temperature conditions of where you live and several other things.
- I always use instant yeast to make all my breads. If you like to use the Active variety make sure to activate the yeast first before proceeding with the recipe.
- Keep the dough covered using a kitchen towel or a cling wrap at all times to avoid it from drying out.
- Once baked, do not leave the bread in the baking pan for too long as due to condensation the base would turn soggy.
- You can use this bread to make any kind of sandwiches, as a toast or simply with butter and jam.
- Refer the video in the recipe card or on Youtube for steps on how to knead and shape the bread.
Choosing the Right Baking Pan
I prefer to use 9x5 inches baking pan. You can also use 8.5x4.5 inches baking pan. Shape the dough according to the size of your baking pan.How to Store Bread?
The bread stays fresh for 2 days at room temperature in a bread bag or bread container or even in an air tight container. Avoid storing the bread in the fridge as it tends to dry out the bread.Can I leave out Milk Powder?
Yes, you can. Use plain flour instead. Milk Powder acts as an enrichment and makes the bread soft but if you do not find any just leave out.Conclusion:
At this time of the year, it is essential to learn few basic cooking and baking recipes.
This White Sandwich Bread is one amongst them.
This homemade White Bread recipe from scratch makes a light, fluffy, soft and incredibly tall bread loaf that is perfect for sandwiches, toast, or simply with butter and jam.
In just 2 hours you all would have a beautiful homebaked bread that is going to leave your house smelling soooooo aromatic.
I will see you soon with yet another one
Until then
Hugs
Sushma
Sangeetha Sripal says
Hi sushma.... I follow your blog, channel, page...a doubt? Standard cup size measure 240 gms- 1cup,
You mentioned 3-4.5 cup or 500 gms....please explain
sushma iyer says
Hi Sangeetha.. 1 cup dry flour measures 120 gms. So you start the recipe with 3 cups that is 360 gms of flour and gradually keep adding more flour if needed to make a supple dough. You can add up to 540 gms. This would depend largely upon your flour how old or new it is and how much protein content it has.
Sherry says
I don’t know whether or not to have the vent set to closed or open when proofing on the yogurt mode in the Instant Pot. Thanks for the recipe and your help. It is in the pot on closed right now.
sushma iyer says
You should not put the vent to sealing.. Check this guide on Instant Pot Bread Proofing with which you can literally proof any kind of dough: https://spicesnflavors.com/proof-dough-in-instant-pot/
Maureen says
Can this be made with gluten free flour? TY
sushma iyer says
Hi Maureen.. sorry I have not tried any substitutions 🙂
Vimls Bangera says
Hi Sushma,
I tried this recipe today and is turned out so prefect. Yet to slice it. But it's turned out so soft n pillowy. Thk u for all the tips.
sushma iyer says
Yay!! so pleased to know this.. thank you 🙂
Jaz says
What kind of bread knife you use for slicing
Can you please post a link
Gayathri says
A very nice recipe. I tried it today & it came out very well. Thanks for sharing the detailed procedure and measurements. I ended up using 3 cups.
Could you please post one recipe for brown bread (whole wheat bread too) ? Do you think I can substitute APF with whole wheat flour and get a good brown bread ?
Thanks !
sushma iyer says
Thank you Gayathri.. glad to know that the recipe worked for you.. thanks for sharing.. I am working on a good wheat bread recipe will try to share it 🙂
Regards
Sushma
Bharthi says
Hello, love your posts and recipes!
Attempting this bread today, could you please confirm if we start with 3 cups of flours?
I started with 3 cups as mentioned above, but the dough was extremely unworkable. Tried kneading using the mixer, even after 20 mins of kneading, the dough was extremely sticky.
Thank you
sushma iyer says
Hi Bharthi.. as mentioned you would need 3 to 4.5 cups so you start with 3 cups and then gradually add 1/2 cup flour more at a time until you get the right stage. So you need to add more flour but a little at a time. hope this helps.
Pooja Srinivas says
Awesome recipe! Perfectly explained and serves as a great activity with children! Just baked this beauty with my children and we all loved it 😍
Laura says
I’m a bit confused about the proofing...do I proof for 30 mins or an hour in the IP?
sushma iyer says
Hi Laura.. It is 30 mins proofing in the Instant Pot or 1 hour on the counter top.
Lakshmi says
I have made this bread four times in the last two weeks! And the family loved it so much that they don’t want me to buy bread outside! I also tried Hokkaido bread recipe and it was a hit. Thanks for posting details, pics and tips!
sushma iyer says
Hi Lakshmi.. that's so good to know.. I am glad that you guys enjoyed the bread so much.. thank you for sharing your wonderful feedback with us.. appreciate it 😀
Neha says
I am a big fan of your presentation. Please specify the amount of flour ,its 3 cup or 4.5 cups,i think a difference of 1.5 cups will effect the outcome of bread.i wish to make a soft bread
Thanks in advance
sushma iyer says
Hi Neha..
So you start with 3 cups and then gradually add more flour as and how you knead the dough. Sometimes you may need 4 cups of flour or sometimes 4 and 1/4 cups or 4.5 cups depending upon the type of flour you are using. Watch this video for more clear idea: https://www.youtube.com/watch?v=ljyXvC-HUJ4
Regards
Sushma
Mitali says
Hi Sushma, I tried baking bread from your recipe, it turn out super soft thank you for recipe not only this but for all recipes as I find very few bloggers who give no egg recipe for cake,cookies or bread.
I have a question for the bread, it came out soft and nice but when I make toast of it, it breaks, can you tell me what wrong i am doing with the recipe?
sushma iyer says
Hi Mitali..
So pleased to learn that you are liking the recipes.. Thank you for sharing your thoughts.
For your bread to break there might be two reasons:
1. You did not knead the dough well, and there was not enough structure formed. You can learn more about the same from this video too if you like:https://www.youtube.com/watch?v=ljyXvC-HUJ4&t=182s
2. You sliced the bread when it was still hot or warm
Hope this helps
Regards
Sushma
Pooja Srinivas says
My girls and I baked this bread today and we can't stop gushing about how marvellous it is. The slices are perfect and delicious and we are wondering if we should ever buy store bought bread again 💖 Thank you for such a detailed recipe, we made the best of a cold holiday noon thanks to your blog 🙏💕
sushma iyer says
Awww thank you Pooja.. that is such a wonderful comment. I am glad that you and your girls had a lovely time together baking this bread. thank you for sharing this with us.. appreciate it 😀
Aparna says
What do I brush on top of the bread as glaze for the shiny brown color
sushma iyer says
Hi Aparna..
Do you mean for the brown colour or shiny glossy finish? For brown colour since we are using milk products in here ideally you do not need a milk wash on top but if you like the brown colour then just give a milk wash before baking. And you have to brush butter on warm bread once baked to get that shiny glossy crust.. Hope this helps
Regards
Sushma
Zahra Mahuvawala says
I have made this recipe 5 times and it does the magic to my mouth every time!
I just love this channel and it's recipes, they are 100% fool proof and delicious.
Everyone should try this recipe.
Thank you to the Author.
sushma iyer says
Hi Zahra..
That is fantastic.. I am so pleased to read through this.. thank you for sharing your wonderful feedback with us. This surely will motivate others too.. glad to know that you liked the recipe.
Regards
Sushma
Prasanna says
Wonderful recipe and really well explained. Thankyou!!! The bread came out super soft and delicious. One question, is it ok to reduce the amount of milk powder and use milk and water mixed? If yes, any recommendations on amount.
sushma iyer says
Hi Prasanna..
That is so good to know.. Thank you for trying and sharing your wonderful feedback with us. And yes it is totally ok to reduce or skip the milk powder and use water:milk ratio or totally knead using milk.. All well. Any ratios can be used.
Regards
Sushma
Nivi says
Perfect bread all the time. Thank you so much! Please try with whole wheat too and share recipe.
sushma iyer says
Hi Nivi..
That is awesome.. thank you for sharing your wonderful feedback with us.. yes whole wheat is on my mind.. will try soon.. thank you
Malathi Iyengar says
Hi Sushma tu your recipes are super easy and simple to follow for beginners to baking like me. I am allergic to yeast and don't eat eggs. Please can you share recipe for. Sandwich bread that I can bake at home without yeast or eggs.
sushma iyer says
Hi Malathi..
Are you allergic to commercial yeast or all the yeasts?? I am saying this because you can make yeast at home easily and bread made using that way is healthier too.
You can make bread using baking soda also known as quick bread but the texture is not the same.
Regards
Sushma
Bageshri Naik says
Hello
Can u plz share the without yeast bread recipe
sushma iyer says
Hi Bageshri..
Yes I am trying out the sourdough sandwich loaf it would soon go live on the blog and channel.
Regards
Sushma
Sudha says
Thank you so much for this recipe.,I tried it and it was a hit with family.only difference was that my bread did not brown as yours.what could be the reason?
sushma iyer says
Hi Sudha..
I am so pleased to read through your comment.. Good to know that you liked the bread. The browning on top of the bread depends upon how hot is your oven, what material is your loaf pan made of and the ingredients used.
You can also do a milk wash on top of the bread next time if you would like to get a brown colour crust. I prefer mine with pale colour itself so did not brush the top.
Regards
Sushma
Sudha says
Thank you so much for the reply..keep inspiring us with your recipes.
sushma iyer says
My pleasure Sudha.. 🙂
Kimberly says
This is the best bread recipe I have ever used. I have been able to duplicate my results This makes a loaf of bread that creates a professional grade loaf of bread. The best thing I learned from this recipe was let the bread rise to the height of the pan on the ends. Thank you for breaking down the recipe in great detail. I also love using my Instant Pot and Mixer to speed up the process. I am looking forward to trying your other recipes.
sushma iyer says
Hi Kimberly..
I am so pleased to read your comment.. Thank you for taking the time out to try the recipe and getting back with wonderful feedback. Appreciate your time.
Pleased to learn that the tips and the recipe details were helpful.
Definitely IP proofing is such a time saver. Totally agree with you.
Hope you find many more interesting recipes to try.
Regards
Sushma
Diana Maruez says
Hello...I tried this recipe and while it came out delicious it didn't rise enough while baking (the top was more flat than rounded) and it was a little dense.. Any suggestions? I'm new to baking bread but because you have very detailed, easy to follow step-by-step instructions, I feel confident that I will get it right! 🙂
sushma iyer says
Hi Diana..
So glad to learn that you liked the recipe.. There can be a couple of reasons why the bread could be dense - not kneading it enough, not creating a tight roll while shaping, using the right size baking pan, not being able to trap enough gas to begin with. So to point out one particular reason for bread baking is not possible. I feel you did not allow it to proof well in the second rise.
Since you are a beginner I would suggest you start with kneading the dough well. Take your time, use warm water and make sure the yeast is active. Keep practising and you would get it right.. by your comment I can see that you have done a good job and need just practise.
Did you face any particular problem while making the bread?? Hope this helps.
Regards
Sushma
Ele says
Hi there! This bread looks amazing!! Could I use this recipe for whole wheat bread? If so, what do I need to change? Not sure how differently the whole wheat flour could behave... thank you!
sushma iyer says
Hi Ele..
You can change but the bread would turn out little dense I feel.. the measurements would remain the same I would just add little flour at a time and knead 🙂
Brittany Williamson says
That is interesting! I've been searching for a post like this for a very long time.
I was looking for somebody who'd be able to clearly navigate me with this matter and was fortunate enough to locate you.
Thanks a lot for your detailed reason, you drew attention to a very common matter!
Though I share your opinion for the large part, I believe that some points
are worth using a more comprehensive look to comprehend what is going on.
sushma iyer says
Thank you for your suggestion Brittany.. And I am glad to know that you found this article.. thank you for dropping by 🙂
Lisa says
Can I use this recipe in a bread machine?
sushma iyer says
Hi Lisa.. I do not own a bread machine so never tried.. sorry about that
Priya Lakshminarayan says
saving this! That bread looks perfect! Awesome attempt to bake white bread at home. Will try it soon.
sushma iyer says
Hi Priya
That is amazing.. Hope you do give it a try soon.. I also have another basic white bread on the blog.. here is the link see if it interests you: https://spicesnflavors.com/white-bread-recipe/ thank you
Teresa says
Is there a subsitute for milk powder? I cant find anywhere local (or online) that has any in stock.
Teresa says
Oops I just now finished reading the rest. Lol. It's middle of the night here
sushma iyer says
Sorry about the long post then.. 😉
sushma iyer says
Hi Teresa..
Yes sure you can skip milk powder and use plain flour instead.. And use milk in place of water for a softer dough 🙂
Dave says
Good post on home made bread, shame there's very little flour and yeast on supermarket shelves.
sushma iyer says
Awww my bad Dave.. Even I am running out of yeast now.. Just have 4 packets left so soon planning to post yeast free breads too.. please do keep a tab if possible..
Kathryn Manderfield says
What kind of bread pan did you use....as I noticed the sides of your loaf were white....and, not browned at all! Just wondering! My kids always want to cut the brown crust off....and, they would like the "white" sides! Thanks!
sushma iyer says
Haha.. can totally relate to you kathryn.. I got my pans from India and those are aluminium..
Pooja says
Made this bread twice,once with APF and the other time i made a whole wheat one from chapati flour. The loaf comes just like one would find in a bakery, the slices are soft and delicious! My children love this bread and i don't think I would buy bread again! Thank you so much Sushma 💖
sushma iyer says
That is awesome Pooja.. so good to know.. thank you for sharing your wonderful feedback with us.. appreciate it <3
Elsa says
Hi
Can you please post a brioche in a Pullman pan ?
sushma iyer says
Hello Elsa..
Yes sure will do that 😀 Thank you so much for your suggestion 🙂
Elsa says
Hi!!! I baked this bread today.it was soo soft. I did add more milk and reduced the water accordingly..and only used 3 1/2 cup flour..thank you so much for this recipe. Awaiting a post on baking bread using a pullman pan.
sushma iyer says
Hi Elsa..
Yay!! that is awesome.. thank you for sharing your experience with us.. glad to know that substitutions worked.. yes would try to share a pullman pan recipe.. I do have a regular white bread on the channel here is the link if you would like to see: https://spicesnflavors.com/white-bread-recipe/ thank you