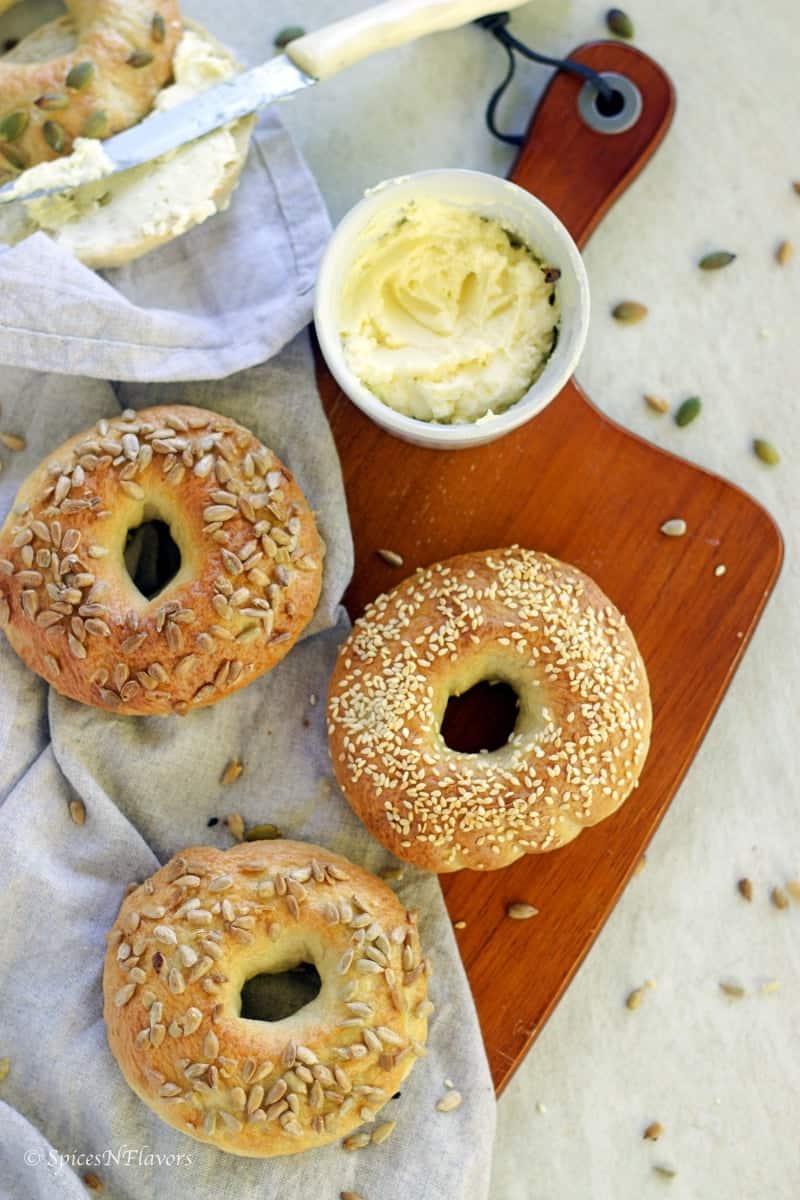
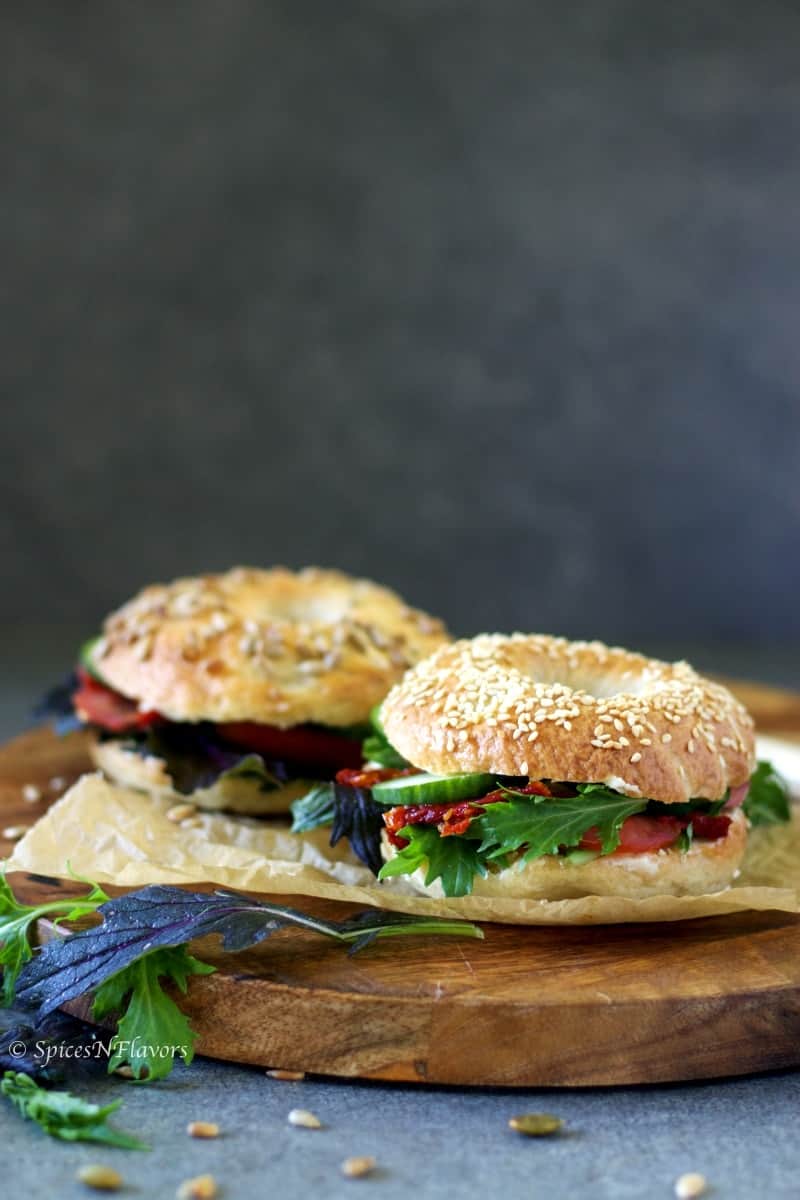
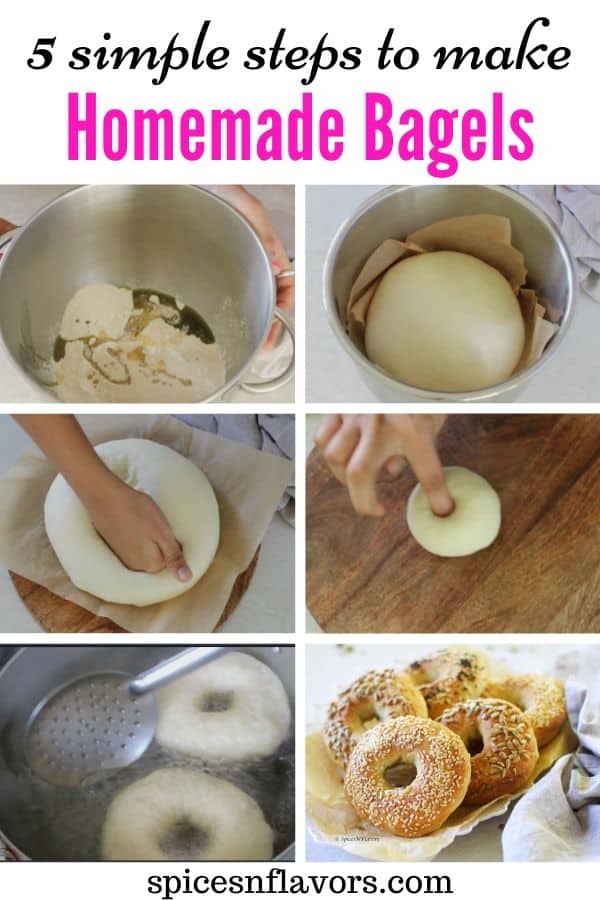
The only 5 simple steps you need to know to make the best Homemade Bagels recipe that is dense, soft and chewy on the inside and crusty on top, right at the comfort of your kitchen in just 1 hour.
This post has got you covered with all the tips, techniques, different variations in a step by step video tutorial format.

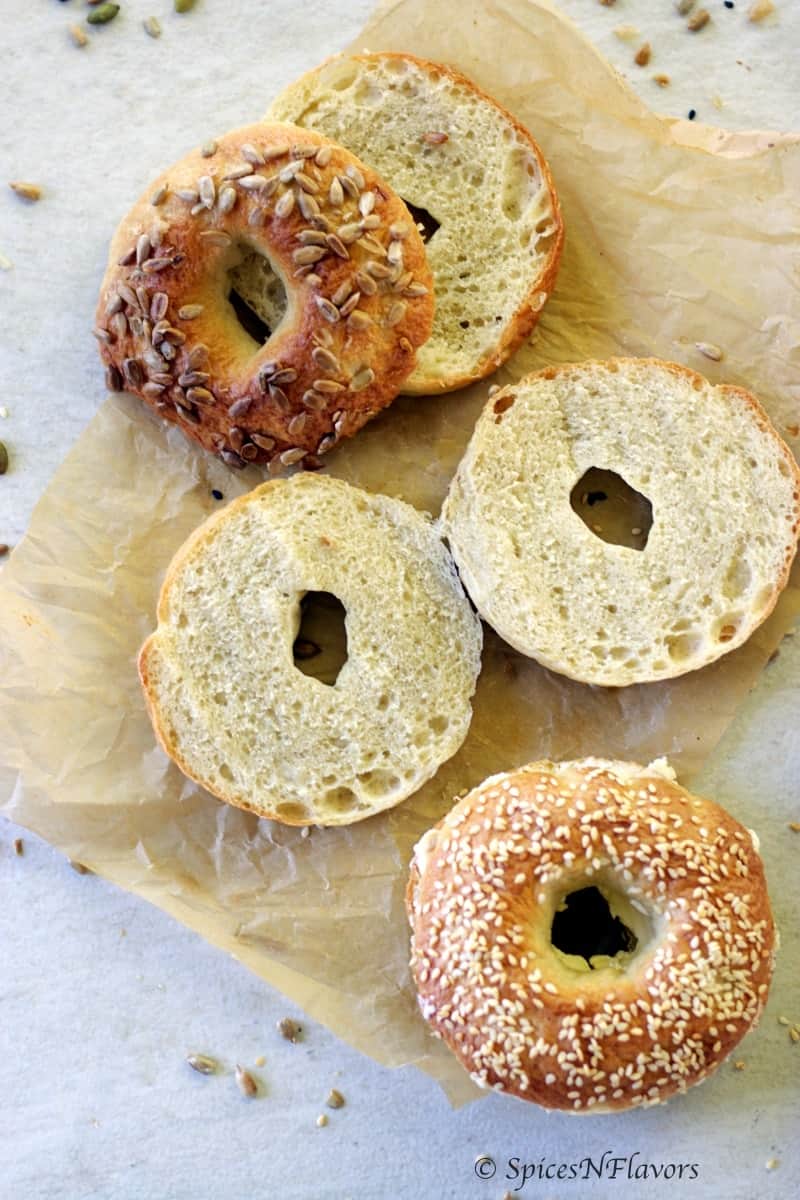
New York Style Water Bagels
I know.. I know..
Some of you might be wondering why to buy one when I can easily walk up to the corner to buy the best selling Bagels from the nearby bakery.
That sounds fair enough but..
Have you ever sensed the feeling of accomplishment when you create a masterpiece.. I totally do
And that sense of pride is enough to keep me going.
Apart from that, it is much cheaper to make your own Homemade Bagels.
Plus you also know the ingredients that go into making them so a win-win!!
If baking breads is one of your New Year's resolution or Goals then trust me it is one of mine too.
And since we are on the same page about bread baking goal, I would suggest you; please do subscribe to my Youtube Channel for regular updates as I am planning to post a lot more bread recipes this year.
What are the ingredients in a plain bagel?
Before we proceed with the same, one of the things that I would highly recommend is to invest in a good weighing scale.
If baking is something you want to explore this year then trust me it would be a worthy investment.
I have been using my scale for 3 years now and I don't think I would need another one anytime soon.
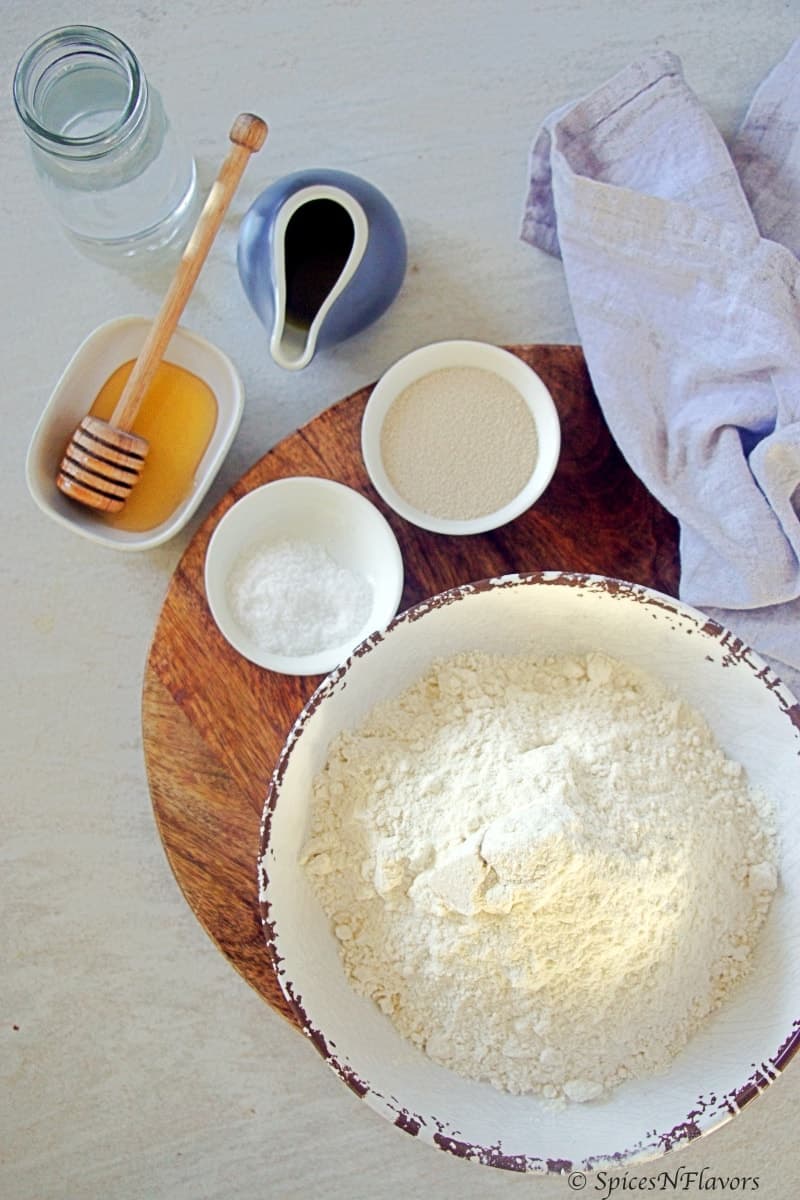
With that like any other bread, you would need the basic ingredients for making homemade bagels.
Bread Flour/ Strong Flour/High-Grade Flour:
So unlike regular basic bread, like Dinner Rolls, you would need a stiff dough while making bagels that would withstand the boiling water temperature.
And hence you would specifically need Bread Flour for making this particular recipe.
If you cannot find the same then you can use All-Purpose Flour.
Homemade Bagels with all-purpose flour will not have that stability to withstand the heat whilst boiling and hence it is advisable to include extra Gluten while making the dough.
Golden Syrup:
The recipe originally calls for Golden Syrup as the sweetener for Yeast to feed on.
I know most of us do not have it as a staple in our pantry and for such small amount, it is really not worth it to buy an entire tin.
So I have replaced the golden syrup with Honey in this recipe.
Feel free to use whatever you have handy.
Yeast:
I always use Instant Yeast in all my bread recipes.
If you are using the active yeast then make sure to activate it first before proceeding with the recipe.
Apart from that, we would need the other basic ingredients like Salt, Olive Oil and Water.
Now that we have all the ingredients for making the bagels, let us get into the step by step pictorial tutorial for homemade bagel recipe.
How to make Homemade Bagels from Scratch - Step by Step Tutorial
Step 1: Preparing the Dough
This is the easiest step ever.
Simply combine all the ingredients in your stand mixer and once it forms into a dough, knead it for 8 mins (Steps 1 - 3).
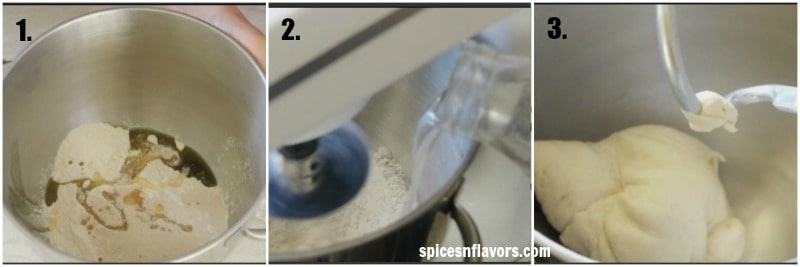
You want a really stiff dough so that the bagels holds its shape while boiling and retains the dense, soft and chewy texture.
Step 2: Proofing
How long does it take to proof a bagel?
This is the best part of the recipe.
It takes just 15 mins to proof the dough in an Instant Pot.
By now you all know I always and always proof my dough in the Instant Pot, saves a lot of time especially if you are making no-knead bread.
In fact, I love this hack so much that I made an entire blog post on How to proof dough in Instant Pot which I think you all will love too.
Just one thing to keep in mind is that you need an Instant Pot with Yogurt Setting in it.
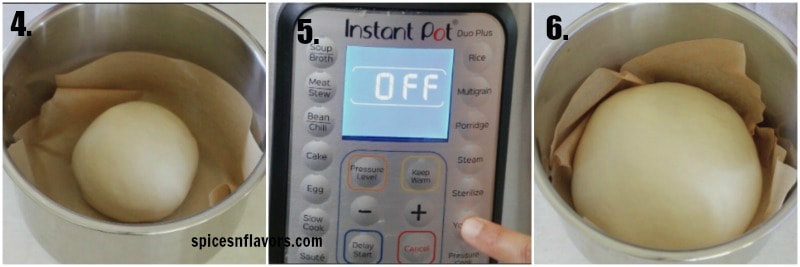
Simply line the base of your Instant Pot with a parchment paper and place the dough into it (image 4).
Oil the top of the dough lightly so that it doesn't dry out. Close the lid.
Choose the Yogurt Mode (image 5) and it is not possible to select 15 mins in the Pot so what I do is select 30 mins in the Pot and once it is turned on, I set the timer to 15 mins on my phone and follow that timing.
First Proofing: In the Instant Pot - Select Yogurt Mode - Set time to 15 mins.
How to proof the dough without Instant Pot?
So, of course, you do not need the Instant Pot if you do not own one.
Lightly oil the bowl in which you kneaded the dough.
Place the dough into it. Coat the dough with oil too.
Cover with a tea towel and let it proof for 30 mins.
Step 3: Shaping the Dough
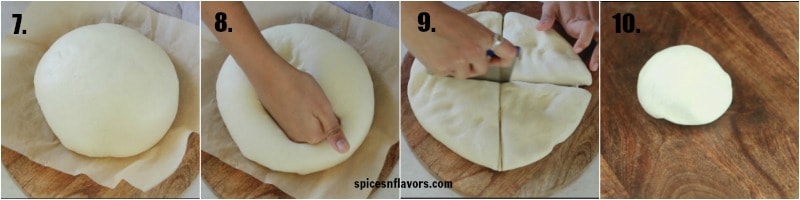
Once proved, take the dough onto the countertop and punch it down well (image 6).
This step is called, "Knock-back".
And then divide the dough into 7 equal portions of 80 gms each (image 9).
Take out each portion, tuck the sides to the bottom and give it a round shape as seen in the video (image 10).
Cover with a tea towel.
How to shape homemade bagels?
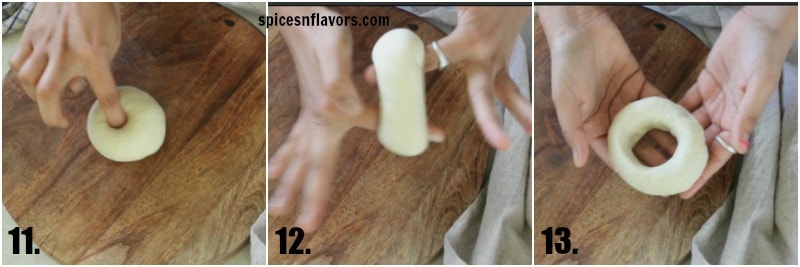
Poke your finger to the centre of the dough till you see the finger on the other side too (image 11).
Then use two fingers to widen the dough to 1.5 to 2 inches in diameter to get a hole in the centre of the dough (image 12).
It couldn't get simpler than this right!!
Once all the dough is shaped it is time for intermediate proofing which is 15 mins.
What it means is once shaped, simply cover the dough with a tea towel and let it proof for 15 mins.
Things to do while Intermediate Proofing:
- Preheat the oven to 220°C
- Bring a pot full of water to boil. I used my Instant Pot for this step as well.
- Take about 1/4 cup milk in a ramekin or a bowl and set aside. You can also prepare an egg wash if you wish to avoid milk.
- Keep some seeds like sunflower, poppy or sesame seeds ready in a plate.
- Line a baking tray with parchment paper.
Step 4: Boiling the Bagels
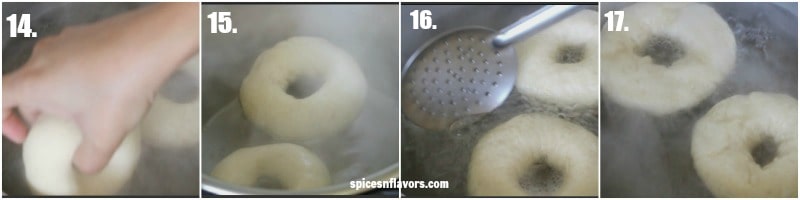
Please note the water literally has to be in the boiling state - not hot or not simmering but rolling boil.
So once proved, drop the bagels (image 14) 2 or 3 at a time depending upon the capacity of the pot and let it cook on one side for 1 minute (image 15) then flip it using a slotted spoon (image 16) and cook on another side for 1 minute (image 17).
Take it out on a wire rack to drain completely.
Place it on the baking tray.
Step 5: Baking the Bagels

Apply some milk or egg wash on top (image 18) and sprinkle the seeds of choice (image 19).
Collect the hot boiling water in a baking tray (image 20) and place it on the lower rack of your oven. This would help create steam which gives a nice crusty top to the bagels.
Then place your baking tray on the middle rack and bake it for 14-18 mins until golden brown on top (image 21).
Allow to cool completely before slicing and filling it with your choice of filling.
Now with that let me tell you:
How to Serve Bagels
1. Cream Cheese: Bagels and cream cheese are a match made in heaven. Check out the recipe card below to know how I like to make mine.
2. Veggies: Fill it with veggies of your choice like fresh salad leaves, sun-dried tomatoes or fresh tomatoes, cucumber, avocado, guacamole, onions etc.
3. Pizza: Spreading some pizza seasoning on top of mayo or simply adding some cheese and pizza seasoning and then toasting the bagels.
4. Burger: Using the bagels as burger buns and filling it up with a burger of choice.
5. The meat of your choice or salmon would also be an option but since I am a vegetarian I would not be able to guide you on the same.
Homemade cream cheese spread for bagels:
Take 75 gms of softened cream cheese and beat it until creamy.
Crumble 75 gms of feta cheese into it along with 1/4 tsp salt or to taste and 1/2 tsp of Garlic Powder.
Combine everything until it is all creamy and is of spreadable consistency.
Different Bagel Variations:
Now ever since I started making bread at home, I am just in awe of the different variations that one can try from a basic recipe.
I have shared 15 such different variation idea in my Star Bread recipe which I totally love. Sharing a few in this post that I think would go well with this recipe of bagels.
The recipe shared in this post is of Plain Bagels. Few simple variations of the same would be:
1. Everything Bagels Recipe:
Basically you just buy the everything bagel seasoning from the supermarkets or online and sprinkle it on top of the bagel dough as mentioned in Step 4 after the milk or egg wah step.
If you do not wish to buy the seasoning packet or do not have access to it then here is how you can make it at home.
How to make Everything Bagels Seasoning?
Take a bowl and add
2 Tablespoons poppy seeds
2 Tablespoons sesame seeds
1 Tablespoon dried minced onion
1 Tablespoon dried garlic flakes
1 Tablespoon coarse salt and mix everything. Voila your homemade everything bagel seasoning is ready.
2. Seed Topping:
Just like the toppings I have used in this recipe, instead of combining everything just sprinkle the ones that you like.
Poppyseed bagel- Simply add poppy seeds after brushing with milk or egg wash.
Sesame seed bagel - As the name suggests add sesame seeds on top.
Likewise, you can also do Sunflower seeds or pumpkin seeds.
3. Cheese Bagels:
Add a good sprinkle of Cheddar Cheese on top. You can opt for any other cheese of your choice too.
The other thing you can do is to add 1/2 cup shredded cheese along with the flour while making the dough. And then sprinkle extra on top,
4. Cinnamon Raisin Bagels:
Add about 1/3 cup to 1/2 cup raisins and 1 tsp cinnamon powder while making the dough.
Sweeter versions like Nutella Bagels or Nut Butter Bagels can be made but this would be the part of filling to go inside the bagels.
Some Frequently Asked Questions:
Why do you have to boil bagels?
- Boiling water gelatinises the starch in the dough which makes them grow by doubling in size and also is the reason behind the shiny crusty top.
- Hot water also kills the yeast activity in the dough and helps in retaining the size.
How long do you boil bagels?
So 1 min on each side is just enough to get that chewy and soft texture from within.
Why are my homemade bagels flat?
The main reason for it is Over proofing.
You really need a Stiff Dough to begin with so that it is stable and can withstand the high heat.
Proofing the Dough for long makes it soft.
All you have to do is Intermediate Proof - then the final proofing happens when it hits the boiling water.
So one quick swell and the yeast is killed for good. And that is the final rise happening.
Avoid over proofing and try to keep the dough as stiff as possible.
Why is there a hole in the bagel?
Isn't it simple!!! A very simple answer to this is to aid in expansion and increase in volume.
The logic is the same as that of scoring the bread dough while making an artisan bread.
So the hole basically allows the bagels to cook consistently all around as the dough is quite thick and you want to be sure if it is cooked all through.
If you are an Indian and have made Vadas before you know the logic 😀
How to store homemade bagels?
Just like any other bread in a bread box or airtight container or simply plastic wrapped.
Honestly, I do not recommend storing it for more than a day. You can however store it in the fridge or freezer for extended shelf life. Check out our post on How long do Bagels last in the fridge for additional details.
Fresh and Warm Bagels are the best.
How to freeze homemade bagels?
I personally do not recommend freezing bagels but this article explains how to freeze them properly.
So you can check it if you like.
My 6 top tips to perfect this Best Homemade Bagel recipe:
- Make sure that you have a really STIFF DOUGH in order to withstand the high heat while boiling the dough. To achieve that stiffness please use Bread Flour/Strong Flour/High-Grade Flour. You can also use APF too but do add extra gluten for stability.
- Do not overproof the dough as you will end up with flat bagels.
- Proofing the Dough in Instant Pot saves you time. Instant Pot Bagels are easy and quick to make comparatively.
- While Shaping the Dough do keep a gap of 1.5 to 2 inches in the centre as the dough expands while proofing and will cover up the hole. So leave enough margin in the centre so that you do not end up with a belly button or worse case a burger bun 😉
- Boil on 1 min on each side to get the classic chewy and soft texture from within and crusty top and bottom.
- Always boil just 2 or 3 bagel dough at a time depending upon the size of the pot so that each bagel has enough space to swell up and expand.
IF YOU LIKE THIS RECIPE OR HAPPEN TO TRY IT THEN SHARE YOUR EXPERIENCE BELOW IN THE COMMENTS BY GIVING IT A STAR RATING OR LET ME KNOW BY TAGGING ME, TWEETING ME OR INSTAGRAM ME. I WOULD LOVE TO CONNECT WITH YOU AND YOUR POSTS.
Consider joining the community of 100K subscribers on our Youtube Channel for regular updates.
How do you make bagels?
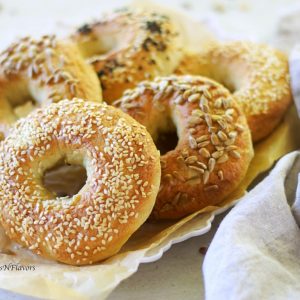
Best Homemade Bagels Recipe
Ingredients
- 350 gms Bread Flour/Strong Flour/High Grade Flour
- 9 gms Salt
- 10 gms Olive Oil
- 20 gms Honey
- 12 gms Instant Yeast
- 210 ml Water
Other Ingredients
- 1/4 cup Milk room temperature
- handful of seeds of your choice
- Cream Cheese spread and filling of your choice
- Water for boiling
Instructions
Step 1 - Preparing the Dough
- To the bowl of your stand mixer, add in all the ingredients and once it starts forming a dough knead it for 8 mins.
- You can also choose to knead by hands just that it would take a little longer to knead the dough.
Step 2 - Proofing
- Line the base of the instant pot with parchment paper, transfer the dough, brush some oil on top so that it does not dry out. Close the lid. Choose Yogurt setting. Set the timer to 15 mins.
- If you do not have an Instant Pot simply oil the bowl in which you kneaded the dough. Put the prepared dough into it. Cover with a tea towel and proof for 30 mins.
Step 3 - Knockback and Shape the Dough
- Once proved, take the dough on your countertop and punch it down several times to release the air bubbles.
- Divide the dough into 7 equal portions of 80 gms each.
- Tuck the sides of each roundel to the bottom and give it a round shape and set aside. Similarly, shape all the portions and keep it covered with a tea towel.
- Take one roundel at a time, poke your finger to the centre of the dough till you see the finger on the other side too.
- Then use two fingers to widen the dough to 1.5 to 2 inches in diameter to get a hole in the centre of the dough. Set aside and shape the remaining roundels too.
- Cover with a tea towel and allow it for an Intermediate Proofing - 15 mins.
Step 4 - Boiling the Bagels
- Fill the Instant Pot with 3 to 4 cups of water. Select the Saute Mode and bring the water to a rolling boil.
- Add the bagels one at a time leaving enough space for them to expand and swell. So at a time I just dropped 2 bagel doughs.
- Cook for a minute then turn the bagel dough using a slotted spoon and cook the other side for a minute as well.
- Take it out on a wire rack, placing the seam side (or not so good side) down and let it drain completely.
- STOVETOP VERSION: Simply bring a large pot full of water to rolling boil. Depending upon the size of the pot boil 2 to 3 bagel dough at a time for a minute on each side. And then drain on wire rack.
Step 5 - Baking
- Once drained place the bagels on a baking tray that has been pre-lined with parchment paper.
- Brush the top with some milk. Alternatively, an egg wash can also be used.
- Sprinkle seeds of your choice.
- Fill a baking pan with the hot water used for boiling the bagels and place it in the bottom rack of the oven. This would create steam to develop the crusty top of the bagels.
- Bake the bagels in the middle rack in a preheated oven of 220°C for 14 to 18 mins.
Video
Notes
- Make sure that you have a really STIFF DOUGH in order to withstand the high heat while boiling the dough. To achieve that stiffness please use Bread Flour/Strong Flour/High Grade Flour. You can also use APF too but do add extra gluten for stability.
- If you are using All Purpose Flour use 340 gms of APF and 10 gms of Gluten.
- Do not overproof the dough as you will end up with flat bagels.
- Proofing the Dough in Instant Pot saves you time. Instant Pot Bagels are easy and quick to make comparatively.
- While Shaping the Dough do keep a gap of 1.5 to 2 inches in the centre as the dough expands while proofing and will cover up the hole. So leave enough margin in the centre so that you do not end up with a belly button or worse case a burger bun 😉
- Boil 1 min on each side to get the classic chewy and soft texture from within.
- Always boil just 2 or 3 bagel dough at a time depending upon the size of the pot so that each bagel has enough space to swell up and expand.
- Do refer the post on how to serve bagels - have shared my version of the classic Cream Cheese Spread; different variations of bagels and a step by step pictorial tutorial alongwith links to the required tools, equipments and ingredients.
Things to Do while Intermediate Proofing (Step 4):
- Preheat the oven to 220°C
- Bring a pot full of water to boil. I used my Instant Pot for this step as well.
- Take about 1/4 cup milk in a ramekin or a bowl and set aside. You can also prepare an egg wash if you wish to avoid milk.
- Keep some seeds like sunflower, poppy or sesame seeds ready in a plate. Or you can also use the everyday bagel seasoning for the same.
- Line a baking tray with parchment paper.
How to make Yeast Free Bagels?
So I just tried my hands on Yeast Free Bagels and it turned out amazing. All you need is 2 ingredients to make it in a much simpler way with NO Yeast, NO APF, NO Rise Time Here is the link to the detailed recipe on How to make 2 ingredients Bagels.Conclusion:
In just 5 easy to follow steps and in less than an hour, this recipe of homemade bagels would surely make you feel like a Master Chef.
The sense of accomplishment and pride of creating a masterpiece is something that has to be experienced and this recipe promises exactly that.
A step by step tutorial in both pictorial and video format would help you to get the perfect bagels every single time.
If bread baking is your goal for this year then definitely consider subscribing to our Youtube Channel for regular updates.
Pin this to your Bread board or Instant Pot board
I will see you soon with yet another one
Until then
Hugs
Sushma
DISCLOSURE:
This post contains affiliate amazon links which means if you choose to purchase through the link provided in the post then I would earn a commission from the sale with no additional charges to you
Ciara says
I love these bagels - I can’t honestly remember how often I’ve made them. We’ve a fructose-intolerance in our house, so instead of honey I use rice syrup mixed with brown sugar (in case someone needs a strict vegan substitute). Thanks Sushma!
sushma iyer says
Hi Ciara.. Thank you so much for your kind words! It makes me really happy to know that you’ve been enjoying the bagels so often—it’s such a lovely feeling when a recipe becomes a regular in someone’s kitchen. I truly appreciate you sharing your substitution too—using rice syrup and brown sugar as a fructose-friendly and vegan alternative is such a smart idea. I'm sure it will help many others who are navigating similar dietary needs. Thanks again for taking the time to leave this thoughtful comment. Happy baking!
AP says
Is there anyway i could get this recipe in cups and tsp/tbsp measurements? Appreciate it
sushma iyer says
Sorry haven't tested the recipe for cups and tsp
Mia says
Second time making these bagels. They are amazing and so easy to make. Thank you so much for the well written recipe
sushma iyer says
Hi Mia.. that sounds wonderful.. thank you for sharing your feedback with us.. appreciate it 🙂
Marion says
Delicious was first time making bagels
I did useAPF but dough was firm so that was ok
Wondered if you could help with converting from grams maybe an optional menu
Will definitely make again
sushma iyer says
Hi Marion.. thank you for trying the recipe out and sharing your wonderful feedback with us.. appreciate it. I do try to provide the cups and gms measurement in most of the recipe but where it is absolute must to weigh I do not provide the cup alternatives. sorry 🙂
Juliana says
The first three I made came out perfect. while waiting for the first batch to bake my 2nd batch over proofed and turned flat. I know where I went wrong. Great recipe. Thanks for sharing
sushma iyer says
Aww I am so sorry to learn this.. But glad that you realize your mistake so it won't happen the next time. 🙂 Happy Baking and thank you for your wonderful feedback.. appreciate it
Erin McCarthy says
I used this recipe to make garlic bagels. They were very tasty and they looked so good that my friend thought I had sent them a stock image, not a real picture of the bagels I made! I used an egg wash instead of the milk and then pressed the bagels into a plate of minced garlic before baking.
sushma iyer says
Hi Erin..
Thank you so much for the wonderful feedback. I am glad to know that you liked the recipe and your flavouring of choice sounds so yum!!
Sampada says
Hi Sushma,
Thanks for the recipe. I tried the bagels yesterday and they came out superb. The recipe was super easy to follow for a beginner like me.
Regards,
Sampada
sushma iyer says
Wo hoo.. That is awesome Sampada.. glad to know you liked it.. thank you
Stuti says
Hello Sushma,
I was looking at bagels recipe and couldn't stop myself from trying it.you always amazed me with all the bread recipes as well.
Tried the bagels recipe today and it came out PERFECT.
Thank you so much for detailed explanation.
I wish I could attach a picture here.
sushma iyer says
Yay Stuti..
I am so pleased to read through your comment.. Yes I remember about your comment on other bread recipes too. Glad to know that you are liking all the recipes. And I feel so happy to read through your success story.. If you are there on any social media like Facebook and Instagram you can find me there on the same name and share your pictures or you can also email me them to [email protected] Would love to see your pictures 🙂
Regards
Sushma
Usha says
Hi Sushmita,
Love your recepies. Tried these bagels it came out very good. My family loved it. If we double the quantity, Do we knead for long time.
Thankyou!!!
sushma iyer says
Hi Usha
That is excellent.. thank you for sharing your feedback with us.. no you don't have to knead the dough for long even if you double the quantity 🙂
Regards
Sushma
Liv says
Forgot to rate the recipe wish i could add more than 5 stars!!
Liv says
Just made these and they came out perfect!! Your instructions were so easy to follow...It got the hubby approval I was hoping for..thanks again for sharing, can't wait to make them again and share with friends and family. 😉
sushma iyer says
Hi Liv..
That is awesome.. So pleased to read through your comment.. Thank you for trying and taking the time out to share your wonderful feedback with us.. appreciate it.. And thank you for the rating too.. yay!!! so kind of you 🙂
Regards
Sushma
Catherine says
HI,
The bagels look amazingly good. Can you tell me how to make egg bagels as mentioned in the article.
Thanks
sushma iyer says
Hi Catherine..
So pleased to learn this.. I read the post again to see where I have mentioned egg bagels but I couldn't find any.. did I miss anything here.. could you please tell me under which subheading it is as I am not able to figure it out. sorry about that.
Regards
Sushma
Eva Huang says
I tried the receipt yesterday and it turned out so great. The bagels is still tasted very good on the 2nd day. I need to find a way to make a larger batch because we ate most of the bagels within 2 hours!
sushma iyer says
Yay!!! that is amazing Eva.. thank you for trying and sharing your feedback with us.. appreciate it.. <3
Regards
Sushma
Karinne Silva says
It is the first time I ever commented on a recipe. But it so deserve it!!
I made some mistakes on the beginning because my 8-month-old wouldn’t let me cook, but they turned out amazing anyway. I ate one everything flavour with no spread whatsoever.
Thank you for the recipe, I cannot have dairy, soy or eggs, só store bought bagels are a no for me.
sushma iyer says
Hi Karinne..
I am so pleased to read through your comment.. Glad to learn that I could help you with your dietary restrictions.. Thank you for taking the time out to try and share your amazing feedback with us.. appreciate the time that you have spent.. Hope you find many more interesting recipes in the future too.. thank you
Tammy says
Is there another option if you do t have a tea towel
sushma iyer says
Hi Tammy..
You can keep it loosely covered using cling wrap in that case
SJ says
Thank you for sharing this recipe!
I have been wanting to make a homemade bagels for awhile and we LOVE it!
But my bagel end up too chewy (rubbery), My teeth couldn't cut it off instantly like we eat regular bread.
I am wondering why?
sushma iyer says
Hello SJ
Thanks a bunch for trying the recipe out and sharing your feedback with us. So glad to know that you loved it!!
Bagels are a bit chewier than regular bread. Plus we are using bread flour to make these which makes the end product little chewier. But of course, it does not turn as hard as you have explained it here. Did you leave it in the open air uncovered by any chance?
Veronica says
Thank you for sharing this recipe!
I have been wanting to make a homemade bagels for awhile.
I liked how you have pictures instruction step by step on top of video tutorial. And of course the written recipe helped so much as well. I feel like you won’t go wrong at all if you follow all the steps and tips here.
I ended up with 7 delicious, fluffy and bit chewy inside and good crusty top and bottom as I liked it. Made few plains, couple with cheddar toppings, and my most faves with mix seasoning seeds tops. Spread it with mashed avocado and cream cheese. So Yummy!!! I swear not buying store bought bagels anymore. You must try!!!!
sushma iyer says
Hello Veronica..
Thank you for taking the time out to try the recipe and share your experience with us.. Cream cheese, Avocado and Bagels - a match made in heaven.. sounds so yummy!!!
And it is so thoughtful of you to let me know that the step by step pictorial instructions, the tips were helpful as that is how I get to know that I am on the right track and you guys are not bored by reading all the long text.
Hope you find many more interesting recipes on the page..
Thanks and Regards
Sushma
Marie-Anne Irvine says
Thanks for sharing this recipe! Your instructions were easy to follow and bagels were a success!
sushma iyer says
Thank you Marie for taking the time out to try this out and share your experience with us.. truly appreciate it.. <3
Regards
Sushma
Soujanya says
Hi Sushma! That looks amazing and tempting. They look exactly like store bought. I’m planning to try them. But I have active yeast. So after activating the yeast, I have to knead the dough and proof for15 minutes in IP just like instant yeast? Or do I need to proof for longer time?
TIA
sushma iyer says
Hi Soujanya.. Thank you.. Proofing time remains the same for Active Dry YEast too.. Just make sure to activate the yeast first that is the only extra step needed.
Regards
Sushma
Soujanya says
Thanks for your quick response. I am super excited to try the recipe
sushma iyer says
Thats great soujanya.. so looking forward to your trial 😀 Thank you
M-A Irvine says
428°F?
sushma iyer says
Hi Marie..
Saw your comment on FB too so replied you there.. please don't mind.. Like I said that's the correct temperature and saw your end results too there.. It is totally stunning and loved it.. <3
Regards
Sushma