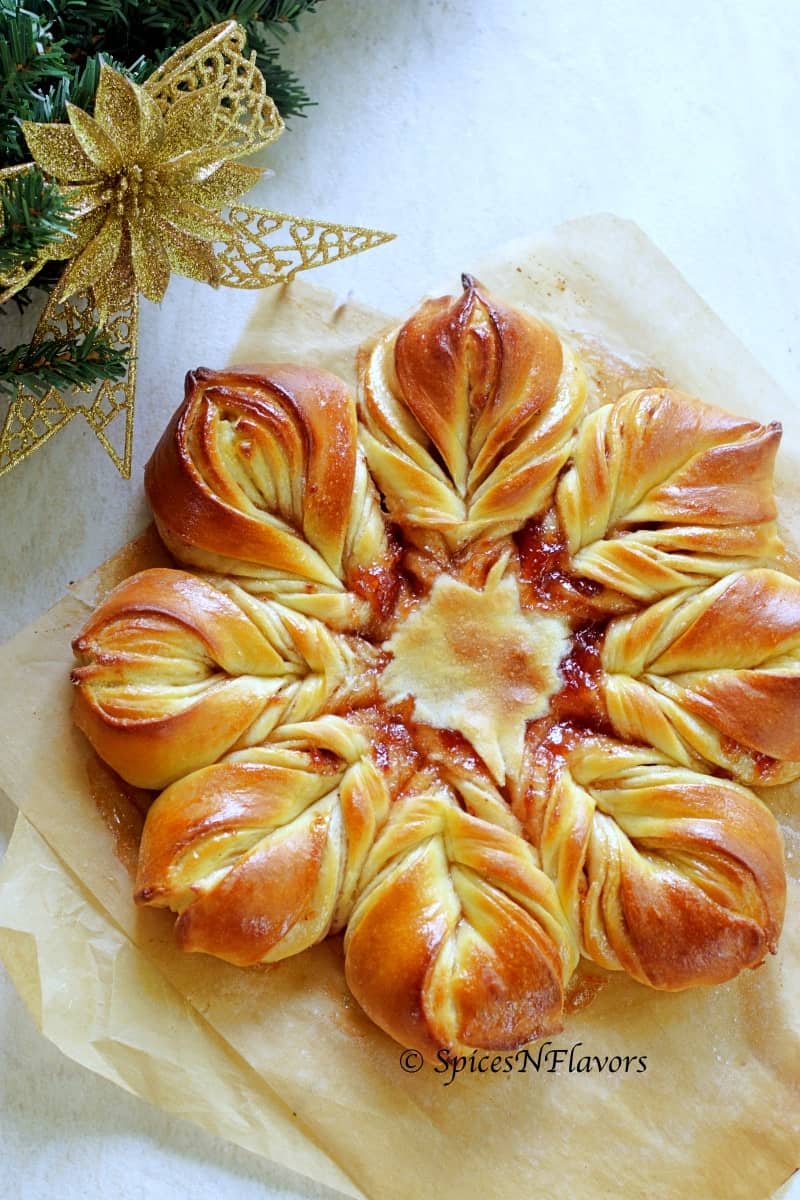
This Christmas enjoy your morning Breakfast on Bed with this soft and fluffy, perfectly sweetened Star Bread with a cuppa of coffee that can be made in 5 simple steps
Also, find 15 other filling variation ideas in which you can make this star bread recipe in this post.
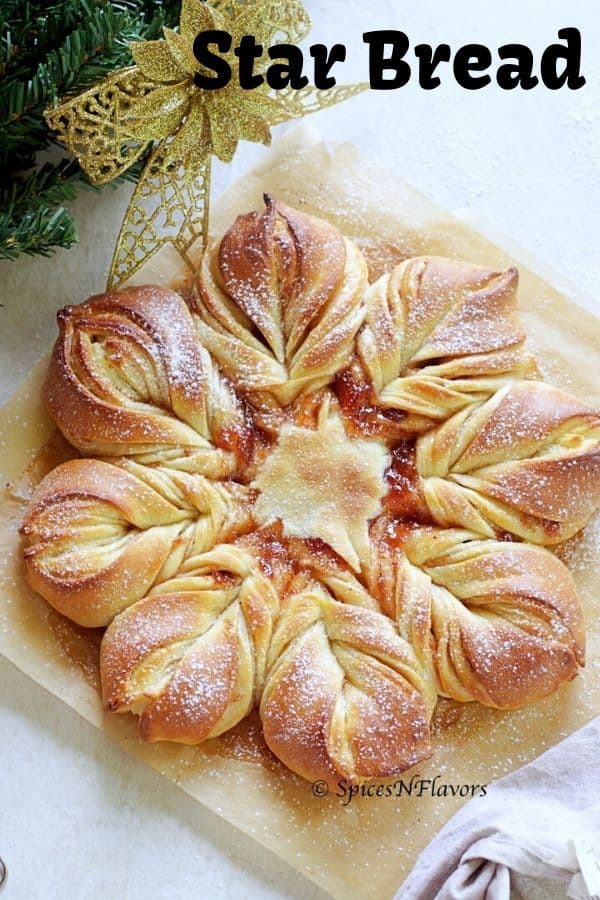
Have you finished setting up the Christmas Tree?? In my house the excitement is on another level.. And do you know why??
WE ARE HAVING A CHRISTMAS BABY!!!
Yay!!! Isn't it amazing.. I mean I am due on this 19th but how cool will it be to deliver on the 25th?? I know the kiddo won't get two presents each year but won't it be amazing to celebrate two occasions each year??
So honestly the paparazzi about Christmas baking is not in full swing this year - perks of #37weekspregnancy
But still can't stop myself from baking fresh bread on Christmas mornings.. So I tried my hands on this striking star-shaped light and fluffy bread this early itself as I really don't know what would 3rd week of December be like.
And oh boy!!! Was I impressed?? Well totally!!!
Did I make any mistakes?? Yes of course!!!
Am I satisfied with the bake?? You will find out..
So here is sharing all the mistakes that I could have potentially avoided so that you could learn how to shape bread in the first go itself.
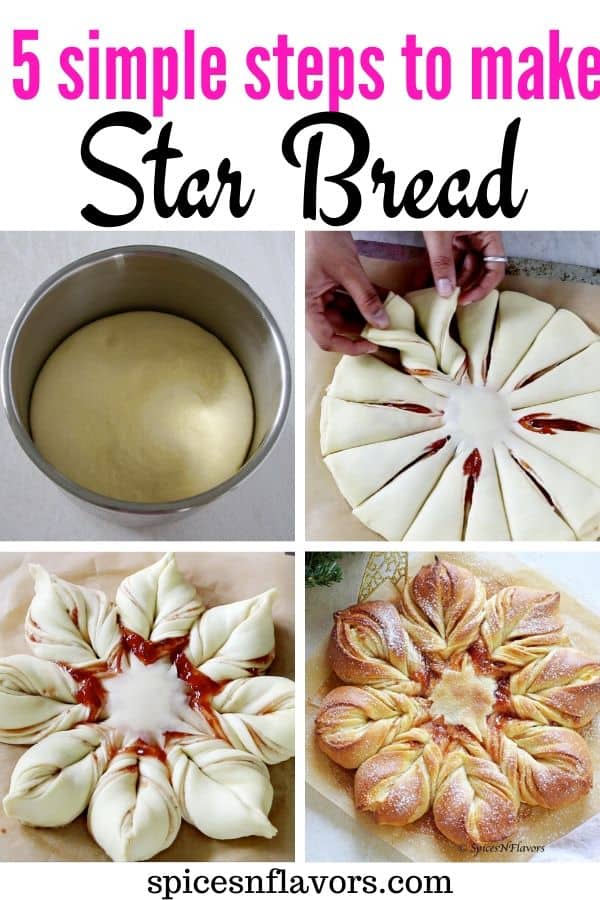
How to make Star Bread in 5 simple steps?
Step 1: Kneading the Dough
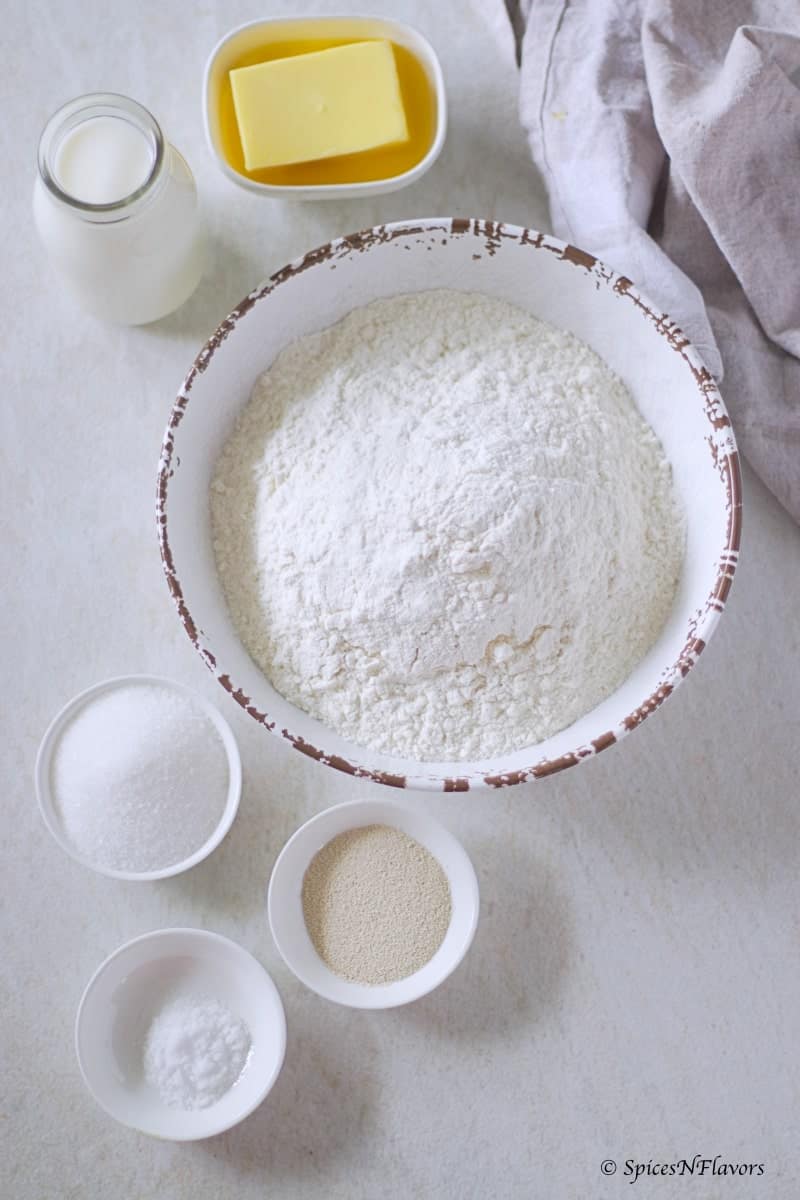
Well, this is a no brainer step. We would start by making the bread dough. The ingredients needed are pretty basic and standard - Flour, Sugar, Salt, Yeast, Butter and Milk. I have skipped using Eggs which acts as enrichment in this bread and instead have used Milk to do the job.
So combine everything until it forms a soft and smooth dough.
Step 2: First Proofing.
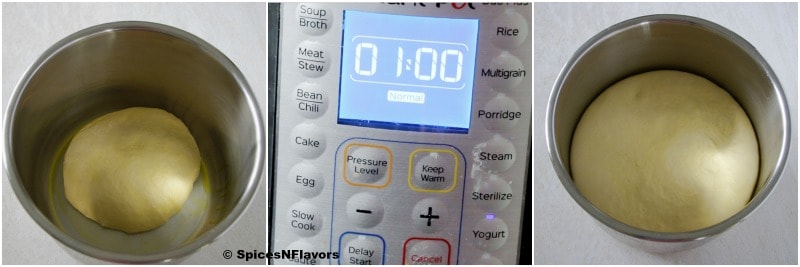
Allow the dough to double up in size. So if you do not have an instant pot then simply put it in a greased bowl and allow it to rise for 2 hours at room temperature.
How to proof bread dough in Instant Pot?
Grease the inner pot with some oil. Transfer the dough into it and apply some oil on top of the dough as well so that it doesn't dry out.
Close the lid. Select Yogurt Mode. And set the time to 1 hour.
Step 3: Shaping the Dough.
Well, this is the most interesting part of the recipe. Doesn't it look intricated and complicated? Well, you will be smiling by the end of this part when you find out how simple it is to actually make the bread.
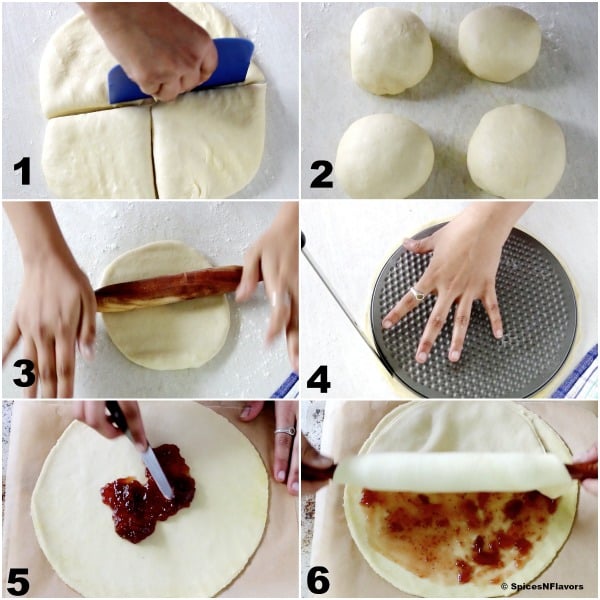
Once proofed, slightly degas the bread and divide it into 4 equal portions (pic 1).
Roll out each portion to 10-inch diameter. You can also use a plate or cake pan base like I have done to cut it out into the exact measurement (pic 2-4). Well, this is optional, it is easy to do bread so you do not have to stress on it.
Once rolled, place it on to a baking tray lined with parchment paper.
The first mistake I think I did was rolling it uneven, if you look closely the centre looks thinner than the sides so when I started with the layering process instead of getting a bulge in the centre once baked it looks flat.
Add a layer of the filling of your choice. I have used strawberry jam here but feel free to use any of your choices or check out the 15 different variations that I have shared below.
The other mistake I did - my filling, if you use, was chunkier, yes I used Strawberry Jam but it was a chunky jam so as you all can see while slicing the bread it oozed out and I lost some shape in the centre. So yeah you try to possibly avoid using chunky filling.
( UPDATE: I now use homemade Strawberry Jam which is much more easier to make and is smooth too)
Repeat the process with the remaining three portions of dough until you reach the very top and remember to leave it bare (pic 5-6).
So 4 layers of dough filled with 3 layers of filling.
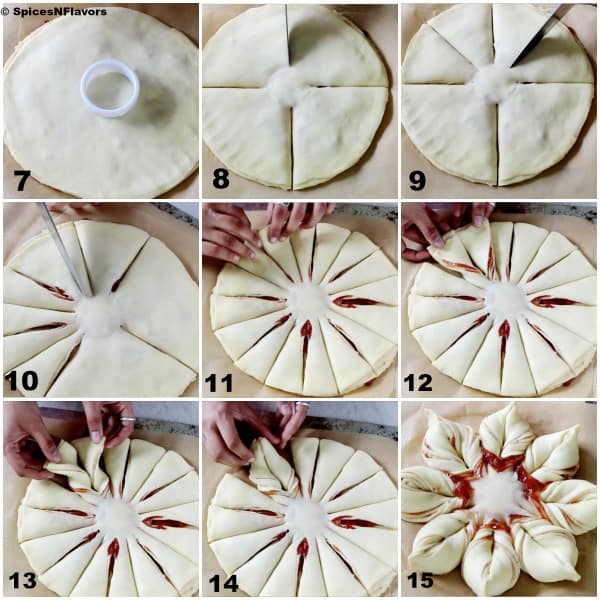
Using a cookie cutter or a bottle lid of approximately 2.5 inches make an indent right at the centre of the dough. This is the centre of the star bread (pic 7).
Make 4 slits perpendicular to each other as seen in the image above (pic 8).
Then make slits following the images above that is at the centre of two slits or you can also refer to the quick video. In all make 16 slits pic (step 9 -10).
Next twist the adjacent two slits outwards two times and pinch at the end to create the tapered effect (pic 11-14).
Step 4: Second Proofing:
Once shaped simply cover with a cloth and let it rise for 30 mins.
Step 5: Bake that beauty:
Brush the top with some milk.
And bake in a preheated oven of 200°C for 15 to 18 mins.
Voila, that aroma is just enough to pull everyone to the kitchen!!!
Once baked brush the top with some butter and dust with icing sugar
15 Other Filling variations that you would absolutely love:
-
Cinnamon Sugar:
Well, no surprise there right!! The most common flavour combination of the season!!
-
Cinnamon Sugar + orange zest + Fresh or Dried Cranberries:
That would be so aromatic and screaming Fall.. Ain't it??
-
Nutella:
An all-time hit for any kind of bread filling or even for puff pastries.
-
Garlic Butter:
Pull apart bread plus chopped garlic and coriander mixed in melted butter is always a winning combination.
-
Herbed Butter:
Talking about garlic and coriander, another lovely combination would be doing a mix of herbs - coriander and mint or keep it entirely Italian - basil, rosemary, chives, parsley etc mixed in melted butter and then brushed would also be a great choice.
-
Pesto:
How can I skip this Italian classic - Using pesto would be the most convenient option.
-
Pizza toppings:
Another classic combination would be to spread tomato sauce and then top it with sundried tomatoes, pizza seasoning, chilli flakes and some cheese of course!!
-
Cheese and Herbs:
This would be a lovely combination too!! Won't it??
-
Creamy Cheesy Filling:
Now, this filling is inspired by our Thanksgiving favourite recipe - Cheesy Filo Cups. You would need a blend of cream cheese or ricotta, cheese and some onion.
-
Jam of your Choice:
Well, I have used strawberry jam today please feel free to use any of your choices.
-
Nut Butter of your Choice:
Peanut Butter would be an amazing choice. Any other nut butter or even apple butter will also work.
- Gujiya BreadImagine your favourite mawa gujiya filling. Just stuff it into this bread and enjoy the non fried baked gujiya for Diwali or Holi. Here is a video tutorial if you would like to see it in action.
-
Chai Spice:
Well basically you would need warm spices - 1/4 tsp each of ground Cinnamon, ground Cardamom, ground ginger and ground all spice mixed in 5 tbsp of sugar, mix well. Brush the circle with melted butter and sprinkle the sugar topping.
-
My Indian tadka:
Lol.. This might sound silly but who wouldn't love a classic combination of coconut, sugar and cardamom powder along with cashew nut or almond powder. This is a favourite filling combination used in a variety of Indian sweets.
-
Chocolate:
I know Nutella would be chocolaty too!! But if you just don't want to buy a jar then simply add some mini chocolate chips or grated chocolate and you would not regret!!
-
Favourite Chutney of your choice:
Well, again this is where my Indianness comes into play. You can use your favourite chutney of choice. I have already shared 5 of my favourite recipes choose from that or simply use store-bought green and red chutneys.
- Christmas Tree Bread:
Not only the filling you can also play around with the shaping.. I used the same bread dough and turned it into Christmas Tree Bread.
Those were some of my favourite combinations to slather on the bread. Which one are you going to try??
Once you have the bread made with your favourite filling of choice, I understand sometimes you might have little leftover..
What to do with leftover bread?
You can cover and store the leftover star bread at room temperature for 1-2 days or in the fridge for 4-5 days.
How to reheat leftover bread?
Just dab or brush or spray some water on top of the leftover bread. Either reheat in a microwave for 30 sec to 1 min or warm it up in a preheated oven of 200°C for about 5 minutes, until it’s warmed through.
The bread will be soft and taste fresh.
How to store bread dough (Make-ahead instructions)??
After the first proofing simply punch the dough to de-gas.
Cover the dough tightly or put in an airtight container, then place it in the refrigerator for up to 2 days or in the freezer for up to 3 months.
If frozen thaw the bread overnight in the refrigerator. Remove the dough from the refrigerator and let it sit on the counter, for 30 minutes.
Punch the dough down again to release any air bubbles. Then, continue with step 3.
Also linking a few other bread recipes that you might want to try:
- Reader's favourite - Pita Bread
- Restaurant-style Naan Bread
- Soft and fluffy Dinner Rolls
- The easiest bread recipe you can ever, ever try - No Knead Bread.
Here is a detailed recipe guide on How to make Star Bread in 5 simple steps:
How to make Star Bread in 5 simple steps
Ingredients
- 3 cups (370 g) Plain Flour/Maida
- 2 tbsp (40 g) Sugar
- 1/2 tsp Salt
- 1/3 cup (75 gms) Butter softened
- 1 cup (250 ml) Warm Milk
- 2 tsp (7 g) Instant Yeast
- 3/4 cups Strawberry Jam (refer notes)
Instructions
- In a bowl, add in the milk, yeast and sugar. Give it a stir. Next in goes the softened butter and mix again.
- Add the flour and salt little at a time and using a spatula combine together until you get a sticky mass.
- Then transfer to a lightly floured surface and knead the dough for around 15 mins until it is soft and elastic. If using a stand mixer simply knead for 5 mins.
- Oil a bowl and place the dough in it to rise for first proofing - 2 hours. If using an Instant Pot follow the same steps of oiling the inner pot. Place the dough lightly oil the top of the dough too so it doesn't dry out. Close the lid and choose Yogurt mode and set the time for 1 hour.
- After the proofing time, punch down the dough to de-gas. Divide evenly into four portions. Roll out one portion into a circle with 10 inch diameter whilst keeping the rest covered to prevent it from drying.
- Take 1/4 cup of strawberry jam and spread it all around the circle leaving just an inch of gap at the end.
- Roll the next portion too into inches diameter circle and place it on top of the strawberry jam layer. Repeat the steps until you reach the bare top and you will have 4 layers of circles with 3 layers of filling.
- Take a cookie cutter or any lid which is 2.5 inch in diameter and make an indent in the centre. This is the centre of the star and then make 16 slits across the dough like the way shown in step by step pictorial form above or from the video.
- Twist the adjacent two sections outwards twice and pinch the edges to seal together.
- Cover with a cloth and allow it for second proofing - 30 mins.
- Meanwhile, preheat the oven to 200°C. After the second proofing, if you find that the bread has lost some shape then again seal the edges first then brush the bread with some milk and bake for 15-20 mins until golden brown and baked through.
- Apply some butter once baked and dust with icing sugar and simply enjoy with your cuppa coffee for breakfast
Video
Notes
- Make sure the butter is softened and the milk is warm.
- Let the yeast proof for 15 mins before proceeding with the recipe if you are using any other variety other than Instant Yeast.
- Choose any filling of your choice as per the variations I have mentioned in the post or of your choice. Only thing to note is that avoid using bigger chunks as you would have a hard time slicing the bread dough. At the same time avoid using juicy filling as it will ooze out and you won't get the look of the star bread once baked.
- This is exactly what happened with my loaf of bread too.. I guess the jam spread a little at the centre and I lost the circular shape effect if you look closely.
Conclusion:
Star Bread is a fancy looking bread but at the same time, it is easy to pull it off too..
In this Star Bread Recipe, I have shared a step by step recipe to help you make this bread in 5 simple steps.
A light, soft and fluffy bread that is perfectly sweetened enough to go with your morning cuppa coffee.
Make your Christmas morning special by making this bread and have a great day with your family and friends.
If you like this Christmas Star Bread Recipe then do let me know me by tagging me, tweeting me or Instagram me. I would love to follow you and your posts.
Pin this to your Bread board or Instant Pot Board
I will see you soon in my next one
Until then
Hugs
Sushma




Laurie says
Can you fill it with cream cheese and sugar like a cheese danish filling? Looks delicious can’t wait to make it!
sushma iyer says
Oh yum!! that sounds delicious laurie.. you absolutely can try that 🙂
Georgie says
I haven’t tried your recipe as of yet but I assure you..I will. Your video is so helpful and amazing! My question is …can I use cherry pie filling instead of jam? The idea is so appealing to me.
sushma iyer says
Hi Georgie.. yes absolutely as long as it is not super liquidy
Myun Hwa says
I loved the video and the filling suggestions, thank you. I just made two star breads and they look beautiful! My only question is, during the bake, how do you keep the seams together? I pressed the seams firmly before baking, but as the dough rose, all the "legs" of the star separated from its pair.
sushma iyer says
Hi Myun.. It is natural for some of the shape open up due to oven spring. Pressing firmly before baking is the only method which you seem to follow. Also once baked and while the bread is still warm press again to retain the shape
Laura says
This recipe was awesome. I did the spice chai filling version. I’m a new baker (like have only ever made cake from a box mix new) and was able to follow the recipe and video and have it turn out great. Thank you so much! Will definitely be making again
sushma iyer says
Hey Laura.. that sounds fantastic.. I am pleased to learn about your successful attempt.. thank you for sharing 🙂
Divya says
What an amazing recipe.Thanks for sharing. I look forward to trying it this weekend.. Have you ever tried moxong two spreads? So one half with jam and other with pesto? It will give a nice Christmas colors too. Do you think the juices will flow into each other?
sushma iyer says
Hi Divya.. No it won't flow.. yes you can try two fillings at a time.. it works just fine 🙂
Divya says
What have I gotten myself into!! Before you bake this, make sure you are up for it..
I made it once around Christmas (pesto filling), just to see if I can pull it off (I suck at baking). It was a huge hit. Gone within couple hours!. My older one wrapped prosciutto around it and called it the best thing he has ever tasted.
Ever since then whether I am hosting or invited over at a friend's place, I HAVE to bake this!!! I have tried pesto, garlic herbed butter, jams. Pesto is so far the most loved. My friends and family demand it, no respite. Lol. I am kidding I love the attention..who doesnt? . Thank you for sharing the recipe. Thus non baker is grateful. My 8 yr old has seen thr video and now he can do the shaping all by himself. That's how detailed and helpful the instructions are.
sushma iyer says
I have to agree with you Divya, pesto is my favourite too.. seriously its the best combo.. Thank you for taking the time out to try and share your wonderful feedback with us.. I truly appreciate it 🙂 this message made me smile today.. thank you 🙂
Sabine Starr says
Hi, this turned out amazing! Thank you!
It’s so pretty, I want to take it to a Xmas party, but it is in 3 days. Can I freeze it? And if yes, how to thaw it best? Thanks
sushma iyer says
Hi Sabine.. thank you for trying and sharing your thoughts with us.. appreciate it.. Yes you can freeze the baked bread. Freeze it whole or in individual pieces. It’ll last for 3 months. When ready to enjoy, thaw overnight in the fridge and reheat it until warmed throughout in the oven. If you want to store for just 3 days then you can refrigerate it instead of freezing
Karen says
Excellent recipe. I made there in one go, two sweets, raspberry jam & nutella, one garlic butter. The sweet ones tasted really good. The savory garlic butter not as much. I tried with both unsalted and salted butter and with fresh minced garlic, something seemed missing. The bread itself seems to go better with a sweet fillings. Do you have any tips for the savory? Thank you for sharing. ❤️
sushma iyer says
Hi Karen.. Thank you for taking the time to try and share your wonderful feedback with us.. appreciate it.. And coming to your query I really see no reasons as to why the savoury filling did not taste well.. We have had success with both sweet and savory. I am sorry for not being a help here.
Regards
Sushma
Radha says
Can we half the recipe? Will it work the same?
sushma iyer says
Hi Radha..
Yes halve it and make a smaller circle..
Rashi says
Hi.. Can I try this recipe with whole wheat flour instead of Maida... if so pls tell me
sushma iyer says
Hi Rashi.. Sorry I have not experimented yet..
Sarbani says
Hi dear im a great fan of your beaking .... Always follow your instructions ..thanks for guiding us
sushma iyer says
Thank you sarbani.. appreciate it.. I am so glad to know that the instructions are clear and helpful. thanks for sharing 🙂
Regards
Sushma
Veronica Jacobus says
This star bread not just beautiful it taste amazing!! Especially with endless choice of filling you can go with, no fail guarantee!!
Don’t feel intimidate with how it looks! Super easy ingredients, clear visual steps, and sushma tutorial videos always easy to follow. I am not a great baker just an average mom who love to feed her kiddos and hubby with delicious food. I highly recommend this recipe. And all of the blogger recipes. I
(This is her second recipe I tried )I can wait to try what’s next I will try to bake/cook!
Thank you Sushma.
sushma iyer says
Hi Veronica..
Yay!!! That is amazing!! Thanks a bunch for the time you have taken to try and leave a comment about your experience.. Appreciate it.. I am so pleased to learn that the instructions and videos are helpful.. I am always two minded about penning down all the details as I often receive comments stating that it was too much to scroll through 🙂 but you have cleared my mind that there are some who are benefitted by the details will continue doing it. thank you for sharing that..
And I saw your image on Facebook.. I was definitely a great bake and what a lovely message you gave in that.. that was priceless actually..
Thank you 🙂
Regards
Sushma
Jaime says
We made it and it was YUMMY! We made a savory spinach cream cheese filling. We will definitely make again. Video made it so easy to follow.
sushma iyer says
Hi Jaime..
That is amazing!!! I am so pleased that the bread came out great.. and that filling sounds so YUM!!! I love this combination and I often make it as a filling for filo pastry commonly known as Greek Spanokopita.. You must try it sometime.. And glad that the video was helpful.. Thanks for sharing your feedback with us.. appreciate it <3
Regards
Sushma
Jaime says
I will be making this soon! There are only two of us in the house so can i cut the recipe in half?
Thank you!
sushma iyer says
Hi Jaime..
So pleased to learn that you are planning to make this bread.. You can cut this recipe in half but then you won't be able to make a 10 or 12 inch size bread. Yours might turn smaller and I am not sure whether the design would be distinct in small size. But the taste of the bread won't be affected.
Regards
Sushma
Lisa says
The recipe was easy to follow, and the dough was very nice and pliable. I think I would prefer tart jam or cinnamon and sugar if I made it again. It was too sweet for our family
sushma iyer says
Hi Lisa..
Thank you so much for sharing your honest feedback with us. so pleased to learn that you liked the recipe. I think in that case apricot jam would be a nice addition 🙂 by the way what did you use as a filling this time?
Betsy says
I made this today. I used strawberry jam for the filling. It was so easy and so good. Shhhhh.... looks so fancy people will think you slaved over it! Next time (and there will definitely be many next times ) I'm going to add a little cream cheese to the strawberry filling as strawberry-cream cheese is one of my favorite flavors of pastries. Thank you so much for sharing this recipe. I look forward to trying others of yours.
sushma iyer says
Yay!!! that is amazing betsy..
totally it looks so intimidating and time-consuming right!!! I am so pleased to learn that you loved the recipe. and yeah totally cream cheese and strawberries are my favourite combination too 😀 and that is why I always and always top my cheesecake with strawberry filling. 😀
thank you so much for sharing your amazing feedback with us.. truly appreciate it.. and I too hope to see you more often in this space in the hopes that you find many other interesting recipes to try 🙂
Regards
Sushma
Donna culbert says
Can I do this in a bread machince
sushma iyer says
Hi Donna..
I have never really used a bread machine before so I am not sure whether this would work or not. sorry about that
Regards
Sushma
Ann says
Hi there - I'm so excited to try this technique and really appreciate all of your excellent tips and detailed instructions! Wanted to weigh in here because I totally plan to use my bread machine for this. I'm a relatively experienced home bread baker, and I rarely do my own mixing or kneading any more. Haven't for years now because the bread machine just does those tasks so perfectly. Plus you can also do the first proof right in the machine as well. All that I do manually is the shaping - which is the best part anyways, especially with this gorgeous star bread!! I have a feeling this is going to be our newest must-do tradition - thank you, Sushma!
sushma iyer says
Hi Ann.. that is wonderful.. You are now tempting me to try a bread machine. I have never really used one till now. It seems that bread machine would make making breads a breeze. Do let us know how your bread turned out. Hope it becomes a regular at your place too.
Regards
Sushma
Monique says
This may taste even better than it looks, if that is possible!! My family fought over the leftovers. I made half the jam recipe and it was more than enough. My first time proofing in the Instant Pot, what a great idea. I look forward to making this again for a party.
sushma iyer says
Hi Monique..
Totally agree with instant pot proofing idea.. I also loved it the first time I tried and using it ever since. I saw the picture of your bread on Facebook page too and it looked amazing. Thank you for sharing your feedback with us.. truly appreciate it
Regards
Sushma
Shannon says
If your instant pot doesn’t have a yogurt setting would you be able to do it in there another way?
Thanks.
sushma iyer says
Hi Shannon..
If you do not have a yogurt setting you can do it in a regular way that is to let it prove on a countertop or you can prove it in the oven light too..
Michele says
Thanks for the recipe and video. I took it as a personal challenge and tried it. Not only was I impressed but so was my hubby who was taking pictures of his slice 🥰. I just used a cinnamon sugar and melted butter filling and coarse sugar on top. The colour contrast in the layers was very cool.
sushma iyer says
Yay!!! That sounds amazing Michele.. I am so glad to learn that you and your husband loved the bread. Thanks a bunch for sharing your amazing feedback with us.. And yes cinnamon sugar combination sounds just perfect. At this time of the year, the aroma of baking cinnamon flavoured anything is just so nostalgic.. <3
Anne says
Could you use almond flour and a sugar replacement? Looks great and would like to make it Keto.
sushma iyer says
Hi Anne..
Sorry but I haven't tried it with almond flour yet. So won't be able to guide you on the same.
Jessica says
Great Bread!! I've made the star bread a number of times. However, I've never proofed in my Instant Pot.
Thanks for the suggestion!!!
sushma iyer says
Hi Jessica..
Oh is it!! so good to know.. yes indeed proofing bread in the Instant Pot is one of the best hacks you can ever try.. saves a lot of time.. 🙂 so glad to know that you liked the idea.
Regards
Sushma
monda holleger says
did you put the instant pot locking lid on to proof your bread or a glass one? my Duo Plus won't let me use the Yogurt function with a glass lid. I get error code "LID" if i try to use the glass one
sushma iyer says
Hi monda..
If you follow this recipe then you can use the lid that came along with the pot. only if you want to double the recipe then I would not recommend. It is strange though as I also have an Instant Pot Duo 6 plus and it never showed me the error.
Regards
Sushma
Ravina says
Could you make this into a different shape? Would it be enough dough to make a Christmas tree? Thanks!
sushma iyer says
Hi Ravina.. yes totally a Christmas tree bread is totally possible. I would suggest you to divide the dough into 3 instead of 4 equal parts then roll it into 12 inches instead of 10 and try cutting at an angle to make the Christmas tree shape.
Do let us know how it turned out if you happen to give this a try.
Regards
Sushma
Amy says
Could you use active dry yeast instead of instant?
sushma iyer says
Hi Amy..
Yes definitely.. the same amount of active yeast should work.. just allow it to prove for 15 mins before proceeding with the recipe 🙂
Regards
Sushma
Patti says
Is it really a 200 degree oven? Mine didn’t even begin to cook by 20”
sushma iyer says
Hi Patti.. Guess you missed the Celsius.. it is 200-degree celsius which comes to 392 degrees F.. So what did you do?? Hopefully, you baked it for longer and it was baked through..
Ginny says
Would you be able to tell me how to use eggs instead of milk? I have a daughter that is lactose intolerant.
Thanks in advance.
sushma iyer says
Hi Ginny..
Yes sure you can decrease the quantity of milk to 150 ml and use 1 egg as the enricher.. or since it is a basic dough you can also try using water instead of milk, but increase the butter to 150 gms and also use 1 egg. If you find that the dough is dry you can add little water while kneading and if you find it to be too wet you can add some flour.. or you can also use any of your favourite bread dough recipes as the base too.. it is a very easy bread that can be customised to suit your needs 🙂
Regards
Sushma
EileenHolland says
Try alternative milks such as oat milk. I use it all the time in baking as my daughter is lactose intolerant. I also use lactose-free Earth Balance, a butter substitute.
Manjula mj says
I tried the recipe with grating d chocolate.. it came out very well.. Thank you for the wonderful recipe..
sushma iyer says
Wow Manjula that was uber quick.. And grated chocolate sounds yummy.. Thanks a bunch for sharing your feedback with us.. this comment really made my day 🙂
Regards
Sushma
Betcy Allen says
It luks so yummm....gonna try it soon...can we use samosa filling in this bread to make it a saviury bread?
sushma iyer says
Hi Betcy..
Thank you so much.. And samosa filling sounds so yum!! Yes indeed you can use that only thing is mash the potatoes really really well as any chunkier pieces would cause a problem while slicing and there are chances of it oozing out 🙂
Betcy says
I tried it with potato filling.had grated d boiled potato..it came out very well...d bread ws very evenly cooked...this was my first trial on bread..gonna try out ur other bread recipes as well..
sushma iyer says
Hi Betcy..
That sounds amazing.. so glad to know that you enjoyed the bread.. and potato filling does sound yum; you can never go wrong with potatoes.. 😀 Thanks a bunch for taking the time out to try the recipe and share your feedback with us.. really appreciate it 😀