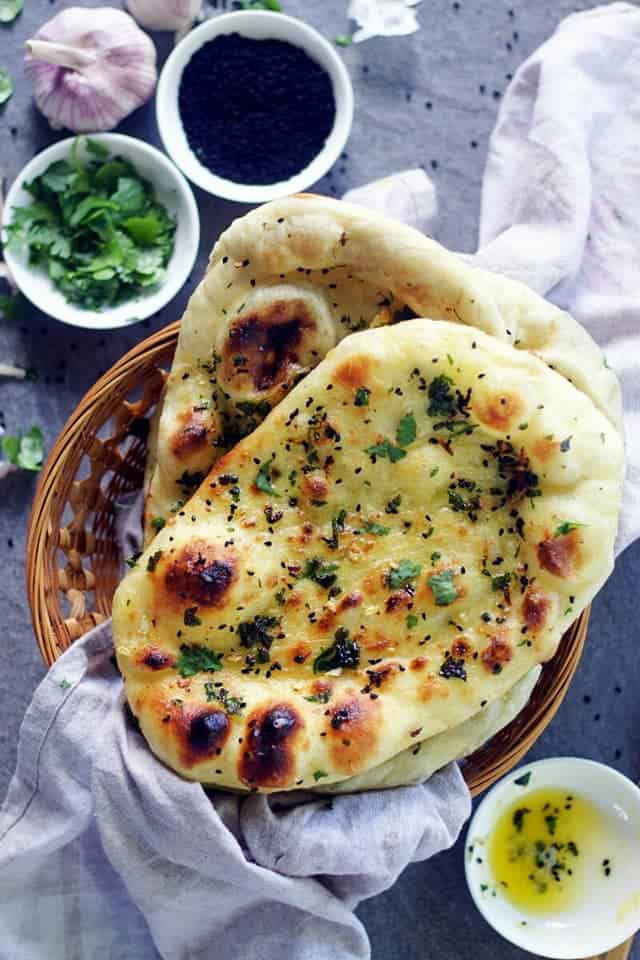
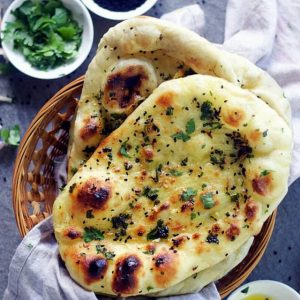
How to make Naan Bread at home like a PRO - the only 4 steps you need to know. This tandoori style flatbread is soft, light and fluffy with beautiful brown blisters just like those served in Indian restaurants. Once you crack the steps to make this easy homemade naan bread, there is no looking back.

Being an Indian my love for Naans, Rotis and Phulkas are in-built. However, I understand that some of you reading this post might not be aware of the same.
So What is a Naan Bread?
Naan bread is a leavened flatbread usually made using Yeast as the leavening agent and the speciality of this flatbread is being cooked in the Tandoor; hence the name Tandoori Naan.
Tandoor is basically a cylindrical clay pot. The heat is generated by heating up charcoal or wood fire and the temperature can go up to 900°F.
Once you reach such high temperature, the naan bread dough is then stuck to the sides of the pot thereby being exposed to direct fire to cook which results in the classic brown blisters that you see on top of the naan.
Of course, no one has a tandoor oven at home. But still, I am going to share with you guys the exact trick of sticking the naan bread dough to your iron skillets and cooking them in a way to get that perfect brown blisters by mimicking the technique for direct-fire cooking.
So definitely stay tuned for all the tips, tricks, videos, step by step photos to help you make the best homemade naan bread ever. I have two other bread posts that I would like to suggest to you guys at this stage to check out because of the details and tips that I have shared in that too.
Please do not use the Jump to Recipe button for this particular post.
The basics of understanding how to make the best bread at home (be it any bread for that sake) is to understand what ingredients go into it and the role of each ingredient as well.

Naan Bread Ingredients:
Well just like any other bread dough you would need the basic ingredients like Flour, Yeast, Water, Sugar and some Fat.
However, to mimic the restaurant-style naan, in this naan bread recipe, we will be adding Milk and Yogurt too.
1. Flour:
We would be using our good old All Purpose Flour or Maida for this recipe.
That also explains: What is the difference between naan and roti?
Naan is usually a leavened flatbread made using APF or Maida whereas Roti is an unleavened flatbread made using Whole Wheat Flour.
These days due to health constraints you do get whole wheat naan in some restaurants back in India, well I will reserve that for some other day and today let us focus on the most common type of Indian bread available everywhere which is made using Plain Flour.
There is also one common question that I come around most often, are naan and pita the same?
Well, not really even though the ingredients and method of kneading are somewhat similar there is a huge difference in the way or the preparation of the two. So definitely, they are not the same.
I have shared a detailed post on How to Make Pita Bread at home both using APF and Whole Wheat, you can refer that for additional details.
2. Yeast:
Choosing the variety of yeast, that is active, instant or fresh yeast is up to you.
If you are using the active variety you might have to do the one extra step of activating the yeast, since I always tend to use Instant variety I directly add it to my dough without the need to activate.
An authentic Naan recipe is made using yeast as the leavening agent, however, these days a non-traditional way of making naan is by using yoghurt and baking soda and powder instead of yeast.
The recipe would vary slightly in that case. I will mention the substitution if possible in the recipe card or else would make a separate post altogether.
Today we are making naan recipe with yeast only.
3. Water/Milk:
You obviously need some binding agent to make the dough right!!
The only twist is that in place of water we will be making use of milk today.
Milk would make the dough softer and keep the dough well-hydrated ultimately yielding a much softer naan. Also helps to get that beautiful brown colour on top.
The key point here is to remember to make sure that the milk is neither too hot nor too cold. Too hot would kill the yeast in the dough and too cold will not activate the yeast in the first place.
So maintaining a warm temperature is important.
How do I check whether the temperature is right?
Now, this is not a scientific method. This is what I follow and it has never failed me.
I like to dip my little finger (don't worry I wash my hands before starting with any recipe 🙂 ) into the milk or water and if I could place it there and count till 1 to 20 without feeling the need to take my finger out which I would if it were too hot then I know that the temperature is just right.
4. Yoghurt:
In some restaurants, an egg is added to enhance not only the flavour quotient but also to make a softer dough.
We are going to replace the role of the egg with just a little yoghurt in the recipe. Just a small amount that is a quarter of a cup of yoghurt will also make sure that the dough is so much softer.
5. Milk Powder:
Blah blah.. I know you might be bored by now.. 😉 But Milk Powder is also added to soften the dough. But this is optional since we are using milk to knead the dough you can skip the milk powder if you like.
If you were using water to knead the dough then I would totally recommend or insist to use Milk Powder.
Let us consider other ingredients like salt, sugar and oil as additives here. Their role is not too significant enough but you need them too.
Now don't get intimidated with the list of ingredients, trust me its a really basic dough which would come together in no time.
Especially with the next section on all the tips and tricks, you will never go wrong.
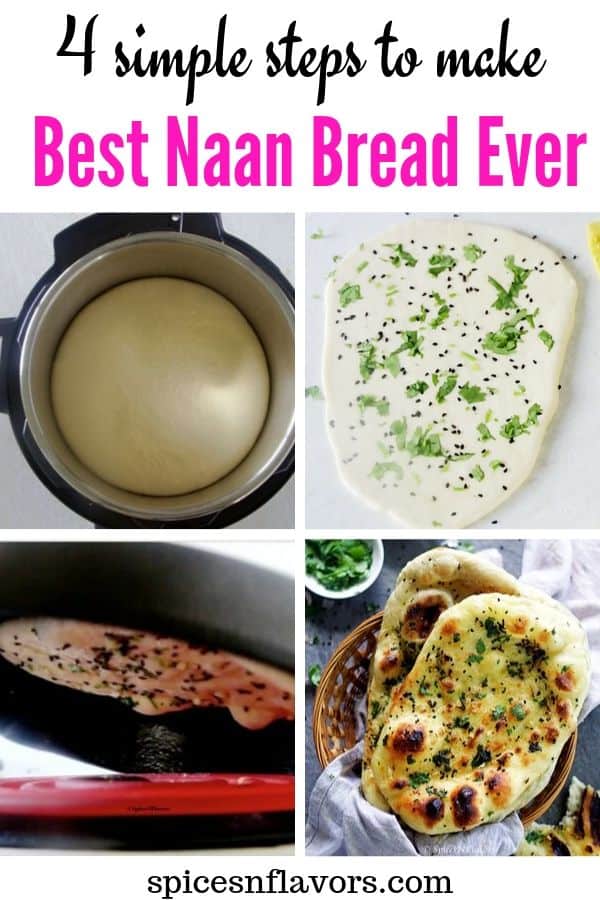
Here are my 4 steps on how to make Naan Bread at home like a Pro
Just like any other yeast-leavened bread dough the basic steps like Kneading, Proofing, Shaping, and Cooking remains the same for this one too.
Step 1: Kneading the Naan Bread Dough
Two simple pointers to note before starting to knead the dough.
One is that the liquid (milk in this case) is warm - not too hot nor too cold.
Second, if you are not using the instant variety of yeast make sure to activate it before proceeding.
In my last Pita Bread recipe, many of you asked me to share steps on How to Activate the Yeast so including that in this one.
Collage 1: To 1/4 cup of warm water add in the yeast and sugar. Stir to mix everything. Cover it with a cloth and allow it to rise for 15 mins.
You can also put the bowl in the microwave (switch off) and let it sit there undisturbed for 15 mins. Yeast prefers a warm environment to be activated so a microwave works just fine for me.
However, if you are using Instant variety of yeast you can just skip this step.
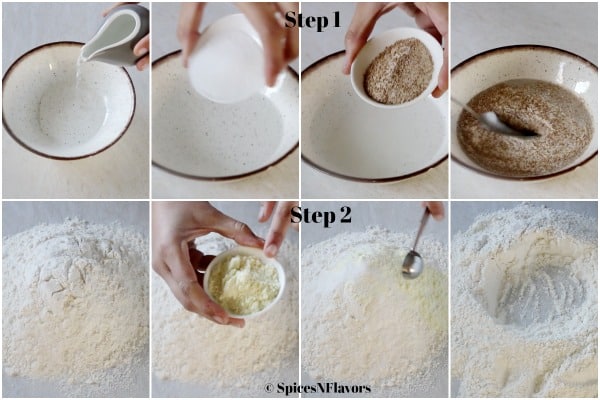
Collage 2: For this naan recipe on a clean worktop mix together all your dry ingredients.
Make a well in the centre and start adding your wet ingredients which would include - Activated Yeast Mix and Yogurt.
Give a quick mix.
Then add little milk at a time to combine everything into a dough.

DO NOT BE TEMPTED TO ADD ADDITIONAL FLOUR AT THIS STAGE.
Now that everything is mixed into a dough start the kneading process.
If you want to use your stand mixer, definitely go ahead and use it. Knead the dough for 8 mins in the stand mixer. Then add the oil and knead again for 4 more mins. Check out our Air Fryer Naan Bread recipe for the same.
You should have a hydrated dough, which means when you lift the hook of your stand mixer, you should see the dough sticking to the base of the mixer bowl a bit just like the way we did while making the softest Dinner Rolls ever.
Since the quantity is not so much, I will be kneading it by hands today. If you too love kneading bread and find it therapeutic stick along to get some additional tips.
First of all, if you have never kneaded a bread dough by hand before then I would highly suggest you watch this video on How to Knead a Dough, this step would really help you understand the right way to stretch the dough while bread making.
The dough is going to be super sticky. Don't be tempted to add flour just keep on kneading and in about 4- 5 mins you will observe that your hands are getting cleaner and the dough is starting to take a shape.
In all, I might have used just 1-2 tbsp of additional flour not more than that while kneading.
Keep kneading.. After about 8 mins in total add the oil and knead again.
Once you add the oil you will observe that the dough comes together much more easily and is much softer than before.
Wondering, why should we add FAT at a later stage?
Hmm.. so fat actually inhibits the development of Gluten, the protein structure that holds any bread structure together. So by adding fat at a later stage we are actually helping the gluten to develop.
So knead your dough for a total of 15 mins at least from start to finish to get that perfect consistency.
What you are looking for is when you try moving it around it is not a totally soft dough but instead, it sticks just a little bit to your board as shown in the picture below or best refer my detailed video on Youtube.
Step 2: Proofing
Once you have made the dough, kneaded it well for around 15-20 mins it is now time for Proofing.
Before proofing, give it a round shape, smoothen the top off by tucking the sides to the bottom.
And for proofing just oil your bowl place the dough in it give it a mix so that the oil coats the dough as well and remains soft and moist and doesn't dry out.
Cover it with a tea towel and allow it to proof for 2 hours in a warm place.
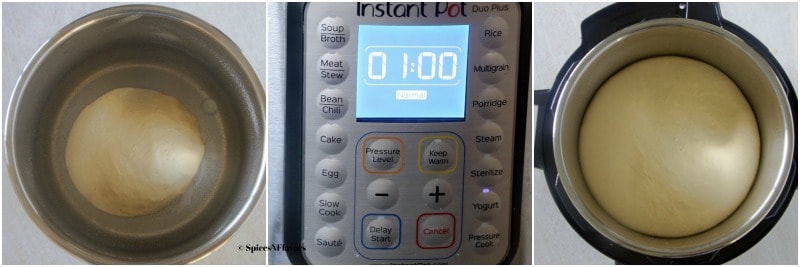
Alternatively, Yay!!! Comes in my favourite equipment - Instant Pot
So use the Yogurt Setting and reduce the proofing time by half.
Follow the same step, spray some oil to the base of your inner pot. Place the dough, roll it around to coat the dough.
Place the lid. Choose the Yogurt button. Set the time to 1 hour and allow the dough to proof.
So proofing time in a normal bowl at your countertop: 2 hours
In an Instant Pot: 1 hour.
WORD OF CAUTION:
If you are planning to double the batch or make a bigger quantity never use the Instant Pot Lid as the dough might rise and stick to the pin from within and lock the lid thereby and you would have a hard time struggling to release the lid.
Instead, just place a kitchen towel or the clear lid that is now available on Amazon.
Step 3: Weigh, Rest and Roll
Once the proofing is done, to test it, insert your finger in the dough and it should not bounce back.
Now since this is a very homestyle naan bread recipe you absolutely do not have to be specific about dividing the dough, simply judge and divide it into 8 equal balls.
Or weigh and divide .. up to you..
Give it a round shape and cover with a tea towel let it rest for 10 mins.
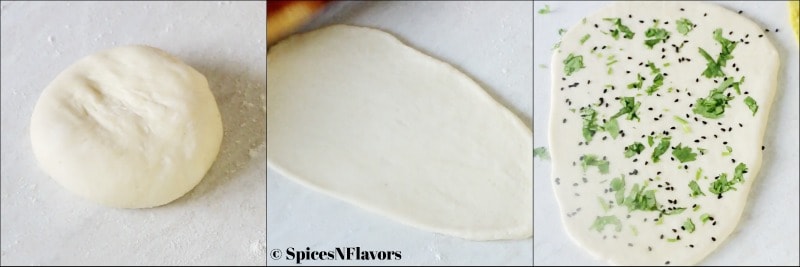
Take the ball that you shaped first and then roll it out to an oval shape.
Spread some kalonji on top and press it down with the rolling pin. This is your basic naan dough. I will talk about the butter naan recipe and garlic naan recipe in the variations part down below.
Step 4: Cooking the Naans with a secret trick
Just to save ourselves from burning our hands just in case 😉 we will make a cushion pillow. This is the same trick that is used in restaurants too to stick the naan to the tandoor.
If you have ever wondered how does naan stick to tandoor? Then this is how. Now you know 😀
So place a neat and clean tea towel on your countertop. Place two more neatly folded tea towels on top of the laid out tea towel.
Bring the corners together and tie it into a knot to make the pillow. Keep it ready.
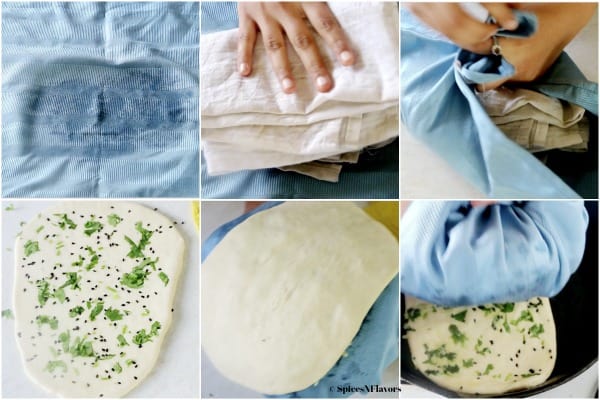
Now place the naan on top of your pillow with the rolled out nigella seeds side facing down. On the now facing top portion generously pat some to cover the entire surface.
Take it to the hot skillet and stick the naan. The water acts as adhesion and helps the naan to stick to the iron skillet. This is why you sprinkle naan with water
Cook it for a few seconds.
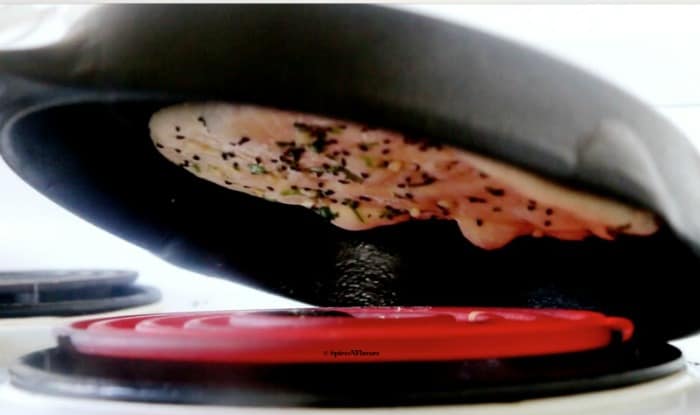
Then lift your iron skillet (I understand) it will be heavy but do lift it, turn it upside down and show it directly on the flame. The burned charcoal will start cooking the top portion of the naan and you will get the nice bubbling brown blisters just like the way you see it in the restaurants.
Watch the quick video for a clear picture.
Oh no!!! That's a too risky business for me.
If you feel so then definitely try it out on your Barbeque grill
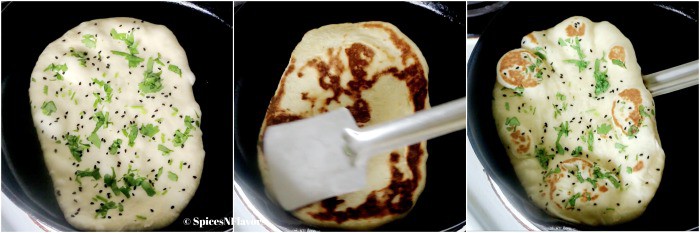
Or simply toast it on both sides like a regular tortilla or a chapati. Refer my Youtube video for the alternative method. Just that you won't get that bubbling effect on top, It would get pressed down.
Once done using a spatula lift the naan and place it covered under a tea towel as we did with our pita bread. This is how you make plain naan or tandoori naan.
If not simply switch to cooking the naan in the air fryer. The easiest method in my opinion.
How to make Garlic Naan Bread at home or a Butter Naan for that matter?
Along with the pillow, the other things you need to keep ready to make a garlic naan would include.
In 4 tbsp of melted butter add 1 or 2 garlic cloves either grated or chopped fine and some finely chopped coriander leaves. Mix. This is the garlic butter for garlic bread I mean garlic naan.
For making butter naan simply keep melted butter ready.
So in step 3 when you sprinkle nigella seeds and press it down, along with, that brush the garlic butter too to make the garlic naan and follow step 4. This is how you make homemade garlic bread from scratch
or simply plain butter to make butter naan. Then follow step 4. Once cooked on both sides, again brush some melted butter in both cases. Simple ain't it.
If you plan to make just the garlic naan bread then you can also add 2 tsp grated garlic while kneading the dough as well for additional garlic flavour.
Other Variations of making a Naan:
1.Peshwari Naan: Along with nigella seeds in step 4 go ahead and sprinkle some black and white sesame seeds, good amount of crushed pistachios and melon seeds. Press it down with a rolling pin and proceed with step 5. Once cooked brush the top with some melted butter if you desire.
2.Keema Naan: It is basically stuffing minced lamb with some spices. Since I am a vegetarian I have never cooked or tasted it before but I know many of you would love it. So linking to a recipe video here. I absolutely love her channel and follow her. So do check it out in case you are interested.
3. Kashmiri Naan: This is again a stuffed naan variety usually stuffed with cashew nuts, almonds and glazed cherries.
The other stuffed naan variety includes aloo (potato) naan, paneer (cottage cheese) naan, coconut naan etc.
These were some of the popular naan varieties if you would like to know any specific then let me know in the comments below would be happy to share whatever I know 🙂
Now that you have prepared Naan, the next question that I believe I should address to is
How to serve naan or How to eat naan?
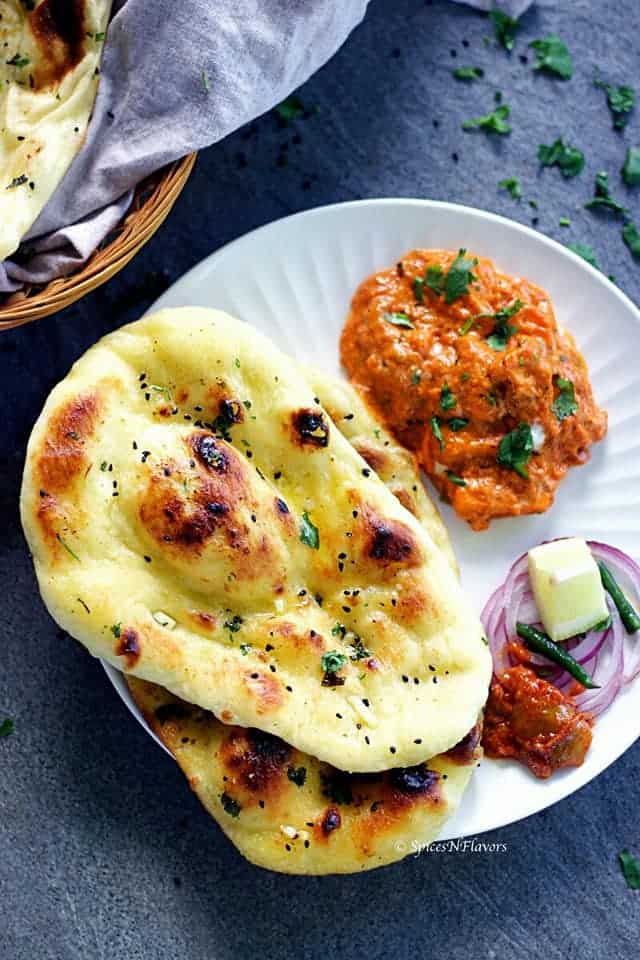
Naan and curry is usually the classic way to serve naan.
Along with the curry in restaurants, they also serve some sliced onions, pickle and fried or fresh green chilli. In roadside restaurants or dhaba, you will usually find pickled onions too.
Generally, we also have a glass of lassi or most preferred masala chaas (Masala Buttermilk). Masala Buttermilk aids in the digestion of all the heavy butter and masalas from the curry that you are having.
Now-a-days younger generation prefers to have some Coke or Pepsi.
My suggestion for you would be to have buttermilk though.
So eat the naan, my non-Indian friends usually take a bite of the naan and then use a spoon to take a morsel of curry as they are not acquainted with the habit of eating with hands and some of them also find it gross to eat with hands. No problem with that at all after all its a matter of practice or comfort.
But trust me eating with hands has its own benefit too, you can check this article here if you like
Just for once give this method a try and you will just enjoy the pleasure of eating and relishing the food. So tear apart a piece of naan using your fingers, dunk it into the curry to get a good chunk of chicken and gravy if you are having garlic naan and butter chicken or a good chunk of paneer and gravy if you are having paneer butter masala, a big morsel, a mouthful of delicious bite.
Then take some pickle in your forefinger and lick it.. yes literally 😉 take a slice of onion to bite and green chilli if you can handle the heat.
Trust me a burst of flavours in your mouth.
How do you Store Leftover Naan?
Just place them in a ziplock back once cooled completely and store at room temperature for 2 days or in the freezer for 2 months.
How to Reheat Naan?
If frozen bring it to room temperature first.
Then dab both the sides of the naan with some water and microwave for 10-15 seconds or more depending upon your microwave settings.
Not only frozen if you made the naan for lunch and have some for dinner as well, even then you can follow the above step of dabbing the naans with water, microwave for the softest naan bread ever.
Here is the recipe for how to make naan bread at home like a PRO
How to make Naan Bread like a PRO in 4 simple steps
Equipment
- Iron Skillet
Ingredients
- 3 cups All-Purpose Flour/Maida
- 1.5 tbsp (15 gms) Milk Powder refer notes
- 1 tsp Salt
- 1/4 cup Yoghurt room temperature
- 1/2 cup Warm Milk
- 2 tbsp OIl
- 1/4 cup Warm Water
- 1 tbsp (20 gms) Sugar
- 1 tbsp (14 gms) Instant Yeast
Garlic Butter
- 4 tbsp Melted Butter
- 2 cloves of garlic, grated
- 2 tbsp Coriander leaves, chopped
Instructions
- Start by activating the yeast if you are not using the Instant Variety. For this step, mix together the water, yeast and sugar. Stir and let it sit for 15 mins in a warm place for the yeast to bloom. (Since I used Instant Yeast I did not wait 15 mins for blooming the yeast rather continued with the next step)
- On a clean countertop, measure out the flour, milk powder and salt. Give it a mix. And create a well in the centre.
- Add the yoghurt and bloomed yeast mixture. Mix everything together.
- Adding milk little at a time, combine everything to bring it into a dough. This would be a sticky dough, do not be tempted to add any extra flour.
- Keep on kneading and in 5 mins you will observe that the dough is starting to leave your hands and is coming together little by little. After about 8 mins of kneading the dough add in the oil and continue kneading.
- Once you add the oil you will observe that the dough has become soft and is now easy to knead it further. (Check my tips section to see why to add oil at a later stage or how to knead the dough the right way)
- Knead the dough for a total of 15-20 mins to get it into a smooth and elastic stage. (Check my tips section to see how do you know the dough is ready).
- If you want to use a stand mixer. Then sure you can. Simply dump everything in the stand mixer and knead for 8 mins. Add the oil. And knead for a further 4 mins.
- Allow the dough for first proofing. Lightly oil the bowl place the dough, cover it with a tea towel and let it proof for 2 hours. Or you can use an instant pot. Oil the instant pot bowl, place the dough. Close the lid, select the yoghurt button, vent to sealing and set the timer to 1 hour.
- While the dough is proofing, prepare the cushion - lay down a tea towel on your counter-top and place two neatly folded tea towels in the centre. Bring the edges together and tie the knots in the centre.
- Also, you can prepare the garlic butter at this stage. Mix together everything mentioned in the ingredient labelled under garlic butter and keep ready. Also, keep some melted butter ready for butter naan.
- After the proofing time, divide the dough evenly into 8 portions. Shape it into a ball, cover with a tea towel and let it rest for 10 mins
- Starting with the ball that you shaped first, roll it into an oval shape. Sprinkle some nigella seeds and press it down with the rolling pin. Place it on the prepared cushion with the nigella seeds facing the cushion.
- Dab the other side with water.
- Take it to the hot skillet and place the naan on top of it with the help of cushion. The water acts as an adhesive and helps the naan to stick to the skillet.
- Cook it for 1-2 mins and then lift the skillet, turn it upside down and place it directly on top of the heat source. (Refer video for a clear picture). Cook until you see the brown blisters evenly distributed.
- If you find this method risky, you can use a spatula and cook it on both sides like a regular tortilla or chapati. In this case, you won't get that bubbly blisters as it would be pressed down but it would taste equally good. This is how you prepare plain naan.
How to make Butter Naan
- Once you roll the naan to an oval shape, brush it with some plain melted butter, sprinkle some nigella seeds and coriander leaves and press it down with a rolling pin. Follow the cooking instructions as mentioned above.
- And when the naan is cooked on both the sides, take it off the heat and immediately brush some more melted butter on top.
How to make Garlic Naan
- Once you roll the naan to an oval shape, brush it with some prepared garlic butter and nigella seeds and follow the cooking instructions. Once cooked take it off the heat and apply some melted butter on top if you desire. That would be Butter Garlic Naan.
Video
Notes
- If you like to see a video recipe check out my detailed step by step video post on youtube by clicking here.
- For a better understanding or my detailed tips on how to knead the dough, how to roll and how to cook the naan tandoor style along with the alternative method do check out the paragraph above or my detailed Youtube video by clicking here.
- Make sure that the yoghurt is at room temperature and the water and milk are warm. Too hot would kill the yeast and too cold will not activate the yeast in the first place.
- Using milk powder is totally optional. Since we are kneading the dough with milk you can totally skip the milk powder in the recipe but if you are kneading the dough with plain water then I would recommend you to use milk powder.
- Activate the yeast first if you are not using the Instant variety of Yeast.
- You may or may not require additional 2 to 3 tbsp of milk while kneading the dough depending upon the flour and the consistency of yoghurt.
- Use an iron skillet or flat iron tawa to make this recipe, it won't work on a non stick pan. Well you can definitely make it on a non stick pan as well what I mean is you won't get that flavour and texture.
- After making 3 naans in a stretch, sprinkle the tawa with some water and rub off the flour if any using a tea towel. As the left out flour would stick to the naan from the base and would burn evertually.
Word of Caution:
If you are planning to double the recipe or proof it for a longer period of time, please do not use the Instant Pot Lid. As the dough will rise and would stick to the pin from beneath and lock the lid and you would have a hard time opening the instant pot. Instead use the clear lid or simply cover the top with a tea towel.Conclusion:
This is the best naan bread recipe ever.
Yes, find all the tips and tricks to make the soft, light and fluffy tandoori style flatbread with beautiful brown blisters just like those served in Indian restaurants. Once you crack the steps to make this easy homemade naan bread, there is no looking back.
I have also covered all the details from kneading the dough to cooking it along with additional tips, variations and storing methods in the post which would be super handy to you.
If you thought that this post was informative and you really liked reading all the science and tricks then let me know by connecting with me on Facebook or Instagram.
And if you felt that this was boring and too much of text even then let me know by commenting below. Would love to have your feedback.
Pin this to your Bread board on Pinterest.
I will see you soon with yet another recipe
Until then
Hugs
Sushma
Corriander Leaf says
The recipe was really helpful. thank you for all the tips and tricks.
sushma iyer says
That sounds fantastic Corriander Leaf.. Thank you for sharing your thoughts with us.. appreciate it 🙂
Thomas says
I love this recipe, however it turns out different every time, because I think the cup measurements are different to mine (I'm Australian). Could you possibly tell me the gram weight of the flour? 3 cups for me is somewhere between 300g to 350g, depending if I heap them, or pack them down.
I'm enjoying your recipes, I've also made your pita bread, it was so good!!
sushma iyer says
Hi Thomas.. So pleased to read through your comment. Glad to see your interest in trying new recipes. So my 1 cup flour weighs 120 gms so 3 cups is 360 gms 🙂 Hope this helps
Thomas says
That solves my issue completely 🙂
Thank you so much!!
Keep up the good work, looking forward to seeing your next recipe!
sushma iyer says
Thank you <3 Glad to see it helped 🙂
Katy says
I made this with white whole wheat flour using my stand mixer and it was perfect. What a relief because the one time I tried making naan before, it was so sticky I couldn't even roll it out. Thank you for all the information and tips.
sushma iyer says
Hi Katy..
That is excellent.. so glad to know about your successful attempt.. thank you for sharing it with us.. appreciate it 🙂
Regards
Sushma
Renuka says
My dough was too dry too. I think 1/2 cup milk, 1/4 cup water and 1/4 cup yogart is not enough for it. Also, can u tell me how should be this dough? Should it be like chapati dough?
sushma iyer says
Hi Renuka..
I hope you are using the liquid Pyrex Measuring Cup to measure your liquid ingredients and not the ones meant for dry ingredients. If you feel that your dough is dry then you can certainly add more milk to it. 🙂
Regards
Sushma
Lana says
Thank you so much, Sushma!
This recipe was really fantastic ♡
At first, it was difficult to combined and knead because it was flakey and too dry but then I added more water. Then the flour became chippy and I had to discard that leftover flour and later, when I added the oil- it needed more of that flour I should have not discarded :0. Even at my faults; they turned out very nice. I think they needed a milk with a higher fat content than the almond milk I used. Still, great recipe ! I need more practice though. Kneading that is hard work T.T
sushma iyer says
Hi Lana..
I understand it is difficult to knead sometimes.. Have you considered using a stand mixer?? Would be easier.. But after all those faults I could see that you still had a great lunch/dinner.. I am so pleased to know that.. thank you for sharing your feedback with us.. Appreciate it.
Regards
Sushma
Samsu says
I tried today your naan recipe, but did not add milk powder as I don’t have it, but still it came so soft and super yummy.
It’s so easy that I will do it again and again 😍.
sushma iyer says
Hi Samsu..
that is amazing.. so pleased to read through your comment.. thank you for sharing your amazing feedback with us.. appreciate it 🙂
Regards
Sushma
Alita says
Thank you for this excellent recipe. My first attempt at Naans and they turned out simply super.
sushma iyer says
Hi Alita..
That is excellent.. Thank you for sharing this with us.. so pleased to learn that you had an amazing experience..
Regards
Sushma
HOLLIE HOLLIS MOTOSICKY says
I couldn't get this to turn out. I followed the directions and instead of being really sticky, it was super dry and wouldn't come together at all, so I added a couple of tablespoons of milk, like suggested, and ended up with a super stiff hard blah, that didn't even resemble dough. Also found the directions confusing, and couldn't figure out when to add the powdered milk because it's not actually listed anywhere in the directions, just in the ingredients and the ingredients weren't listed in any type of order (most recipes put them in order as you use them). Was really disappointed, wanted to make this for using with butter chicken.
sushma iyer says
Hello
I am so sorry to hear this.. sorry that you had to go through it..
I have now rectified my mistake of not including milk powder in the instructions column in the recipe card but it was stated in the step by step pictorial instructions and also in the video.
I am unable to get how come your dough remained dry.. this recipe has enough liquid contents.. Milk and water makes it a sticky dough.. Did you miss out on anything by chance??
Also, the ingredient list is in a group.. the water yeast and sugar are together and the rest of the ingredients flour - oil in the order in which they are added.
But I will keep your suggestions in my mind for future posts. I am sorry you had to face this but the liquid ingredients are enough to make a sticky dough. LEt me know if you faced any other issue would be happy to help
Regards
Sushma
Mrs Chaos says
Hi, Thanks for sharing this recipe and the video (I found you through your great pita post!)
However I think perhaps there is a mistake in the ingredients, the blog says 1/2 cup of milk and the video says 1 cup of milk. The dough is definitely not very sticky with a 1/2 cup of milk, as mentioned in the above post...
sushma iyer says
Hi Mrs Chaos.. I like your username btw.. so glad to have see you here.. good to know that you enjoyed the pita video..
Coming to this post.. did you consider the 1/4 cup water used to dissolve the yeast.. I just checked both the recipe card and the video states 1/2 cup milk only so not sure what the confusion is?? so the liquid ingredients include: 1/4 cup yogurt, 1/2 cup milk and 1/4 cup water you can add 2-3 tbsp additional milk or water if need be to get it into a dough
Hope this helps
Sushma
Mrs Chaos says
Thanks for the feedback, I didn't notice the recipe card initially, but at 2:17 in the video you refer to 1 cup of milk - however I have since watched the video again and saw that later you clarified only 1/2 cup was required , so my mistake! The naan bread tasted great though, even though the dough was tricky too work with as I added too much liquid to try and compensate! Will try again!
sushma iyer says
ahhh I see.. I am glad to learn that in the end everything came out well.. thanks for sharing your feedback though.. may be next time I would try to be more specific 🙂
Chandana says
Sushma, Can you please do video recipes
sushma iyer says
Hi Chandana..
I have been doing video recipes for each and every recipe for more than 2 years now.. Each post has a video attached to it.. You can also check the Youtube channel for more detailed videos if you prefer that way. Here is the link for the same: https://www.youtube.com/channel/UCPnAy7LJpbvgzeuIr8xleDg thank you
Sue says
Suggest linking the youtube site in multiple places on the post where its being referred to as ai wasn’t able to find it either here and on the website.
sushma iyer says
Hi Sue..
I am so sorry about that.. I do re-read and re-read the blog post just to make sure that I am not missing out on anything but somehow I do miss out such things.. Please accept my apologies for the same. I will edit it out immediately.
Here is the direct link for you just in case you are still interested to check it out: https://www.youtube.com/channel/UCPnAy7LJpbvgzeuIr8xleDg
Thanks and Regards
Sushma
Cindy Barney says
Thank you!
sushma iyer says
Pleasure is all mine.. Thank you 🙂
Dhwani says
Superb post Sushma! Now anyone can make Naan at home with your so detailed post. Thanks for sharing.
sushma iyer says
That is so generous of you to say that Dhwani.. glad to know that this post was handy.. thanks a bunch for sharing your thoughts with us 🙂 appreciate it