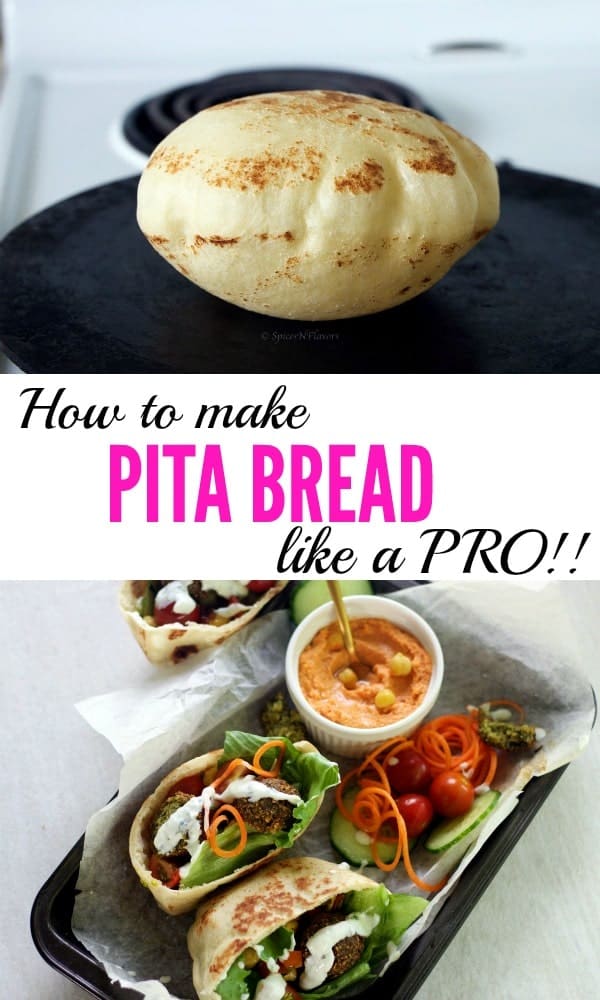
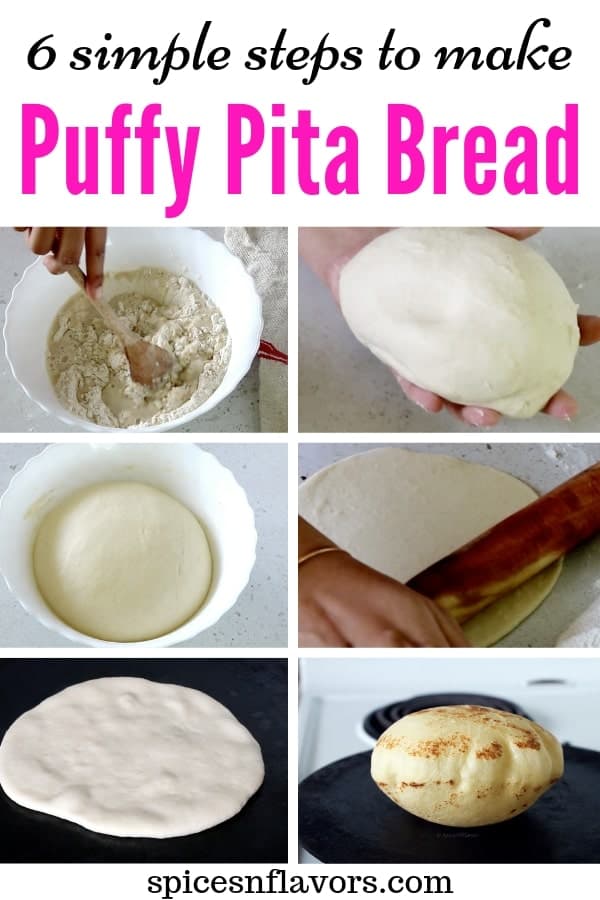
The only 6 simple steps you need to know to make Pita Bread at home like a BOSS!!!
Once you make this soft and chewy homemade Pita Bread that puffs like a Balloon creating beautiful pockets for your falafels, veggie fillings and hummus, you would never even look at the store-bought pita bread anymore.
I understand some of you reading this post might not be aware of these pita pocket bread. And for them let us quickly see
What is a Pita Bread?
Pita is a type of flatbread from the Meditteranean region.
What a Naan is to us, Indians - Pita is the same to the Arabians. This Pita bread is also often referred to as Arabic Bread, Syrian Bread or Greek Pita Bread.
Even though the pita bread dough is similar to other flatbreads like pizza dough or a naan dough few ingredients and techniques used while making pita bread is what gives it the unique puff (pocket) making it ideal for fillings, wraps or sandwiches.
Stay with me because that is exactly what I am going to walk you through this detailed post on how to make pita bread from scratch covering all the tips and especially HIGHLIGHTING all the mistakes that I made so that you do not make one. 😀
Before we begin making the best pita bread recipe, it is important to know the Pita Bread Ingredients because making a good dough is the key to making soft pita bread.
So, What is a pita bread made of?
6 basic ingredients - Flour, Yeast, Water, Salt, Sugar and just a bit of Oil. That's just all the basic ingredients you need to make pita bread dough recipe
1.Flour
Any type of flour can be used to make this bread. You can choose to use 100% All purpose flour or make a whole wheat pita bread, totally up to you.
Today we will be making this Lebanese bread using All-purpose Flour or Maida.
However, I have added just a touch of Whole Wheat or Atta to make this pita dough recipe.
Why do we need to add Whole Wheat Flour?
You might wonder for the reason and if I were you even I would have given a thought about the same.
Well, one of the main reason to add whole wheat or atta is to give that stability to the dough.
You might have observed whenever we try to roll a naan or kulcha made of maida, it often shrinks back to the original size and sometimes becomes difficult to roll too. Rolling is one of the important steps that help to get that perfect puffy pita bread.
And this is exactly where our good old Atta or Whole Wheat comes handy. Due to the addition of that little flour, it makes our job of rolling much much easier.
2.Yeast
Choose to use active dry, fresh or instant variety, any kind of yeast would work as long as it has not crossed the expiry date.
If you are using the active dry kind variety, you might be knowing the drill which is to activate the yeast before proceeding with the recipe.
Since I am using the instant variety of yeast I would skip this step and directly add everything to the flour mixture.
3.Water
It is important to maintain the temperature of the water.
Too hot you would end up killing the yeast, too cold you won't be able to activate the yeast in the first place.
The optimum temperature of water to make this perfect pita bread is preferably around 90 to 100-degree Fahrenheit.
You can consider salt, sugar and oil as just helpers in this recipe.
Now that you know that you just need a couple of basic ingredients that you probably have it even at this point of time, all you need to do is just get up and start baking this bread along with me right now!!
Because as promised in my Best Buttercream Frosting 101 post, this year I want to try and push and motivate you guys to start baking and start believing in the mantra that,
"anything homemade is always better, healthier and tastier."
And if you are intimidated by the world of bread baking then this is one of those perfect basic pita bread recipe to start your journey of bread baking.
Some of you might be subconsciously thinking as to,
How can she confidently say this?
That is because if you have ever made chapati at your home or even watched your Mum making one you can easily master making pita bread.
Even if you have not done either of the above things you will still crack the recipe because I am going to share the mistakes that I did in my first attempt so that you do not do it.
Yes, I could not make the bread puff up in my first attempt so I made this once again noting down all the mistakes and experience and in my second attempt each of my bread, I mean literally all the 10 breads puffed up on the tawa seeing which I danced up on the kitchen grounds 😉
That was a pathetic rhyming.. blah... anyways it is like a child's expression a million dollar brightness when you literally see your labour of love coming out so well.
Here are my 6 steps to help you master the art of making the best ever Pita's
Pita is a yeast-leavened flatbread which means it has to undergo the usual stages of bread making - Kneading, First Proofing, Shaping, Second Proofing and Cooking.
That brings us to the first step. Also every now and then I would be referring the art of making pitas to our good old grandma style of making a chapati because I guess with a connection to something that we eat on a regular basis it becomes easier to understand.
Step 1: Kneading the Pita Dough
First and foremost make sure that the liquid that is water, in this case, is at the optimum temperature which is 90 to 100-degree Fahrenheit in this case. (Yes in each and every bread dough the temperature of water varies)
Secondly, if you are using the active dry yeast make sure to activate it first before proceeding with the recipe.
Since I am using the instant variety, let's just mix all the dry ingredients in a mixing bowl - 2 types of Flour, Salt and Sugar.
Always mix the yeast with water that helps in even distribution of yeast in the dough.
Now add the liquid, and just combine everything using a wooden spatula and in the later stages just combine everything to a blob of sticky mass using your clean hands.
It is going to be super sticky but do not be tempted to add flour now.
Once you see no dry bits of flour just transfer the dough to the worktop and sprinkle some plain flour on top.
Start kneading the dough.
As it is just a handful of dough, I mean the quantity is so less I am using my hands to knead the dough.
If you are using a stand mixer, straight away knead the dough for 8 mins and proceed with the next step.
And if you are kneading it using hands, stick along I have some mighty tips to share with you.
Firstly if you are new to bread baking I highly recommend you to watch this video on how to knead dough, this step would really help you understand the right way to stretch the dough while bread making.
The bread dough is going to be super sticky, but that is absolutely fine just keep on kneading. In just about 3 to 4 mins you will observe that the dough has started to come together and your hands are getting cleaner.
Keep kneading, just sprinkle little flour only if needed. I used about 2 tbsp of flour while kneading the dough. You will notice that the dough is becoming less sticky while you continue to knead, as the gluten develops and the flour becomes more hydrated from the liquid.

In about 8 mins you will observe that your hands are all clean, the dough has become super soft and is not as sticky as the way you started with but it is still tacky.
And yes that is an important part - the dough has to be tacky and has some moisture.
Why is it important to get a tacky dough?
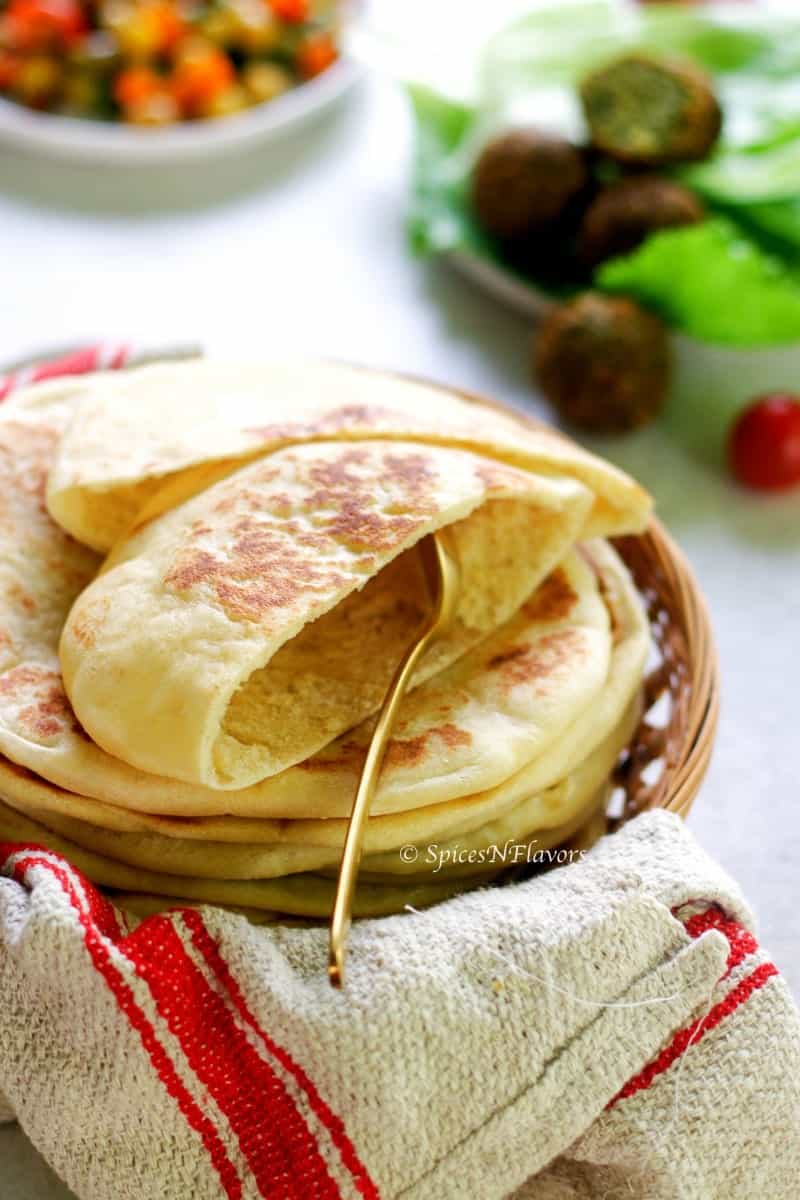
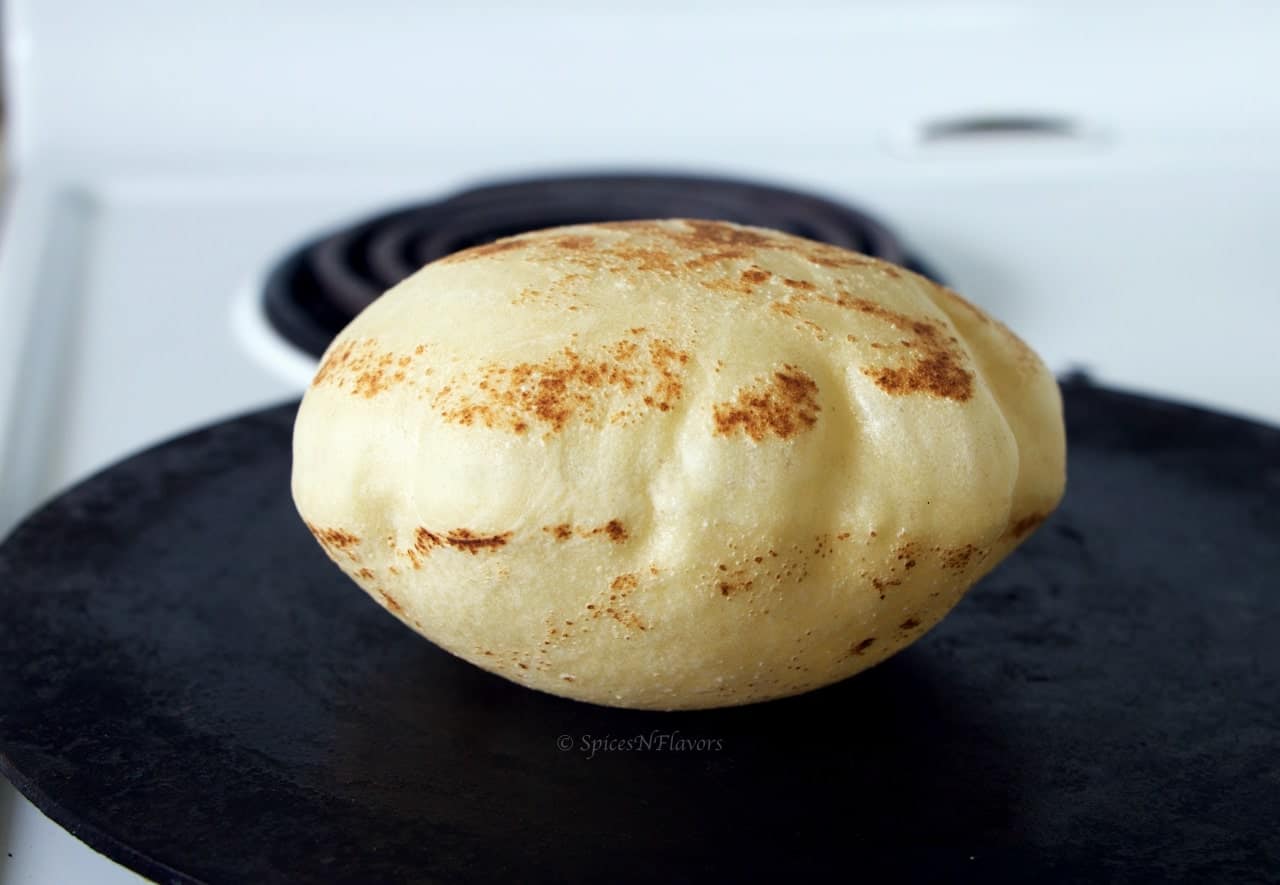
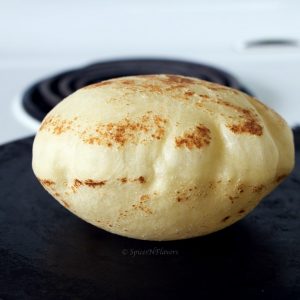
The major characteristic of a pita dough is its puff. The big pockets that it creates while baking is what makes it a different kind of flatbread. This is what enables us to make those delicious pita bread fillings that we binge upon guiltlessly.
But how do you get the pockets?
I believe now you figured the inter-linking. Yes, absolutely the moisture in the dough is the reason.
What happens is in the hot oven or on top of the hot stove, the outside of the bread quickly sets whereas the heat converts the moisture into steam and this steam is pushed outwards (commonly termed as oven spring in culinary terms) causing the push in the bread to create the puff.
And since the outside of the bread is already set by the heat the push of the steam creates a pocket in the bread leaving a soft and chewy end product for us to enjoy.
How to test whether the dough is tacky enough?
It is simple when you try to press the finger onto the dough immediately you feel the softness of the dough, but when you try to remove the finger from the dough you should feel some resistance.
Allow this dough for first proofing - 2 hours.
I know proof all my bread dough in the Instant Pot by following this guide on How to Proof Dough in the Instant Pot? Following that method, the instant pot proofing time for this recipe would be 1 hour.
Step 2: Shaping and Rolling the dough.
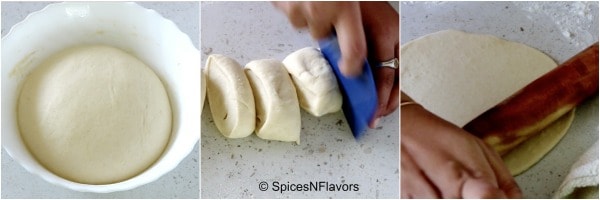
After the first proofing just deflate the dough and divide it into 10 equal parts. I just eyeballed here and divided it evenly.
Take the dough, give it a round shape by tucking the sides beneath and place it on your worktop. Flatten it by pressing the centre down. Cover with a tea towel and proceed with the next one.
Similarly, give a round shape to all the other 9 dough and place it adjacent to the previous one.
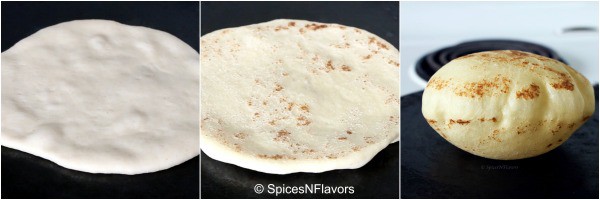
Starting with the first dough that you shaped just roll it out evenly into a circle with a 4 to 6-inch diameter.
Points to note while rolling:
- The dough should be rolled thin. Thinner the dough the more it will puff. The concept is similar to the one while making a phulka.
- It should be rolled out to an even thickness about 1/4 inch. Uneven rolling can cause a certain area to puff whereas the other might not.
- The dough should be rolled without any tears or cracks.
The concept is you want the dough to be thin so that the sides once set quickly, the heat can immediately cause the moisture to convert to steam and start the push in the centre expanding the pocket before the dough becomes too rigid.
If there are tears or cracks while baking or cooking the bread, the steam would get an exit point and would escape from there instead of doing its job of expanding to create a pocket. You might have seen this while making a chapati, if you get a hole the phulka just won't puff as all the steam just escapes.
Step 3: Placing and Second Proofing
Once you roll the dough, it is essential to place them on a baking tray lined with parchment paper or worktop dusted with flour and then covered with tea towel.
That is because when you keep them for second proofing they seem to get wet a bit and when you try to lift them sometimes it tends to stick to the surface and you would end up tearing it a bit so in order to avoid this better to keep it on a parchment paper so that it is easier to place it on a baking stone or stove top afterwards.
After you roll out all the dough to thin disc keep it for second proofing - 30 mins, so that the gluten has time to rest before baking.
Step 4: Baking the Pitas
The one thing that you have to take care while baking it in the oven or on the stove top is that the medium should be extremely HOT!!
You need that hot conditions to quickly create steam which would eventually create the pockets. If the oven temperature is too low, steam won't puff the pitas, and you'll end up with thick pita bread.
Preheat the oven to max temperature with the baking stone inside so that the stone is also hot when you place the pitas. Within a matter of 3 to 5 mins you will observe the pitas puffing up.
Making pitas on stove top:
You have to use an iron skillet to maintain the high heat level. I would not recommend using a non-stick.
Make sure that the skillet is hot otherwise the pitas won't puff.
So cook the pitas on both sides until they start puffing.
Step 5: The right way of cooking or baking the pita bread
Yes, you read it right. There is a right way of cooking the pitas.
From the above step, you got to know that the importance of heat, but the placement of the pitas is also equally important.
So right before baking or cooking the bread, you have to flip the pitas face down on the stove top or on the baking stone.
Which means the top rolled part would hit the heat first just like how we make an everyday roti or paratha.
The reason for this is that even though we keep the dough covered the top becomes dry comparatively so when we put that part on the stove top first it becomes easier to flip. And once flipped the moisture then helps to push the dough into pockets.
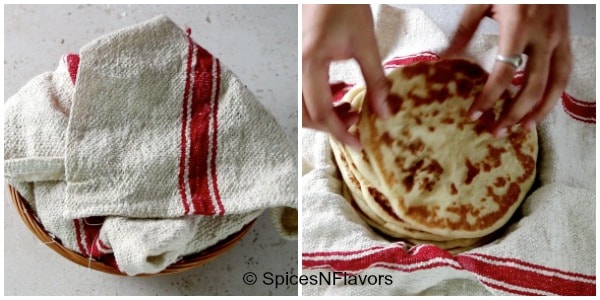
Step 6: Grandma's way of keeping the rotis aka pitas
I believe this final step is a no brainer step. We Indians have been practising this for ages now.
To keep the pitas warm and soft we need to enclose them or wrap them up using a tea towel as soon as they come out of stovetop or oven. This helps to keep the pitas soft for a long time because, the tea towels aids in capturing the right amount of moisture letting the pitas breathe at the same time.
Follow these 6 simple steps and I can assure you that most of your pitas would definitely puff.
Yes, I am not saying all but mostly because sometimes the pitas just don't want to puff.
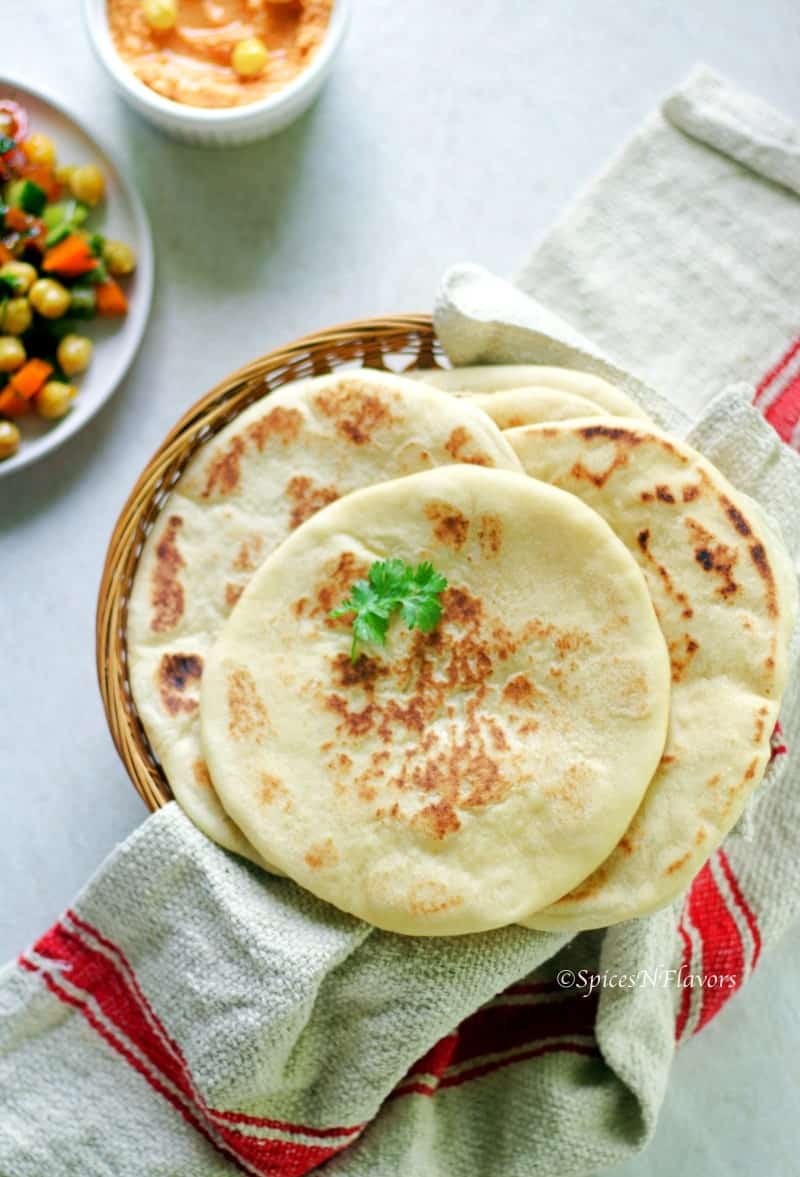
There is nothing like a fresh warm pita bread!!
For the Pitas That Just Won't Puff:
Don't get disheartened if the pitas won't puff. The first time I tried making pitas at home none of it puffed. But I am glad that it didn't because that's how I learned the science of making perfect pita bread.
Even if the pitas don't puff, these pocketless Pita Bread still turns out to be so so so soft and chewy and delicious and can still be used as a wrap or simply dipping in hummus. Or use it as a base for making pizzas; Pita Bread Pizza tastes amazing or just make pita chips or crisps out of it. Stay tuned that is what I am going to be sharing next week with you all.
So yeah keep all that in mind and please note the
5 Common mistakes to avoid while making pita flatbread recipe:
- Knead the dough to the right consistency. Do not be tempted to add excess flour.
- Do not skip the wheat flour Just a little while kneading, makes a lot of difference.
- Take your time to roll the dough. Don't lose patience or be in a hurry. Just relax. Switch on music and roll it thin.
- Flip the pitas carefully so that you do not tear or make a hole causing the steam to escape.
- Make sure that the oven or stovetop is EXTREMELY HOT
Storing the Dough
After the first proofing, the pita bread dough can be refrigerated for about a week and used as and when needed just like the way we do with our regular chapati dough.
Just pinch out the required dough to make 1 or 2 or the required amount of pitas and store the remaining in an airtight container for about a week.
You can also freeze the rolled out dough by placing a parchment paper between each disc for around 1-2 months.
Or partially cook them say 30 sec on each side and then freeze them with parchment paper between each disc, then wrapped in foil and plastic wrap. Defrost, then toast in the skillet as per recipe.
And here is the detailed instructions to make this quick and easy pita bread recipe
How to make Pita Bread at home
Ingredients
- 2 cups All purpose Flour plus 1/2 cup for dusting
- 1/2 cup Whole Wheat Flour
- 1 tbsp Sugar
- 1 tsp Salt
- 1 tbsp Olive OIl
- 2 tsp Yeast (refer notes)
- 1 cup Warm Water
Instructions
- Combine all-purpose flour, wheat flour, salt and sugar in a mixing bowl. Stir to mix.
- Add the yeast to warm water and stir to dissolve completely. Pour this in the mixing bowl along with olive oil and then combine everything into a sticky mass.
- Transfer to your worktop dust with additional flour and knead for 8-10 mins until you get a soft and tacky dough. (Refer the detailed instructions from the above paragraphs)
- Lightly oil the same mixing bowl. Transfer the dough into it, coat it with olive oil from all sides to refrain it from drying and then allow it for first proofing -2 hours.
- After 2 hours lightly deflate the gas and divide the dough into 10 equal parts. Tuck the sides in of it and give it a round shape. Press in the centre and cover with a tea towel. Repeat the process until you shape all of them into roundels.
- Take the first dough that you shaped and roll it thinly and evenly to 6 inches in diameter. Place it on a baking tray lined with parchment paper and cover with a tea towel.
- Once you have rolled out all the roundels allow it for second proofing - 30 mins.
- Preheat the oven to 230 degree Celsius with the baking stone inside. Right before baking flip the rolled out dough on to the stone and bake for 4-5 mins until it is nicely puffed up.
- To make it on a stovetop make sure that the skillet is hot. Flip the rolled out dough and place it on the hot skillet. After about 20 sec flip the dough and you will observe that the dough puffs up like a balloon in minute's time. Flip it over again and cook on both sides.
- Wrap it in a tea towel as soon as it comes out of the oven or skillet to keep it soft.
- Pita bread tastes best when still warm.
Video
Notes
- Since I have used the Instant Variety of Yeast I just dissolved it in water and proceeded with the recipe. However, if you are using the active dry yeast then make sure to activate it before proceeding with the recipe.
- The ideal temperature of water for this recipe is around 90 to 100 degree Fahrenheit.
- Do not be tempted to add more flour while kneading, the dough has to be soft and tacky, not dry.
- Make sure to roll the dough thin. Also, flip the dough right before baking or cooking it.
- Wrap the pita bread in a tea towel to keep it warm and soft. The bread tastes amazing when still warm and fresh.
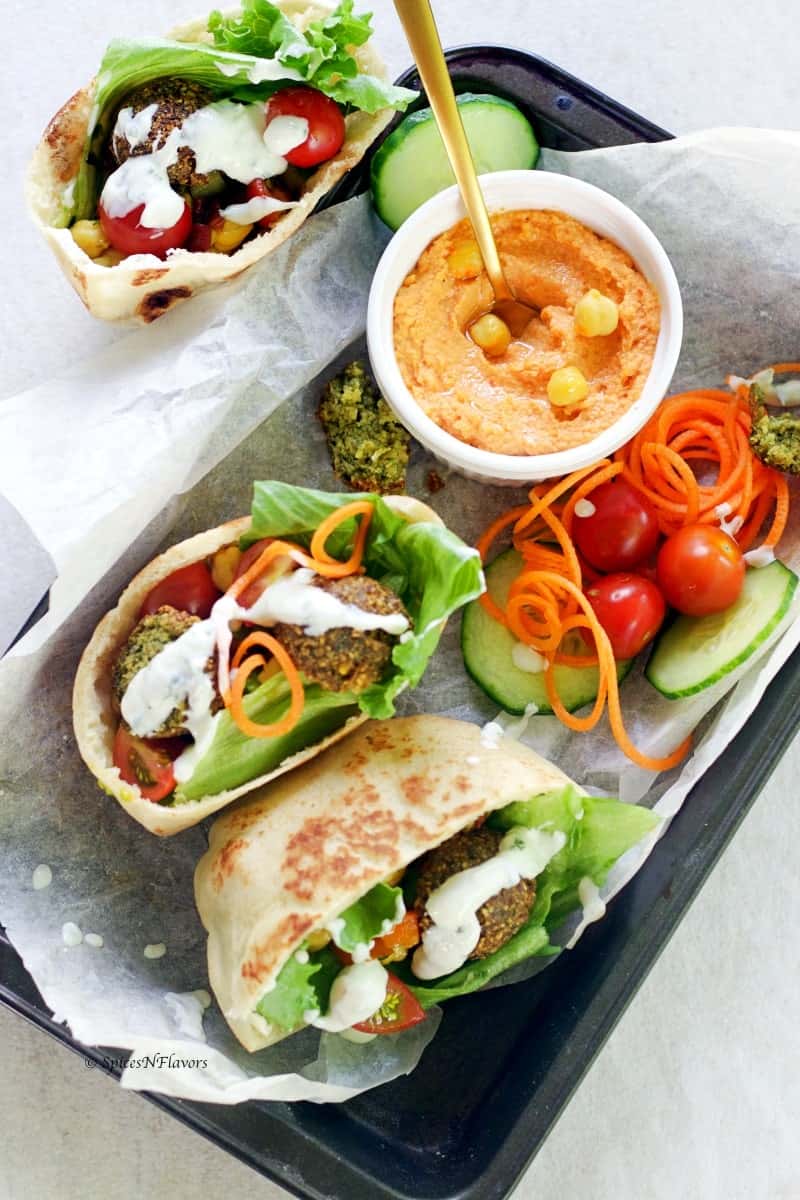
- Serve the pita pockets with fillings of your choice like falafel, hummus, veggie fillings or tzatziki.
I hope that this post on a simple pita bread recipe was informative and you got to know all the tips and tricks of making a perfect puffy pita bread.
If you are wondering what to serve with pita bread - Here is what we had for lunch the other day: Pita bread with hummus, falafel, balela salad, fresh greens and tzatziki sauce.
And if you did then do let me know by sending a message on my Facebook, Twitter or Instagram page.
Comment below and let me know what are you going to serve pita bread with?
You should also check this post on the Secret Bakery (DOMINOS) style Pizza from scratch.
If you love baking then definitely check out my Baking Inspiration board on Pinterest and specifically this board on Bread if you are interested in baking fresh warm homemade bread.
Pin this for later
I will see you soon with yet another post.
Until then
Hugs
Sushma
N says
I haven't made them yet, but came here looking for a recipe to make pitas for donairs and I just wanted to say how much I like your photo of the beautiful puffy one.
sushma iyer says
Thank you 🙂
Carly says
Pitas puffed up and taste great. Can you share baking instructions for the rounds that I froze?
Much thanks
Reena says
Hi Sushma, i am so excited to try your recipe but i just want to clarify the 1st proofing time of 2 hrs. I am from very warm (or even hot!) Philippines and my lean bread dough is usually doubled in an hour. Am concerned that I will overproof in 2 hrs. You were very specific with this proofing time whereas most recipes usually say “till doubled “. Am in a quandary as to following your 2hrs instruction and risk overproofing, or proofing just till dough doubles and risk not succeeding in getting the pita to puff. What is the temp in your kitchen when you do 2 hrs proofing? Also, can i pre-shape into rondels before refrigerating dough after 1st proof?
sushma iyer says
Hi Reena.. you can reduce the time if you dough is proofed a little over double in half the time.. not an issue..
Lisa says
Do you put oil or butter into the skillet when you bake them on stovetop?
sushma iyer says
Hi Lisa.. no I don't
Toshiko says
Thank you so much! All but the 1st pita I cooked turned out beautifully. The 1st pita taught me that "hot skillet" means medium-high heat and that lightly flouring my hands before transferring the dough to the skillet would be very helpful.
I used 260 grams of AP flour (plus also the whole wheat flour), and a stand mixer. The dough turned out nicely tacky.
Very yummy! Thank you for the recipe!
Suzan says
Just discovered your video and recipe for life's.
Will try soon. Your video is fantastic. So well executed.
You are obviously doing what you were to do.
Suzan
sushma iyer says
So pleased to know this..thank you "_
Edel says
I would like to make your pita bread but I live in a country where we calculate in grams and there is a big difference in cup in the USA and England, which measure do you use is the USA cup? Regards Edel
sushma iyer says
Hi Edel.. yes USA cups
Jeff says
Hi Sushma;
My Wife Michelle and I do "alot" of cooking. We meal prep. We made a couple of feeble attempts at pitas awhile back with about 30% success so we didn't bother with it.
We're getting ready to start lifting again and would like to incorporate Pita Bread in our meal plans and ran across your recipe.
We have alot of experience behind the stove but I have to tell you, we followed your recipe exactly and "every single one" of those Pitas turned out.
Probably the best recipe that we've ever followed. Made ZERO adjustments and didn't have to go back for round two or three to make it work.
Just know that there is a married couple in Churubusco, Indiana working this into their lifting routine and appreciate your recipe... very much.
Thanks.
Jeff & Michelle Van Pelt.
sushma iyer says
Hi Jeff.. I could only imagine the chemistry between you two working together.. that is such a beautiful story that you have shared with us today and I am glad that I am a part of it in some way.. hope this tradition of love for cooking only blooms with years to come.. thank you for taking the time to share your feedback with me.. appreciate it..
Brenda Meech says
I have tried many pita bread recipes and none of them were as informative or successful as your recipe.
I tried to subscribe for your emails, but that was sadly unsuccessful.
Never mind, thank you anyway for your wonderful page.
Greetings from New Zealand.
Brenda
sushma iyer says
Hi Brenda
I am glad the post was helpful.. thank you for sharing your feedback with us.. actually I have paused the subscriptions for a while. Will restart it soon.. thank you 🙂 btw I used to live in New Zealand too <3
Coleen Power says
Yes her YouTube video is very detailed. I loved all the tips. I will try this soon.
Sylvia Fairchild says
I tried these tonight and they turned out soft and delicious as stated....and what fun to watch them puff up like they do!!! Thank you for the detailed video. It really helped.
S
sushma iyer says
Hi Sylvia I am so pleased to learn this.. Thank you for sharing your feedback with us, this would encourage many others reading it to try the recipe 🙂
Sylvia Fairchild says
I tried these tonight and they turned out soft and delicious as stated....and what fun to watch them puff up like the do!!! Thank you for the detailed video. It really helped.
S
Diana says
This is my favorite pita recipe. It improved my success rate. In a cast iron pan the pitas puff up almost 100% of the time. I learned so much from watching the video especially the detail on the tackiness of the dough, the tip to invert the rolled dough into the pan and the tips about shaping the pieces of dough. I just love watching them puff up and love eating them. Thank you so much.
sushma iyer says
Hi Diana.. I am so pleased to learn this.. glad to see that the video tutorial was helpful.. thank you for sharing your feedback with us.. appreciate it 🙂
Larry H says
I used a cast iron pan after heating it, and the pitas did not fill up with the stream, but then I put them in the oven, and they came out perfect.
sushma iyer says
Hi Larry.. May be the temperature was not even.. good to know you were quick enough to go for an alternate method and that worked. thank you.. this would help others to try it too..
Claire says
I tried this recipe for the first time today. It turned out perfectly! I am so impressed. I must confess I made the dough in the bread maker (that's why I have one) but followed the rest of the process. I baked them in my oven and without a stone but it was still perfect. I will be making these again. Your instructions were great which is most likely why this has worked first time. Thank you!
sushma iyer says
Wo hoo Claire.. thank you for sharing your feedback. I am glad that the dough worked out well in a bread maker. This would help many others having the same query as personally I have never used a bread maker before so do not have much idea about the same.
Rajish says
Hi, if i were to use only whole wheat flour, would i have to adjust the water. Can you recommend by how much.
sushma iyer says
Hi Rajish.. I have a detailed post on whole wheat pita bread.. here is the recipe link for you: https://spicesnflavors.com/instant-pot-whole-wheat-pita-bread-recipe/ hope this helps
Lisa stump says
Hello…so what if I don’t have any whole wheat flour…have you ever tried with only white flour? And should I use regular ap flour or bread flour…thanks
Lisa
sushma iyer says
Hi Lisa.. Both APF and bread flour would work you can use any. You can skip whole wheat flour the bread still tastes delicious the only thing that I felt was without Whole wheat it is a bit difficult to roll the dough.
Jeannette says
I think this is a very good recipe. I will try it.
sushma iyer says
Hi Jeannette.. that sounds like a plan.. will be waiting for your feedback.. thank you 🙂
Susan Jacob says
Hi Ma'am. Can I make the pita bread the day before and store it and re heat it the next day? If so, do I need to keep it in the fridge?
sushma iyer says
Hi Susan.. yes you can do that.. follow the reheating instructions of dabbing the pitas with water and then reheating to retain the softness.. Keep it in an air tight container at room temperature overnight
Linda s says
Hi
I followed your recipe and watched your video but they did not puff up. What could I have done wrong? I just used a regular griddle pan. Do you think that was it? I am gong to try my stone in the oven next time.I refuse to give up!!
😁
sushma iyer says
Hi Linda. as long as the heat was high it does not matter which pan you are using. the cast iron or stone does help though.. just note that the dough should be well hydrated and rolled thin and even.
Donna says
I don't have any whole wheat flour. Could I just use all purpose flour?
sushma iyer says
yes you may 🙂
Jimmy says
Thanks for the recipe. Just curious what type of griddle are you using to on the stove top?
sushma iyer says
Hi Jimmy.. Pleased to see that you liked the recipe. Thank you. I am using Iron Griddle here commonly used to make Indian style Crepes. Search for dosa pan on Amazon if you would like to buy one for yourself 🙂
Regards
Sushma
Yashashree shah says
Hi, I did try making pita bread with your recipe and they were beautiful and puffed up. I had tried making them before with other recipes and they were a disaster. I made them in convection oven and placed them in the black backing tray and put two at a time at 230’ f and they were all puffed up in about 3-5 minutes. Loved the taste, texture and the way they ballooned up. My family enjoyed their pita wraps and were actually asking for the recipe 😊
sushma iyer says
That is so good to know.. thank you yashashree 🙂
Soniya Kenkre says
How much is 1 cup ofvwater please and it's cancelled in you recipe. Can you please tell me?
sushma iyer says
1 cup water is 250ml.. thank you
Renuka Sood says
I like all your recipes and the way you present things too good 👍👌
sushma iyer says
so good to know. thank you renuka 🙂
SS says
Did not con=me out good. Used atta and AP flor plus yeast, Proofed as mentioned, rolled as thin as mentioned Tried cooking some on Tawa and some in the oven It did not turn out like yours. Not happy about it. Had to continue and cook all the dough to so-called PITA BREAD, which became hard eventually
sushma iyer says
Sorry to know about that SS.. There are many factors that could have gone wrong. It is all about the hydration of the dough.
Laura says
Thank you for the detailed recipe! Most of mine puffed up and it was so fun to watch. I sat like a kid in front of the oven.
sushma iyer says
Awww.. I can totally imagine the scenario.. Glad to know you liked the recipe 😀
CJ says
What if I don’t have the whole wheat flour ??
sushma iyer says
HI CJ.. You can definitely substitute it with APF.. Adding wheat flour makes it easier to roll thats it..
Steve says
Tried several others recipes / techniques and have not actually had one fully puff until yours. Most puffed and the first few that didn't I know what I did wrong. Going to do another batch tonight to freeze (which I didn't know was an option).
sushma iyer says
Hi Steve..
That is awesome.. so pleased to know that you found what you were looking for.. Thank you for the feedback.. appreciate it.. <3 glad that the recipe worked out so well for you too.. thanks for sharing.
Regards
Sushma
Rei says
Fantastic recipe, such detailed instructions and great tips. Followed to a T and all 10 pieces of pita bread puffed up deliciously. I cooked them on a pizza stone on the bbq outside cranked up the temp to 250C as my first attempt using different recipe (not too successful) baked in the oven just got too smoky. Main points to remember is to roll out thin and rest before cooking. Thank you very much Sushma. Merry Christmas and a happy New Year!
sushma iyer says
Hi Rei.. That is awesome. Thank you for sharing your wonderful experience with us. Appreciate it.. I am glad that the recipe instructions and tips worked for you. Thank you.. And yes thank you for the wishes. Hope you had a great Christmas too. 🙂
Regards
Sushma
Marilyn says
Thank you for the great recipe and explanation. They puffed! I did a kitchen happy dance.
sushma iyer says
Wo Hoo.. that is so exciting isn't it Marilyn?? Thank you for sharing your feedback with us.. appreciate it 🙂
Hassan Sanaat says
Very detailed and through explanation and instruction. Thank you.
sushma iyer says
Glad to know you liked it.. Thank you
JinaO says
This looks amazing. Wondering if you can tell me what type of pan you are using? I know it’s cast iron but is it special type for pita bread?
Thank you!
sushma iyer says
Hi JinaO.. No this is a flat cast iron pan that is used to make dosa or crepe nothing special 🙂
TNM says
Beautiful pitas! Do you have a recipe for whole wheat only pitas?
sushma iyer says
Thank you,, Yes I do.. Here is the link: https://spicesnflavors.com/instant-pot-whole-wheat-pita-bread-recipe/
Regards
Sushma
Srikanth says
Hi,
question about the measurements...When you take a cup of flour, how many grams is it? The reason being, I am not sure what size the cup is. Thanks and your recipes are great.
sushma iyer says
Thank you Srikanth.. 1 cup flour is 120 gms 🙂 hope this helps
dave says
Sushma, thank you so much for this recipe and for explaining everything in detail!
I struggled endlessly until I found your recipe. Watching my pitas puff up is a joy every time.
sushma iyer says
Hi Dave.. Yay!! That is awesome.. Thank you for sharing your feedback with us.. appreciate it
Liz says
P.s. thank you for the section where you showed some troubleshooting tips. That was extremely helpful
sushma iyer says
Hi Liz..
So pleased to learn this.. glad that the post was helpful..thank you for sharing your thoughts with us.. I truly appreciate it 🙂
Regards
Sushma
Liz says
Thank you for a great recipe! I had a lot of problems with them not puffing correctly, but I believe it is my situation and not the recipe. We are full-time occupants of a 19 foot travel trailer. The air conditioner blows almost directly onto the stove I didn't realize this until halfway through the recipe. I believe if I blocked the air or baked them outside they might turn out more consistently. I did have a few puffs up beautifully. The flavor is outstanding, I made mine with sourdough instead of yeast, because I can only eat fermented bread. They are wonderful. Thank you for taking the time to write up the recipe and post it
sushma iyer says
Oh wow Liz.. thank you for sharing your experience.. I so want to try this with sourdough.. My sourdough is just 4 months old lockdown made me do it.. lol.. ok so yeah I am so interested in doing this with sourdough now that I have a green sign from your I would try it pretty soon.
And I am sorry about the pitas not puffing you guessed it right the skillet needs to be hot for the same 🙂
Regards
Sushma
Emerald says
Hi Sushma,
Thanks for these easy to follow recipe. This is my first time making pita bread, I just randomly searched on you tube and watched your video on how to make it. It was very thorough and detailed. After watching several times, I decided to make it yesterday just in time for dinner. I followed exactly the same with a couple of variations, I used 3 cups of plain flour/ all purpose flour only and I used a stand mixer to knead to save time as I need to prepare other dishes to accompany this pita bread. It had its full 2 proofing done accordingly. However, only the 1 st pita puffed 100% 🥳🥳and the rest of the pita gradually reduced in puffing up 🤔🙁. I wish I had my phone to video the first successful puffed pita, but when I got my phone to video the subsequent ones all of them fail to perform as expected..
I believe it must be due to rolling the dough as well as the tawa became too hot it started to scotch the bread and any bubbles formed underneath were scotched and punctured causing it to not puff up. However the breads cooked and wrapped in tea towel, placed in a hot pot remained hot and soft. I was disappointed I could not split the pita pockets, I tried to split the pockets but it was partially stuck together and it tore in half. Do we cut up the pita and split the pockets immediately before wrapping in tea towel, or do it just before eating? I have a cast iron tawa used for making tosai, which I used in making this pita on stovetop, can I place this tawa in the oven and heated it up? If yes how many degrees in Celsius ( Fan or no fan mode) or is there a specific mode I need to select? How thin should I roll the pita in cm?, I understand you mentioned 6 inches in diameter, do we need to roll the edges thinner than the center or rolled the entire disc evenly both center and edges? I placed my tawa on the stove tops wok burner side, and heated up high till it started to smoke before putting my first pita which puffed, but subsequent ones started to scorch the pita, do I switch to medium or low or do I remain on high once I place the pita on the tawa? During anytime in the cooking process do change the heating level or do I remain on max high? I have a second half the prepared dough in the fridge. Is there any specific steps need to be taken before using the dough from the fridge? Does it need to be room temperature before rolling and do we still need to let it proof 30 minutes before cooking it? Hope you will be able to help me with these questions.. Thanks Sushma for your detailed video explanation.
sushma iyer says
Hi Emerald..
I am so pleased to learn that you are so much keen in making these Pitas. Glad to hear about your trial.
Yes from your detailed explanation I can see that your Tawa got too hot so the pitas stuck to it and while flipping it you are accidentally puncturing it. In that case what you can do is sprinkle some cold water on to your Tawa. This would reduce down the temperature of the Tawa. OR you can also reduce the heat to medium if you see that the tawa is getting too hot to handle. This would help prevent the pitas from sticking.
Other thing to note is that you will get the pockets only if the Pitas puff or else it would be like how you have described here. Puffing is important.
And no need to put your tawa in the oven.. If you have a pizza stone that would be preferred as it would retain the heat well. Or you can simply use baking tray as you can cook a minimum of 4 pitas at a time.. So cook the pitas at high heat for just 3 to 4 mins until puffed.
About rolling them even rolling is what we are after there is no need to roll the sides thinner or anything of that sort. So roll it to 14 to 15 cms should work.
Hope this helps..
Regards
Sushma
Steve says
Are you using a dry skillet?
sushma iyer says
Hi Steve.. I would say kind of.. After every use I wash my skillet, oil it and heat it then store it so even though at the time of cooking there is no oil but since the iron skillet is seasoned each time after use it does have some oil.
Hope this helps or else you can watch the sequel video for further queries: https://www.youtube.com/watch?v=6bMeGec9mvg&t=670s
Regards
Sushma
Liz N. says
Thank you for this recipe! I made it today and all but one puffed up! They were so soft and perfectly chewy. I used a cast iron skillet and I didn't have wheat flour but I used 1TB of vital wheat gluten.
sushma iyer says
Hi Liz..
That is good to know.. so pleased to learn that you all enjoyed the bread. Thank you for taking the time out to try and share your wonderful feedback with us..
Regards
Sushma
Lakshmi Sevugan says
Tried this out today came out extremely good.. all these days were doing other recipes but today only I made it perfect. Thanqks a ton for it. One small suggestion it would be so helpful for many if u give measurements in grams too. I tried using grams measurement from one of ur reply in butterscotch cake abt ur cup is 250ml. I converted that into grams for flour and used now. Came exactly good. Am asking for grams or oz. measurements as everyone r not aware to measure in cups properly.. till now am not able to measure in cups properly. So kindly help me out. tomorrow planning to do strawberry filled cupcakes.
Am really impressed by ur detailed explanations n ur output. Keep rocking ,, thanks a ton once again
sushma iyer says
Hi Lakshmi..
Yay!! that is amazing.. thank you so much for taking the time out to try the recipe and then share your wonderful feedback with us.. I truly appreciate it.. and also accept my heartfelt apologies for not replying back on time.. But I am glad that you have somehow figured it out..
So I also like to measure in gms only to be honest but majority of my readers ask for cup measurements so started using that but in my latest recipes I now try to give both so one can choose as per needs.
My 1 cup liquid is 250ml and 1 cup of flour is 120 gms.. 🙂 Hope this helps.. And going forward will try to put both.
Regards
Sushma
Kristin says
I've watched your video 3 times (which was very good and thorough, BTW), and I've made this recipe 3 times this week, and I'm still not meeting with success. I just need some help trying to figure out what to change, so I can finally reach pita perfection.
I can always follow recipes really well, and have them turn out just right the first time I make it, but pita bread has definitely been a challenge for me. The first time I made this, I did it in the oven. I don't think I had added enough flour. The dough was just too sticky. It was sticking to the parchment paper. On the 2nd and 3rd tries, I did it on the stovetop. (It's already getting very hot where I live, so turning on a 550 degree (Fahrenheit) oven is not ideal at this time of year.) I used a cast iron pan, and I made sure it was nice and hot before starting. I tried to do it just like you did, by gently loosening the pita right when it hits the heat, and flipping it over fairly soon. No bubbles are really forming at all though. Only the first pita that I try to cook (on both the 2nd and 3rd tries) seemed to even remotely start getting bubbles. Then, after the first, I get no bubbling. I almost wonder if my cast iron is too hot? They cook so quickly, that I'm worried that if I wait for bubbles, they'll burn. What do you set your burner to? I had mine on medium high heat at the beginning. Should it be medium? I feel like I kneaded the bread well, and it was nice and moist. I use a tortilla press to flatten the dough to save some time in rolling out each one. It's so much faster. On the 3rd try, I made sure the pitas were pressed to 6 inches (whereas previous times, I pressed them even thinner). Other than the pan being too hot, I can't figure out what I'm doing wrong! Help! I have to conquer this! 😀
sushma iyer says
Hi Kristin..
So sorry that you are not able to get it right the first time.. with your comment I understand that you are good when it comes to cooking..
And you have also mentioned that the dough was moist. So now the only thing that you could go wrong is rolling where again you have mentioned that you rolled to 6 inches.. Seems like you have followed all the steps well so far..
Now I could only add that do not roll all at once.. Roll 2-3 at a time and keep.
For your skillet.. I heat mine on max and once hot I lower the flame to medium and cook.. If it gets too hot in between you can sprinkle some water on top and reduce the temperature. This has become a challenge to me too now.. Sometimes when recipe doesn't work my mom says to leave it for a while and try after few days.. Other than that may be you can also give the wheat pita a try.. here is the link: https://spicesnflavors.com/instant-pot-whole-wheat-pita-bread-recipe/ I find it much easier to roll too..
Sorry I couldn't be of much help here as per your comment you are doing everything right I am not able to figure out where you could have gone wrong 🙁
Kristin says
Thanks for your quick response! I appreciate it so much. 🙂 I'm sure it's tough not knowing how to help people know what they're doing wrong when you're not there with them. I made your recipe twice today, and I finally have met with success! The first attempt today, I decided to try cooking the pita on both the stovetop and in the oven (so I had both hot and ready). The ones I cooked on the stove-top would still not puff up, but when I baked them in the oven, this time, they finally puffed up beautifully! When I cut into a couple of the pitas after they had cooled, I noticed that one side of the pita was very thin, and the other side was thicker. Do you know why that happens? When I was baking them in the oven, I would allow the pita to puff up all the way, and then flip it over to brown on the other side. Should I have flipped it sooner (like how you do on the stove-top... where you wait for some bubbling, and then you quickly flip?)? I decided to make the recipe a second time today to make sure I could do this consistently, and try out flipping the pita bread when it's beginning to bubble. Well, when I tried that on the second batch, it almost seemed to stop the pita from puffing up all the way, so after a couple failed attempts that way, I just allowed them to do their thing... puffing up all the way before flipping. Anyway, I"m happy to finally be meeting with success... although I wish I could do this successfully on the stove-top, instead of using a hot oven.
BTW, I just want to compliment your fantastic video once again. Your tips were very helpful. I loved how, as you kneaded the dough, you would show us how sticky your hands were after a certain number of minutes. I thought it was helpful to see how much the dough would stick to your finger at the end. It was helpful to see how thinly you rolled your dough. It was helpful to watch how you cooked them on the stove-top (even though I have yet to achieve your expertise). Anyway, all your tips and tricks were very good, and I enjoyed listening to it. I think I've listened to it 4 times now.
sushma iyer says
Yay!!!! I am so pleased to read through this.. Finally, you found success!!! Glad that it worked..
And when you cut into it, that's how the bread will be thinner on one side and thicker on other its how it puffs.. you did not do anything wrong there.. so you did it right.. no need to flip half away..
For stove-top maybe you need some practice with controlling the heat..
But I love how determined you are!! You did it tell you were successful I am so pleased to learn that.. Appreciate that quality of yours.
And I am glad that the video was of some help.. thank you for putting it down..
What did you fill your pockets with??
Regards
Sushma
Kristin says
Sushma, I made this recipe again this morning to make sure I could get consistent results. 8 out of 10 puffed beautifully. 1 didn't puff at all, and 1 puffed almost puffed all the way.
I actually haven't eaten any yet. My 5 sons and husband have been eating all my practice ones, and they say how delicious and soft they are. To celebrate my wedding anniversary, my husband and I wanted to try some Middle Eastern/Mediterranean food, so that's why I've been practicing making pita bread. We're going to fill them with falafel (I'll be making/eating those for the first time), and fresh vegetables like cucumber and tomato.. maybe feta cheese? And then some tahini sauce. I"m excited to try some of these new things.
For those who are making pita breads in the oven: I set my oven to 550 degrees Fahrenheit, and bake mine on a pizza stone. In my experience, it takes about 60-75 seconds for the pita to fully puff. I flip it around 90 seconds, and then allow the other side to bake for another 60-90 seconds.
This recipe is delicious, and I'm getting great results. I've made this recipe so many times, I have it memorized. 😀 Thanks so much, Sushma!
sushma iyer says
You are one amazing lady Kristin.. Your family is sure blessed to have you in their life.. What a determination you have I truly admire that.. Happy anniversary to you in advance.. stay blessed.. I am so pleased to learn that I will be a part of your celebration in some way.. thank you for sharing your experience with us.. appreciate the time you have take to try and also pen it down here. This would surely be of great help to many reading this.
Thanks and Regards
Sushma
Ros says
Hi Sushma.. the first time I tried making the pita bread it came out too good👍🏻👌🏻
Thanks for the wonderful recipe!!
sushma iyer says
Hi Ros.. I am so pleased to hear this.. Thanks for sharing.. appreciate it..
Regards
Sushma
Chrissie says
Hi
I followed instructions but my dough felt dry, and not tacky, Can you add water when kneading ?
sushma iyer says
Hi Chrissie..
Yes definitely you can add more water while kneading.. There are so many factors that could affect the moisture like the altitude, how old or new the flour is what brand it is and what weather it is..
So definitely use more water if need be..
Regards
Sushma
Bethany says
They poofed! Well, about half of them did. I am SO excited! I did mine on a cast iron griddle on top of the stove. I wish I could show photos. I feel like a proud mama!
sushma iyer says
Yay Bethany!!!!
I am so thrilled to read through your comment.. I you got me at a Proud MAMA I have had that experience so could relate!!! hehe.. And I would love to see your pictures.. Do you use Instagram?? If yes would love to connect with you there. Here is the link to my handle I am always on Instagram these days.. 😉 Here it is: https://www.instagram.com/spicesandflavors/
Regards
Sushma
Charvi Shastri says
Do you apply oil on the pan when applying pita bread on it? Or you directly place it on hot pan?
And stove cooked pita has dark patches on surface. The ideal pita breads are pale colores with light brown color or very less brown dots.
sushma iyer says
Hi Charvi..
You are right about the patches.. You won't get that while making in an oven. And to answer all your queries regarding pan I have made a separate post on whole wheat pita that might be helpful. Please have a look. Linking it here: https://spicesnflavors.com/instant-pot-whole-wheat-pita-bread-recipe/ thank you 🙂
Usha Fifadra says
Pls send me baking tips Cheese cakes n breads too.
sushma iyer says
Hi Usha..
Are you talking about the tips that I share on Email newsletters. Then Yes it would have tips on Bread too if not I would suggest you to join our Email Newsletter by clicking here: https://spicesnflavors.com/subscribe/ And you will start receiving tips on cakes, bread and everything related to baking.
Regards
Sushma
Ana Maria Tewkesbury says
Tried It for the first time ever, clear and simple instructions to follow with great video. First one did not put but the others did. Maybe the pan was not hot enough. I will definitely invest in a good skillet now. Thank you
Ana Maria Tewkesbury says
My previous comment meant to say the first one did not puff
sushma iyer says
Hi Ana..
So pleased to read your comment.. I am glad to learn that the instructions were helpful. Thank you for sharing your feedback with us.. Appreciate it..
Regards
Sushma 🙂
Poonam says
Tried this recipe yesterday and the pitas turned out great, soft and puffy! I really liked you explaining it in detail and also the video. It helped a lot. I followed it to the T, was just wondering though, does it need 3 proofing? Can we skip the 3rd proofing? Thanks much for the great recipe!
sushma iyer says
Hi Poonam..
So pleased to read through your feedback.. Glad to know that the explanations and video helped.
There are only two proofings - one bulk fermentation and the other after you roll the pitas. Not sure what 3rd proofing you are talking about.. Could you please elaborate.
Thanks and Regards
Sushma
Hyacinth says
I tried your Pita bread and it turned out well. I was happy to have 5 out of 9 pitas puff up. Thank you for the recipe
sushma iyer says
Hi Hyacinth..
Thank you for sharing your feedback with us.. appreciate it 🙂
KathrynT says
I have tried this recipe twice and the second time not a single one puffed. I really think this is too much water for my climate. I weigh my ingredients so I am sure of the exact amount. The humidity level here in Jasper Ga was 99%. I have a feeling it is much lower wherever you are cooking. I made flour tortillas yesterday and they actually puffed but my pitas didn't! Next time I make them I will use considerably less water. The dough was so sticky that I couldn't do a good job rolling it out or handling it. When I would try to get it off the parchment paper it would wrinkle up. Still the bread was delicious and we all enjoyed eating it. So I am grateful for your help, and I enjoy your videos immensely.
sushma iyer says
Thank you Kathryn for your detailed feedback. Yes, maybe you can add less water next time.
Regards
Sushma
KimH says
Can I half the pita recipe? Will the proportions still work to make 5 pitas rather than 10?
Thank you!!
sushma iyer says
Hi KimH
Yes you can 🙂
Gill says
Thank you kindly
sushma iyer says
Always welcome Gill 🙂
Zeina says
Hi Sushma. I was so happy to stumble on this recipe. Being lebanese this is my husband’s absolutely favourite bread. I should mention I’m an experienced baker and I always weigh all my ingredients even liquids but I really struggled with this dough. The first problem was kneading it as it was really tacky. It took about 25minutes until it got to the right consistency as shown in your video. The second problem was rolling it out as it kept springing back even though I added whole wheat flour to the mix. Finally the third and worst problem was removing form the parchment when it came time to cook it. It was so sticky I had to scrape it off, reroll it and proof it for an extra 15 minutes. In the end a couple puffed up half way. Despite it all it tasted very good and I’d love to make this again. I’d really appreciate your input on what went wrong. Thanks
sushma iyer says
Hi Zeina.. I am really sorry that you had to go through all of this.. And thank you for sharing a much detailed experience with us.
When kneading by hand it would take 18 to 20 mins to reach the desired stage.. so I think you were on the right tracks.. I have mentioned about the spring back effect in the video too if it happens that way you can leave it for 2 mins roll another one and then come back to this and re-roll that way the gluten has time to rest and you should not face any problem. I am not sure why the it stuck to the parchment paper.. Did you keep it on there for long?? My suggestion would be to roll 3 to 4 at a time. Then start cooking.. While one pita is cooking you can come back and roll the other simultaneously. Hope this helps..
Regards
Sushma
Zeina says
Thank you so much for your quick reply Sushma. I’ll definitely try this again keeping in mind all your suggestions and let you know how it goes.
sushma iyer says
That sounds like a plan Zeina.. thank you for dropping by.. appreciate your efforts to put in detailed feedback to begin with.
Regards
sushma
Andrea says
I don't have whole wheat flour, can i still do this?
sushma iyer says
Hi Andrea..
Yes you can 🙂
Jacoba says
Many many thanks foor this wonderful bread. I love it.
Greatings from Holland
sushma iyer says
Thank you Jacoba for dropping by. So glad to know that you liked the bread.. <3
Sharon says
Thank you, these came out great! Nice and soft. Cut the recipe in half. #PitaBreadRecipe
sushma iyer says
Hi Sharon..
That sounds amazing.. Thanks a bunch for sharing your feedback with us really appreciate it.. <3
Jul says
Wow! What an amazing video! Thanks for sharing all the possible scenarios that could happen when cooking them on the skillet. When I first started reading the instructions I was already feeling a little overwhelmed by the instructions and steps but the video helped me a lot. 🙂
I will definitely try this recipe and hope I get some puffy pitas too!
sushma iyer says
Thank you, Jul.. I am sorry about the long text but I feel all the information is necessary when it comes to nail the pitas in the first attempt. So glad to learn that the video helped. Thanks for sharing your thoughts with us.. Really appreciate it <3
Ileana fortuny says
Love your instructions and the step by step that makes it look so easy, will make this for sure and will let you know how I did. Thank you so much for a great recipe!!
sushma iyer says
My pleasure Ileana.. I am so glad to learn that you found the instructions clear and easy to follow.. do give this a try sometime and share your feedback with us too.. would love to learn how it turned out for you 🙂
Sarah King says
I forgot to leave my rating, definitely 5 star!!
Sarah King says
This recipe is delicious! I will definitely be making it again!
sushma iyer says
That is so kind of you sarah to come back again to give the star ratings that really helps the site.. I am so pleased to learn that you liked the recipe.. this itself brought a smile on my face and the stars were cherry on the cake.. thank you for being so kind.. appreciate it <3
Nicky says
I made this recipe not believing that my pita would puff up on the first go. It was so amazing! Thanks for the detailed instructions 👍
sushma iyer says
yay!!! I am doing a happy dance here Nicky.. it is exciting to read this comment I am sure you might have been thrilled too.. <3 Thanks a bunch for taking the time out to share your wonderful feedback with us.. Truly appreciate it <3
Mary says
Hi:
thanks for the great recipe. 4 out of of 5 puffed on my first attempt and they tasted very good, BUT, the flour they picked up from rolling them out burned on contact with the hot pan so they tasted a bit charred. I see yours are not as brown/black as mine. What am I doing wrong?
thanks very much
sushma iyer says
Hi Mary..
That sounds amazing.. thanks a bunch for sharing your amazing feedback.. really appreciate it..
Coming to your query.. sounds like you used too much flour while rolling, in that case simply dust it off before placing it on the skillet so you don't face this issue again.. 🙂
Regards
Sushma
Mary says
Sushma:
Of course! I'm sure you're right. Will do this next time.
Thanks again. M
sushma iyer says
My pleasure Mary..
Thank you for taking the time out to try this.. <3
Regards
Sushma
Mi says
I don't understand the part of ,,flipping,, the pitas right before baking. I thought we shouldn't touch them after 2.proofing,so they don't tear?
sushma iyer says
Hi Mi
No they won't tear if you touch them.. they are stable enough to hold their shape after proofing.. Like mentioned that step is done to put the dried part to the base. I have had success doing it this way only and so did many of our readers.. 🙂
Regards
Sushma
TeeWai says
Hello!
I just tried this. Tastes good but my pitas didn't really pop at all and I'm not so sure why. I guess I'll keep trying and hopefully, I'll realize what went wrong.
sushma iyer says
Hi TeeWai..
Aww so sorry to learn that the pitas didn't puff but yes you are right, sometimes it doesn't come out perfect in the first attempt. Even in my first attempt, only 1 pita puffed but in that process is I learned all the mistakes that I have shared here.. Hope you give it a try one more time and get it right this time 🙂 Thank you for your feedback 😀
Regards
Sushma
Sharon says
Wonderful!!!! Such a great explanation and instructions! One question: making just for one person, I can’t eat all those delicious pitas at once (or I shouldn’t anyways). At which stage in the recipe can I conserve the dough for later? And how do I save it? Thank-you!
sushma iyer says
Hi Sharon..
There are two things that you can do.. Either halve the recipe to make only 6 at a time. Or you can knead the dough, allow for first proofing and then put it in the fridge. I have talked about that in the video.. the video might help.. Please have a look 🙂
Regards
Sushma
Zeba says
Lovely....your video has given me enthu to try out these pita...i will sure try after watching..thank you for sharing in detail.
sushma iyer says
Hi Zeba..
Sounds great.. do share your feedback with us if you happen to try this.. thank you
Arundhati says
Hi Sushma, the post is really very nicely written n the pics are very informative too. But somehow my pitas didnt puff up ☹️. Cud u help me out finding out wht exactly wud hv gone wrong?
sushma iyer says
HI Arundhati..
so sorry to learn this..
There are couple of reasons that could have gone wrong that I have elaborated in the post like
1. Reaching that tacky stage dough so that it has some moisture in it.
2. Rolling it right
3. The most important thing is to have a HOT TAWA or a really HOT OVEN
Honestly, none of my pitas puffed in the first attempt and from that I learnt all the mistakes and rectified it.. Don't get disheartened and try it one more time you will surely get it right 🙂
Regards
Sushma
Nila says
Mine didn’t puff either, but they did taste great! I’ll definitely try again!
sushma iyer says
Awww Nila..
It is definitely about practise here.. hope you nail it in your next attempt.. 🙂
Nouf says
I really liked the recipe, and the notes and tips you gave were really helpful. I really enjoyed listening to the scientific side of making food. Thank you for the time you invested in making such a complete guide.❤️
sushma iyer says
Hi Nouf..
Its my pleasure.. so good to know that all the efforts are being appreciated.. can't thank you enough for sharing your wonderful thoughts with us.. truly appreciate it.. <3 thanks a bunch
Regards
Sushma
Doreen says
What is the nutritional info? Especially carbs. Thanks.
sushma iyer says
Hi Doreen..
Will try to update my post with nutritional info asap..
Regards
Sushma
skylar borgstrom says
Hi Sushma!
Thank you for posting this recipe. Just wondering what the name is of the griddle you were using on the top of the stove?
Thanks,
Skylar
sushma iyer says
Hi Skylar..
It is called Tawa, basically it is an iron skillet that I got from India.. but I am pretty sure you can find the same in Indian stores as well and even on Amazon
Regards
Sushma
Uma Singhal says
Hi sushma
The receive seems awsome n easy, definitely will try it. Could you please specify how much dry yeast will be required?
Thanks
Uma
sushma iyer says
Hi Uma..
The quantity of yeast would remain the same for all varieties 🙂 Thank you <3
dhwani mehta says
OMG!! look at those puffed Pitas!! Lovely share sushma with a detailed recipe. Thank you!
sushma iyer says
Hi Dhwani..
so glad to learn that you found this post informative.. Thank you for sharing your lovely thoughts with us..
Regards
Sushma
Freda @ Aromatic essence says
Love that perfectly puffed pita!! Such a visual treat!
sushma iyer says
Hi Freda..
Yay!!! thank you so much for the kind words
Regards
Sushma
Vandana says
Loved the recipe Sushma, will definitely try it soon and let you know if it turns out perfect.
Thanks for the great tips.
sushma iyer says
Hi Vandana..
That sounds great.. definitely waiting for your feedback <3
Thank you
Regards
Sushma