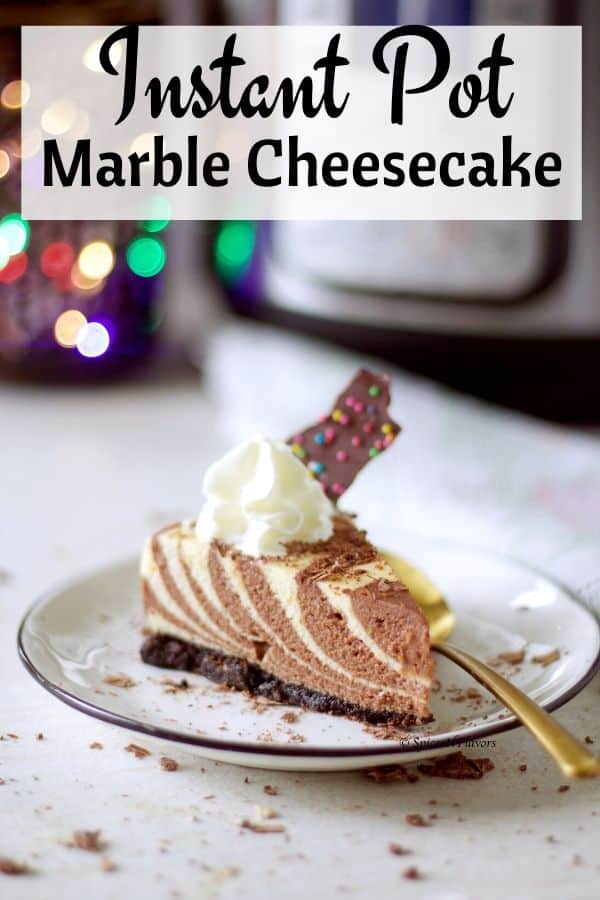
Take your favourite Instant Pot Cheesecake recipe to the next level by trying out this super simple way of making Instant Pot Marble Cheesecake this Thanksgiving and be rest assured to wow your guests.
Choosing the right cheesecake flavour or be it any other cake for that matter has always been a sort of debate in my own.
Hubby prefers good old classic vanilla cheesecake flavour and I am a die-hard fan of anything that screams CHOCOLATE - be it a rich moist chocolate cake, chocolate ice-cream or a dark chocolate cheesecake you name it and I am sold out.
So this time to satisfy the love for flavours I decided to make this Instant Pot Vanilla and Chocolate Cheesecake
What is so unique about this Instant Pot Marble Cheesecake?
Well in terms of taste it obviously tastes like a Vanilla Cheesecake or a Chocolate Cheesecake.
The only catch here is in terms of the look - the wow factor.
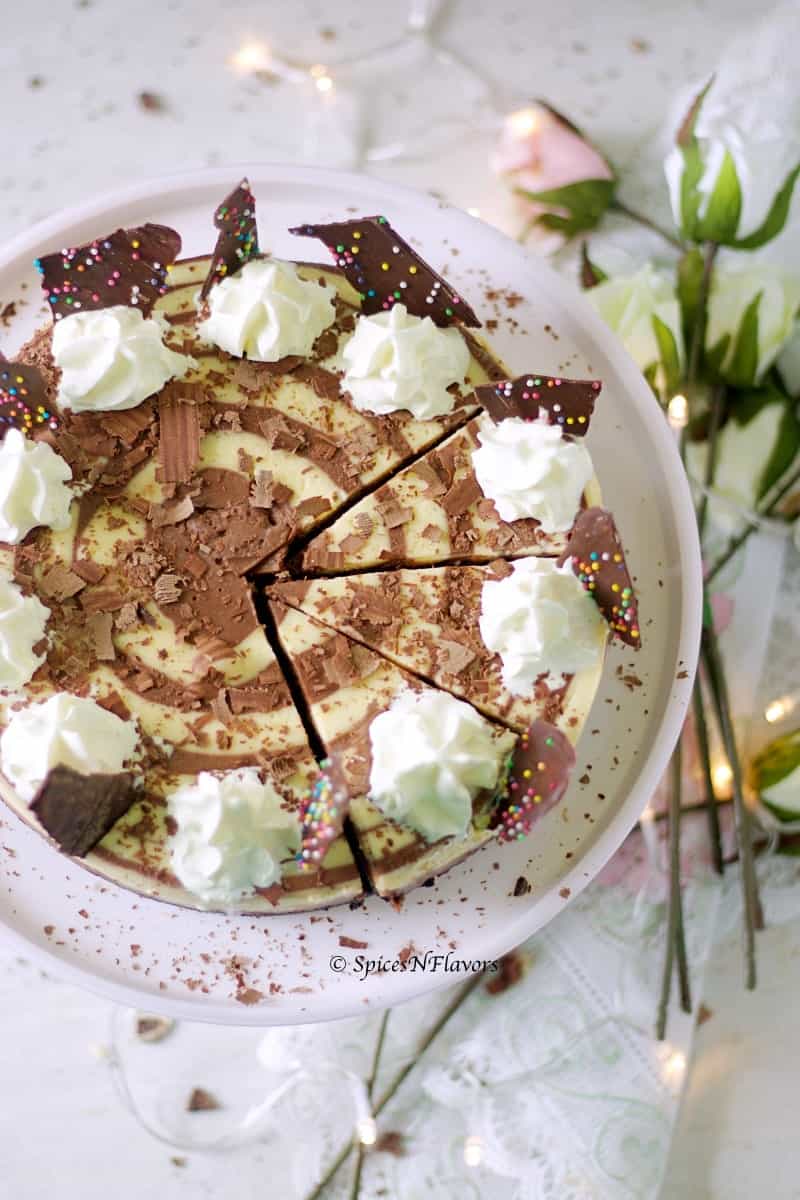
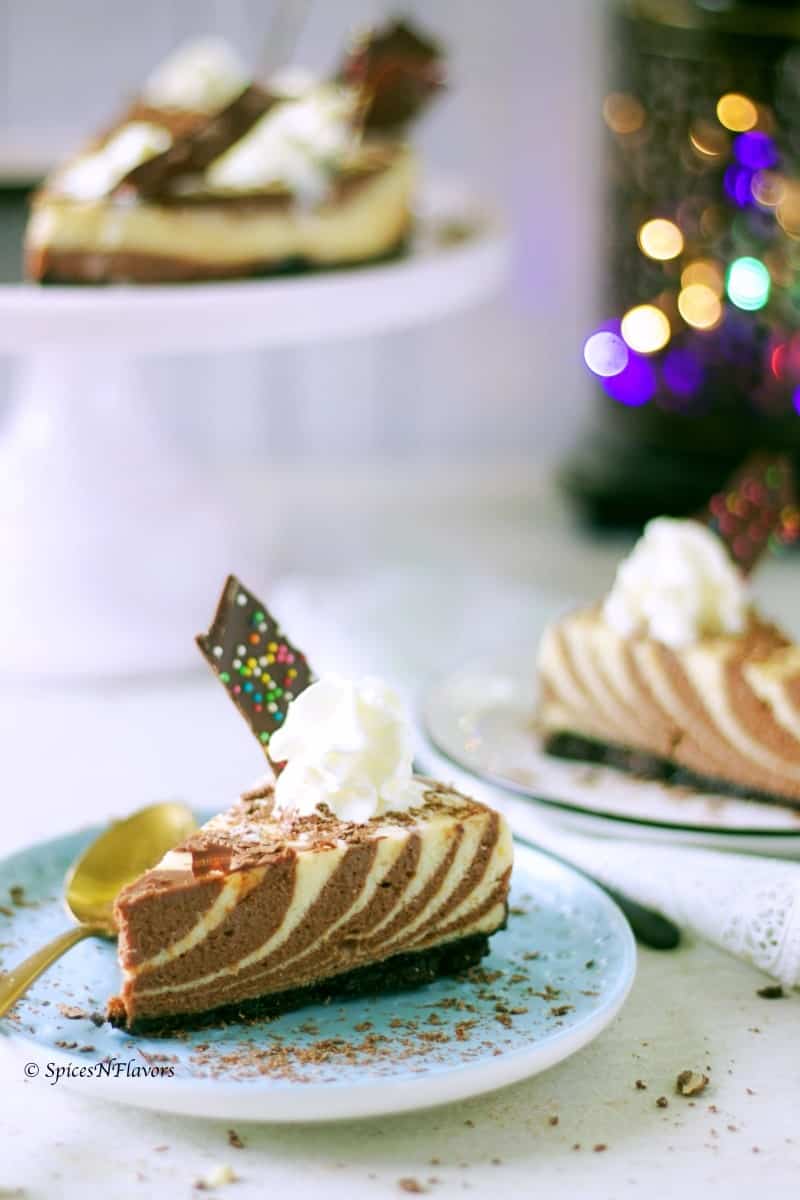
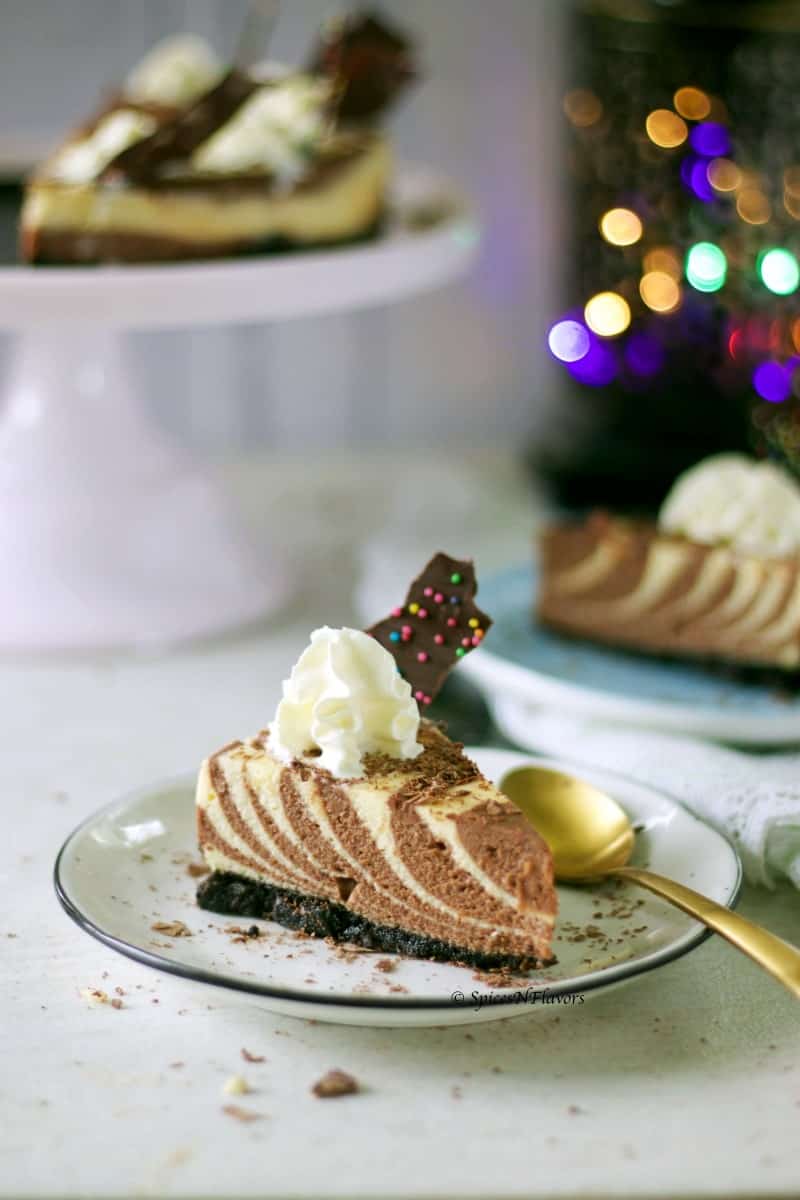
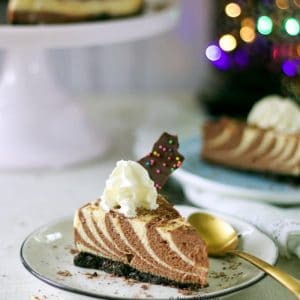
When you slice into the cheesecake you get this patterned look of white and dark cheesecake replicating a zebra's skin tone and maybe that is why this is often referred to as a Zebra Cheesecake or Zebra Cake as well.
The 3 layers of an Instant Pot Cheesecake | How to make Instant Pot Marble Cheesecake
Be it any cheesecake it all starts with a cheesecake crust:
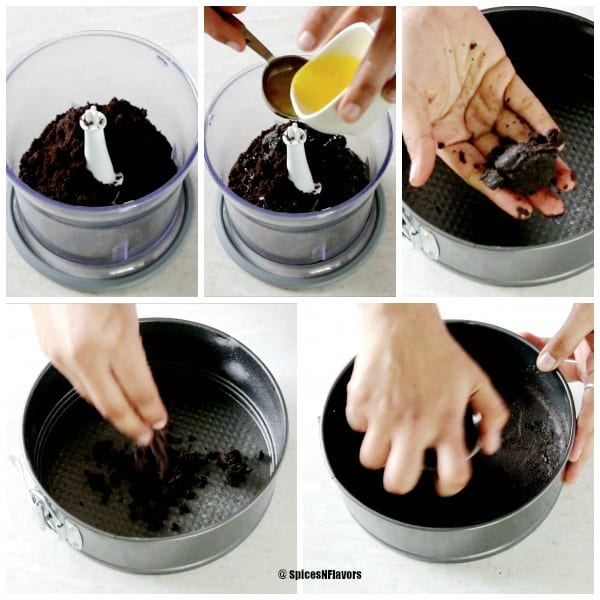
For today's ripple cheesecake recipe I have used an Oreo Biscuit crumbs as the base for our crust. Simply pulse the biscuits in your food processor and to that add 3 tbsp of melted butter and pulse again until when pressed together it holds its shape.
Transfer it to the base of your 7 inch cheesecake push pan or springform pan. (You can spray it with cooking oil before pressing the crumbs down if you like)
So transfer the crumbs and using your fingers form a nice and even layer covering the base of the pan.
Since this is just a basic cheesecake recipe, you can even use good old graham crackers as the base, to bring a variation you can add cocoa powder to the crushed graham crackers or even toasted and powdered nuts of your choice to for additional texture.
Graham crackers with toasted hazelnuts would form a lovely base for your Cheesecake.
The Actual Cheesecake Batter:
You would need the basic ingredients - Cream Cheese; of course ;), Sugar, Sour Cream and Eggs.
Melted Chocolate for the chocolate batter.
Always and always start with room temperature ingredients.
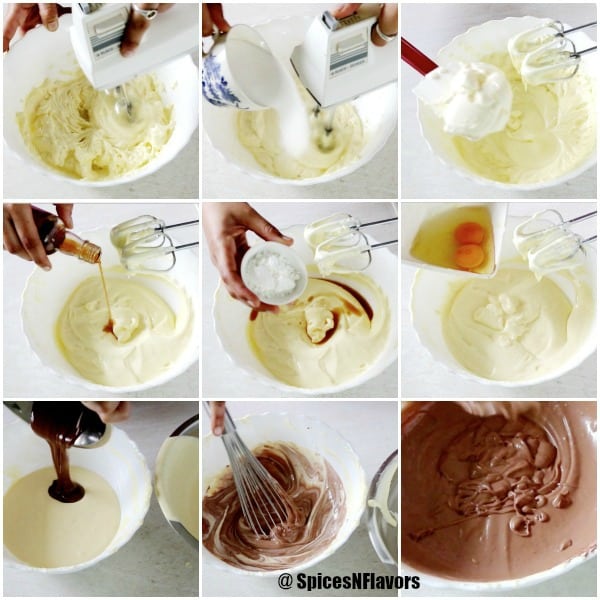
So beat the softened cream cheese until it is smooth and creamy.
Whipping continuously add in the sugar a little at a time until is all mixed up and dissolved.
Next in goes the sour cream. Again beat well. The cornflour and then the vanilla essence, mix that too.
And then add in the eggs one at a time.
The only thing to note here is that once you add the eggs, do not overbeat the batter or else you would end up incorporating lot of air into the batter which would eventually rise while cooking and sink back while cooling and you won't get a nice even layer.
Rather you would end up with cracks or a sunken centre once the cheesecake cools.
Once the eggs are incorporated in the batter, divide the batter into 2 parts - approximately 400 gms each
In one part, add in the melted chocolate and beat again until homogenous.
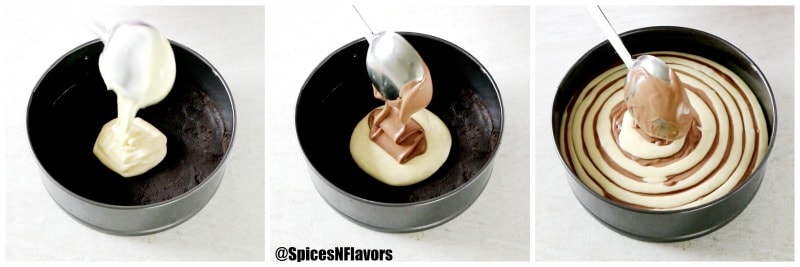
Now comes the fun part.
So take your pan from the fridge and start pouring equal amount of the prepared cheesecake batter right at the centre.
What I mean is, I have used a ladle for measurement, scoop out the plain vanilla batter and add it in the centre of the pan. Using the other ladle scoop out the chocolate batter and add in the centre on top of your vanilla batter. Repeat the same way.
With each addition, you will observe that the batter spreads on its own and will reach the sides of the pan eventually on its own to give you the alternating layers of vanilla and chocolate.
Cover the top with an aluminium foil and also prepare a sling to carry the pan easily or you can also use the trivet that came along with the pot.
Before you put the pan in the pot, add 2 cups of water to the inner pot using the cup that came along with it. Place the trivet and with the help of the sling slide the cheesecake pan into the pot.
Cover with the lid, vent to sealing mode, choose the pressure cooker or manual button and set the timer to 40 mins. After 40 mins let it release naturally for 10 mins then do a quick release.
When you take the pan out the centre of the somewhat set cheesecake should still jiggle a bit. Allow it to cool at room temperature for 20 mins then place in the refrigerator to set completely for another 4 hours.
After that decorate the top as you like and then slice and enjoy.
An important tip for slicing the Instant Pot Marble Cheesecake:
When you make a cut on the cheesecake do not drag the knife, like we do regularly instead try to lift it up. That is because if you drag the knife you would end up mixing the beautiful marble effect that has been formed and won't get that stunning layered look.
My Top Tips to get perfect Instant Pot Cheesecake every single time:
- Always Use Room Temperature Ingredients: It is hard to beat cold cream cheese into a soft smooth state without the formation of lumps and that is the last thing we want in our cheesecake batter right. So yeah use softened cream cheese and also cold eggs won't whip properly so use room temperature ones.
- Avoid Over-Beating the Batter: Over-beating the batter would mean incorporating air into it which would rise while baking or cooking and upon cooling would sink in the centre. Now you know the reason for why my cheesecake sinks? right!!! So yeah avoid over-beating especially after you add eggs.
- The reason for adding cornstarch to our cheesecake batter is that the flour helps to set the proteins and hence do not skip this step.
- Try not to press down the biscuit crumbs too tightly or else you will find it difficult to cut it later once the cheesecake is all set.
- Always and always give resting or setting time to the cheesecake and you will see tons of difference in terms of texture and flavour.
I have discussed all these tips in much detailed with step by step instructions in my earlier cheesecake recipe posts which you can check out from here, here or here.
Here is a detailed recipe on How to make Instant Pot Marble Cheesecake
Instant Pot Marble Cheesecake
Ingredients
Cheesecake Crust
- 1 cup Oreo Biscuit Crumbs
- 3 tbsp Melted Butter
Cheesecake Base
- 16 oz Cream Cheese softened
- 2/3 cup Sugar
- 1/2 cup Sour Cream
- 2 Eggs
- 1 tbsp Cornflour / Cornstarch
- 1 tsp Vanilla essence
- 1/2 cup (4 oz) Chocolate chips Melted
Instructions
Cheesecake Base
- Pulse together oreo crumbs and melted butter until it resembles wet sand-like texture that holds its shape when pressed between your palms.
- And then transfer it to a 7-inch springform cake pan. But before that just spray the pan lightly with cooking oil.
- Press down gently yet firmly and then let it sit in the refrigerator while you prepare the cheesecake batter.
Cheesecake Base
- Beat the softened cream cheese until it is smooth and creamy.
- Beating or whipping continuously add in the sugar a little at a time until the sugar is mixed in and dissolved.
- Next in goes the sour cream. Beat well. Scrape the bowl. Add the cornflour and vanilla essence. Beat well. Scrape the bowl.
- Time to add the eggs 1 at a time. Make sure to mix it well before adding the second one. However, do not overbeat the batter at this stage as we do not want to incorporate air into the batter.
- Once it is all mixed, divide the batter evenly between 2 bowls around 400 gms in each bowl. To one of the bowl add in the melted chocolate and mix well. So basically you have two batters now - one vanilla and other chocolate. Time to start marbling.
- Take the pan from the refrigerator and using any standard cup start adding a dollop of vanilla cheesecake right at the centre of the pan. Using a similar size cup add a scoop of chocolate cheesecake batter right on top of your vanilla one. ( I used ladle as my measurement to add the scoop full of batter)
- Repeat the alternating process of adding vanilla cheesecake batter and chocolate cheesecake batter right on top of each other at the centre until you reach the very end. Do not worry about spreading the batter as it will reach the ends of the pan on its own.
- Line the base of the pan with aluminium foil also cover the top with foil and keep ready. You can also make a sling for dropping the pan easily into the instant pot if you prefer, find the procedure for the same from here.
- Add 2 cups of water to the base of the instant pot using the cups that came along with the pot. Place the trivet inside.
- Carefully place the prepared cheesecake pan on top of the trivet.
- Close the lid. Valve to sealing. Choose pressure cook or manual and set the timer to 40 mins.
- Once the timer goes off. Allow the pressure to release naturally for 10 mins and then do a QR. Take the pan out using the help of the sling.
- The cheesecake should have a wiggly centre and fully set sides. Allow it to cool down at room temperature for about 20 mins or so and then let it set in the refrigerator for a minimum of 4 hours.
- Decorate the cheesecake as you like then slice and enjoy.
Notes
- I recommend using chocolate melts for the recipe that can be easily melted and not the chocolate chips for baking as that is meant to hold its shape and you won't be able to melt it easily.
- While slicing the cheesecake do not drag your knife through the cake rather try to lift it up that is because dragging may disturb the beautiful marble pattern from withing.
- Always use room temperature ingredients.
- This recipe is perfect for a 7 inch cake pan which fits perfectly well in a 6qt or 8 qt instant pot.
- If you would like to watch the detailed video in a step by step format then you can check that by clicking here.
Conclusion:
The only cheesecake recipe you need this holiday season has to be - Instant Pot Marble Cheesecake.
Take your best New-York style-plain vanilla cheesecake to the next level by adding the marble effect. This holiday season wow your guests by making stunning vanilla and chocolate cheesecake.
Just one additional step and you have a beautiful show stopper dessert.
I hope you liked this Instant Pot Vanilla and Chocolate Cheesecake and if you did then do let me know by tagging me, tweeting me or Instagram me. I would love to follow you and your posts.
Pin this to your Instant Pot Desserts Board for later:
Paul says
I made it and I loved it. Have made it twice now. I used a regular graham crust and added cocoa. Great recipe. Thank You. Looks like I cant post a photo or I would!
sushma iyer says
Hi Paul.. That is so good to know. Glad to see the variations worked too. Thank you for sharing your feedback.. appreciate it 🙂 You can share your photos with us through Facebook or Instagram if you use those platforms or send us an email at [email protected]
Debi Kemp says
I am excited to try but a little confused. Recipe states chocolate chips it then you stated in one of your responses not to use chips but you used melts. Just want to make sure I use the right thing
Thank you!!!
sushma iyer says
Hi Debi..
So by chocolate chips I meant the melts that can be easily melted.. So use melts.. Thank you for pointing out the error I will add a note to the recipe card. Sorry for the confusion.
Regards
Sushma
Saniya says
Hi Sushma,
This cake looks beautiful. Is it possible to make the cheesecake without egg? I would love to try this out.
Thanks.
sushma iyer says
Hi Saniya.. Eggless Cheesecakes do not need baking or cooking. This particular recipe would need eggs I will try to share a No Bake Eggless Cheesecake recipe soon 🙂 Though I do have pineapple version on the blog but not the plain version 🙂
Bethany says
I wish I could leave a photo - this cheesecake came out so beautiful! Only change I made - My husband LOVES mint so i used mint Oreos for the crust. I will certainly be making this again! Thank you for the recipe. The video was so helpful.
sushma iyer says
Yay Bethany..
That is amazing.. I am so pleased to learn that you and your family loved the cheesecake.. and mint oreos sounds so good.. Good that you decided to go with what would suit your family best. Thank you for trying this out and sharing your wonderful feedback with us..
Now since you mentioned about mint I would like to bring this Mint Cheesecake Jars to your notice.. This is one of my all time favourite cheesecake recipe.. see if it interests you: https://spicesnflavors.com/instant-pot-mint-cheesecake-jars/
And are you there on Instagram?? If yes I would love to see your pictures there.. Here is the link to Instagram: https://www.instagram.com/spicesandflavors/
Regards
Sushma
Janice Smith says
Hello,
I have 3 questions ,
1) Do I use both the Corn Flour and the Cornstarch ? I will have to get the Cornflour !!
2) Is the Vanilla Essance the same as Vanilla Extract ?
3) Are the Chocolate Chips the sweet one's ??
I'm so excited to make this Marble Cheesecake @@
I wanted to be sure that I have everything right !!!
Thank -You for Sharing with us !!
sushma iyer says
Hi Janice.. I am so glad to learn that you are willing to try this recipe out can't wait to learn how it turned out for you.
To answer your questions:
1. Cornflour and cornstarch are the same just known by different names in different parts of the world.. so feel free to use whatever you have in hand.
2. Vanilla Extract is much more strong and pure form of vanilla so you can use less amount of vanilla extract. If you are using 1 tsp of vanilla essence you can use 1/2 tsp of vanilla extract.
3. I have used dark chocolate melts. Do not use chips as it won't melt easily.
Please do let me know how it turned out once you make it 🙂
Regards
Sushma
Freda Dias says
That looks gorgeous! Love how perfect the layers look! Well done, Sushma 🙂
sushma iyer says
Hi Freda
That is so good to know.. thank you for your lovely feedback 🙂