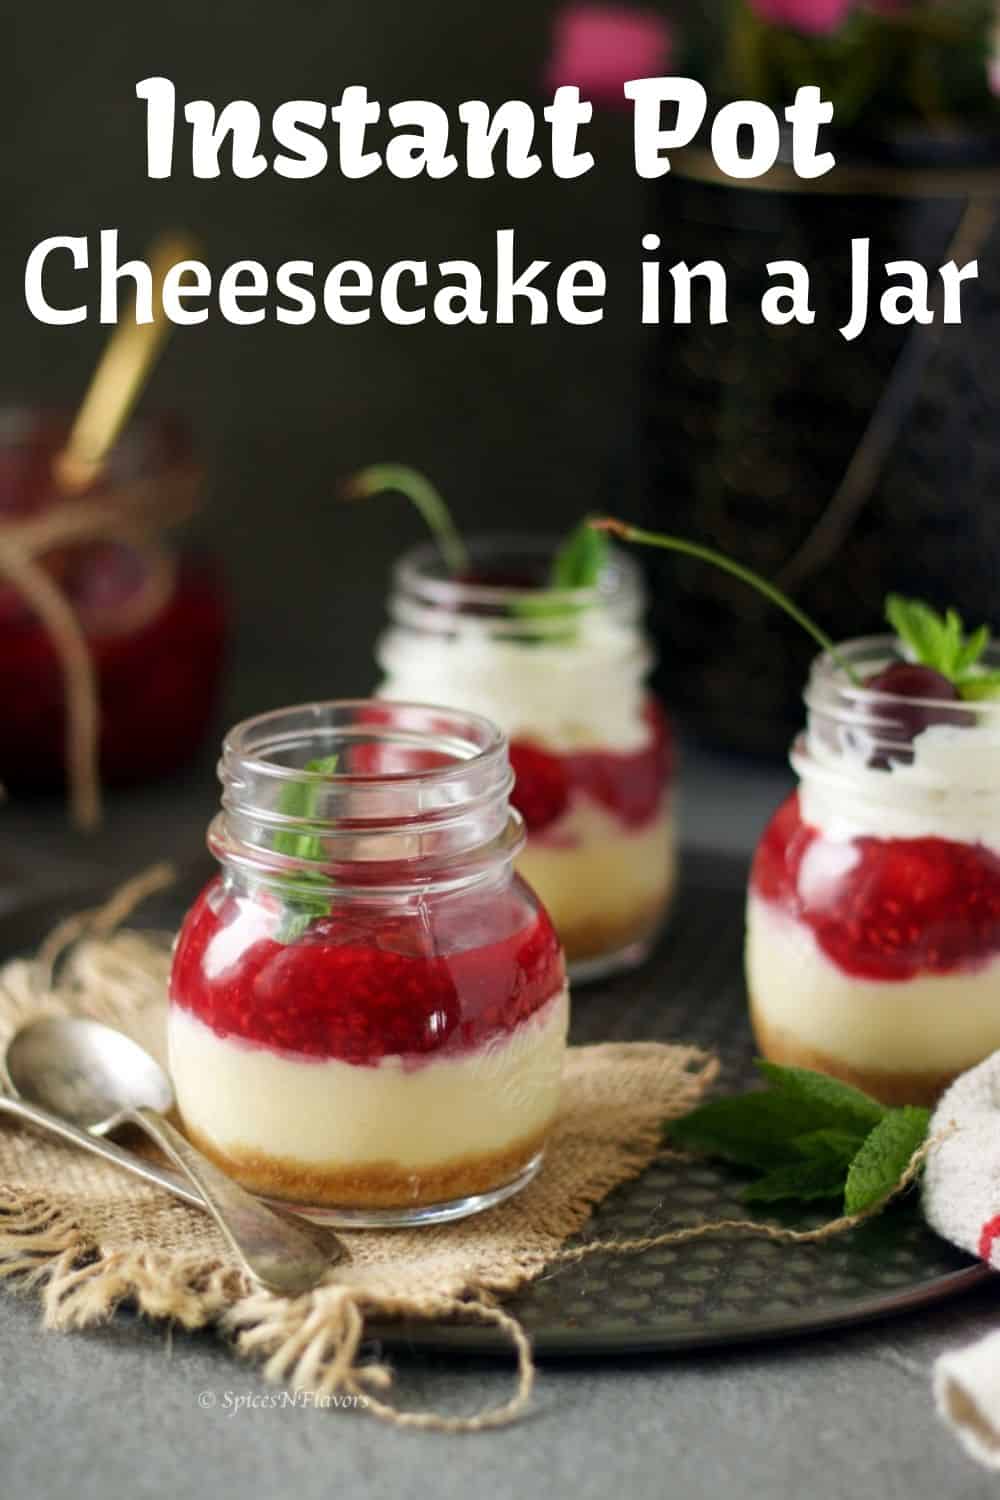
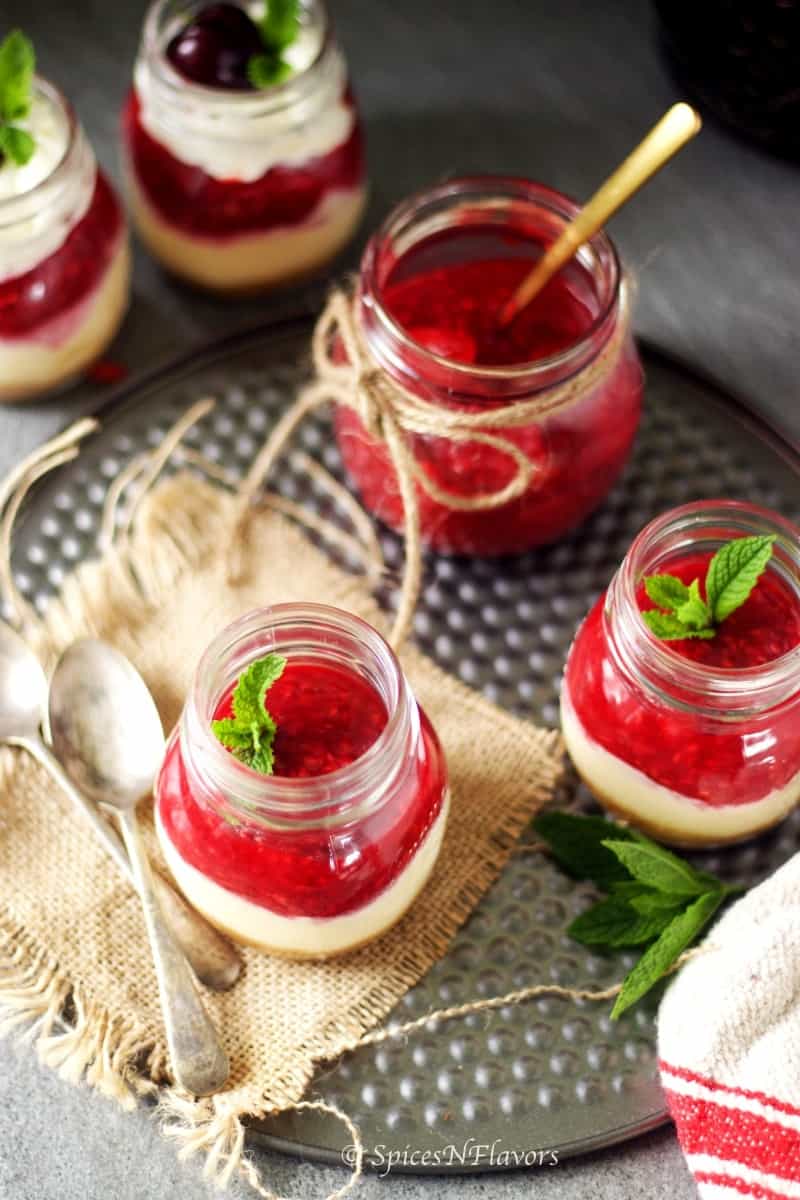
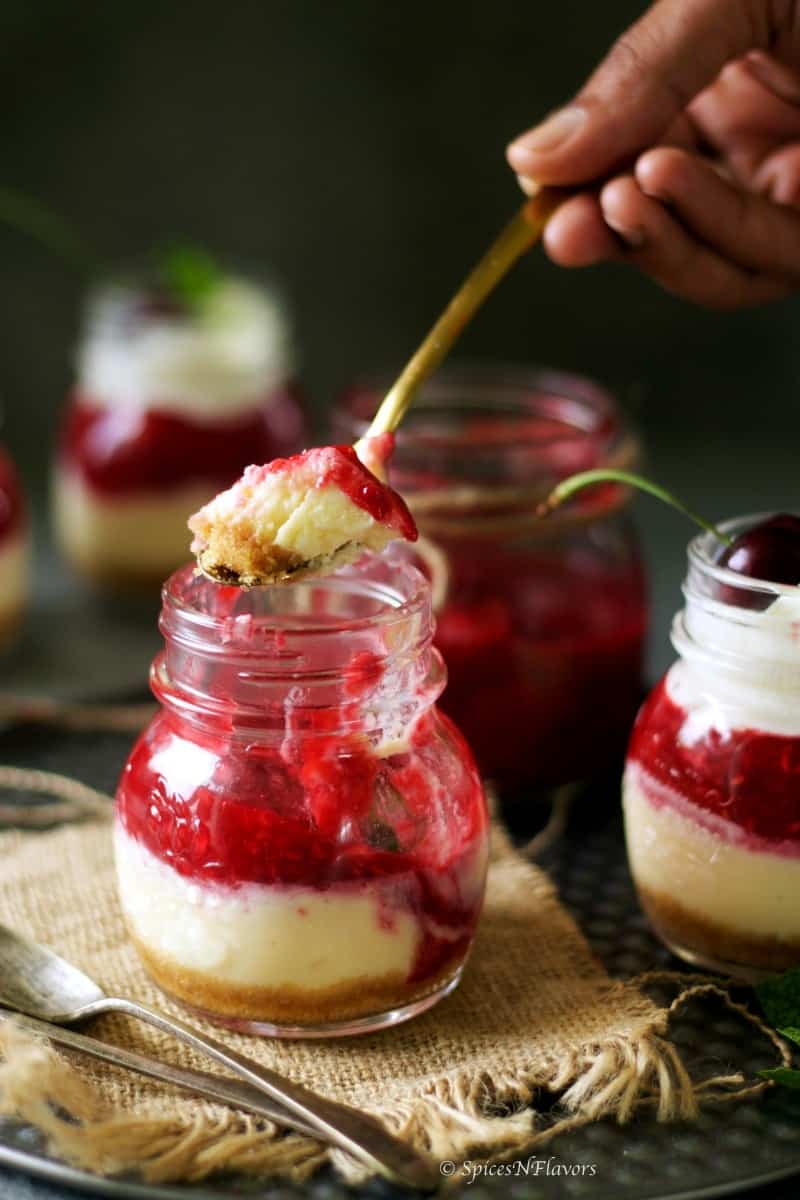
Get consistent and perfect results every single time with this Instant Pot Cheesecake Jars recipe. This pressure cooker cheesecake has a crusty biscuity base followed by a creamy cheesecake layer topped with a vibrant berry sauce - the easiest instant pot dessert one could ever make!!
How to make Individual Mason Jar Cheesecake in Instant Pot
Making cheesecake in instant pot is one of the best things you could do.
By now it is no big secret right!!
Every Instant Pot owner might have made at least one type cheesecake in their Instant Pot.
I own an Instant Pot 6 duo plus and I have made so many cheesecakes till now.
By far my most favourite one is Instant Pot Mint Chocolate-chip Cheesecake.
I said by far, yes mark it because this Instant Pot New York Style Cheesecake stole my heart away in a literal sense.
Step 1: Cheesecake crust
A classic cheesecake recipe always and always has a crust of graham crackers.
We do not find it easily in stores here, so I have used plain digestive biscuits as my base.
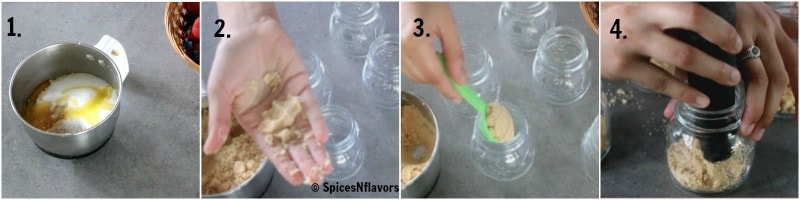
Simply pulse together biscuit crumbs, sugar and melted butter (pic 1) until when pressed in between your palms holds its shape (pic 2).
Then divide it evenly between 5 mason jars (pic 3).
Press it down gently to form an even layer (pic 4) and let it sit in the refrigerator until you prepare the cheesecake batter.
VARIATIONS:
Sometimes I even like to add some pecans or walnuts to the base which you might have seen in our Pumpkin Cheesecake jars recipe.
But a New York Style Cheesecake or Plain Cheesecake lives up to its name and is as easy and as basic as it could be so in today's recipe you will not find any additional ingredients.
Step 2: Cheesecake Batter
While the biscuit crumbs rest and set in the fridge let us make the cheesecake batter.
Now the recipe could not get simpler than this!!
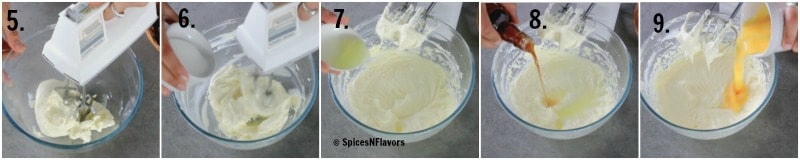
Beat the cream cheese until smooth and creamy (pic 5).
I often get asked which is the best cream cheese to make Cheesecake?
And I have always said hands down Philadelphia Cream Cheese (this is not a sponsored post how I wish it were though!!)
However, you can get good results with Anchor Cream Cheese too.
So once smooth and creamy scrape down the bowl once and then beating continuously add in sugar (pic 6) a little at a time until combined.
Mix through the lemon juice and vanilla essence (pic 7 and 8).
Finally, beat the egg (pic 9) until just mixed without incorporating too much air into the batter.
I like to switch to a spatula in place of a beater so that I do not end up over-beating the batter which is a crucial factor to get even flat tops on cheesecake.
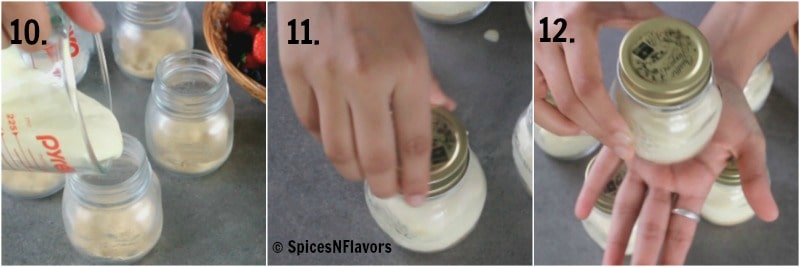
Divide the batter evenly between the mason jars (pic 10 ). Around 4-5 tbsp in each jar.
Cover loosely with the lid (pic 11).
Tap it gently onto your palms. (pic 12)
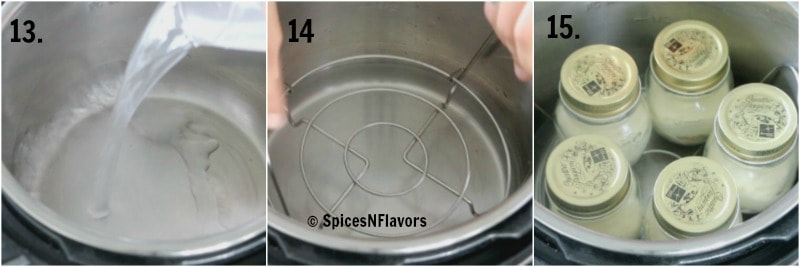
Add 2 cups of water to the base of the pot (pic 13). Place the trivet (pic 14).
Transfer the mason jars with cheesecake batter into it (pic 15). Close the lid. Vent to sealing position.
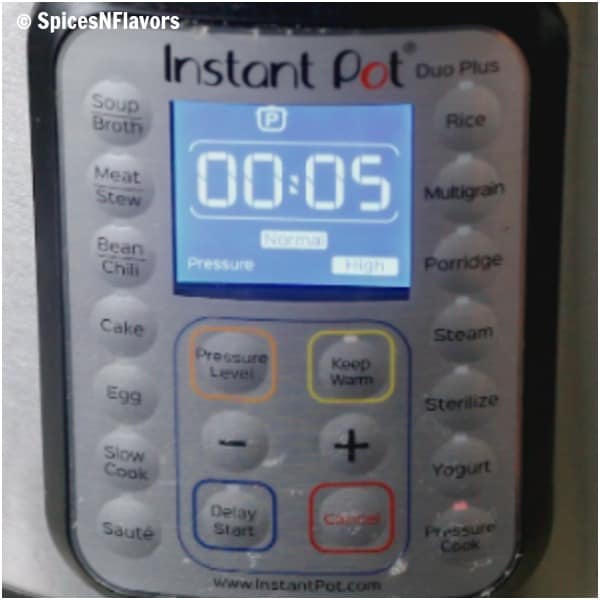
Choose Manual or Pressure Cooker mode and set the time to 5 mins.
Allow Natural Release. Open the lid, take the jars out using a tea towel or oven mitten and let it cool for 20 mins on counter-top and then refrigerate for around 2-3 hours until set completely.
Oh, by the way, did you notice we have not added any sour cream while making this cheesecake in instant pot.
Trust me you would not find any difference in this instant pot cheesecake without sour cream.
I have tried instant pot cheesecake with sour cream too in our cinnamon roll cheesecake jars recipe.
We need just 2 tbsp of sour cream in place of lemon juice. So the tub of 8oz sour cream just sits in my refrigerator for long.
As I really do not make use of sour cream in my regular everyday Indian cooking recipes.
Hence I prefer to use lemon juice in place of sour cream.
Step 3: Cheesecake Topping
It seems strawberry topping for cheesecake are the most favourite and sort out topping.
I have used a combination of raspberries and strawberries for my topping as that is what I had handy that day.
You can also go for a combination like I have done or simply follow the recipe with a single type of berry or even mixed berries.
And if you are running out of time or really are bored then simply choose to buy the cherry pie topping.
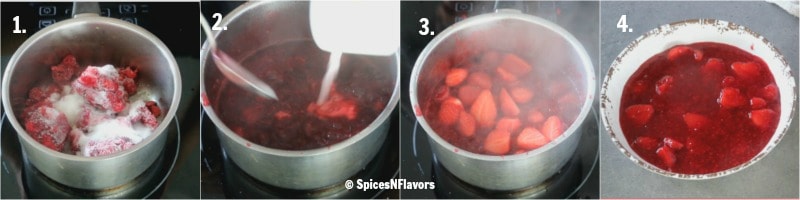
To make the topping, in a saucepan combine together, frozen or fresh berries, sugar and lemon juice (pic 1) and cook on medium flame until the berry turns soft and dissolved.
At this stage add some fresh berries for a texture followed by cornstarch slurry (pic 2 and 3) and cook until thickened.
A thing to Note:
Each batch of berries would be different - some would be sweet and some would be sour or ripe.
So it is not possible to give an exact measurement for lemon juice.
I would advise you guys to do a taste test here and then add more sugar if you find it too sour and more lemon juice if it is too sweet.
Other Topping Variations that you can try:
So apart from making the instant pot cheesecake with homemade strawberry sauce here are other topping ideas that you could try:
- A simple variation would be using raspberry, blueberry or mixed berry sauce in place of strawberries
- Caramel Sauce with some popcorn - just yum!!
- Butterscotch Sauce
- Instant Pot cheesecake with chocolate Ganache tastes so yum.. if you do not have time for that simply pour some chocolate sauce on top.
- Or keep it simple with some fresh fruits
- Maybe just Whipped Cream
- Or how about trying instant pot cheesecake with cherry compote - you can use the store-bought ones too. Feel free to substitute the strawberries from our cupcake recipe to cherry to make your own homemade version.
Ahhh... just use a combination of any if you prefer 😀
You can also try some variation when it comes to crust... Like Instant Pot cheesecake with almond crust or cookie crust would give you a different flavour altogether.
All go bold and make your instant pot cheesecake without crust.. yeah.. apparently crustless cheesecake is a thing!!
Especially for someone like me who is not a big fan of cheesecake crust.
And that is the advantage of making mason jar cheesecake.
Wondering what could be some other uses of making instant pot cheesecake in mason jars, then here are some

5 Advantages of making instant pot mason jar desserts:
1. It just takes 5 mins of cook time. Will you believe that!! Of course, you would have to take into account the 10 mins time for it to come into pressure and another 13-15 mins for natural releasing but still, that is way less than what you would spend while making a regular cheesecake!!
2. Portion Control - Well I would not judge you if you had more than 1 at a time because these are sooooo addictive.. <3
3. No worrying about water baths or even cracks on top.
4. Doesn't that look uber cute?? Perfect for any parties or potlucks.
5. Half the amount of ingredients used as compared to a regular springform cheesecake.

Here are my 5 top tips to make the best instant pot cheesecake jars every single time!!
1. Always and always start with room temperature ingredients.
2. Never incorporate too much air into the batter as the cheesecake will collapse or sink in the centre after a sudden rise.
3. Do not pack the crust densely or else it would be difficult to scoop it out while eating.
4. Allow the pot to release pressure naturally or else due to temperature shock the cheesecake might crack.
5. Once out of the instant pot allow the cheesecake to cool to room temperature before refrigerating to set completely.
After posting so many IP Cheesecake recipes especially the cheesecake in jars I have received many questions about the right way to make these that I had to include all those in here.
The most common ones here being:
What kind of Jars do I use for making my instant pot cheesecake in jars?
I got mine from a local store in New Zealand.
But these are also available on Amazon under the brand name Quattro Stagioni.
These are expensive for sure but that is what was available to me here locally.
However, you can use any mason jar of 4-5 oz.
Can you put mason jars in instant pot? Is glass safe in instant pot?
The key point is preventing the building up of pressure in the jar.
Never put the lids on tight. A loose-fitted lid is a key here.
If you want you can also use aluminium foil in place of mason jar lids.
Also, the use of trivet is important too so that there is space between the jars and the pot and they are not dancing in hot water.
If you are still worried and not comfortable then you can also make these in a ramekin.
In fact, I used ramekins the other day when I made these cute little Chocolate Custard Pots (best dessert to make for Easter). Or any regular ramekins can also be used for that matter.
I had first thought of making the instant pot cheesecake in ramekins only to be honest with you but then I choose the mason jars only to make the photos visually appealing - the bare truth.
Life of a food blogger!!
Which Instant Pot makes cheesecake?
You can use any model of the instant pot to make the cheesecake.
I own an Instant Pot Duo 6 plus and absolutely love it.
How to make Instant Pot Mini Cheesecakes
To make mini cheesecakes in the instant pot you would need some Silicon Molds to begin with.
Follow the same recipe. Make the biscuit base and flll the silicon molds with 1 tbsp of crumbs. Press and refrigerate.
Meanwhile prepare the cheesecake batter and once ready fill the molds with 1-2 tbsp cheesecake batter.
How to Stack Mini Cheesecakes in the Instant Pot?
Start by adding water to the base of the pot.
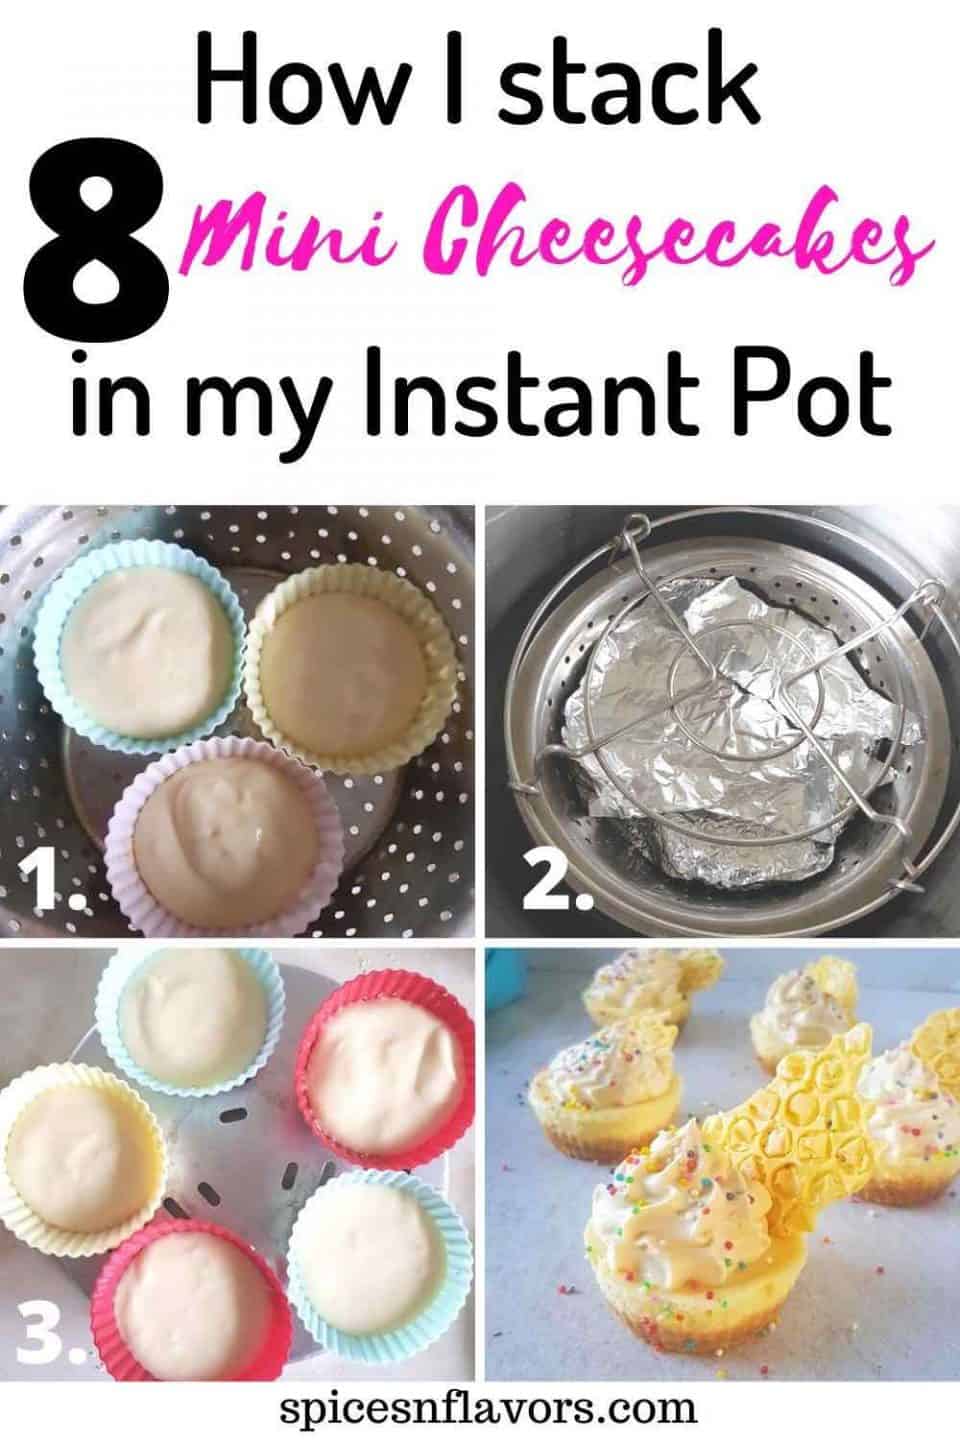
I am using a colander (pic 1) in which I could fit 3 cheesecakes. Make sure to use a colander that would fit in your pot.
In place of colander, you can use any other plate or even trivet.
Put that to the base of the pot. (The base of the colander touches the water in the instant pot)
Placed the trivet (one that came with IP) upside down (pic 2)
Added a plate on top (pic 3) and placed 5 more silicon molds.
Closed the lid and then follow the instructions.
If you have two trivets then you could easily fit 10 mini cheesecakes in a go. I own an Instant Pot Duo 6 plus.
Or you can also try pouring them in heart shaped silicon moulds.. Check this post on heart cheesecakes where I have enclosed the cheesecake in chocolate shells to make it perfect for Valentine.
IF YOU LIKE THIS RECIPE OR HAPPEN TO TRY IT THEN SHARE YOUR EXPERIENCE BELOW IN THE COMMENTS BY GIVING IT A STAR RATING OR LET ME KNOW BY TAGGING ME, TWEETING ME OR INSTAGRAM ME. I WOULD LOVE TO CONNECT WITH YOU AND YOUR POSTS.
CONSIDER JOINING THE COMMUNITY OF 100K SUBSCRIBERS ON OUR YOUTUBE CHANNEL FOR REGULAR UPDATES.
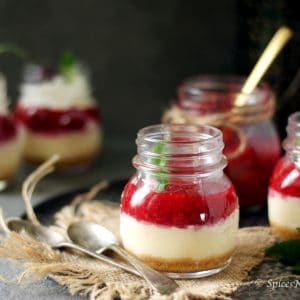
Instant Pot Cheesecake in Jars
Ingredients
Cheesecake crust
- 1/2 cup Biscuit Crumbs
- 2 tbsp Sugar
- 2 tbsp Melted Butter
Cheesecake Base
- 8 oz Cream Cheese
- 1/3 cup Sugar
- 1.5 tbsp Lemon Juice
- 1 tsp Vanilla essence
- 1 large Egg
Berry Topping for Cheesecake
- 8 oz Fresh or Frozen Raspberry (refer notes)
- 1/4 cup Sugar
- Few drops of lemon juice (refer notes)
- 2 tsp Cornflour
- 1 tbsp Water
Instructions
Cheesecake Crust
- Take the biscuit crumbs, sugar and melted butter in a food processor. Pulse until combined. When you press the crumbs in between your palms it should hold its shape.
- Divide it evenly between the mason jars and press it down until even.
- Close the lid and let it sit in the refrigerator till we prepare the cheesecake batter.
Cheesecake Batter
- Beat the softened cream cheese until smooth and creamy. Scrape the bowl in between to ensure even beating.
- Whisking continuously add in the sugar a little at a time until combined.
- Time for lemon juice and vanilla essence. Beat them as well.
- Scrape the bowl and add the egg. Beat on low speed until just mixed. You might want to switch to a spatula towards the end to avoid over-beating of the batter
- Divide evenly between the mason jars around 4-5 tbsp in each one. LOOSELY cover with the lid. Give a gentle tap at the bottom of the jar to remove air bubbles if any.
- Add 2 cups of water to the base of the instant pot. Place the trivet and line the jars. I could easily fit all the 5 jars in my Instant Pot.
- Close the lid. Vent to sealing. Using the manual or pressure cook button set the timer to 5 mins. (It would take around 10-12 mins to build the pressure within and then the timer would start).
- Allow the pot depressurize naturally. Once the pin drops take the lid off and remove the jars onto a wire rack.
- Caution: The jars would be super hot so I would recommend using a tea towel or oven mitten to take them out.
- Let it cool to room temperature around 20 mins and then let it chill in the refrigerator for 3-4 hours to set completely.
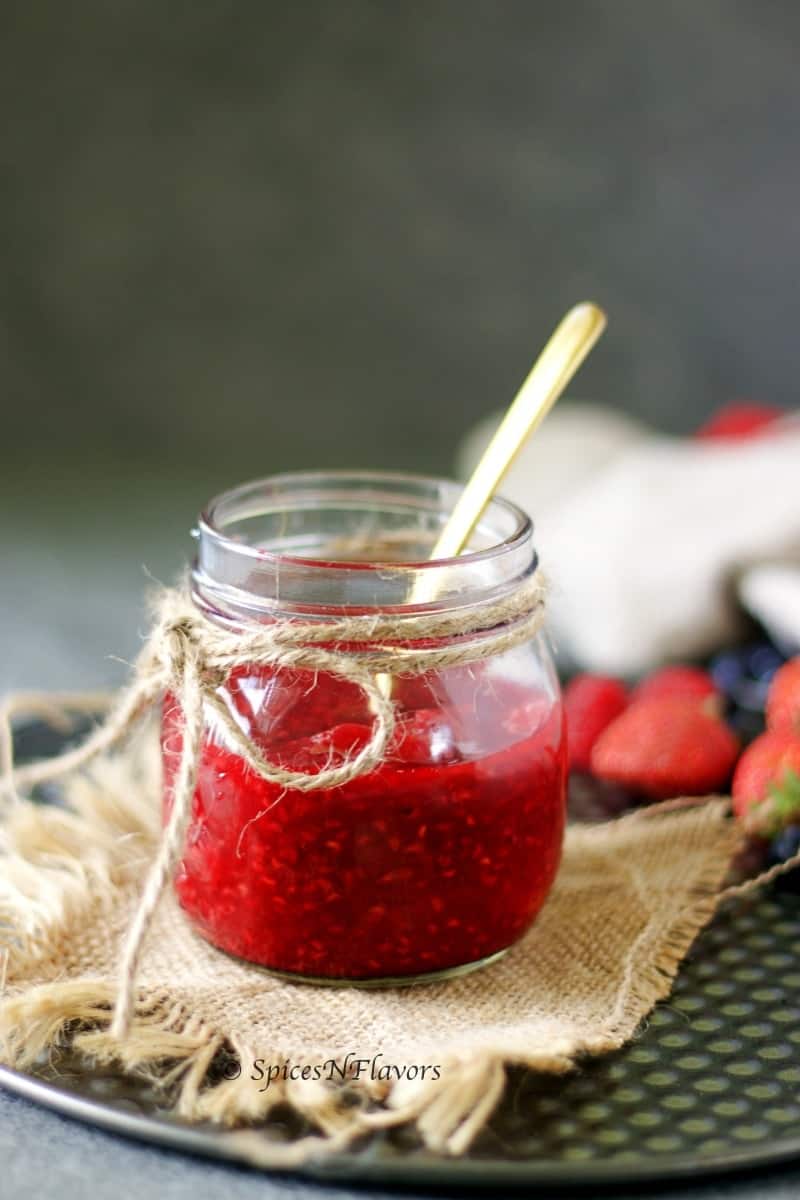
- Serve with toppings of your choice. I have made berry topping today.
Berry Topping for Cheesecake
- In a saucepan combine together raspberries, sugar and lemon juice and cook over medium heat until the raspberries have become soft and almost dissolved.
- Do a taste here, if you find it too sweet add some lemon juice and if it is sour add more sugar and adjust the taste accordingly.
- Next in goes the halved strawberries followed by the cornstarch slurry (2tsp cornstarch dissolved in 1 tbsp water). Cook it for a minute.
- Transfer to a wide mouth container. Cover with a cling wrap so that it touches the sauce and refrigerate till cool completely.
- Note: The mixture would thicken once you add the cornstarch slurry. You can adjust the consistency by adding more water if need be. Remember the sauce will thicken further upon cooling too.
- Once the cheesecakes sets, serve it with as much or as little of the topping as you like. Also, feel free to add a dollop of whipped cream and a mint leaf on top if you prefer.
Video
Notes
- I have used plain old digestive biscuits as my base. You can use graham crackers or a cookie crust too.
- Do not press the biscuits too hard or else you will have difficulty while scooping it out.
- Never overbeat the cheesecake batter. The air incorporated in the batter is the culprit for cracker cheesecakes and cheesecakes sinking in the centre.
- Do not close the lid of the jar TIGHTLY. You do not want to build pressure in them. If you want you can also prefer to close the lids with aluminium foil.
- Each batch of berries is different. Some may be sweet some sour. So while making the berry topping please do a taste test and adjust before adding sugar. Like if it is too sweet add some more lemon juice and if sour add sugar and adjust accordingly.
- In place of raspberry, strawberries, blueberries or a combination of berries can be used to make the sauce. Or you can also choose to top the cheesecakes with store bought cherry pie filling. Few other topping ideas has been given in the post above the recipe card.
- Ever since I had posted my Instant Pot Mint Chocolate Chip Cheesecake Jars I have been constantly asked about the mason jars. So the one I use is from the brand Quattro Stagioni - 5 oz. You can use any jar of 4-5 oz for this recipe.
- The recipe can be easily doubled.
- Do check the post for ideas on different toppings for cheesecake, tips to get crackfree cheesecake alongwith links to the required things to make the cheesecake.
Conclusion:
If you love cheesecake but find it challenging to make it then this Instant Pot Cheesecake in Jars recipe is SUPER easy and guarantees you a perfect result every time!
You can easily make this wonderful Instant Pot dessert from scratch using simple, easy-to-find ingredients.
This individual cheesecake in instant pot would surely win hearts around. Looking for flavour alternatives, this Biscoff Cheesecake is all the rage now.
Not only does it look uber-cute, but it also tastes equally good too with layers of crumbly biscuit, smooth cheesecake and that vibrant homemade strawberry topping for cheesecake is something that you will keep coming back for more.
This instant pot mini cheesecake recipe is one recipe that is worth bookmarking!!
I will see you soon with yet another recipe.
Pin this to your Instant Pot board

Until then
Hugs
Sushma
Shinangi says
Can we make eggless cheesecake?
sushma iyer says
Hi.. yes absolutely you can.. though I do not have an eggless cheesecake recipe made in the pot.. I do have eggless cheesecake recipes made in the oven.. here is the link to one such recipe: https://spicesnflavors.com/eggless-gulab-jamun-cheesecake/ There are more flavors available on the blog simply search for eggless cheesecake and you will find it.. thank you
Heather says
Question- if a different topping besides the beasties is used, would you then eliminate the lemon juice? Chocolate, for example.
sushma iyer says
Hi Heather..
You mean for the base?? No I would not skip the lemon juice in this recipe for the cheesecake base as the acidity is needed you can use around 1/4 cup sour cream instead of lemon juice here.
Regards
Sushma
Marlene Fedoruk says
Hi, I would just like to know if you can stack more on top like another jar on top of two jars? Really wanting to try this!
sushma iyer says
Hi Marlene..
Yes you can stack one on top of another if it fits in your IP.. My jars are 5 oz and I couldn't fit them in 6qt IP duo.. But I know that if you use 4 oz jars then stacking is totally possible 🙂
Regards
Sushma
Amy says
Made these last night, the recipe was super easy and the cheesecakes came out beautiful as well as delicious!! I will definitely try the other variations of cheesecake!
sushma iyer says
Oh that sounds amazing Amy.. Thank you for taking the time out to try the recipe and more than sharing your feedback with us.. Truly appreciate it.. glad to know that you liked them <3
Thanks and Regards
Sushma
Kerri says
Thank you for this recipe. It was sooooo good! My only adjustment was the jar size, I used four 500ml mason jars, as it’s all I had and all that would fit. And worked perfect for the four of us. Devoured it and and so easy to make! Thank you! Already bought more cream cheese to make again this weekend. 🙂
sushma iyer says
Yay!!!!
Kerri.. that sounds amazing.. thanks a bunch for taking the time out to try the recipe and more than that sharing your wonderful feedback with us.. really appreciate it.. I am glad to learn that you and your family loved them. and also good to know that those mason jars worked just fine for you 🙂
Regards
Sushma
Christina Arellano says
Great recipe and sooooo simple. Thank you so much!
sushma iyer says
Hi Christina..
so glad to know that you liked the recipe.. Thank you so much for taking the time to leave your feedback here. Made me smile.. 🙂
Regards
Sushma