Chocolates.. chocolates.. chocolates.. everything you need to know..
What is Chocolate made of? How to melt Chocolate?? And how to use these melted chocolates in your projects? Yes that is what this post is going to be.
This is one of those posts where there is not going to be a lot of pictures in fact hardly 2 or 3.. But this is going to be one informative post.. And yes ofcourse there is a video too so you can directly watch that if you wish..
Chocolates are my first love.. I started baking for the love of my chocolate..
ORIGIN OF CHOCOLATE:
Chocolate originates from the cocoa tree which is indigenous to Northern South America.
Cocoa trees require warm humid conditions and lots of shade to grow successfully so are grown under the canopy of other trees such as banana and coconut palms.
Processing of Chocolate:
The cocoa pods are split and the beans are covered and left to ferment.
They are then sun dried to remove the water content and the beans are then transported to factories all around.
These beans are then roasted and ground to cocoa paste - base of all chocolates.
From cocoa paste the cocoa butter is removed to resemble ordinary butter, the cocoa cake that is left over is crushed again to produce cocoa powder.
Composition of Chocolate:
Dark Chocolate:
Cocoa paste, cocoa butter and sugar
Milk Chocolate:
Cocoa paste, cocoa butter, sugar and milk solids
White Chocolate:
No cocoa paste, cocoa butter, sugar and milk solids
Cocoa paste gives Chocolate colour and main flavour
Cocoa butter gives its the texture, flavour and setting properties.
So technically white chocolate is not a chocolate at all..
Two Main Types of Chocolate:
1. Couverture Chocolate:
Couverture chocolate is what is known as "real chocolate" and is used predominantly by professional pastry chefs and chocolate makers for items such as moulded chocolates, centrepiece and for flavourings in products like mousses.
When using couverture it is necessary to temper the chocolate if you are using it as a setting agent for eg to make Easter eggs and Run-outs.
If it is used as a flavouring agent like in mousse or ganache then there is no need of tempering it.
2. Compound Chocolate:
Commonly known as "bakers chocolate" used in commercial kitchens.
These types are easy to set and is lot cheaper than couverture chocolate as instead of the actual cocoa butter there is lot of vegetable oil in it.
Use of vegetable fats makes it more a setting agent than a flavouring agent.
These types are used in making run-outs and decorations due to the higher melting point and as it is not flavour rich it is not desirable to make mousse using these chocolate.
How to melt Compound Chocolates the right way?
There are three important things that you need to note before starting with the process of melting the Chocolate.
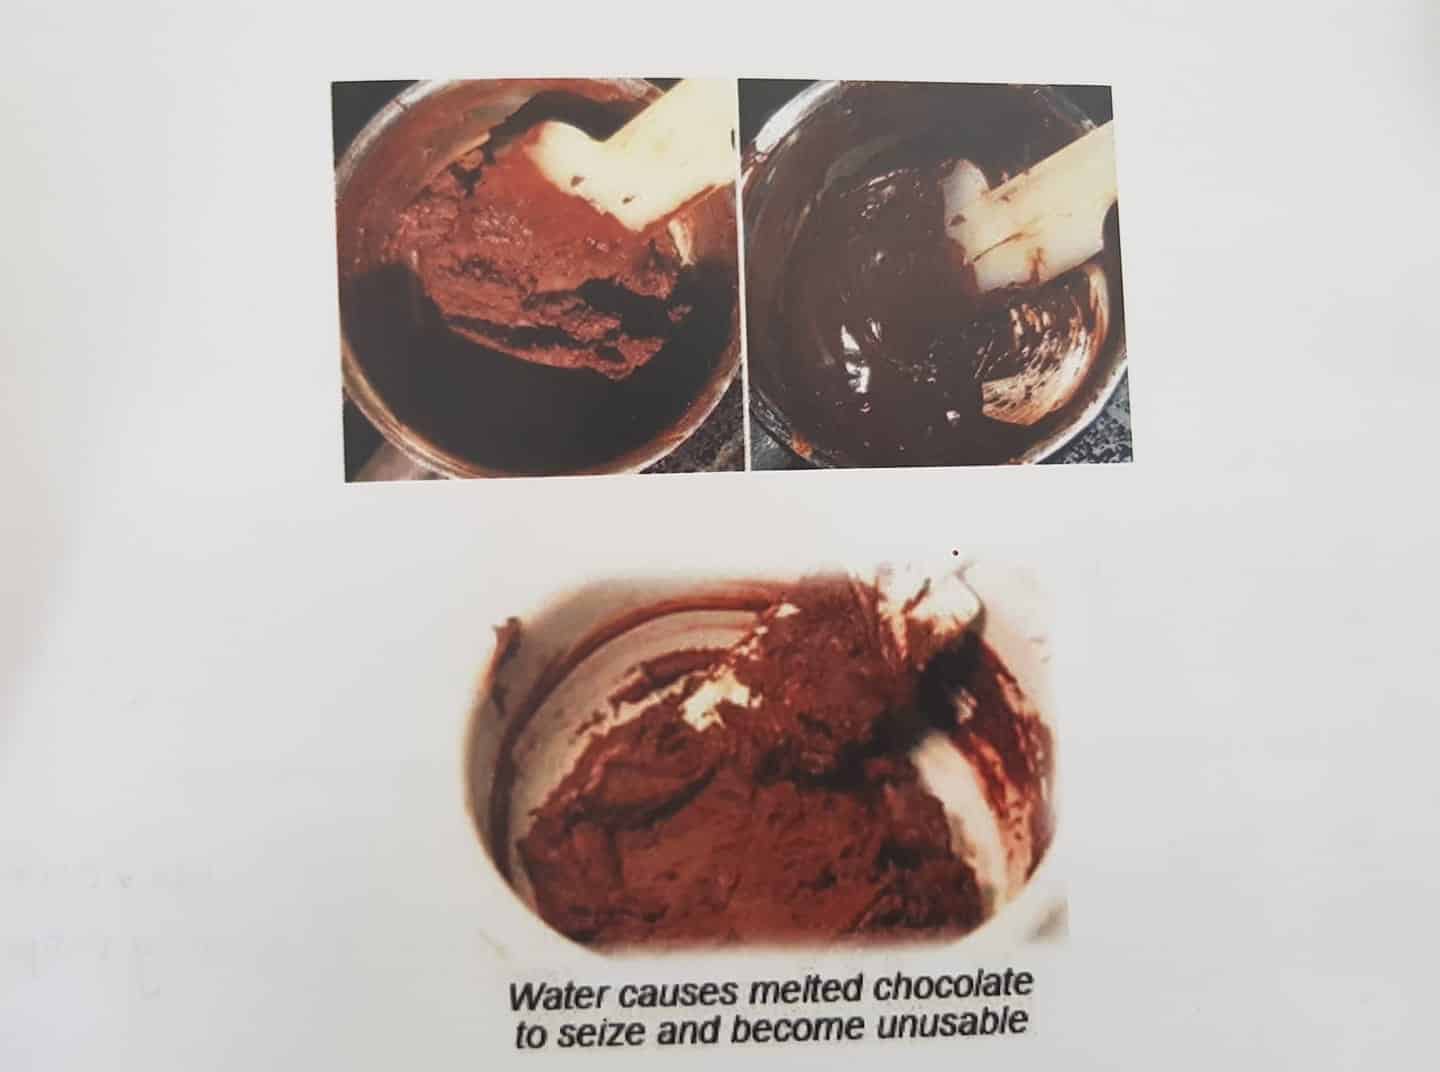
1. You might be already knowing this one; that at no point of time water or steam should come in contact with water. As moisture would cause the chocolate to become thick and lumpy.
2. To avoid this what we should do is that the water in the saucepan should be just simmering and not boiling because the temperature of the water should not go above 80°C or parts of cocoa butter will crystallise.
We all know water boils at 100°C so if we take the water in the saucepan to that temperature then there will a lot of steam production. And since we place the chocolates directly above the steam there is a high risk of this steam entering into the chocolate which we do not want.
3. This also leads us to our third point which is the temperature of the chocolate itself should not be more than 45°C or it will again crystallise, thicken, burn and go lumpy.
Makes sense right? If the water underneath is boiling automatically the bowl will get lot hotter and will eventually burn the chocolate.
So the 3 steps that you need to follow while melting the chocolate is:
1. Place a saucepan filled with quarter amount of water onto the gas. Switch it on and bring it a simmer and not boil.
2. Once the water simmers switch of the gas and place a bowl with chocolates on top.
3. Stir it till the chocolate melts.
You can also microwave the same..
But always microwave for a short duration of upto 20 sec.
So take your chocolate in a microwave safe bowl.. Microwave for 20 sec.. Remove and stir.. Again microwave for 20 sec.. repeat until chocolate is completely melted..
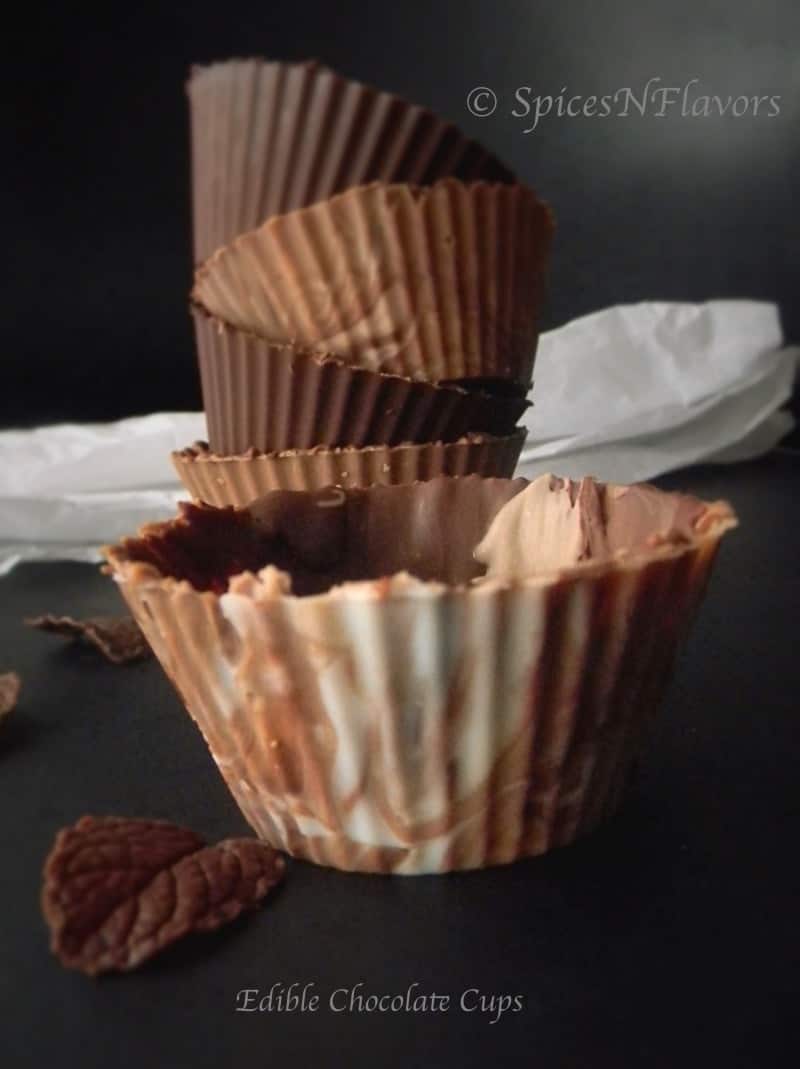
What to do with melted chocolate?
Melted compound chocolate can be used to make run-outs, chocolate decorations for cake, chocolate collar, chocolate barks, chocolate cups and many other varieties.. <3 <3 Instead of a chocolate bark you can also give it different shapes and looks using chocolate moulds like this and this that are easily available in the market.
Also do note that if you are using Bar Compound Chocolate something like this then you will have to chop them finely before melting.
If you found this informative then do let me know by tagging me, tweeting me or even instagram me. I Would love to follow you and your posts.
Reference:
Learned all this information from my Level 4 Bakery Course in term 4 Artisan BAking Skills.
Pin this for later:

Leave a Reply