 Blogging is all about pushing yourself one step ahead. Forget blogging, I would say life is all about pushing ourselves to try something new and different with each passing day. That is how I ended up joining this wonderful group online and for this month's challenge it was all about Charlotte Royale or Russe challenged by Rebecca from BakenQuilt.com.
For the Challenge I choose the Charlotte Russe with Lemon mousse filling. You can find the detailed PDF of the challenge here.

A charlotte is a type of dessert or trifle that can be served hot or cold. It can also be known as an "ice-box cake". Bread,sponge cake or biscuits/cookies are used to line a mold, which is then filled with a fruit puree or custard. (Source:wiki) There are two classic types of Charlotte - Charlotte Royale and Charlotte Russe.
I have chosen to make Charlotte Russe which is made in a loose bottom pan or a springform pan lined with ladyfingers and ideally filled with Bavarian cream or mousse. I have chosen to use Lemon Mousse after seeing the detailed recipe by Chef Anna Olson. You can find the recipe here.

Even though I nailed making the ladyfingers the very first time I tried. But the lemon mousse gave me a tough time. I tried I failed. I tried it again I failed. I tried it for the third time and with my Hubby's help finally nailed it. So since I have made all the mistakes I can assure you that you will nail it in the first attempt itself as I will share my mistakes which I guess would be more helpful.
However the only issue that I feel is that you cannot leave it at Room temperature for a longer time.
To top it up after seeing the picture I realised that the heater was switched on while I was doing the photo shoot. So stupid of me. Blah!!!
But nevertheless apart from one picture I managed to click rest.. 😉

So this the picture I was talking about.. 😛
Well I am glad that I took up this challenge or else I would have never come across such beautiful dessert. My family as well as my extended family (friends) loved this to the core and I must text this by the time I could cut a piece the first piece simply vanished. It is so flavourful.
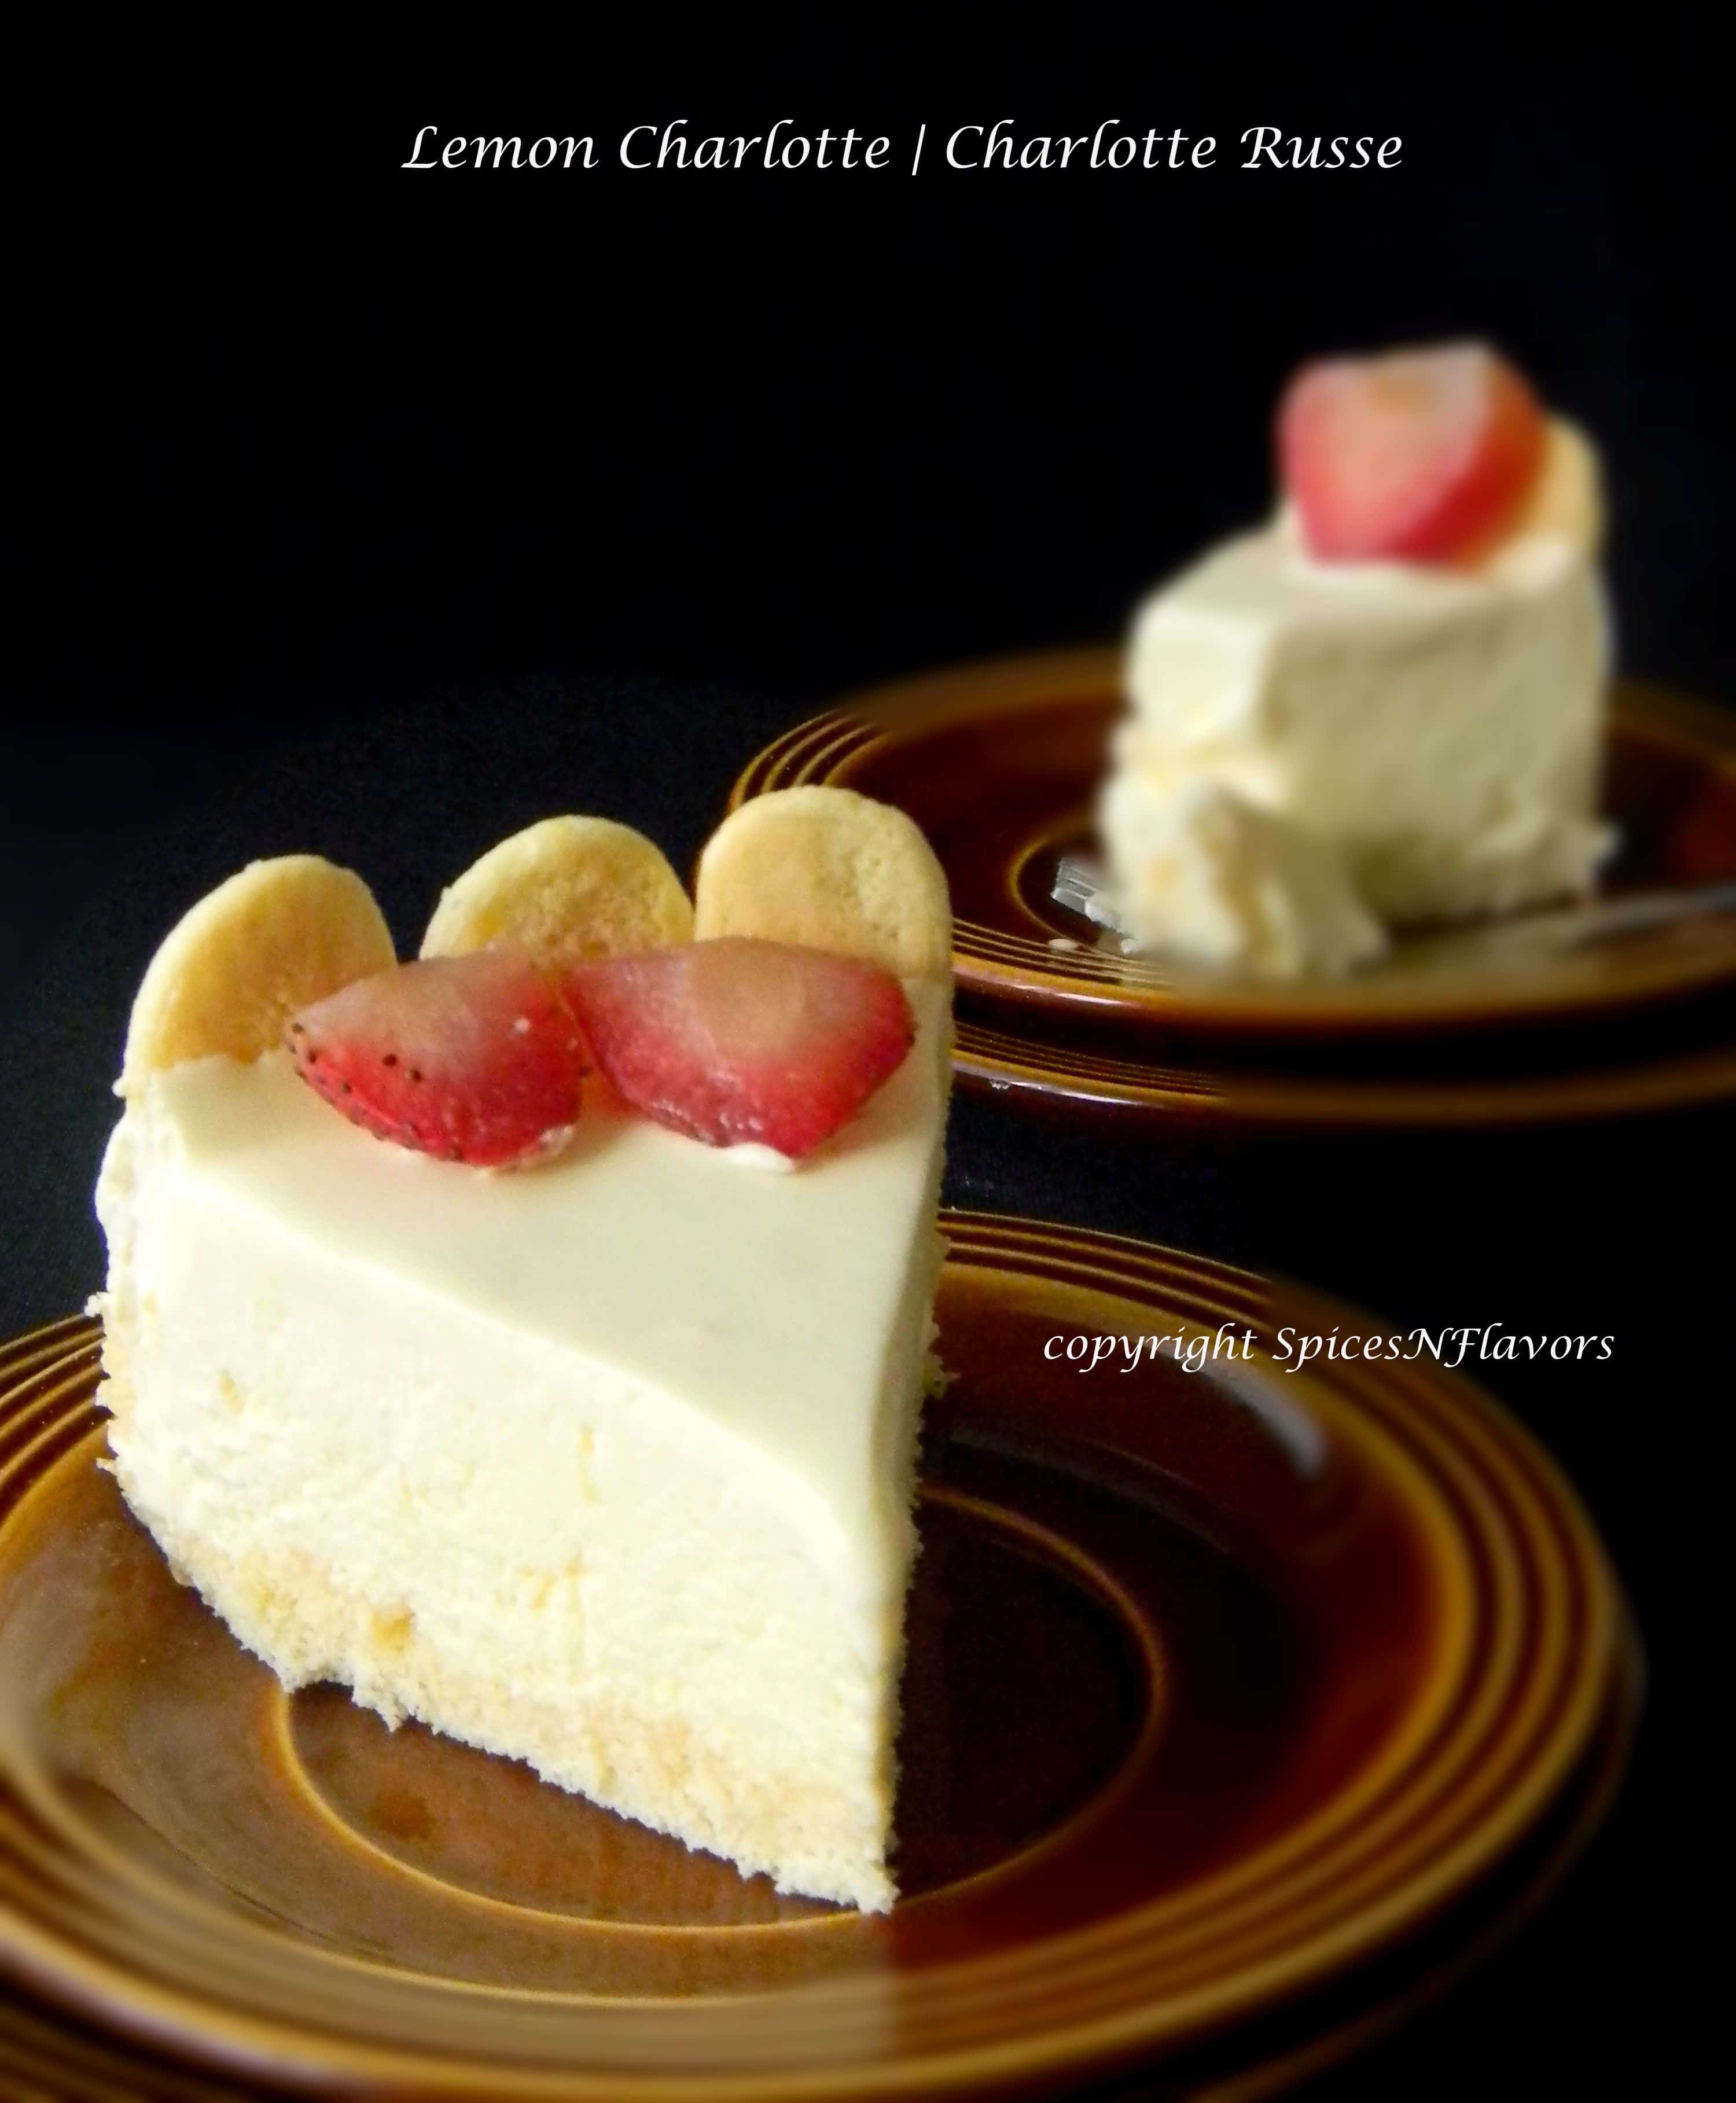 Bored of your regular chocolate mousse (well personally I can never get over chocolate) but still this is some variation to our taste buds. This is perfectly sweetened, balanced tangy or lemony flavour, with soft ladyfingers and strawberry makes it one interesting dessert.
I loved it so much that I am planning to make individual posts on ladyfingers as well as lemon mousse. Watch out for those.
If you plan to make it on one single day it would take 4-5 active hours, so what I suggest is make ladyfingers two days prior. Make the mousse on next day and allow it to set for overnight or 24 hours. So plan and break your steps accordingly. It would be so much easier.
So first I will text down the preparatory steps for both and then will write the methods individually.
Preparatory Steps for Lemon Charlotte | Charlotte Russe:
- Divide the parchment paper into three; 3 inch (7.5 cms) rows, spacing the rows about 1 inch (2.5 cms) between the rows (for easing piping of the ladyfingers cookies) with the help of a ruler and pencil. Keep at least two parchment papers ready.
- Draw a circle of 20 cm diameter on another parchment sheet to form the base of the cake. You can use the base of the springform pan in which you are going to set this cake as a guideline to trace the circle.
- Invert the parchment paper onto the baking tray so that the pencil mark is facing the other side. Or else the mark would stick to your lady fingers while baking
- A piping bag with plain 1/2 inch tip placed onto a tall glass for easy pouring of the batter into it.
- Squeeze out half cup of fresh lemon juice and keep ready.
The Lady Finger batter recipe:
Ingredients:
Makes 2 dozen 3” (7½ cm) lady fingers and an 8” (20 cm) circular base
- 6 large eggs, separated, at room temperature
- ¾ cup granulated sugar, divided
- 2½ teaspoons vanilla
- 1 tablespoon warm water
- 1½ cups sifted cake flour (I have used All Purpose Flour)
- ¼ teaspoon cream of tartar (I have used equal amount of lemon juice instead)
- Powdered sugar for dusting, approximately 1 cup
Method:
- Preheat the oven to moderately hot 400°F/200°C.
- In a large mixing bowl, beat the yolks and ½ cup of the sugar on high speed with a mixer with the paddle attachment for 5 minutes or until the mixture is very thick and ribbons when dropped from the beater. (Another way to test is: Draw the number 8 with the batter, if it holds its shape for sometime then your are ready to proceed with next step).
- Lower the speed and mix in the vanilla and the water. Increase back to high speed and beat for another 30 seconds or until the mixture is thick again. (It took around a minute or so with electric hand mixer).
- Sift the flour over this mixture without mixing it in and set it aside while you beat the whites.
- In another large mixing bowl, beat the whites until they are foamy. Add the cream of tartar (used lemon juice as a substitute) and beat to soft peak stage. Gradually beat in the remaining ¼ cup sugar, beating until very stiff peaks form when the beater is raised slowly. (Beat the egg white continuously while you are adding the sugar). (When you invert the mixing bowl the egg white would stay still and firm and will not slide off).
- Fold 1/3 of the beaten whites with a rubber spatula into the batter to lighten it. Fold until all of the flour is incorporated. Gently fold in the remaining whites, making sure that no streaks remain but being very careful not to deflate the whites any more than necessary.
- Working quickly so that the batter doesn’t lose volume, put about 4 cups of the batter into a piping bag fitted with a ½” or ¾” (1¼ to 2 cm) tip. If you don’t have piping bags and tips, spoon it into a freezer zip-top bag and clip one corner to ½” (12 mm) wide and use that to pipe the batter.
- Holding the piping bag straight up over the baking sheet, pipe the batter into a circle shape following the guidelines drawn on the parchment paper. Pop this pan in the oven and to bake for 8-10 minutes until golden brown.
- While the base is baking, scoop the remaining batter into the piping bag and pipe ladyfingers onto the other baking sheet; they will be 3 inches long and about ½ inches wide. Pipe the fingers apart.
- Sift some powdered sugar evenly over the ladyfingers. After a few seconds the batter will absorb the sugar. For a pearled effect, sift another layer of sugar over the ladyfingers. Bake 8-10 minutes until light golden brown and springy to the touch.
- Remove the sheets to racks and cool slightly. To prevent cracking, remove the ladyfinger strips from the sheets while still warm with a long, thin spatula. For the cake base, invert onto a rack covered with a paper towel or a dishtowel, peel off the liner, and invert onto another rack. Cool the base and ladyfingers on racks until completely cool. Ladyfingers go stale very quickly. If not using them right away, wrap in plastic wrap. They may be frozen at this point for up to 1 month.
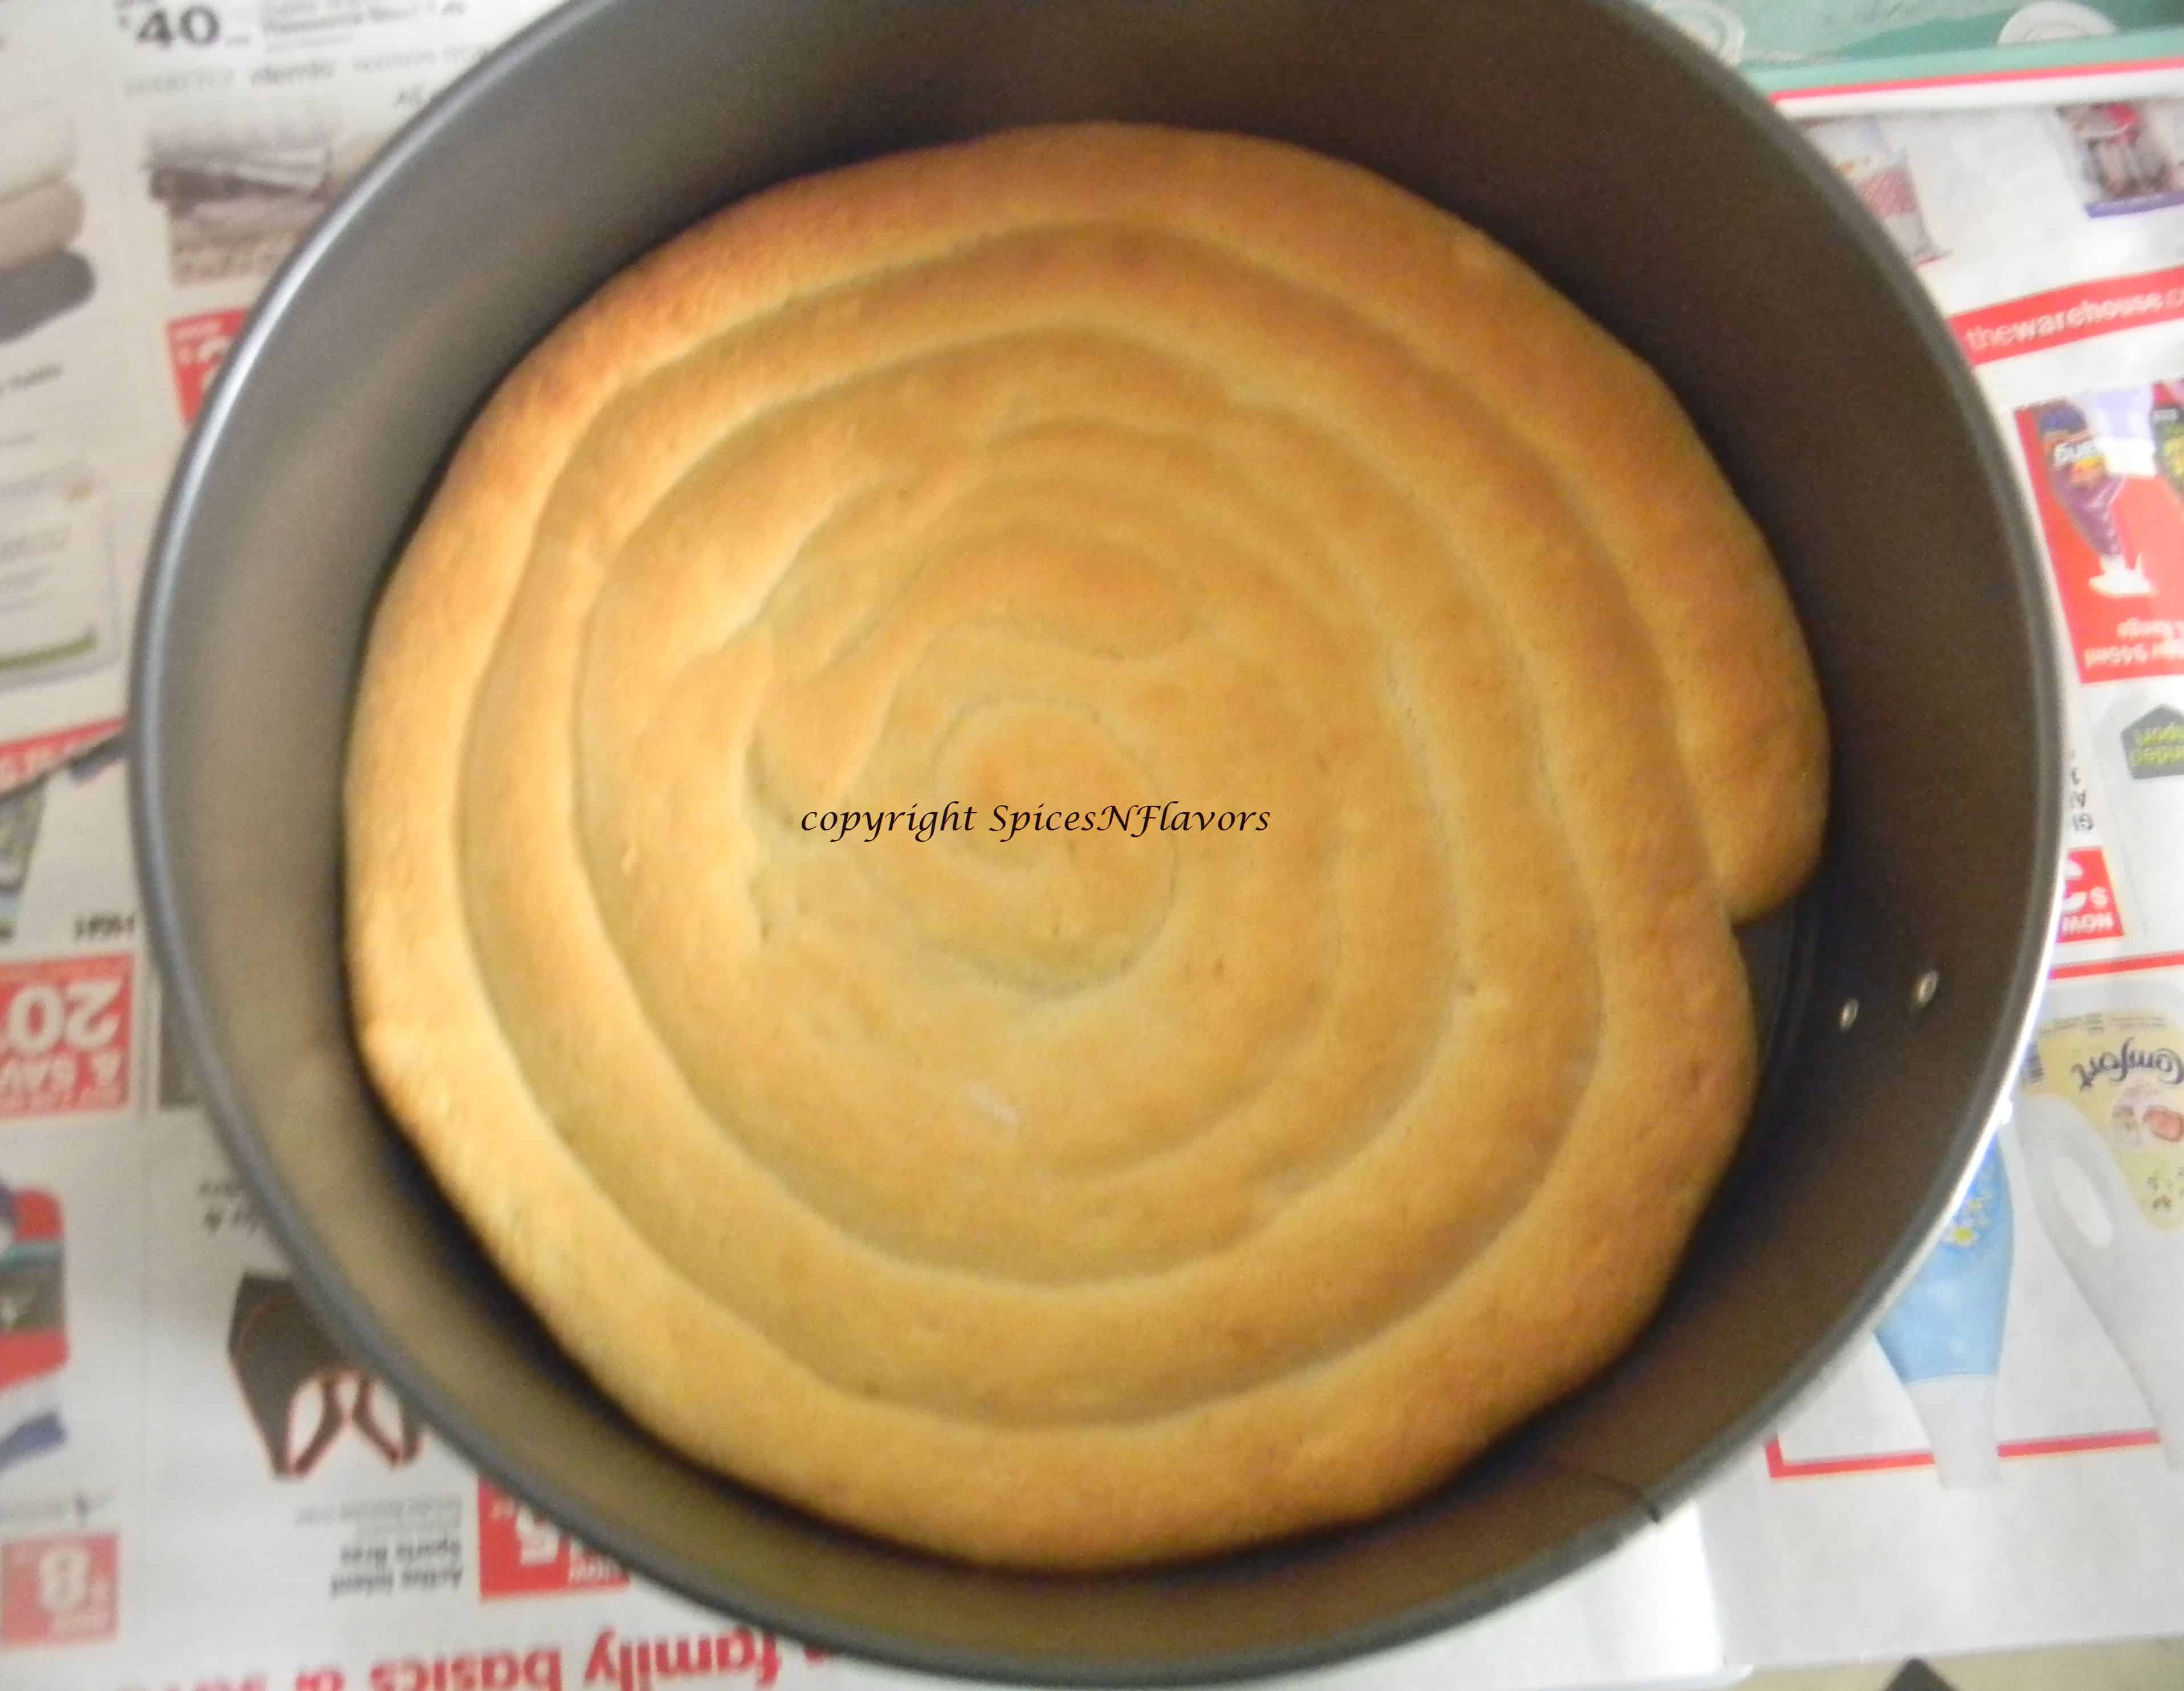
20 cm circle shaped ladyfingers forming the base of the cake.

3 inches ladyfingers lined to the sides of the tin forming the shape for the cake.
I referred the video by Joyofbaking.com for a clear picture.
Suggestions:
- If you are having a smaller oven so that you can keep only one batch at a time then I would suggest you to first bake the actual lady fingers and then the circular one.
- Also I keep my oven to preheat after step 4 which works best in my case. You can adjust as per your oven temperature.
- When baking continuously I found that the oven gets too hot by the time I place my second batch of lady fingers so I would suggest you to keep an eye on them while they are baking and reduce the temperature of the oven if need be.
- You need to work quickly as the egg whites does not hold stiff for a longer period.
Lemon Mousse:
Ingredients:
- 1/2 cup fresh lemon juice
- 1 cup sugar, divided
- 4 large egg yolks
- 1/2 cup unsalted butter, at room temperature, cubed to small pieces
- 1 tablespoon finely grated lemon zest
- 1 1/2 cups whipping cream
- 4 tsp agar agar powder
- warm water to dissolve agar agar.
- 2 cups fresh strawberries
Method:
- Bring the lemon juice and ½ cup of the sugar up to a simmer using double boiler method. (*Though the recipe doesn't call for double boiler but I suggest, first mistake)
- In a separate bowl, whisk the egg yolks with the remaining ½ cup of sugar. Slowly pour the lemon syrup into the eggs while whisking and then return the entire mixture to the pot. Whisk this over medium heat (*again using double boiler method, 2nd mistake) until it just begins to bubble, about 2 minutes, then remove this from the heat and whip with electric beaters or in a stand mixer until cool. Add the butter (one cube at a time) and zest and beat in until smooth and thick. (*Place it into the refrigerator for 15 mins, 3rd mistake)
- Whip the cream to soft peaks. (*Place it in the refrigerator, 4th mistake)
- While that is chilling dissolve 4tsp agar agar in warm water and let it stand in room temperature for 10 mins.
- Make sure that the agar agar mixture is not hot at all. (Because when I poured it in the butter and egg yolk mixture the butter split and my efforts went in vain). Add the agar agar to egg yolk mixture and beat well for a minute.
- Fold the whipped cream into the mixture in three intervals. Fold everything nicely and your mousse ready to be assembled.
To Assemble:
- If you have enough space in your refrigerator then remove the base of the springform form and place the sides of it directly onto your serving plate. (There must be enough place for the serving plate to be placed in the refrigerator). If not then invert the base of the pan upside down and use.
- Place the circular base ladyfinger in the bottom of the pan.
- Trim the bottom of the lady fingers so that they stand upright lining the sides of the pan. Make sure you trim them in a way that they are of equal size. And then line the sides of the pan.
- Pour the lemon mousse mixture into it allow it to set overnight or to a max of 24 hours. (Alternatively, pour the lemon mousse mixture halfway. Place some chopped strawberries and again pour the mousse mixture so that you get a sandwich of strawberries when the mousse is set)
- After the mousse is set. Transfer it to the serving plate. If the lady fingers are not freshly baked brush some sugar syrup to it. Garnish it with some more strawberries and tie a ribbon for the elegant look.
(Refer the pictures above for the procedure.)
Notes:
* Whatever I have mentioned in brackets with asterisk sign is not part of the actual recipe, but what I learned from my mistakes.
The actual recipe does not call for agar agar as well but I used it to set my mousse.
Phew such a big post!!!
But yes it had to be special, I am now going to press the publish button for the 50th time so that calls for something special like my 1st post and 25th post. 🙂 Well all posts are special but these mark a kind of achievement I feel.
If you love mousse like I do then check my Beetroot and White Chocolate mousse as well.
I am taking this to the regular blog party Friday Fiesta. Catch you there.
Happy Baking!!!
Sushma
A special thanks to HIM to stand by me when I failed each time supporting and encouraging me to try again and again and not to give up. Without you this post would not have been possible. Thank you dear.
Manali @ CookWithManali says
what a pretty looking fancy dessert Sushma! Looks like a lot of work but well worth in the end! Well done! 🙂
Sushma Balasubramanian says
Yes Manali.. Lot of steps but when broken into parts it was much easier.. Glad you liked it.. Thank you.. 🙂
Julie is Hostess At Heart says
Your Charlotte came out great! So beautiful and I love lemon. I did the Charlotte Royal and was Late because I didn't give myself enough time to write up the post. Lots of steps right?
Sushma Balasubramanian says
Yeah.. Julie lot of steps but loved the end result.. Thank you dear..
Would love to see your Charlotte Royale.. do post it whenever you have enough time to chalk down.. 🙂
Julie is Hostess At Heart says
It was just posted Monday. Take a peek when you have time.
Anu-My Ginger Garlic Kitchen says
This Charlotte looks damn pretty an delicious, Shushma. I adore this fantastically shared detailed recipe! 🙂
Sushma Balasubramanian says
Wow.. Thank you so much Anu.. 🙂
liana says
your lemony charlotte looks amazing, it is fantastic! lovely!
Sushma Balasubramanian says
Thanks for your feedback!
prettypolymath says
it's so dainty!!--it looks beautiful..a little encouragement from HIM is always great 🙂
Sushma Balasubramanian says
Hehe.. Egg-xactly dear.. Thank you so much.. 🙂
Lili says
Your charlotte is lovely Sushma and it's great you managed to surmount any obstacles and make it! Thanks for all the great tips. I'm curious about using agar agar powder instead of gelatine, so you've inspired me to go ahead and do it! And your cake looks so delicious! 🙂
Sushma Balasubramanian says
Yes since we are vegetarian I try to use agar agar in most of the desserts..
I am glad that you liked this version of Charlotte.. Thank you so much dear.. 🙂
Lili says
You're very welcome Sushma! 🙂
skd says
This looks so gorgeous. The recipe is detailed and clear. I would love to try it ?
Sushma Balasubramanian says
Thank you so much.. I am glad that you liked it..
Yes do give it a try, but as said break and plan your steps.. 🙂
Sushma Balasubramanian says
wow.. please do try.. Glad that you liked it.. Thank you.. 🙂
Rebecca says
Welcome to the Daring Bakers! I'm really glad you tried the challenge and your Charlotte looks beautiful and sounds delicious. I agree - it's so much easier to spread the assembly out over a couple of days. It's not really hard, there's just a lot of steps.
Sushma Balasubramanian says
Thank you Rebecca.. I am so happy that I did it!!
Followed your instructions to the T so could achieve it.. 🙂
Loved being a part of Daring Bakers!!!
Quinn Caudill says
Great job on the challenge. I made the Charlotte Royale for mine. There is a reason The Daring Kitchen calls it a challenge but what a great learning experience. Beautiful dessert. Great job..
Sushma Balasubramanian says
Indeed it was!! learned so much from the mistakes..
Thank you Quinn.. Would love to check out your Charlotte Royale.. On my way to your post.. 🙂
Loretta says
A warm welcome to our Fiesta Friday party and thanks so much for bringing over this beautiful Lemon Charlotte wonder! 🙂 It looks like you nailed it and did a darn good job at it. If at first you don't succeed........great work! It does look pretty involved so your persistence and hard work really paid off. I'm sure everyone at the Fiesta will enjoy this, thanks again. I hope you get to stay around and visit other folks at the party 🙂
Sushma Balasubramanian says
Loretta that so sweet of you to drop by and encourage me with your kind words..
I totally enjoy being the part of FF and would definitely check in with what's going on in the party.
Thank you so much.. 🙂
Loretta says
Oh you're very welcome Sushma, I am one of the co-hosts for Friday's Fiesta. I
hope you get a chance to check out my blog too. I've just added you, so hopefully will get your posts 🙂
Love Served Daily says
How pretty is that
Sushma Balasubramanian says
Ahhh.. Thank you Ritu.. 🙂
Smiling Notes says
Woah!! This looks better than any store bought version. I have no words.
Sushma Balasubramanian says
Thats so sweet of you Shamira.. 🙂
Thanks a bunch dear!!!
Framed Recipes says
That sounds delicious. All that hard work paid off... :).
Sushma Balasubramanian says
Yes Sreelatha.. Thank you.. 🙂
Freda @ Aromatic essence says
Wooaahhh Sushma ! This is so gorgeous , and quite time consuming . Looks very delicious ! Glad you nailed it 🙂
Sushma Balasubramanian says
Time consuming it is so I broke down the steps into two days.. And it was much easier then..
Freda @ Aromatic essence says
That's cool 🙂