
Kick off your Christmas baking with these easy Chocolate-Dipped Orange Cookie Sticks! Made with a buttery shortbread base, infused with fresh orange zest and juice, and finished with a dip of rich chocolate, they’re the perfect festive treat to share or gift this season.

What are Cookie Sticks?
Cookie sticks are a fun variation of traditional cookies, shaped into long bars perfect for dipping into chocolate, tea, or coffee. They have a sturdy base, like shortbread, making them easy to bake and serve.
These cookie sticks are flavored with fresh orange zest and juice, paired with a rich chocolate dip for a festive treat. The crisp edges and soft center make them an irresistible snack for any occasion.
You can customize the base using sugar cookie or chocolate chip dough for a personalized twist.
Whether topped with sprinkles, crushed pistachios, or a drizzle of white chocolate, these cookie sticks are perfect for gifting and adding a personal touch to your holiday celebrations.
Ingredients
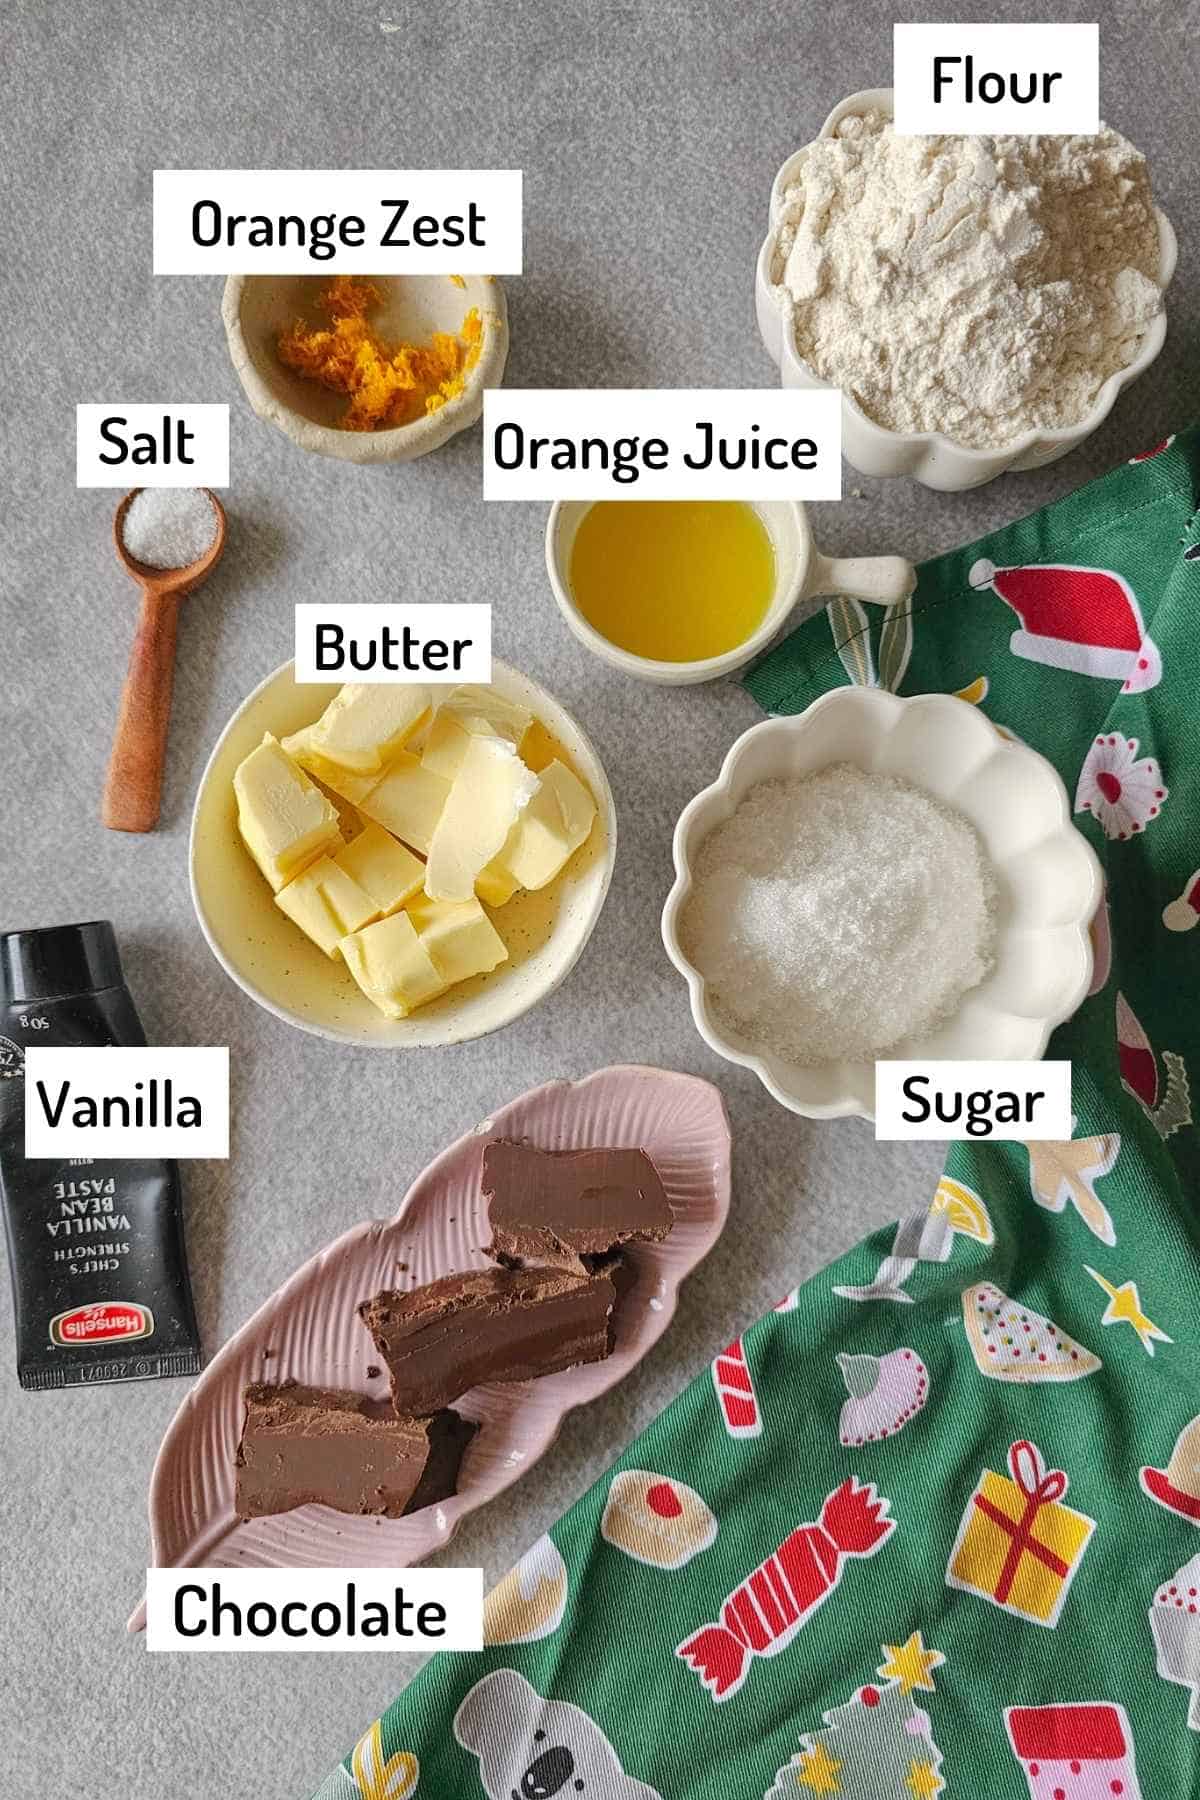
Ingredient Notes:
- Sugar: Granulated sugar works well for the base of these cookie sticks, helping to create a crisp texture. You can substitute with caster sugar for a finer texture if desired.
- Chocolate: Use high-quality dark chocolate for dipping to complement the citrus flavor of the orange. You can substitute with milk chocolate or white chocolate depending on your preference.
Step by Step Instructions
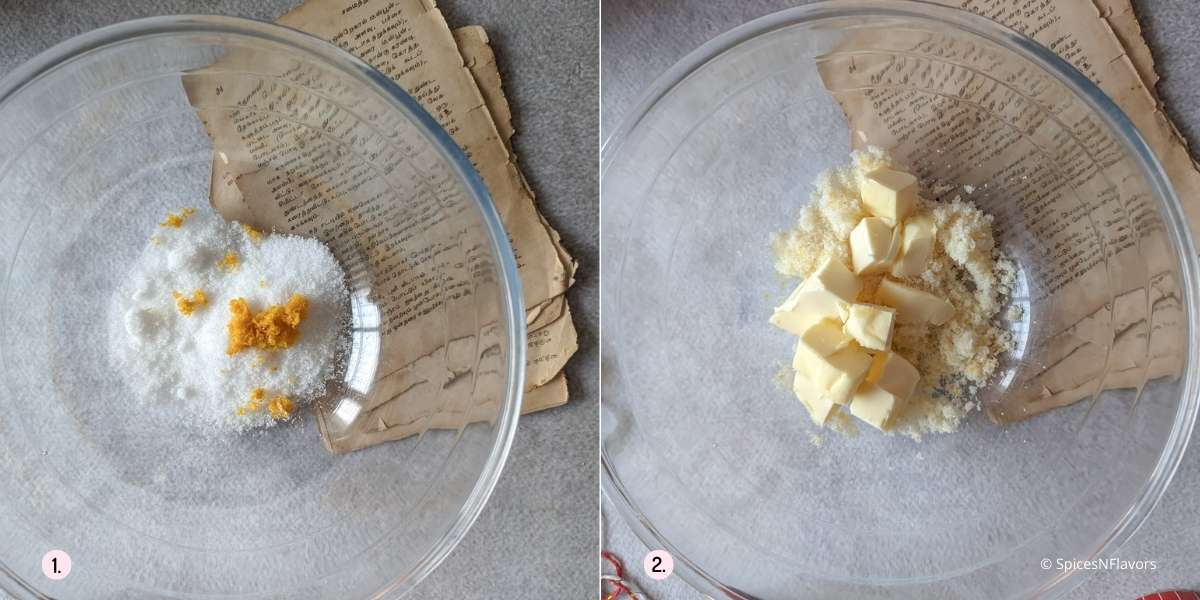
Rub the granulated sugar with the zest of 2 medium oranges using your fingertips to release the oils from the zest, infusing the sugar with citrus flavor (image 1).
Add the cubed, softened butter to the orange-sugar mixture and combine it with a spatula until smooth and creamy (image 2).
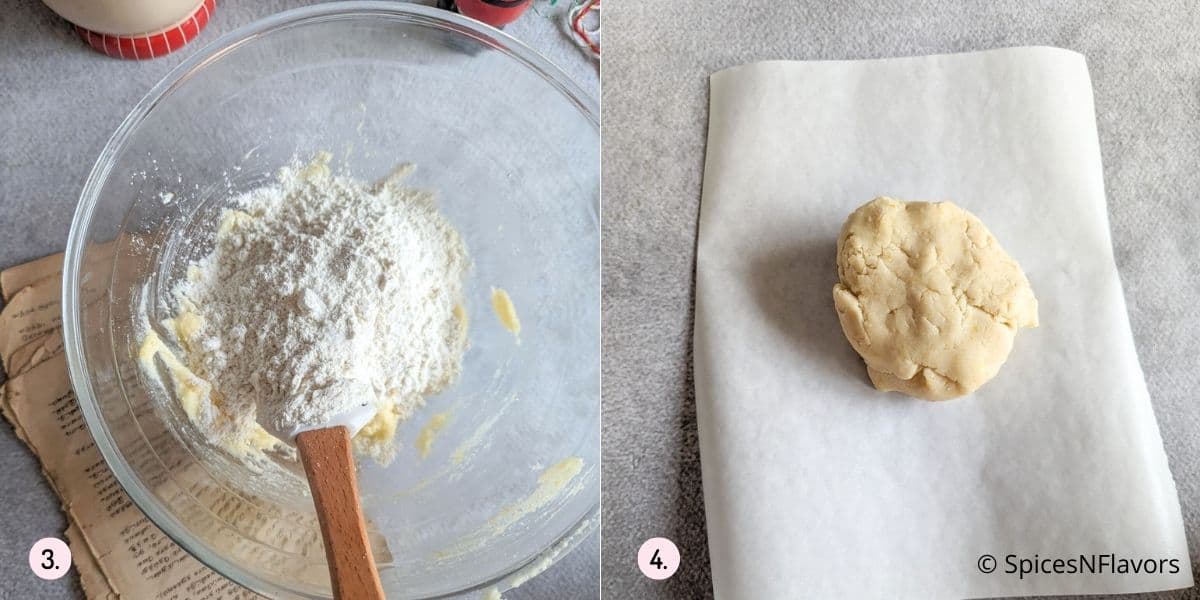
Gradually add the all-purpose flour and mix until the dough begins to come together (image 3).
Add the fresh orange juice and mix until the dough forms. If the dough is too crumbly, add a little more orange juice, one teaspoon at a time, until it holds together (image 4).

Roll the dough out between two sheets of parchment paper to a thickness of about 1 cm (image 5).
Cut the dough into 12x12 cm squares, then slice each square into 1 cm wide strips to form the cookie sticks. Gather any scraps, roll them back into a ball, and re-roll to cut more strips (image 6).
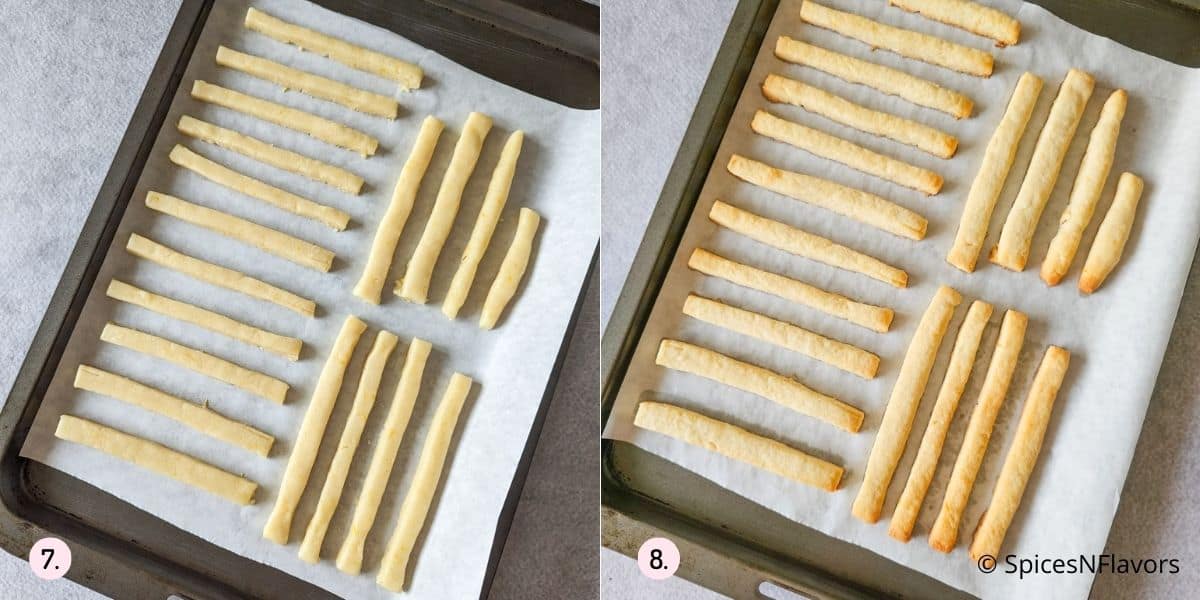
Preheat the oven to 170°C (350°F). Place the cookie sticks on a baking sheet lined with parchment paper, ensuring there’s space between them (image 7). While the oven is preheating place your baking tray in the refrigerator.
Bake for 12-14 minutes, or until golden at the edges and firm to the touch (image 8).
Let the cookies cool completely on a wire rack after baking.
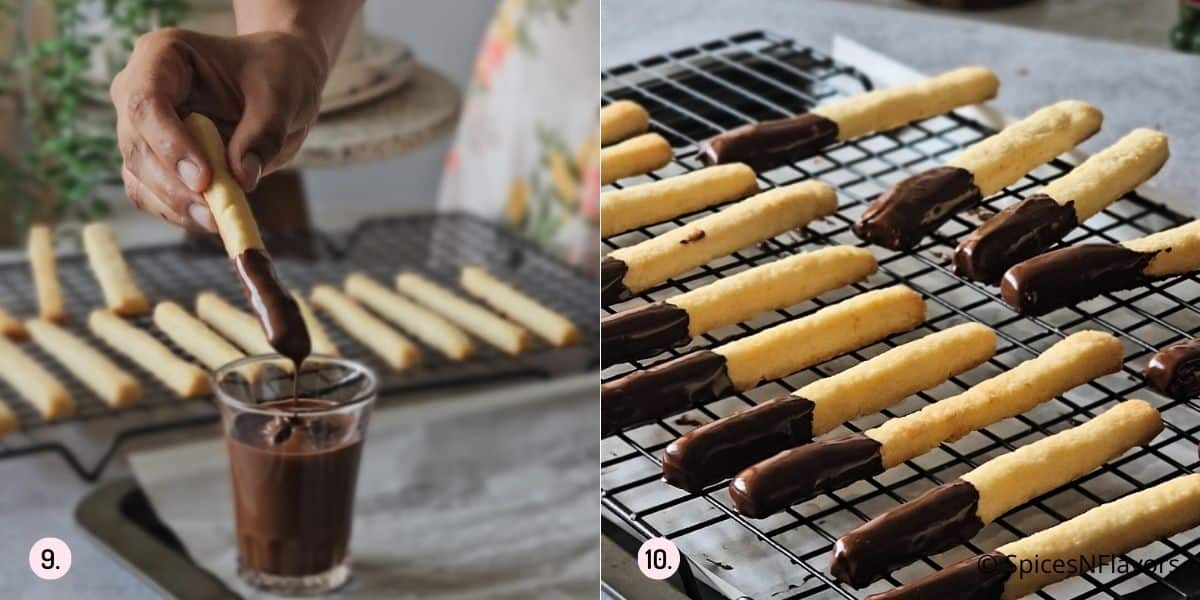
Once cooled, dip each cookie stick into melted dark chocolate, covering one end or half of the stick. Allow any excess chocolate to drip off (image 9 and 10).
Drizzle more melted chocolate over the dipped cookies for added decoration, and let the chocolate set before serving or storing.
Enjoy your festive Chocolate-Dipped Orange Cookie Sticks!
Storage Instructions:
- Store Chocolate-Dipped Orange Cookie Sticks in an airtight container to keep them fresh.
- Keep them at room temperature for up to 5-7 days.
- If you need to store them longer, refrigerate them for up to 2 weeks.
- For added protection, place parchment paper between each cookie stick to prevent the chocolate from smudging.
- For long-term storage, freeze the cookie sticks for 2-3 months. Wrap them tightly in plastic wrap or foil before freezing.
Thawing Instructions:
- To thaw, simply remove the cookies from the freezer and let them sit at room temperature for 30 minutes to an hour.
Pro Tips:
- Softened Butter: Make sure the butter is softened to room temperature before using it in the recipe. This ensures it mixes evenly with the sugar and creates a smooth dough.
- Rub Zest Into Sugar: When rubbing the orange zest into the sugar, use your fingertips to press the zest into the sugar. This releases the essential oils from the zest, giving the dough a strong citrus flavor.
- Chill the Dough: Don’t skip chilling the dough. Refrigerating it for at least 30 minutes makes it easier to handle, roll out, and cut into neat strips.
- Baking Time: Keep an eye on the cookies while baking. Since oven temperatures vary, start checking for doneness at the 10-minute mark. The cookies should be golden at the edges and firm to the touch.
- Cool Completely: Allow the cookies to cool completely before dipping them in chocolate. This prevents the chocolate from melting and makes dipping easier.
- Melting Chocolate: When melting the chocolate, do it gently over a double boiler or in short bursts in the microwave. Stir well between intervals to avoid burning the chocolate. Alternatively, use the Instant Pot hack; my personal favourite way to melt chocolate.
- Customization: Feel free to experiment with different cookie bases like sugar cookie or chocolate chip cookie dough for a personalized touch. Adding nuts like pistachios, or sprinkles, or a drizzle of white chocolate can also elevate the look and flavor.

Make Ahead Instructions and Tips
For the Dough:
Refrigerating the Dough:
After preparing the dough, wrap it tightly in plastic wrap or place it in an airtight container. Refrigerate for up to 24 hours.
Freezing the Dough:
- If you want to make the dough further in advance, you can freeze it.
- Shape the dough into a rectangular block or disc, wrap it tightly in plastic wrap, and then place it in a freezer-safe bag or container.
- The dough will keep in the freezer for up to 3 months.
- Thaw it overnight in the fridge before rolling it out.
Rolling and Cutting: After chilling or thawing the dough, allow it to soften slightly at room temperature (about 5-10 minutes). Roll the dough out between two sheets of parchment paper, cut into strips, and bake as directed.
For the Baked Cookies:
Storing Baked Cookies: Once the cookie sticks have been baked and cooled, store them in an airtight container at room temperature for up to 5-7 days.
Freezing Baked Cookies:
- If you want to store the cookies for a longer period, freeze them after they have cooled completely.
- Place them in a single layer on a baking sheet to freeze first, then transfer them to an airtight container or freezer bag.
- Frozen cookies will keep for up to 3 months.
Chocolate Dipping Tip:
- If you're making the cookies ahead of time and dipping them in chocolate later, ensure the cookies are completely cool before dipping.
- After dipping, let the chocolate set before storing the cookies in an airtight container. This prevents the chocolate from smudging or sticking together.
By preparing the dough or the cookies ahead of time, you can save time on the day you plan to serve or gift them, ensuring a stress-free holiday baking experience.
Frequently Asked Questions
Yes, you can use any type of chocolate for dipping—dark, milk, or white chocolate, or a combination all work well. The choice depends on your flavor preference.
Yes, you can customize the dough. Adding a teaspoon of vanilla extract or ground cinnamon can give the cookies a warm, aromatic flavor. You can also stir in small amounts of chopped nuts, like pistachios or almonds, for added texture.
Allow the chocolate-dipped cookie sticks to cool completely before stacking or storing them. Placing parchment paper between the cookies will also help prevent the chocolate from smudging.
Related Recipes:
- Classic Shortbread Cookies
- Eggless Sugar cookies
- Chocolate chip cookies without brown sugar
- Christmas cookies
Wish to Join US for the love of BAKING? Subscribe to our newsletter and Youtube channel. Follow along on Facebook, Instagram, and Pinterest for all the latest updates!

Chocolate dipped Orange Cookie Sticks
Ingredients
- Zest of 1 medium orange
- 50 gms (1/4 cup) Sugar
- 65 gms (1/4 cup) Unsalted Butter softened
- 131 gms (1 cup + 1 tbsp) All Purpose Flour/Maida
- 1/4 tsp Salt
- 1 tbsp Orange Juice refer notes
- 100-130 gms Melted Chocolate for dipping the cookies
Instructions
- In a mixing bowl, rub granulated sugar with the zest of 1 medium oranges using your fingertips.
- Add cubed, softened butter to the orange-sugar mixture. Using a spatula, mix until the mixture is smooth and creamy.
- Gradually add the all-purpose flour, mixing gently until the dough starts to come together.
- Pour in freshly squeezed orange juice and mix until the dough forms. If the dough feels crumbly, add a little more orange juice, one teaspoon at a time, until it holds together without being sticky.
- Shape the dough into a rectangular block, wrap it tightly in plastic wrap, and refrigerate for at least 30 minutes. Chilling ensures the dough firms up, making it easier to roll and cut.
- Roll the chilled dough between two sheets of parchment paper to a thickness of about 1 cm. Cut the dough into 12x12 cm squares, then slice each square into 1 cm wide strips to form cookie sticks. Gather any scraps, roll them back into a ball, and re-roll to cut more sticks.
- Arrange the cookie sticks on a baking sheet lined with parchment paper, leaving space between each stick.
- Preheat your oven to 170°C (350°F). While your oven is preheating place your baking tray in the refrigerator.
- Bake for 12-14 minutes, or until the edges are golden and the cookies feel firm to the touch. Cool completely on a wire rack.
- Once cooled, dip one end or half of each cookie stick into melted dark chocolate. Allow the excess chocolate to drip off, then place the dipped cookies on a parchment-lined tray. Drizzle more melted chocolate over the cookies for decoration, or sprinkle them with crushed nuts, candies, or white chocolate for a festive touch. Let the chocolate set completely before serving or storing.
Video
Notes
- Ensure the butter is soft but not melted for a smooth and creamy dough mixture. If it is not soft enough to mix you might have to use a hand-held mixer or stand mixer to combine it with the sugar.
- If the dough feels crumbly, add a little more orange juice, one teaspoon at a time, until it holds together without being sticky.
- Don’t waste any dough! Gather scraps and re-roll them to create additional cookie sticks.
- Keep an eye on the cookies while baking. Since oven temperatures vary, start checking for doneness at the 10-minute mark. The cookies should be golden at the edges and firm to the touch. I did rotate my pan after 10 mins and baked again for another 2 mins.
- When melting the chocolate, do it gently over a double boiler or in short bursts in the microwave. Stir well between intervals to avoid burning the chocolate. Alternatively, use the Instant Pot hack; my personal favourite way to melt chocolate.
- Feel free to experiment with different cookie bases like sugar cookie or chocolate chip cookie dough for a personalized touch. Adding nuts like pistachios, or sprinkles, or a drizzle of white chocolate can also elevate the look and flavor.
Leave a Reply