
Make the most PERFECT homemade finger doughnuts with that elusive 'white ring' using this easy step by step recipe!
Rose to fame by the classic British Bake Off series, these finger doughnuts are one of the ways in which you can shape a doughnut dough.
This is also a very classic Kiwi (New Zealand) staple cream doughnut that you can find locally in almost all the bakeries.
What are Finger Doughnuts?
Doughnuts are sweetened fried snack that can be made using the classic yeast leavened dough or from a cake batter. Finger Doughnuts are basically yeasted doughnut recipe that is shaped like a finger; hence the name. It is usually filled with a cream filling and hence is also known as Cream Doughnuts in some part of the world.
I've always been such a lover of brioche doughnuts but surprisingly this recipe does not call for elaborate ingredients unlike the brioche ones and this chantilly cream that's piped in the the middle of these puffy clouds make for the ultimate treat.
Get ready for the first of many doughnut recipes to appear on the site!
Why you will love this Recipe?
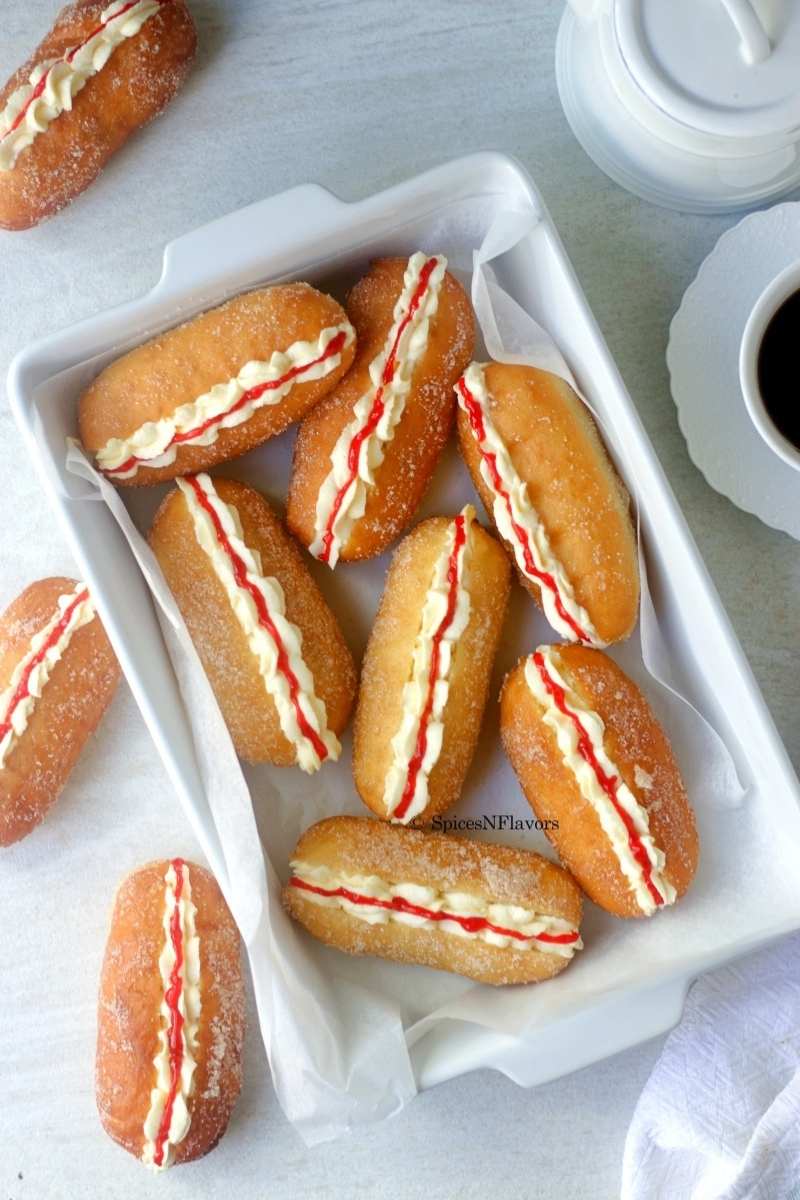
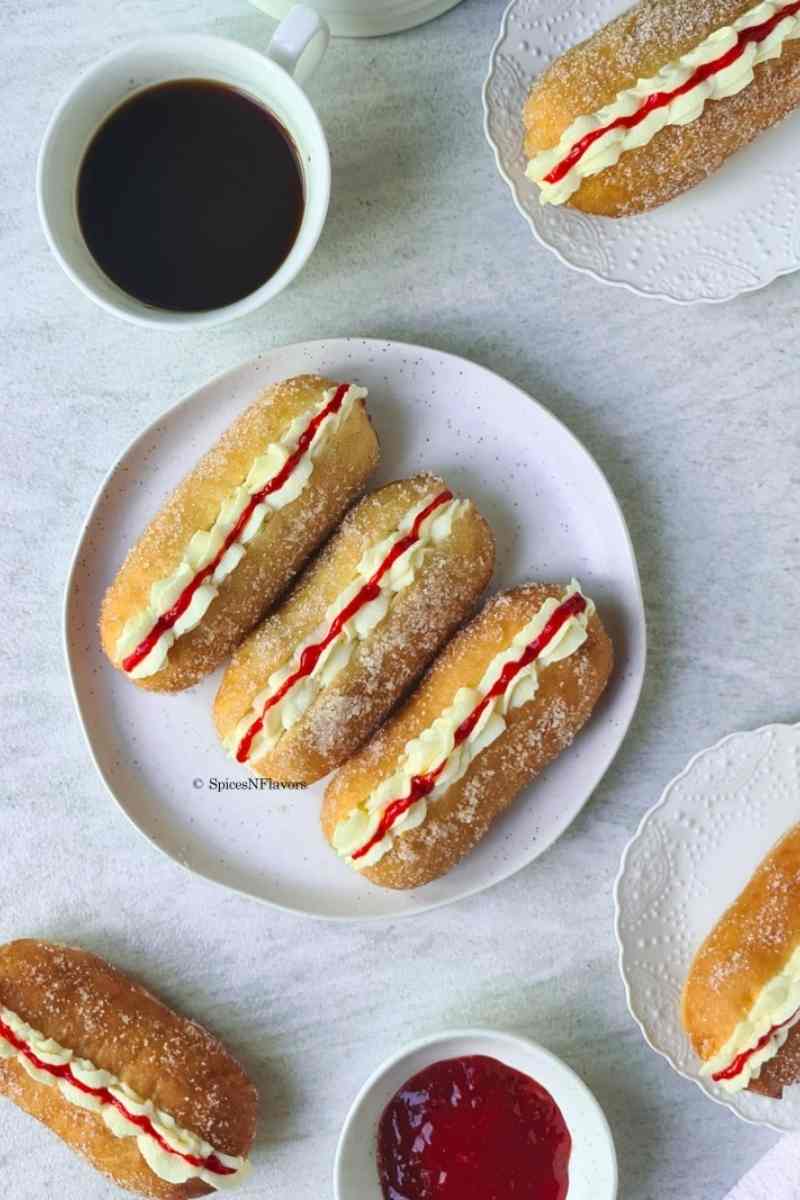
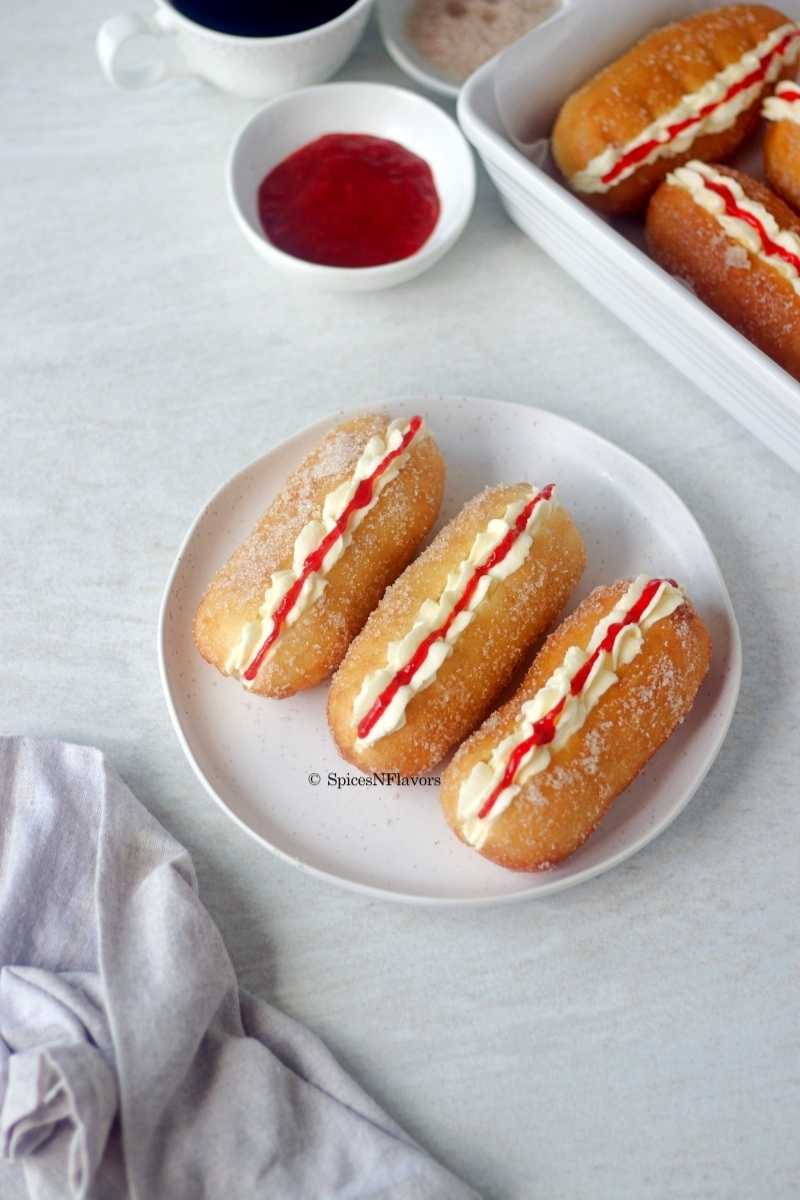
Sugar-coated with a neat stripe of homemade jam these doughnuts are so soft and fluffy that you won't be able to stop at one.
- Due to its unique shape, it opens up a plethora of ways in which you can make the cream filling; giving you the liberty to create many variations from the basic dough.
- The smaller size makes it easier for the kids to have it like a grab and go snack.
- Being shaped like a finger; it makes the perfect little dipper - imagine serving it in a big plate with various filling like nutella, ganache etc as an accompaniment for your guests.
- Absolutely egg-free - so everyone can enjoy doughnuts now!!
- You can’t beat an old fashioned yeasted doughnut. They are much easier to make than you think.
Ingredients Needed:
- 6 gms (1 tsp) Salt
- 480 gms (4 cups) Bread Flour
- 15 gms (1 tbsp) Milk Powder (optional)
- 35 gms (2 tbsp + 1 tsp) Sugar
- 6 gms (1.5 tsp) Instant Yeast
- 25 gms Yogurt
- 250 ml (1 cup) Water
- 37 gms (3 tbsp) Butter
- 1/3 cup Sugar
- 1/4 tsp Cinnamon Powder
- 350 gms Whipping Cream
- 65 gms Icing Sugar
- 1/4 tsp Vanilla Bean Paste
Ingredient Notes:
- Bread Flour: Due to its high protein content bread flour is preferred. If you do not find it you can substitute with all purpose flour.
- Instant Yeast: I always recommend using instant yeast for all my bread recipes as you can directly incorporate it with the rest of the ingredients without having the need to activate it.
- Yogurt: Is merely a substitute for egg. You can use equal quantities of eggs instead.
- Cream: Using dairy based whipping cream would give you a superior taste and flavour.
- Strawberry Jam: Both store bought and homemade version would work for this recipe.
Step by Step Instructions
Step 1 - Prepare the Doughnut Dough
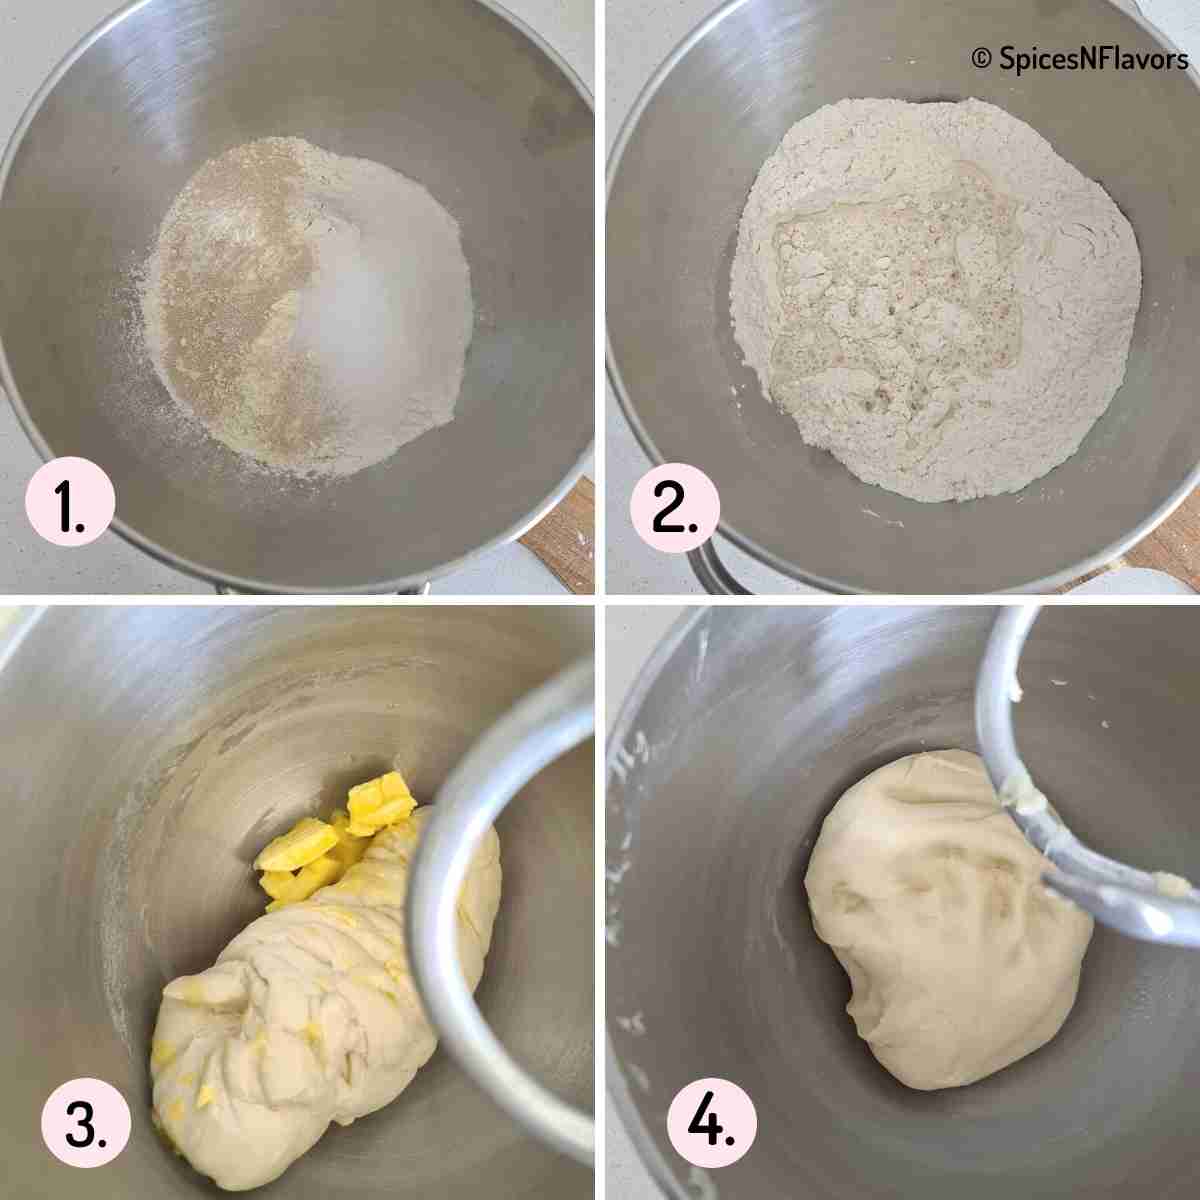
- To the bowl of your electric mixer, add all the ingredients starting with salt, flour, milk powder, yeast, sugar, yogurt and water. (image 1-2)
- Knead the dough at med speed using the dough hook for 4 mins and then incorporate the butter (image 3) and knead at med to high speed for 6 mins. (image 4)
- Alternatively you can knead by hands too. For that to a large bowl add all the ingredients starting with salt, flour, milk powder, yeast and sugar, yogurt and water. Combine to form a shaggy mass of dough and then transfer to your work surface and knead for 5 to 6 mins. Incorporate the butter and knead the dough to a soft, supple, elastic and soft dough stage. This would take additional 10 to 15 mins.
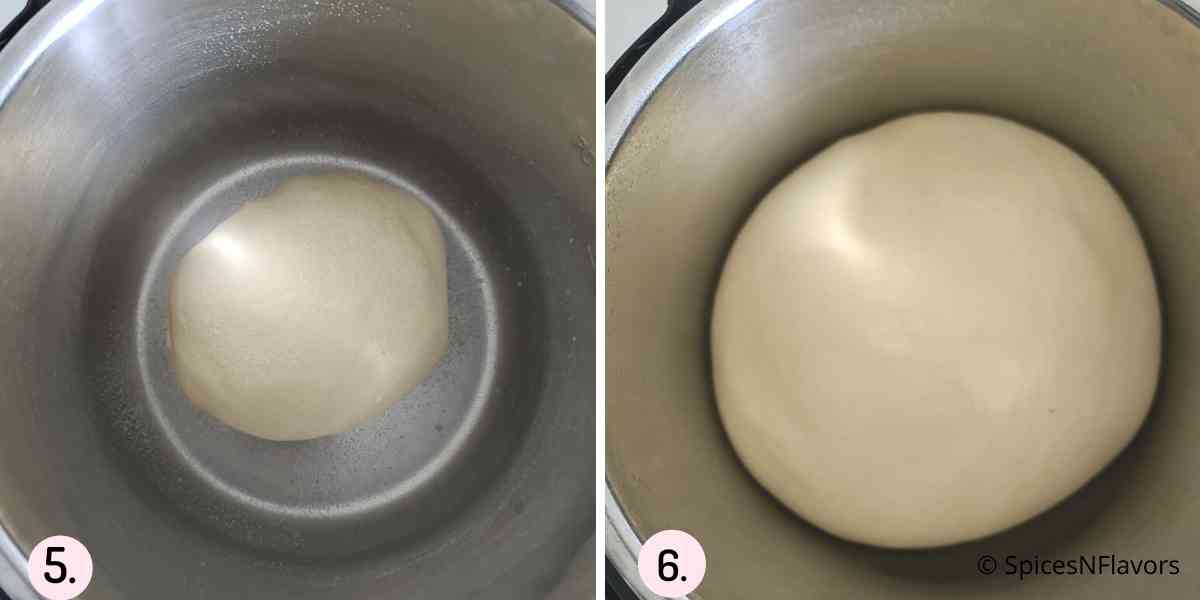
- Take the same bowl you used to mix the dough, lightly grease it with oil and transfer the dough into it. (image 5)
- Coat the surface of the dough with oil too so that it does not dry out.
- Proof the dough in a warm place for 1 hour or until double in size. (image 6)
How to proof the dough in the Instant Pot?
- Alternatively you can proof the dough in the Instant Pot too.
- Grease the inner pot with oil, transfer the dough into it, cover with a glass lid.
- Choose the Yogurt Mode and set the time for 30 mins.
- I have a detailed post on Instant Pot Bread Proofing using which you can literally prove any type of bread dough.
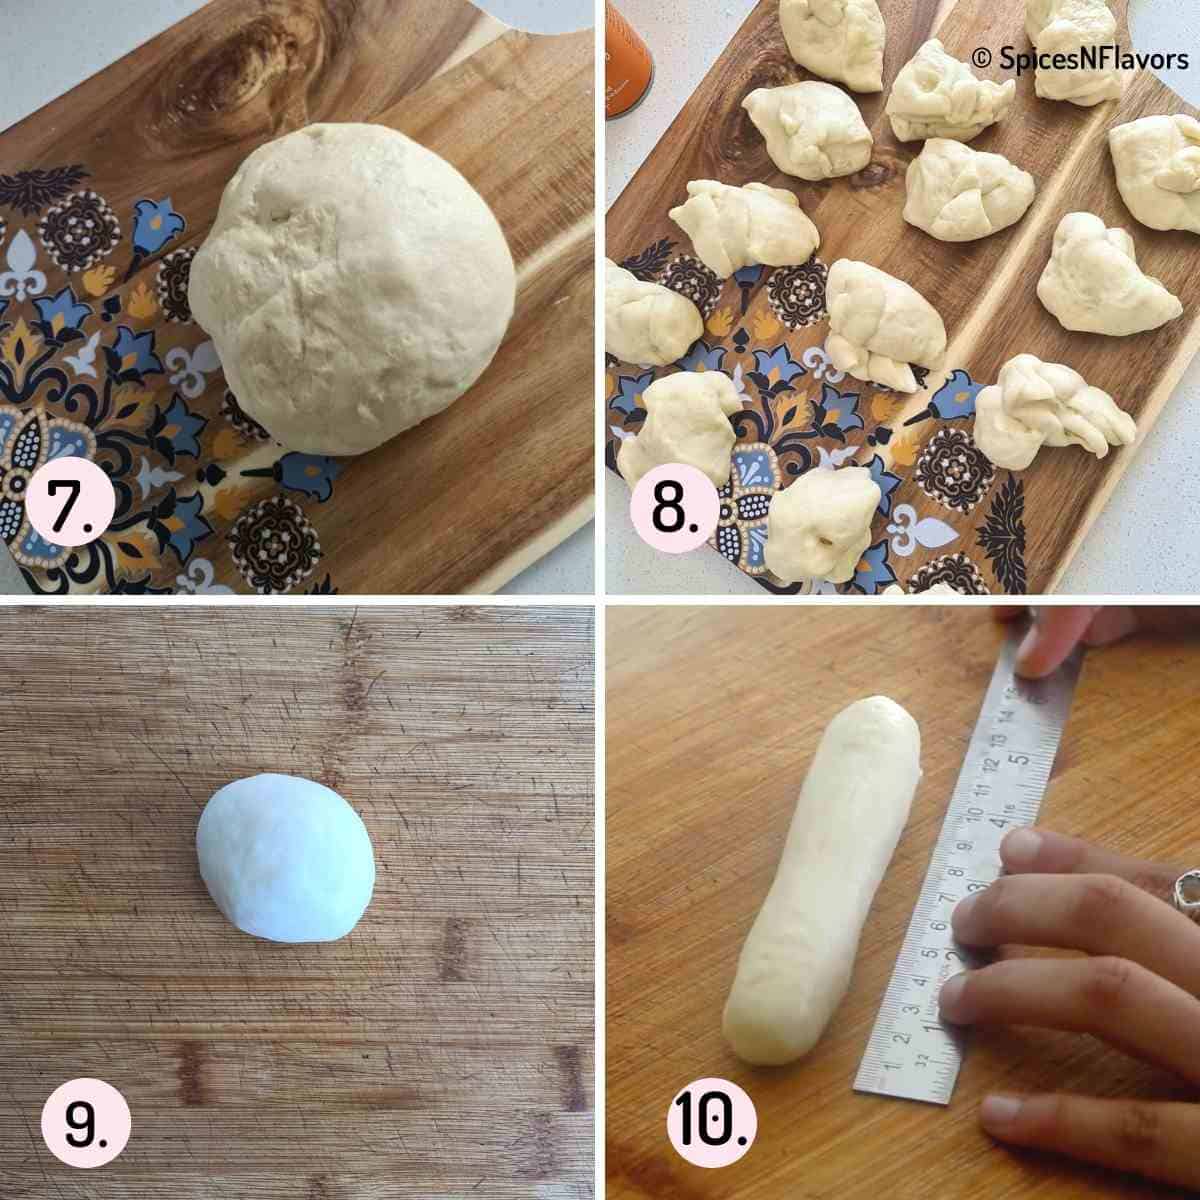
- Punch down your proofed dough to remove the excess gas.(image 7)
- Then divide into 14 equal portions. (image 8)
- Roll them to form a cylindrical shape of 12 cms (image 9-10) and place on a baking tray lined with (image 11) parchment paper . Always keep the dough covered with a kitchen towel while you work on the rest.
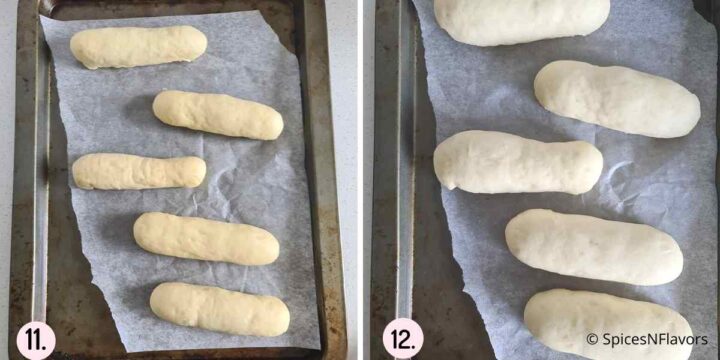
- Allow for second proofing - 30 mins. (image 12)
- Meanwhile heat oil in a pan on low to medium heat. Use flavourless oil like Vegetable oil for frying.
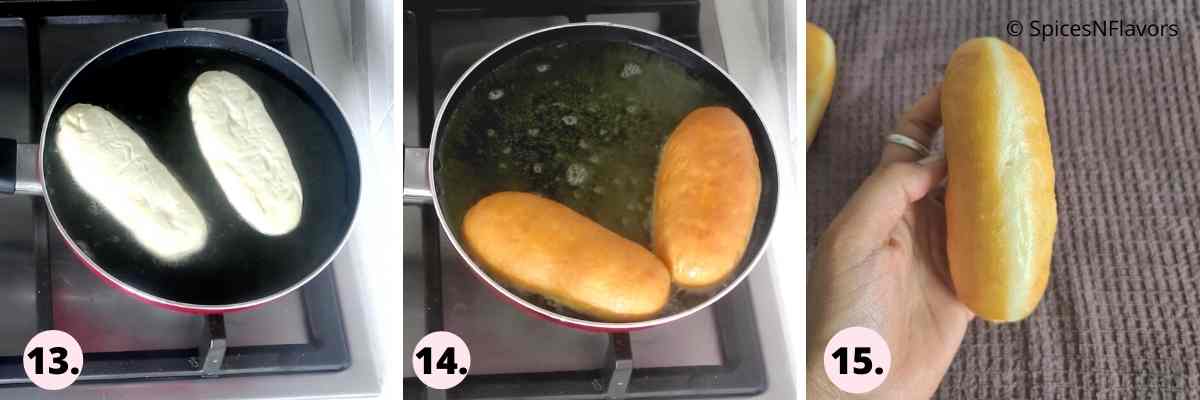
- The temperature of the oil should be 170°C - 180°C.
- If you do not have an thermometer; drop a small piece of dough into the oil. It should not float immediately on to the top. If it does then your oil is too hot. Rather it should pop up slow and steady with little bubbles around it.
- Drop your doughnuts upside down that is the top portion should hit the hot oil first (image 13) carefully one at a time and fry on each side for couple of minutes say around 2-3 mins or until light golden brown in colour. (image 14)
- A trick here to drop the doughnuts is to cut the parchment paper beneath the doughnuts and drop the doughnuts with the help of the paper.
- Using a slotted spoon remove the doughnuts and transfer to a paper towel.

- Let it sit for 2 mins and then coat it with the cinnamon sugar mixture (image 16-17). Please note use caster sugar if your granulated sugar is too big in size.
- Then transfer to a wire rack to cool completely.
Air Fryer Doughnuts
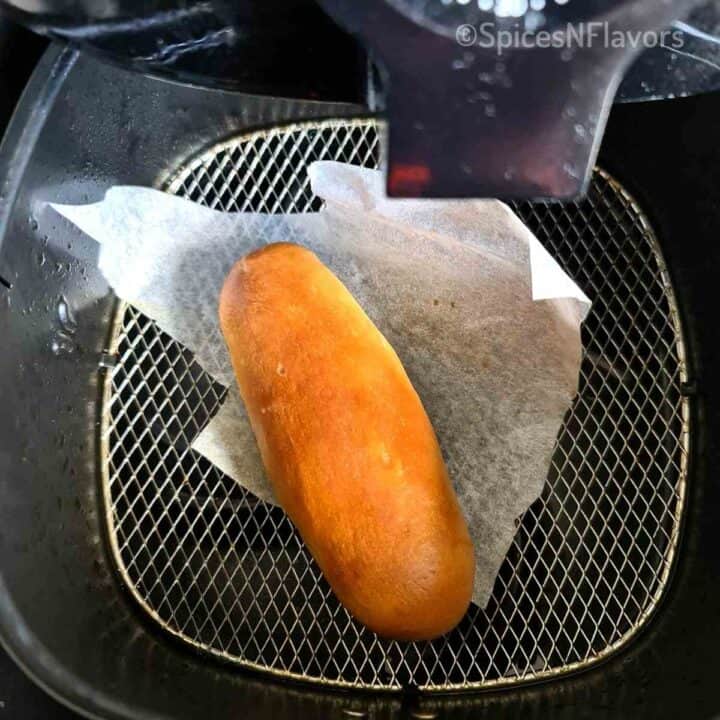
- Preheat the air fryer to 180°C for 3 mins.
- Brush the basket with oil and place the doughnuts into it.
- Bake for 6-7 mins. Ta-da.. How simple!!
- Once baked, brush the top of the doughnuts with oil or melted butter and immediately dunk in to the cinnamon sugar mixture.
Step 2 - Chantilly Cream filling
Some recipes do call for crème mousseline filling, but here in New Zealand bakeries the finger doughnuts are usually filled with chantilly cream and that is what we were taught in the college too.
And hence I am sharing the recipe for the same. Feel free to fill the doughnuts with any filling of choice.
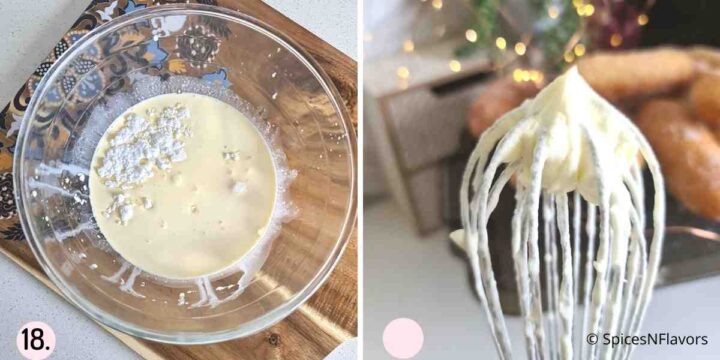
- Whip together the cream, sugar and vanilla bean paste until stiff peaks form. (image 18-19)
- Transfer to a large piping bag fitted with 1M piping nozzle.
Step 3 - Assembling the Doughnuts

- Once cooled make a slit in the centre of the doughnuts, keeping the base of the doughnut intact.
- Pipe the prepared cream filling in the centre as seen in the images. (image 20)
- Fill another piping bag with strawberry jam. Make a tiny cut in the piping bag and pipe the jam on top of the cream as seen. (image 21)
- Voila.. your finger donut is ready!! Enjoy it fresh.
This doughnuts recipe will literally take you to doughnuts heaven; I promise!
Storage Instructions
Homemade cream and jam doughnuts do not last for long since there are no additives or preservatives here. It is best enjoyed fresh.
You can store it in an airtight container in the refrigerator for 4 days.
Since it has cream filling I would not recommend heating it while serving but definitely take it at least 1 hour prior to serving and let it thaw at room temperature.
The doughnuts without the cream filling can be stored at room temperature but once you have added the cream it is recommended to store in the fridge.
Make ahead Instructions:
First Method:
- You can definitely make the dough a day ahead of time. Allow the first proofing and then put it into the refrigerator.
- Thaw the chilled dough by simply placing it on your counter top and let it come to room temperature and then continue with the recipe.
Second Method:
- For the second method, fry the finger doughnuts ahead of time and freeze them in a single layer in the freezer.
- Once frozen transfer to a zip lock bag or freezer safe container and freeze for 2 months.
- When ready to eat, thaw it in the oven for few minutes or in the microwave for few seconds.
- And when at room temperature you can slice and fill with the cream and jam filling.
Variations:
Since this donut fingers are sliced in the centre; it gives us so much choice to fill it with. Here are my few of my creative ideas for you guys.
- Rabdi Doughnuts: Choose to prepare the 2 mins instant rabdi with ricotta cheese and fill it in the centre. Top with some jalebi pieces for Rabdi Doughnuts.
- Rasmalai Doughnuts: Fill the centre with rasmalai cream instead of chantilly cream and top with few rasmalai pieces.
- Gulab Jamun Doughnuts: Fill it with rabdi cream and top with gulab jamun pieces.
- Custard Doughnuts: Follow our egg-free and egg based custard recipe and use it to fill then doughnuts instead of the chantilly cream.
Other than these Indian inspired Doughnuts idea regular fillings like ganache, nutella, salted caramel, and the most popular Paul Hollywood Jam Doughnuts can also be used.
Baker's Tips:
- As a general rule of thumb, for making breads I prefer using Instant Yeast as it can be mixed directly with the rest of the ingredients without having the need to activate it before hand.
- I also recommend adding milk powder to your bread recipes to enrich the dough.
- Ensure that you are using Warm Milk to knead the dough. As of the rest of the ingredients should be at room temperature. Butter should be soft enough to knead into the dough.
- Oil temperature should be 170° to 180°C. Too hot oil would cause browning of the doughnuts giving an assumption that the doughnuts are cooked whereas in reality it would remain undercooked. So temperature of the oil is crucial to make a good doughnut.
- Do not add the hot doughnuts into the cinnamon-sugar mixture as it might melt the sugar making it sticky and won't look appetizing any more.
- Using vanilla bean paste instead of vanilla essence would take your doughnuts to the next level in terms of flavour.
Recipe FAQ's
This is a general indication of a well made dough. You get the white ring because the doughnut floats in the oil and that part of the dough does not come in contact with the oil even when the doughnut is flipped. If the batter is too thick, or hasn’t risen enough it sinks deeper in the oil and you won't get that ring. Cake donuts are heavy, so they won’t have the line, but yeast raised donuts always will. If your yeast raised donuts are sinking and cooking up tough, try proofing them longer before you fry.
Both of them indicate one and the same thing.
The temperature of the oil should not be hot. The ideal temperature for frying the finger doughnuts on a commercial basis is 180°C and for home baking it could be 170°C - 180°C. Too hot will make it brown quickly from the outer leaving the interiors under cooked.
Yes you can. After first proofing, roll dough into a circular shape of 1/2 inch thickness. Using a doughnut cutter, cut out the shapes or use large cookie cutter or any round cutter for the circular shape and back side of the piping nozzle to cut out doughnut holes; then follow the rest of the steps to make homemade doughnuts. Only thing is in this case you won't be able to fill them with cream rather you would have to opt for sugar glaze or dip in ganache made using heavy cream and chocolate.
You can definitely use All Purpose Flour in place of Bread Flour but whole wheat flour won't work.
Related Recipes:
- Korean Twisted Doughnuts
- Eggless Bomboloni
- Eggless Cinnamon Sugar Donut Bread
- Soft Spanish Bread Rolls
- How to make Star Bread
Wish to Join US for the love of BAKING? Subscribe to our Youtube channel. Follow along on Facebook, Instagram, and Pinterest for all the latest updates!

Homemade Finger Doughnuts (Egg-free)
Ingredients
Doughnut Dough
- 6 gms (1 tsp) Salt
- 480 gms (4 cups) Bread Flour
- 15 gms (1 tbsp) Milk Powder (optional)
- 35 gms (2 tbsp + 1 tsp) Sugar
- 6 gms (1.5 tsp) Instant Yeast
- 25 gms Yogurt
- 250 ml (1 cup) Water
- 37 gms (3 tbsp) Butter
Cinnamon Sugar
- 1/3 cup Sugar
- 1/4 tsp Cinnamon Powder
Chantilly Cream
- 350 gms Whipping Cream
- 65 gms Icing Sugar
- 1/4 tsp Vanilla Bean Paste
Instructions
Doughnut Dough
- To the bowl of your electric mixer, add all the ingredients starting with salt, flour, milk powder, yeast, sugar, yogurt and water.
- Knead the dough at med speed using the dough hook for 4 mins and then incorporate the softened butter and knead at med to high speed for 6 mins.
- Take the same bowl you used to mix the dough, lightly grease it with oil and transfer the dough into it.
- Coat the top surface of the dough with oil too so that it does not dry out and allow it to proof in a warm place for 1 hour or until double in size.
- Instant Pot Proofing: Alternatively you can proof the dough in the Instant Pot too. Grease the inner pot with oil, transfer the dough into it, cover with a glass lid. Choose the Yogurt Mode and set the time for 30 mins.
- Punch down your proofed dough to remove the excess gas. Then divide into 14 equal portions.
- Roll them to form a cylindrical shape of 12 cms and place on a baking tray lined with parchment paper. (Always keep the dough covered with a kitchen towel while you work on the rest).
- Allow for second proofing - 30 mins.
- While the dough is proofing, prepare the cinnamon sugar mixture by simply combining the sugar and cinnamon powder on a plate. Set this aside.
- This is also the time to heat your oil on low to medium heat. The temperature of the oil should be 170°C - 180°C. If you do not have a thermometer; drop a small piece of dough into the oil. It should not float immediately on to the top. If it does then your oil is too hot. Rather it should pop up slow and steady with little bubbles around it.
- Drop your doughnuts upside down that is the top portion should hit the hot oil first carefully one at a time and fry on each side for couple of minutes say around 2-3 mins or until light golden brown in colour.
- Using a slotted spoon remove the doughnuts and transfer to a paper towel. Let it sit for 2 mins and then coat it with the cinnamon sugar mixture. Then transfer to a wire rack to cool completely.
Chantilly Cream
- In a large mixing bowl, whisk together the cream, sugar and vanilla bean paste until stiff peaks form.
- Transfer it to a piping bag fitted with 1M nozzle and set aside.
Filling the Doughnuts
- Pipe the prepared cream filling in the centre.
- Fill another piping bag with strawberry jam. Make a tiny cut in the piping bag and pipe the jam on top of the cream.
- Voila.. your finger donut is ready!! Enjoy it fresh.
Video
Notes
- As a general rule of thumb, for making breads I prefer using Instant Yeast as it can be mixed directly with the rest of the ingredients without having the need to activate it before hand.
- I also recommend adding milk powder to your bread recipes to enrich the dough.
- Ensure that you are using Warm Milk to knead the dough. As of the rest of the ingredients should be at room temperature. Butter should be soft enough to knead into the dough.
- Oil temperature should be 170° to 180°C. Too hot oil would cause browning of the doughnuts giving an assumption that the doughnuts are cooked whereas in reality it would remain undercooked. So temperature of the oil is crucial to make a good doughnut.
- A simple trick to add doughnuts to the hot oil is by making use of the parchment paper on which the doughnuts were proofing. Cut the parchment paper to the size of the doughnuts and using that lift your doughnut and carefully drop it upside down into the hot oil.
- Do not add the hot doughnuts into the cinnamon-sugar mixture as it might melt the sugar making it sticky and won't look appetizing any more.
- Using vanilla bean paste instead of vanilla essence would take your doughnuts to the next level in terms of flavour.
- Since this donut fingers are sliced in the centre; it gives us so much choice to fill it with like imagine making Gulab Jamun Doughnuts, Rasmalai Doughnuts and few other variations has been discussed in the blog post.
- Bread Flour: Can be replaced with APF
- Milk Powder: Can be skipped.
- Instant Yeast: Can be replaced with any variety of yeast like Active Dry or Fresh. Just remember to activate it before using. The quantities would also vary.
- Water: Milk can be used instead for a more enriched dough.
- Yogurt: Use equal amount of Eggs instead.
- Preheat the air fryer to 180°C for 3 mins.
- Brush the basket with oil and place the doughnuts into it.
- Bake for 3 mins. Ta-da.. How simple!!
- Once baked, brush the top of the doughnuts with oil or butter for a glossy look and immediately dunk in cinnamon sugar mixture.
Simer says
Amazing recipe and so well explained!
Thanks Sushma for always teaching the A-Z science behind each and evey recipe . You are the best 🙂
sushma iyer says
Hi Simer.. so glad to see your comment here.. thank you 🙂 glad to see it was helpful 🙂
Pushpa says
Very nice eggless recipes
sushma iyer says
Thank you Pushpa 🙂
Neha parpyani says
Very nice receipe😊
sushma iyer says
Thank you Neha 🙂