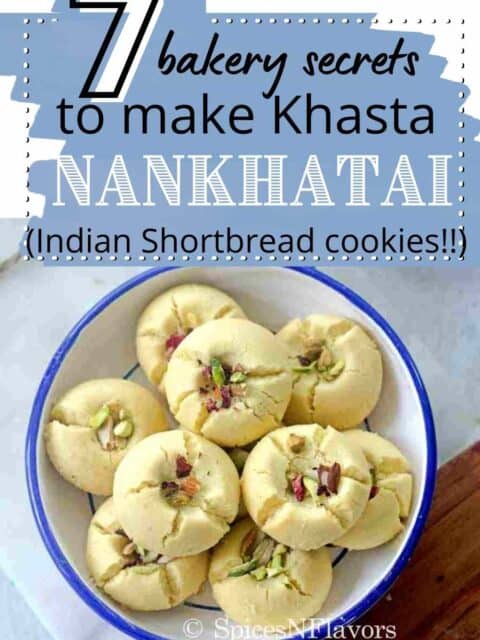
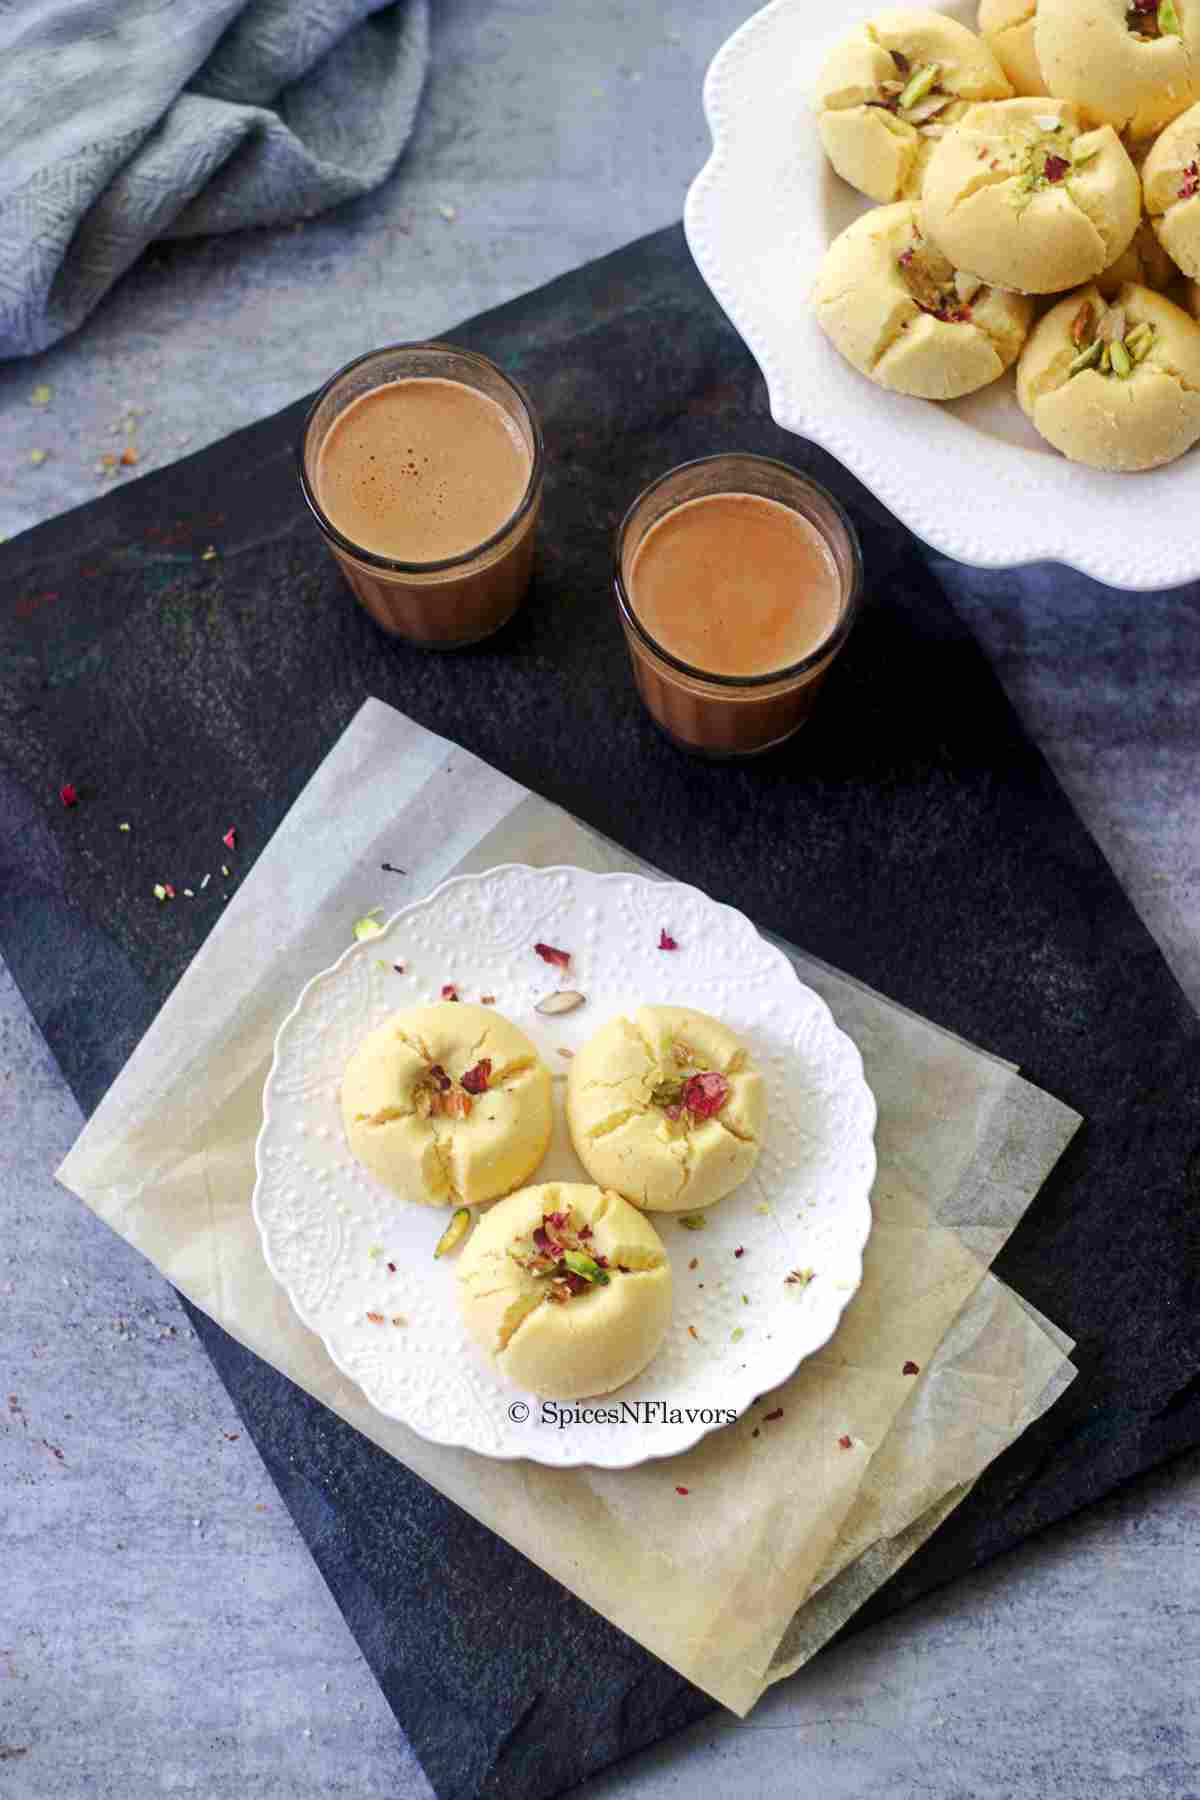
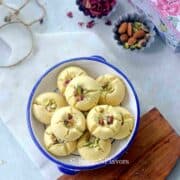
I soundly believe that a good Nankhatai biscuit should be deliciously flaky, nicely crisp, lightly sweet and delectably tender; this Nankhatai recipe is exactly that.
Surprisingly easy to make with basic pantry ingredients that you already have in your kitchen, this recipe of nankhatai is definitely a keeper!!
What is Nankhatai?
Basically having all the characteristics of a shortbread biscuits, it would only be fair to call a Nan Khatai as an Indian Shortbread Cookie. The word Nankhatai is derived from Persian word Naan meaning bread and "Khatai" meaning Biscuit.
(Source: Wiki)
What makes a good Nankhatai?
So what you are looking for in this Indian biscuit is that:
- It should be crisp from outside just like a Naan Bread and should be melt in your mouth tender and crumbly like a Biscuit (Cookie).
- Perfect Khasta texture
- Have an earthy, nutty and gritty flavour
- Should melt in your mouth
- Rich and Aromatic flavours.
With its classic delicate crumbly texture and alluring melt in mouth flavour, it is one of those Indian biscuits that is both nostalgic and tasteful.
What is Khasta?
Khasta is a Hindi word often associated with NanKhatai which literally means light, flaky and crisp in English. The texture of this Indian Shortbread Cookie is crisp (not like a papad) but is identified to the ease with which you snap the biscuit and the flakiness is not like layers in a filo pastry or samosa but to the tender crumbs.
How to achieve the Khasta texture?
To make a good Khasta Nankhatai all you need is to make use of REAL GHEE. What I mean by real ghee is that you do not substitute it with Butter or any other shortening like Dalda.
And that is the reason why Homemade Nankhatais are WAY more tender and delicate than store bought – with a far better real flavour.
Two things:
- Quantity: A good amount of fat in the recipe is what makes it flaky and delectable. So do not alter the measurements mentioned in the recipe. Neither do substitute it with Dalda like Bakeries.
- Consistency: Using Room-Temperature Ghee is the key here. Note the consistency in the ingredient picture below; neither runny nor melted; perfectly granular in a semi-solid state. (If during summers you find that the room temperature ghee is liquid just put it in the fridge for a couple of minutes and it will solidify a bit)
With these two things, nothing can stop you from making the Best Khasta Nankhatai.
Ingredients Needed:
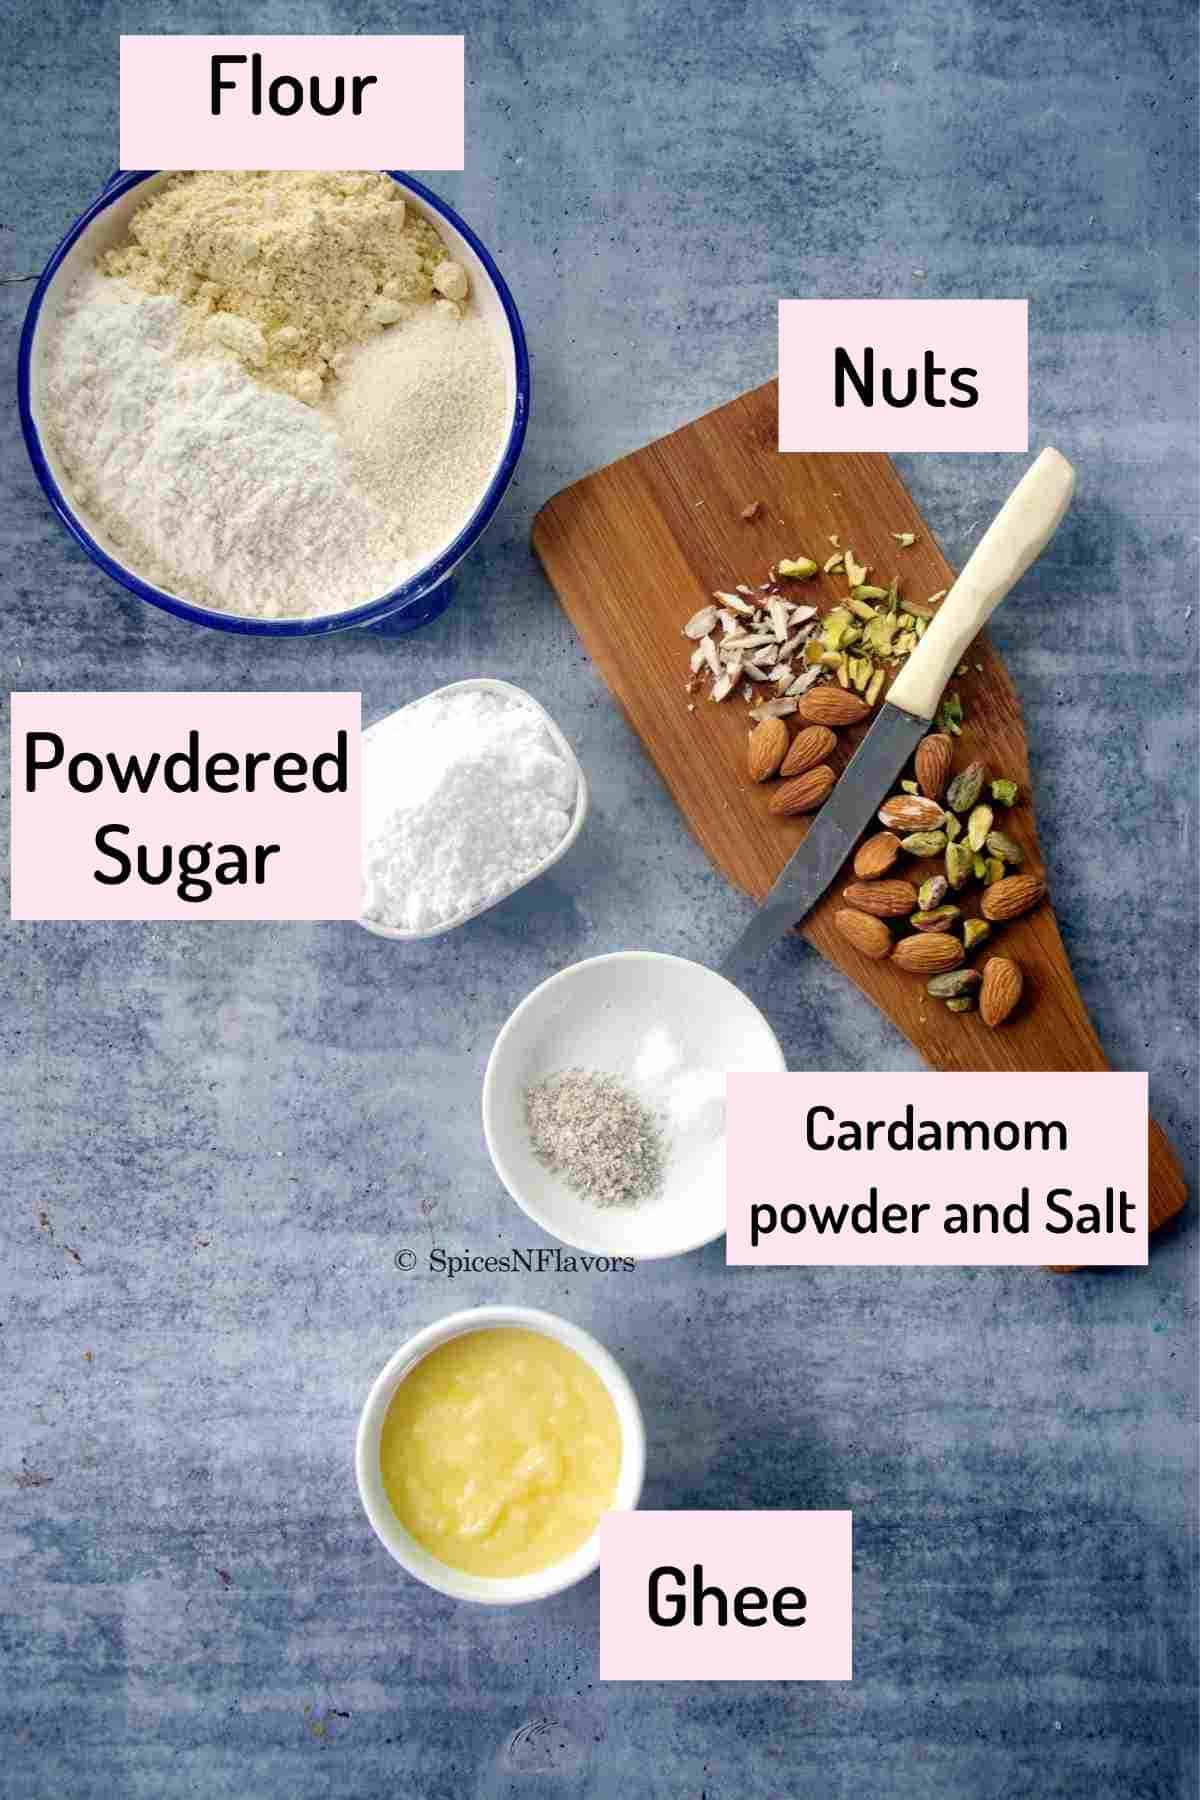
Ingredient Notes:
- Flour: Every Indian Household uses a different measurement to make these biscuits. A combination of Maida (APF), Besan (Chickpea Flour) and Rava (Semolina) is ideal as besan is what gives the earthy and nutty flavour and semolina is responsible for the grittiness.
- Ghee: Do not substitute ghee; the fat source with anything else. This is the key ingredient
- Sugar: Always powder your sugar and then use in this recipe.
This Indian cookies recipe is made without any fancy ingredients, fancy equipments or tools making it the perfect recipe for any beginner to try.
Step by Step Instructions:
Step 1: Prepare the Cookie Dough
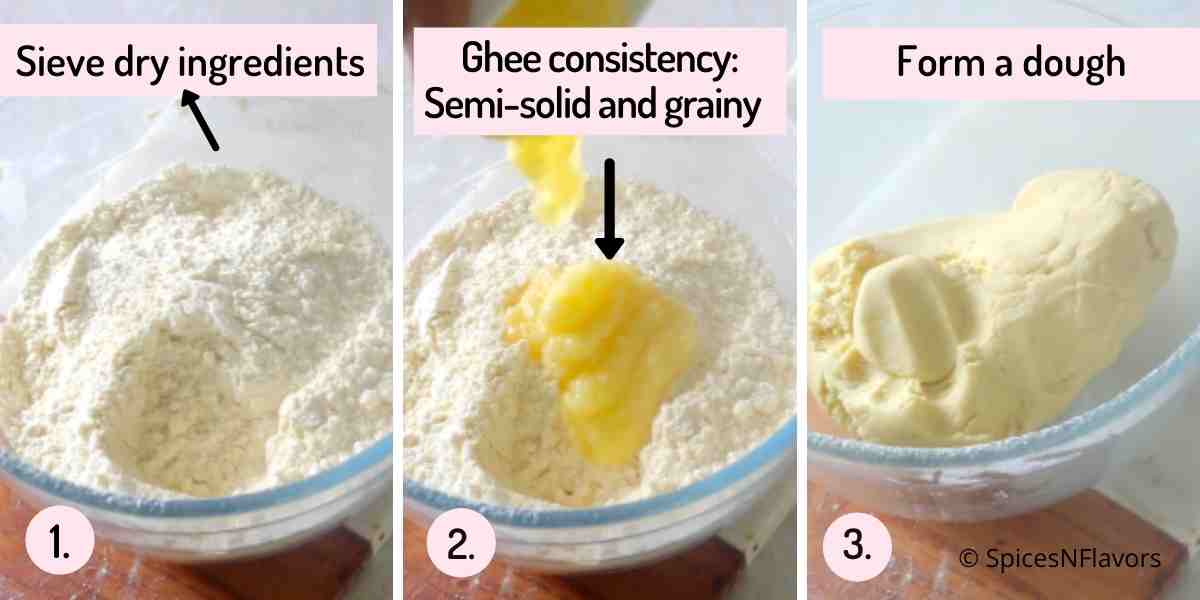
Sieve together APF, besan, rava, sugar, cardamom powder and salt in a bowl (image 1).
Add the ghee and combine everything into a dough (image 2-3).
At first it would be very crumbly, do not be tempted to add any kind of liquid here but keep forming the dough.
The warmth from your hands would melt the ghee and help bind it into a dough.
Pro tip: The dough is ready if you could pinch out a small portion, roll it in between your palms to form a crack-free smooth ball.
Step 2 - Shaping
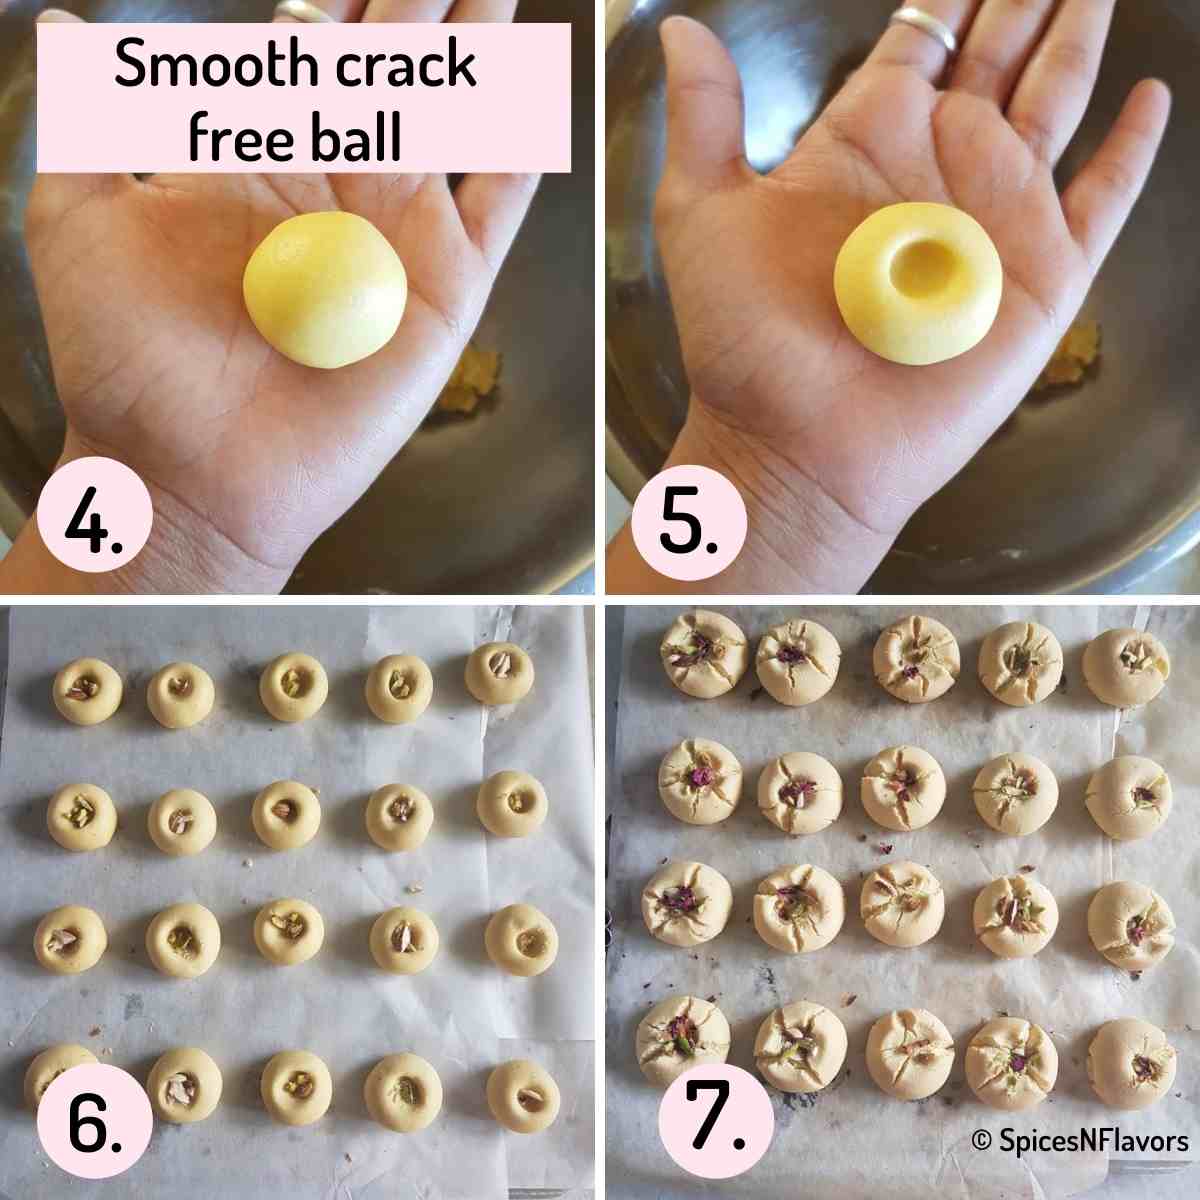
Pinch out a small portion of dough and roll it in between your palms to form a ball shape. It should be a smooth crack free ball. (image 4)
To do so you can eye- ball or use a tbsp as a measurement to form the balls out of the dough.
Or you can use a weighing scale to be precise and make 20 balls of 24 gms each.
Using your fore-finger gently press the top of the ball to form an indentation (image 5) and place it on a baking tray lined with parchment paper.
This indentation would make way for those beautiful cracks to start and your cracks won't be all over the place.
Add some chopped nuts in the cavity (image 6).
Then chill them for 20 mins.
Why chill a cookie dough?
By chilling the dough you are basically solidifying the fat which is ghee in this case. So when the cold fat enters the hot oven it takes a little longer to melt as compared to a room temperature one. This would ensure that your cookies do not go flat by spreading way too much while baking thereby retaining its shape.
This concept is applicable to all the cookie dough that calls for chilling.
If you are a baking nerd I urge you to read my detailed blog post on Science behind Chocolate Chip Cookies for more in-depth understanding.
Here is a comparison of nankhatai's that were made in 2 ways - chilling the dough and not chilling the dough.
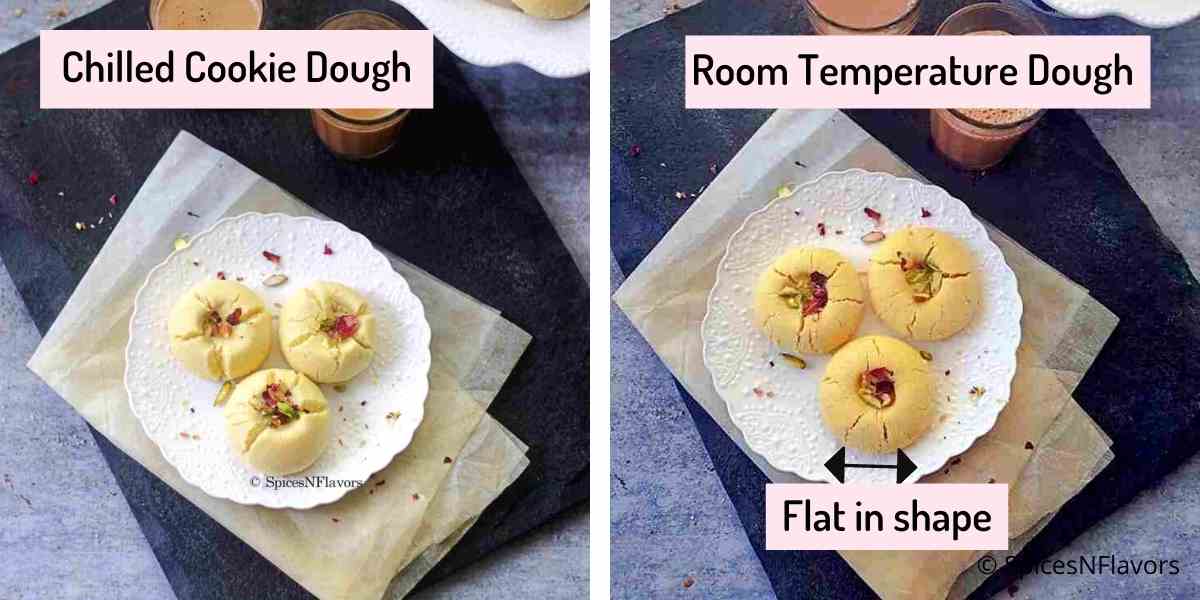
Both are baked equally well with similar taste and texture, the only difference being their shape.
The room temperature biscuits are flatter than the chilled ones because it spread a lot while baking comparatively.
My recommendation: I chill the dough when I am making it in small batches and if I have to make for a party or on order I skip the chilling step.
Step 3 - Baking
While the dough is refrigerating, pre-heat your oven to 190°C.
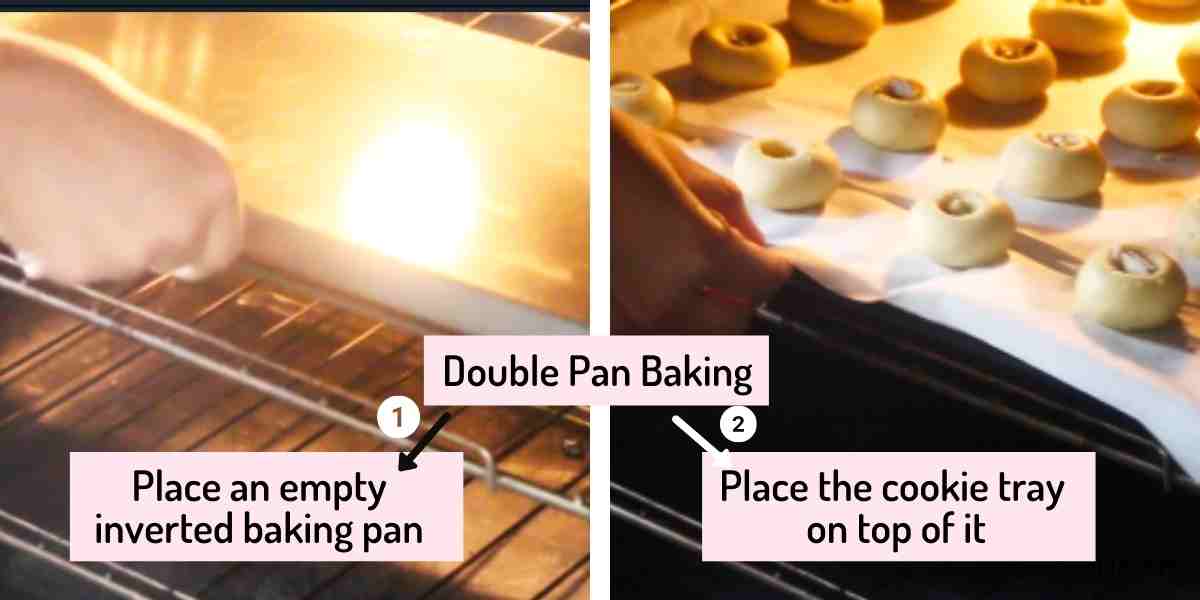
Once pre-heated place an empty baking tray first and then place the baking tray with the shaped cookie dough above it.
This method is known as Double Pan Baking.
By simply placing one cookie sheet on top of other, you are actually avoiding the direct contact of heat to hit the base of the cookies and that way it would slow down the browning of the cookies especially from the bottom.
So bake in a preheated oven of 190°C for 10 to 12 mins until you get nice beautiful cracks with a pale colour on top and nice golden brown colour at the base.
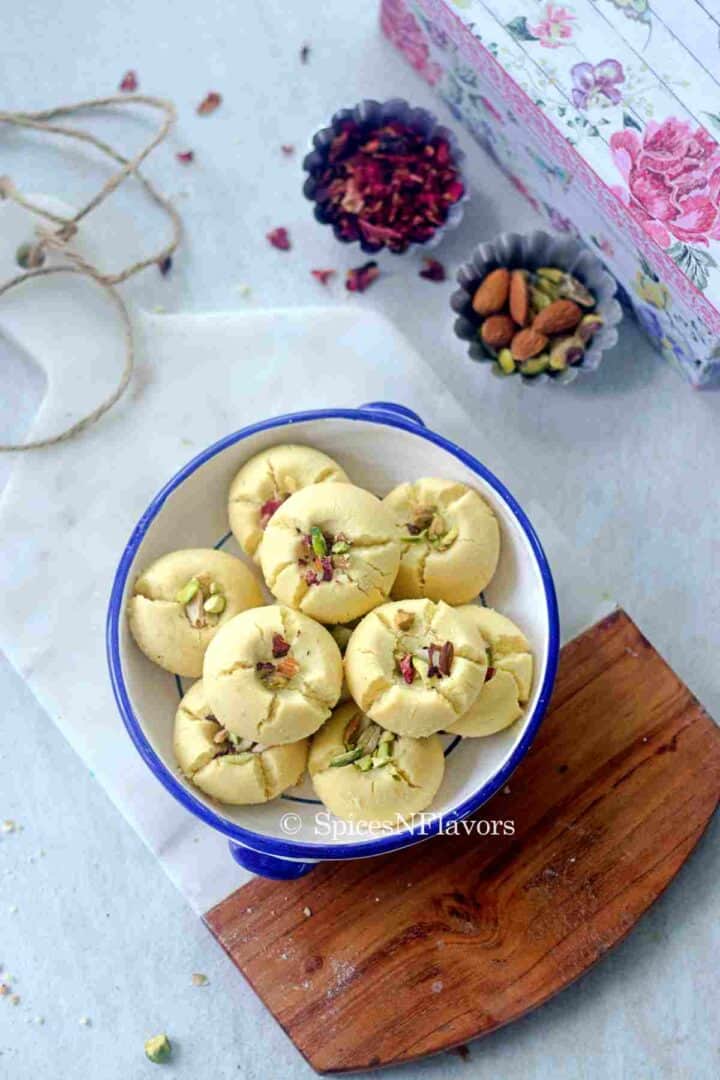
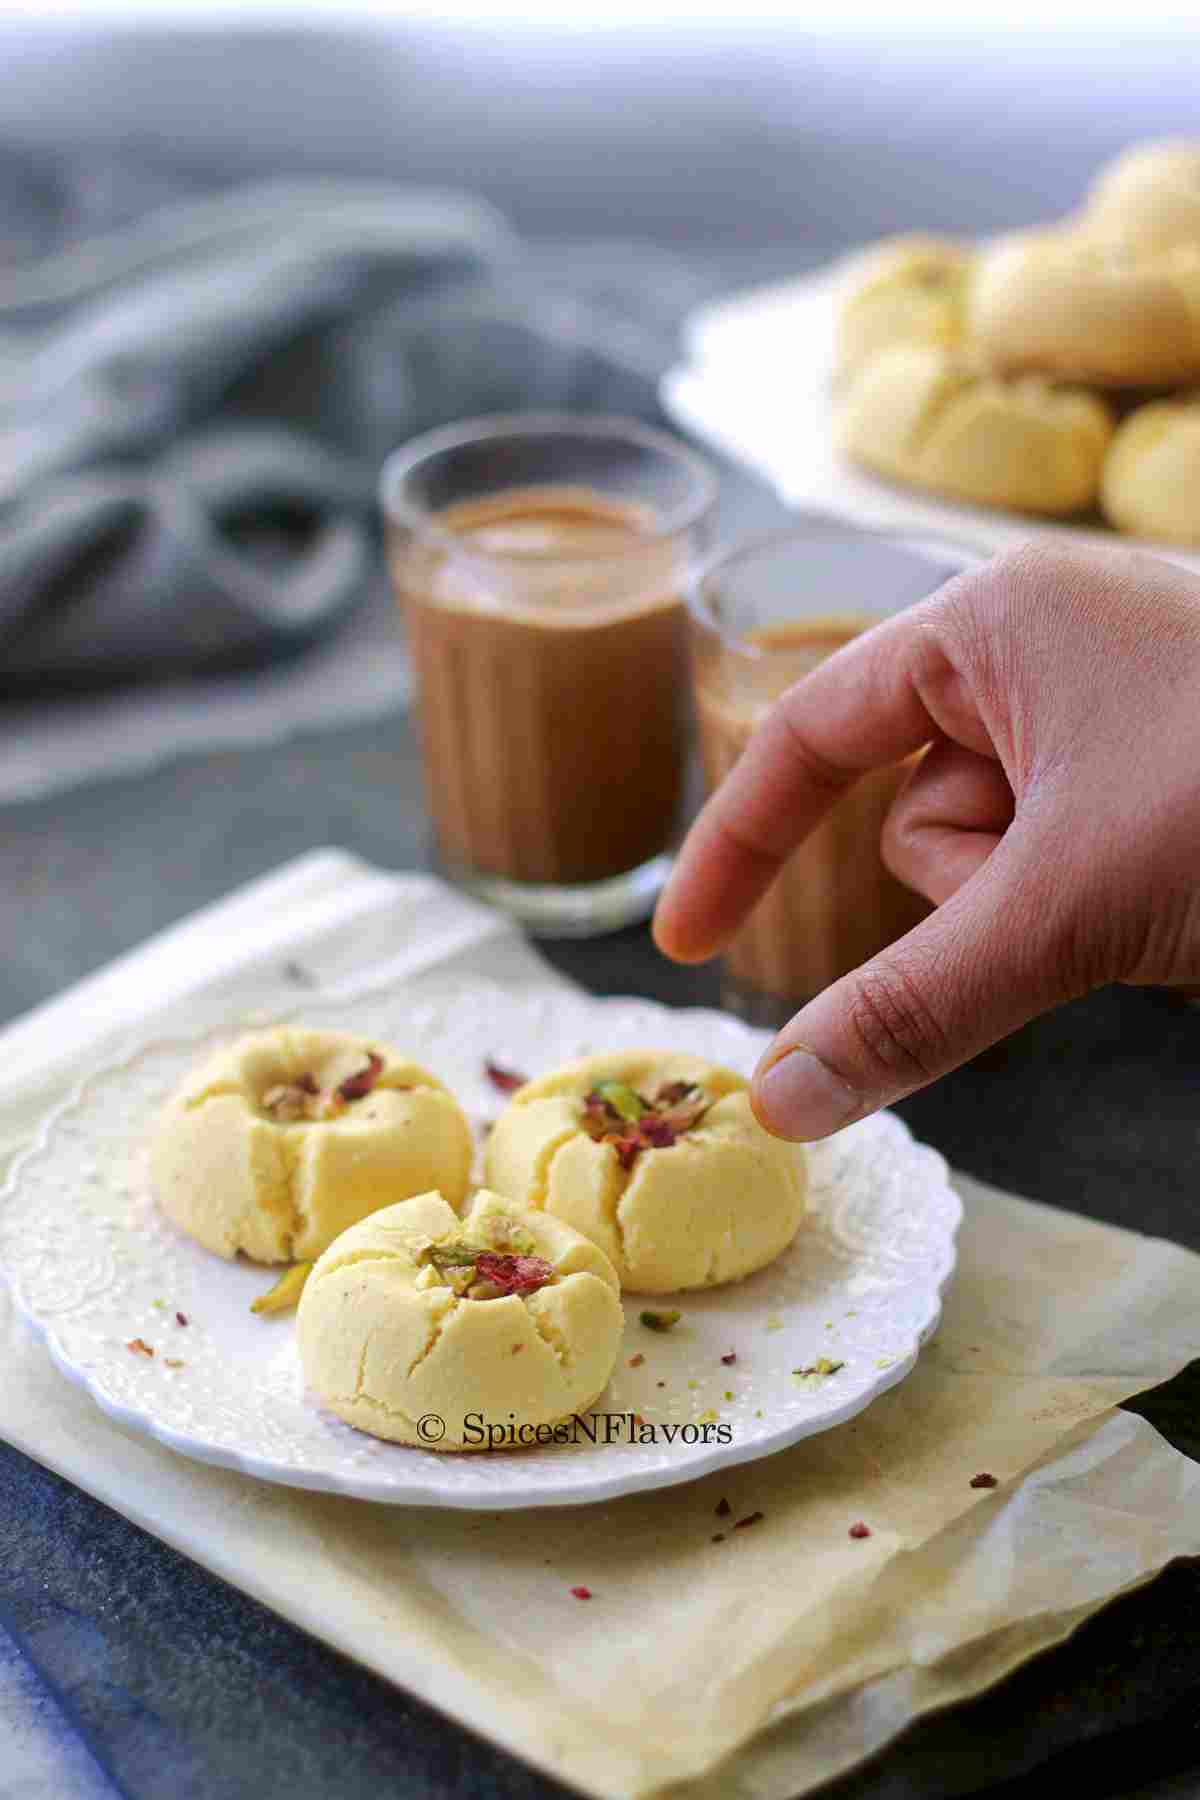
Once out of the oven and while still warm, I like to top it with more slivered pistachio and rose petals for a good colour contrast but this is optional.
Cookies will definitely be soft to touch, so do not be tempted to bake it longer.
Take it out and allow it to cool in the baking pan itself for 5 to 10 mins. The cookies firm up upon cooling.
Later, transfer it to a wire rack to cool completely.
This recipe is adapted from here.
Storage Instructions:
When stored the right way, these cookies would last for weeks.
And guess that is the reason why these were a typical "Diwali cookies" because we often start preparing the eateries so much in advance during festivities, right and nankhatai has always been a staple!!
Store it in an air-tight container only when it is completely cooled.
This would last for 15 to 20 days, even more but honestly this won't last that long as it is that good!!
Baker's TIPS:
- Ingredients: Use only GHEE, combination of flours as mentioned and also powdered sugar for the perfect texture.
- Consistency: Melted ghee might make your dough runny and with too solid ghee you would end up kneading the dough a lot more than needed. To avoid that use room-temperature semi-solid ghee that is neither melted not solid.
- Adjustments: If you find that your dough is runny then put the mixing bowl in the fridge for few mins, the ghee would solidify a bit and you would then be able to combine it into a dough.
- Indentation: Giving an impression on top of the shaped dough of nankhatai would ensure that the cookies have a space to expand and develop cracks while baking right at the centre rather than being all over.
- Flavouring: Use some kind of flavouring agents like cardamom, rose or saffron as usually these are considered to be a flavourful, rich and aromatic Indian biscuits.
- Chilling: Chilling the dough is advisable so that the cookies do not flatten out while baking but it is not compulsory.
- Cooling: It is important to leave the cookies to cool on the baking tray itself for a while, as they generally cook and firm up as they cool. You might accidentally break them while transferring.
- Base Recipe: This makes an excellent base recipe. You can use this to make so many unique flavours. Here is a detailed post on Flavoured Nankhatai to help you get started.
Recipe FAQ's
Yes you can. However note that the cookies won't be as crumbly and as tender as those made with APF
The biscuits will start forming characteristic cracks on top and the colour would just start browning a bit on the bottom when you take it out of the oven. The colour on top will be pale only. If you want them to be just a bit extra crunchy then go ahead and bake them for additional one minute until the edges start becoming golden brown too. Remember the cookies firm up upon cooling so do not be tempted to bake longer.
Yes but certainly the classic texture won't be achieved. You can try it with coconut oil or vegan butter in place of ghee.
Yes definitely. This being an age old recipe when there were no oven in Indian homes you can definitely make them without oven too.
To make it in cooker:
Pre-heat the cooker with some salt in the base. Place a stand over it and then a plate with the cookies on it. Close the lid of the cooker without gasket and whistle and bake for 15-18 mins on medium low flame. Check this video on baking in cooker for more details.
In the microwave convection mode: 200°C for 9 to 10 mins
Certain Variations:
This Nankhatai recipe isn't just for the holidays! Being a really simple and straight forward recipe, you can play around with it to create so many variations at any time of the year.
- Essence: Just use rose, saffron, mawa or malai essence in place of cardamom powder for a different flavour.
- Chocolate: Add some cocoa powder to make Chocolate Nankhatai.
- Thandai: With Holi around the corner, this is the best way to use the Thandai Masala powder. Add around 1/4 cup to your base recipe to make Thandai cookies.
I have now uploaded a new blog post where I discuss all the variations with step by step detailed recipe. It includes 9+ flavour variations. Check out the flavoured nankhatai post for the same.
Related Recipes:
Wish to Join US for the love of BAKING? Subscribe to our newsletter and Youtube channel. Follow along on Facebook, Instagram, and Pinterest for all the latest updates!
Best Nankhatai Recipe
Ingredients
- 1 cup (120 gms) APF/Maida
- 1/2 cup (60 gms) Chickpea Flour/Besan
- 2 tbsp + 1 tsp (30 gms) Semolina/Rava
- 1/2 cup (80 gms) Sugar, Powdered
- 1 tsp Cardamom powder
- 1/4 tsp Salt
- 1/2 cup (115 gms) Clarified Butter/Ghee
- 1 tbsp Slivered Almonds and Pistachios
- Dried Rose Petals for garnishing (optional)
Instructions
- In a mixing bowl sieve together the APF, Chickpea flour, Semolina, Powdered Sugar, Cardamom Powder and salt.
- Add ghee and combine together into a dough. At first the dough would be very crumbly so do not be tempted to add any additional liquid. Just keep mixing, the warmth from your hands will melt the ghee and that would act as a binding agent.
- The dough is ready when you pinch out a portion of it to form a crack free smooth ball. At this stage either eye-ball and divide the dough out or use a weighing scale to form 20 balls each weighing 24 gms if you want to be precise.
- Make an indentation using your fore-finger on top of the ball and place it in a baking tray that has been pre-lined with parchment paper.
- Add some slivered almonds or pistachios in the cavity and refrigerate the tray for 20 mins.
- Meanwhile pre-heat your oven to 190°C.
- After 20 mins, invert a separate baking tray and place it in the middle rack. And on top of this baking tray, place the refrigerated tray with the cookies and bake in the preheated oven of 190°C for 10 to 12 mins.
- The cookies are done when they develop beautiful cracks in the centre with pale colour on top and slight golden brown colour in the bottom.
- Once out of the oven and still warm, I like to add some more slivered pistachios and rose petals to give the colour contrast which is totally optional though.
- Let the cookies cool in the baking tray itself for 5 to 10 mins, then transfer to a wire rack to cool completely. The cookies firm up upon cooling.
Video
Notes
- Ingredients: Use only GHEE, combination of flours as mentioned and also powdered sugar for the perfect texture.
- Consistency: Melted ghee might make your dough runny and with too solid ghee you would end up kneading the dough a lot more than needed. To avoid that use room-temperature semi-solid ghee that is neither melted not solid.
- Adjustments: If you find that your dough is runny then put the mixing bowl in the fridge for few mins, the ghee would solidify a bit and you would then be able to combine it into a dough.
- Indentation: Giving an impression on top of the shaped dough of nankhatai would ensure that the cookies have a space to expand and develop cracks while baking right at the centre rather than being all over.
- Flavouring: Use some kind of flavouring agents like cardamom, rose or saffron as usually these are considered to be a flavourful, rich and aromatic Indian biscuits.
- Shaping: To achieve even shaping I recommend using a kitchen scale and divide it evenly.
- Chilling: Chilling the dough is advisable so that the cookies do not flatten out while baking but it is not compulsory.
- Cooling: It is important to leave the cookies to cool on the baking tray itself for a while, as they generally cook and firm up as they cool. You might accidentally break them while transferring.
mona says
Just made a double batch of these and shared with friends and family. I’ve gotten so many compliments from this recipe, cant thank u enough. <3
sushma iyer says
Hi Mona.. That's so wonderful to hear! I'm so glad the recipe was a hit and that you could share it with your loved ones. Thank you for trying it out and spreading the joy—messages like this truly make my day! 💛
Sam says
Baked these for Valentine's day and they were an absolute hit!! My fiance said they were the best nankhatai he ever had 🙂 I did have to bake them for a few minutes longer for them to be done but every oven is different ofcourse. I look forward to trying to make the different variations of nankhatai in the future! Thank you so much!!!
sushma iyer says
Hi Sam.. That’s so wonderful to hear! 😊 I’m so glad the nankhatai turned out amazing and that your fiancé loved them—what a sweet Valentine’s treat! ❤️ Yes, every oven is a little different, so I’m glad you adjusted accordingly. Can’t wait for you to try more variations—happy baking! 🥰🍪
dipti says
Greetings to you Sushma, from very cold London! Thank you very much for this perfect recipe, and for the detailed method. I followed this absolutely once for THE nankhatai I have wished for for years, and they looked exactly like yours, beautiful. The second time I made errors for reasons of dyslexia, adding 120g of ghee, which while a little softer to roll, were also successful. I fully appreciate the metric measures, so that from as far away as London I could replicate your superb recipe. My wife is thrilled! I look forward to more from my subscription. I am happy to have found your blog.
sushma iyer says
Hello.. So glad to see your successful attempt on the recipe. Good to know that it kindled back memories. Thank you for sharing your lovely feedback with us. This would encourage many others reading it to try the recipe. 🙂
Shamla Nurbadh says
Thank you for the best recipe ever. I baked these today and they were delicious.
Ramya says
Hi Sushma,
These truly are the best! The texture is perfect and I plan to try this very recipe over and again. The search for the perfect nankhatai ends here!
Thank you!
sushma iyer says
Woo hoo.. that's so good to know Ramya.. thank you for sharing your feedback.. appreciate it 🙂
Neha Jain says
Thanks for the recipe! The Nankhatai turned out delicious and all the tips described were accurate and very helpful.
sushma iyer says
Hi Neha.. That is so wonderful to know.. I am glad to see that all the tips were handy.. thank you for sharing your feedback with us.. appreciate it 🙂
Sangeeta says
Had made these nankhatais..must tell u that these were the best shortbread cookies I made till date...
Thank u sooo sooo much for the recipe dear
sushma iyer says
Hi Sangeeta.. That sounds wonderful.. thank you for sharing your feedback with us 🙂
Meena says
Hi
Every one had been using baking powder is it required in your recipe it does not mention
sushma iyer says
Hi Meena.. Baking powder would cause the nankhatai to spread while baking and hence it is not recommended to be used.
Dharmishtha Upadhyaya says
I made it today and exactly followed your recipe. It came out good but no match with what you get in india when got done professionally from bakery. It tasted more like magaj (besan ke laddu) than nankhatai.
sushma iyer says
Hi Dharmishtha.. thank you for sharing your thoughts 🙂
Betcy says
Hi Sushma,
Can we make the basic Nankhatai dough in advance and freeze it?
sushma iyer says
Hi Betcy.. It should work.. but I have not tried it personally yet
Akanksha says
Without baking soda and bp hw it will comes out
sushma iyer says
Hi Akanksha. Could you please explain what is the purpose of leavening agent in a cookie recipe?
Renuka Rohira says
Dear Sushma,
Thank you for this wonderful recipe. I tried it yesterday. Although it tasted amazing the slight issue was I could bite into the suji...it was kind of making a kach kach sound while eating. I followed the instructions and measurements exactly. Only addition I made was adding 1/4 Tsp of Baking powder. So I don't understand if the Suji was undercooked or what went wrong. I chilled them for 20 minutes and then I baked the nankhatai at 180*C for 15 minutes.
Please help. Because of this undercooked Suji issue my nankhatais were not much appreciated.
Looking forward to hearing from you.
Renuka Rohira
sushma iyer says
Hi Renuka.. Why don't you try with other variety of suji?? Did you use fine rava??
Renuka Rohira says
I used the one available in my pantry. Didn't check which variety it was.
Anne says
Came out absolutely perfect. However, I baked the cookies at 180C and added 1/4 tsp baking powder. Thank you, Shushma. I’ve been searching for a good nan khatai recipe for ever.
sushma iyer says
Hi Anne.. I am glad to see that the substitutions worked perfectly for you.. thank you
Manisha says
Hi sushma ji
I made dese cookies today n dey came out so perfect.. Amazing taste. Thank u so much for the perfect recipe.
sushma iyer says
I am glad to know it worked out so well for you.. thank you
Nupur Singh says
You and your ethics are a boon to new bakers like us% I am not into baking professionally but I do want to bake the right way. You are such a huge help, Thanks again Sushma :))
sushma iyer says
Nupur that is so generous of you to leave such a lovely comment. I am glad that the posts and videos are helpful to a budding baker which is exactly what I aim for.. thank you 🙂