
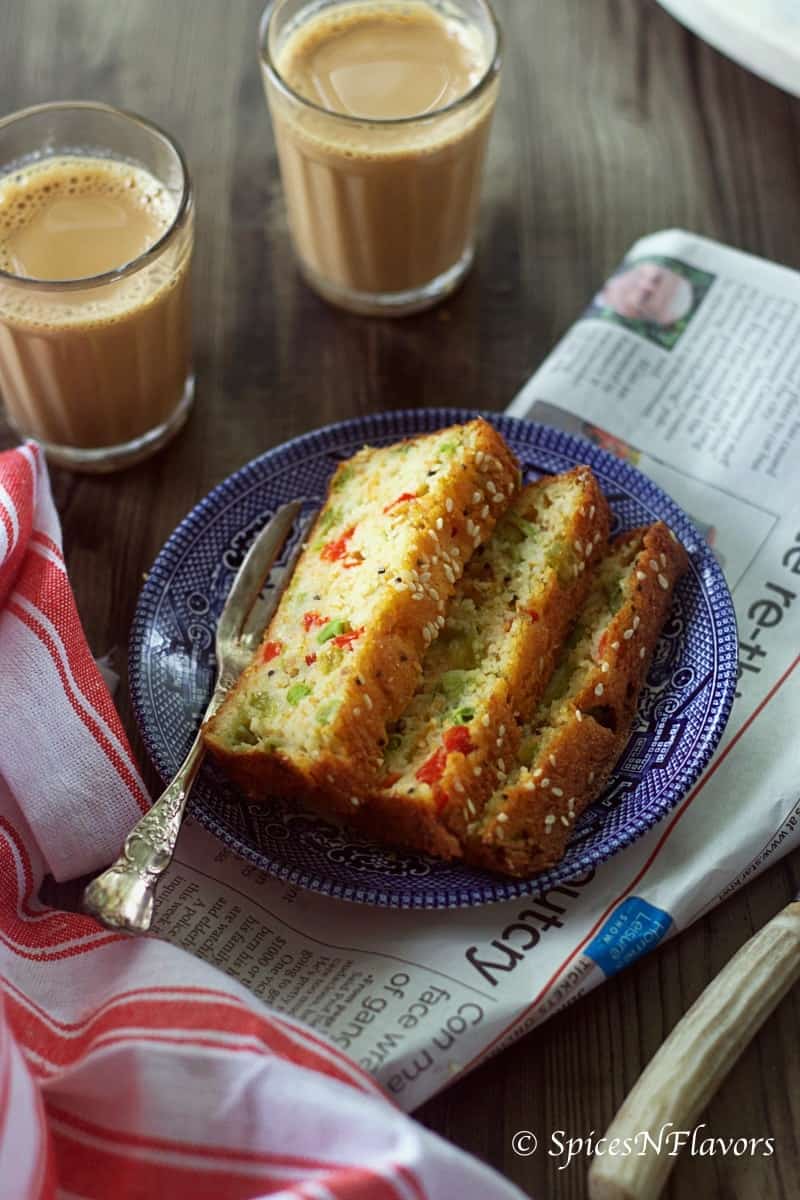
Whether looking for a quick savoury cake recipe or a simple tiffin box idea for kids, this vegetable cake is the need of the hour.
This Indian Savoury Semolina Cake is a simple, easy and healthy cake recipe using semolina and yogurt that is loaded with vegetables and has no butter, eggs, APF or sugar.
Why try this recipe?
- This vegetable cake recipe is refined flour and refined sugar free. And I know so many of us would be looking for an alternative specially this time of the year.
- Serving a regular food in the form of a cake would encourage kids to eat more. Right?
- Takes hardly anytime to make it. You need not be a PRO in baking to make this cake.
- No skills required whatsoever and also no need to worry about overmixing the cake batter and stuff like that.
- Can be easily packed and carried along to potlucks, road trips etc.
Ingredients:
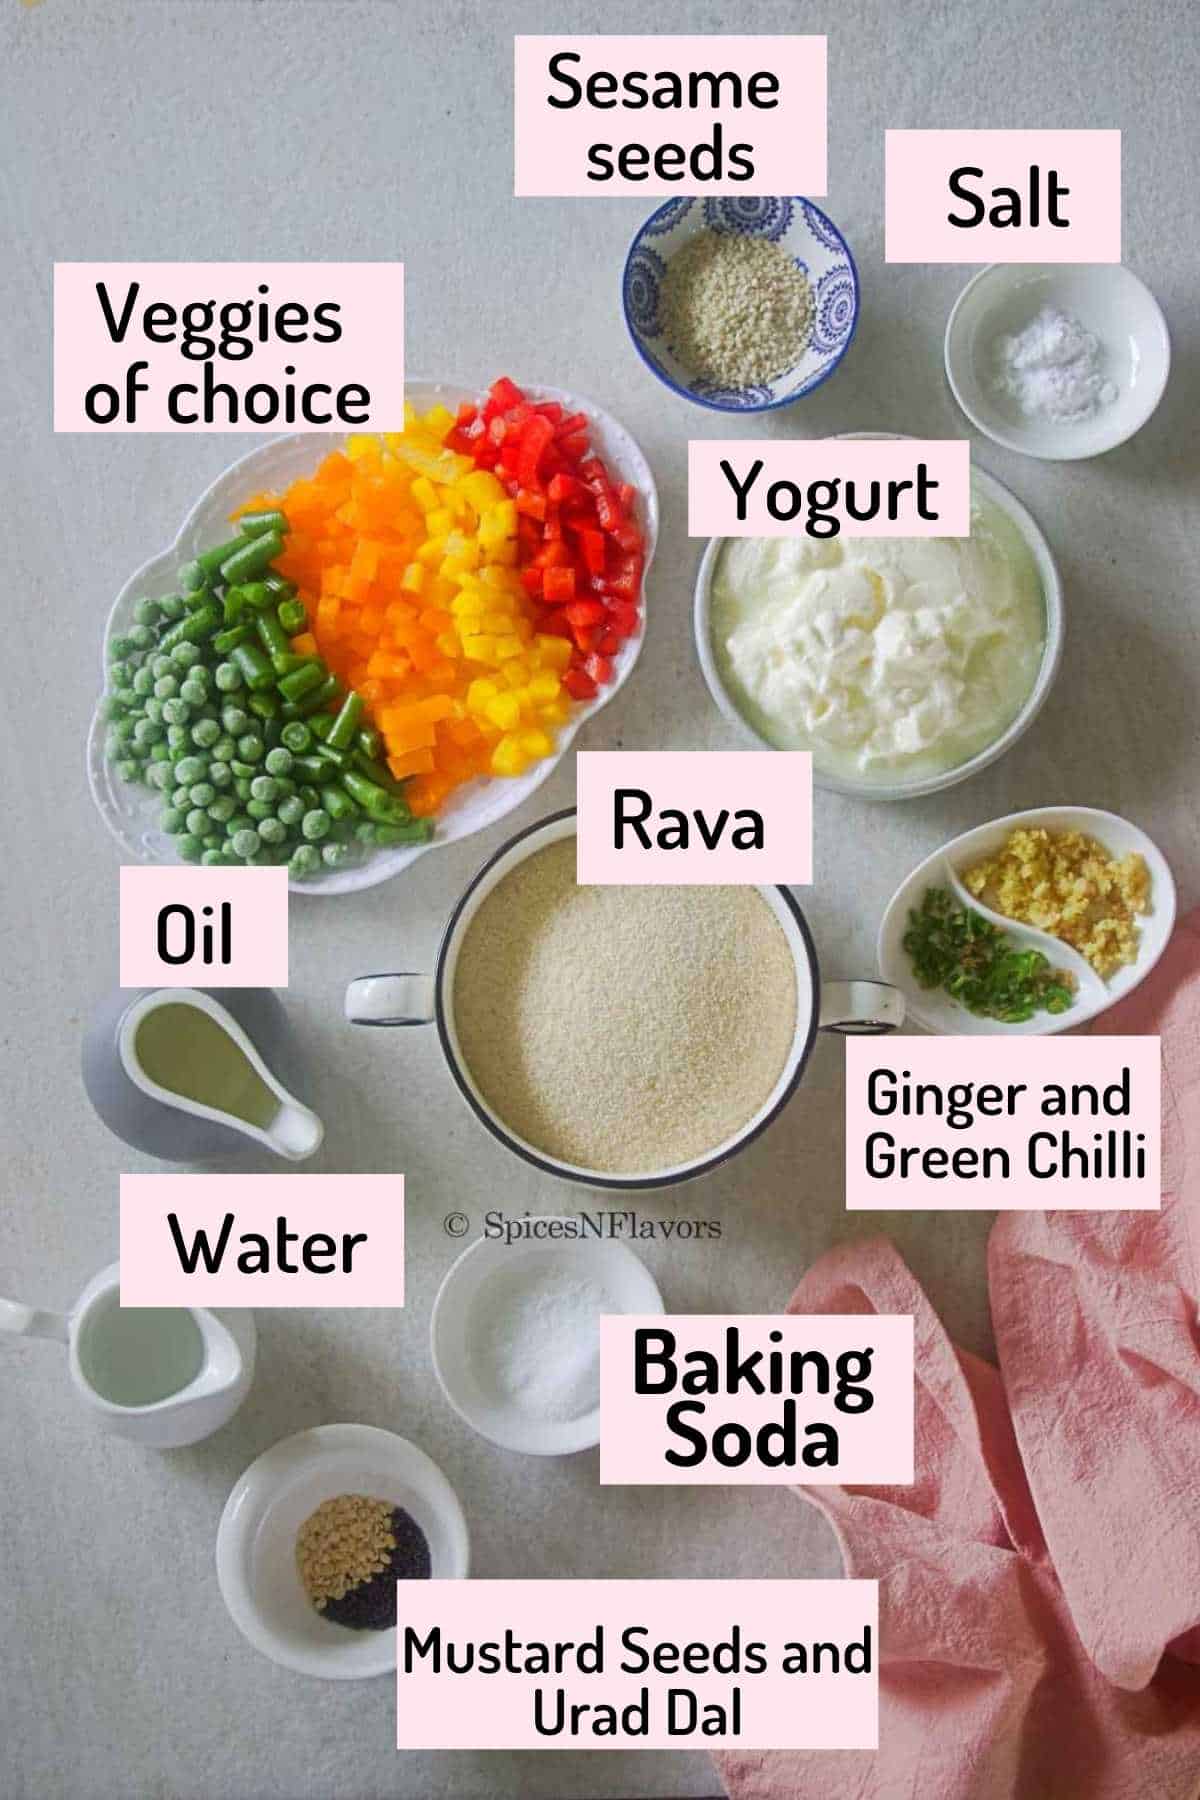
- Semolina: Also known as Rava. Using the Bombay Rava variety here.
- Yogurt: Use thick part of the yogurt.
- Water: Do not use too much water. Around 2 to 3 tbsp should be fine.
Step by Step Recipe Instructions:
Step 1: Soaking the Rava
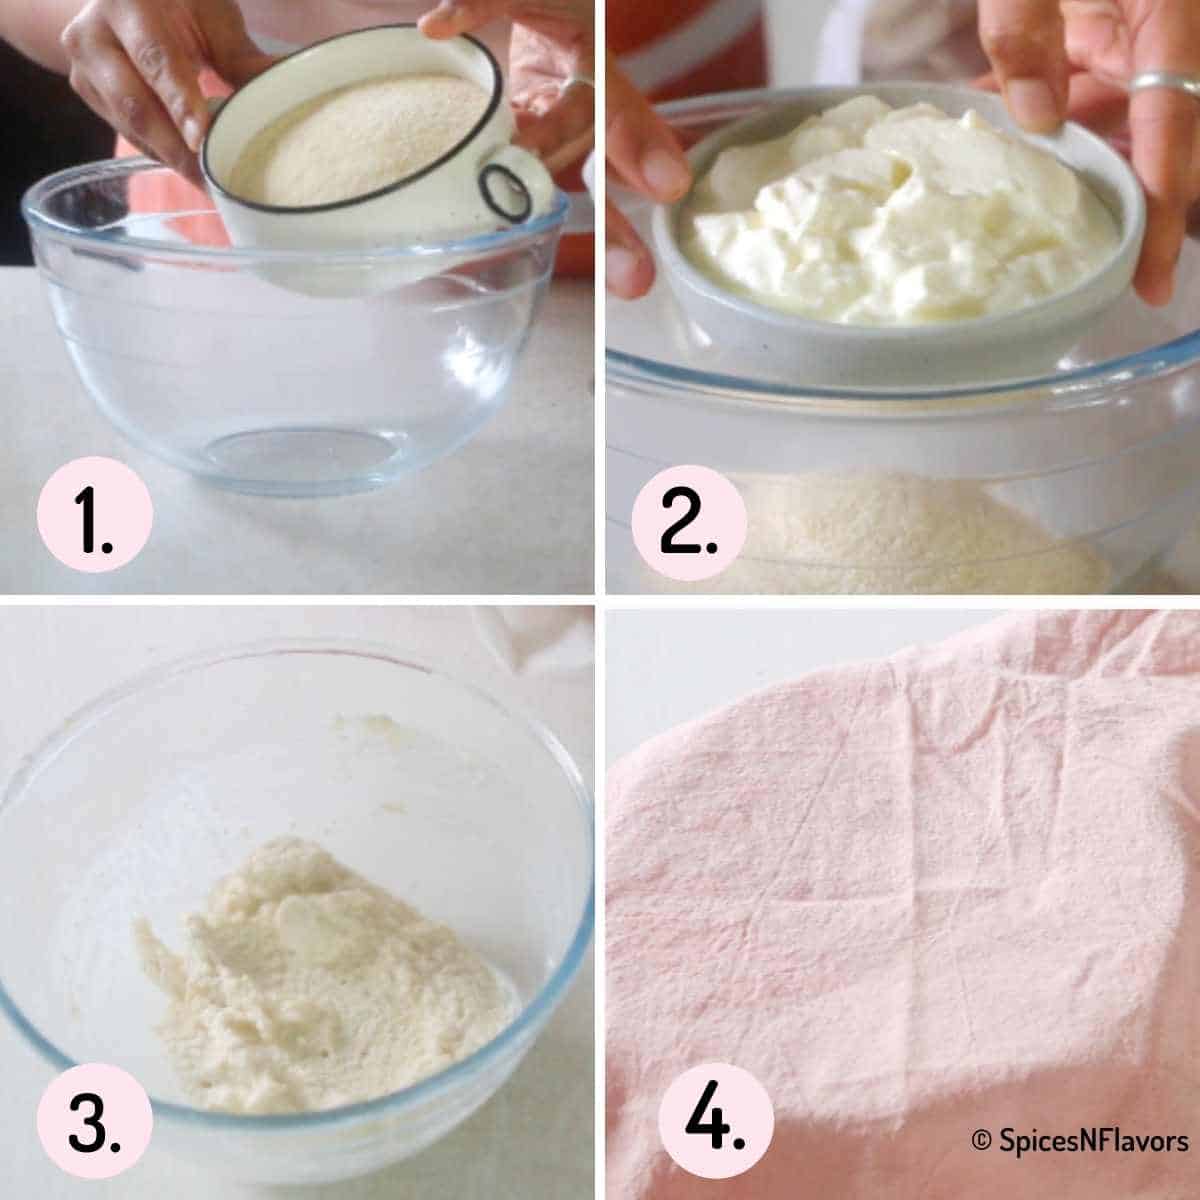
In a bowl, combine the rava that is the semolina and curd (images 1-3).
As mentioned the semolina that I am using here is also known as Bombay rava the ones that we regularly use to make upma at home.
Use the thick part of the yogurt which is at room temperature.
Once mixed, let the rava soak and swell for at least 10 mins. So simply cover with a tea towel or a plate and let it sit aside for 10 mins (image 4).
Step 2 : Prepare the Veggies
Meanwhile let us chop the veggies. I am using tri coloured capsicums or bell peppers, 7 to 8 beans and 1/4 cup of peas today.
You can use any veggies of choice. Cauliflower or brocolli florets, grated carrot will also work.
Also grate the ginger and finely chop the green chillies if using.
Step 3: Preparing the Cake Batter:

After 10 mins, add the chopped veggies, grated ginger, green chillies and salt into the bowl.
Combine well (images 5 -8).
To get it into a batter like consistency add water a tbsp at a time and mix (image 9 -10).
Remember the batter will get even more runnier upon the addition of baking soda so do not be tempted to add too much water at this stage.
You can always adjust the consistency later too.
Step 4: Prepare the Tadka
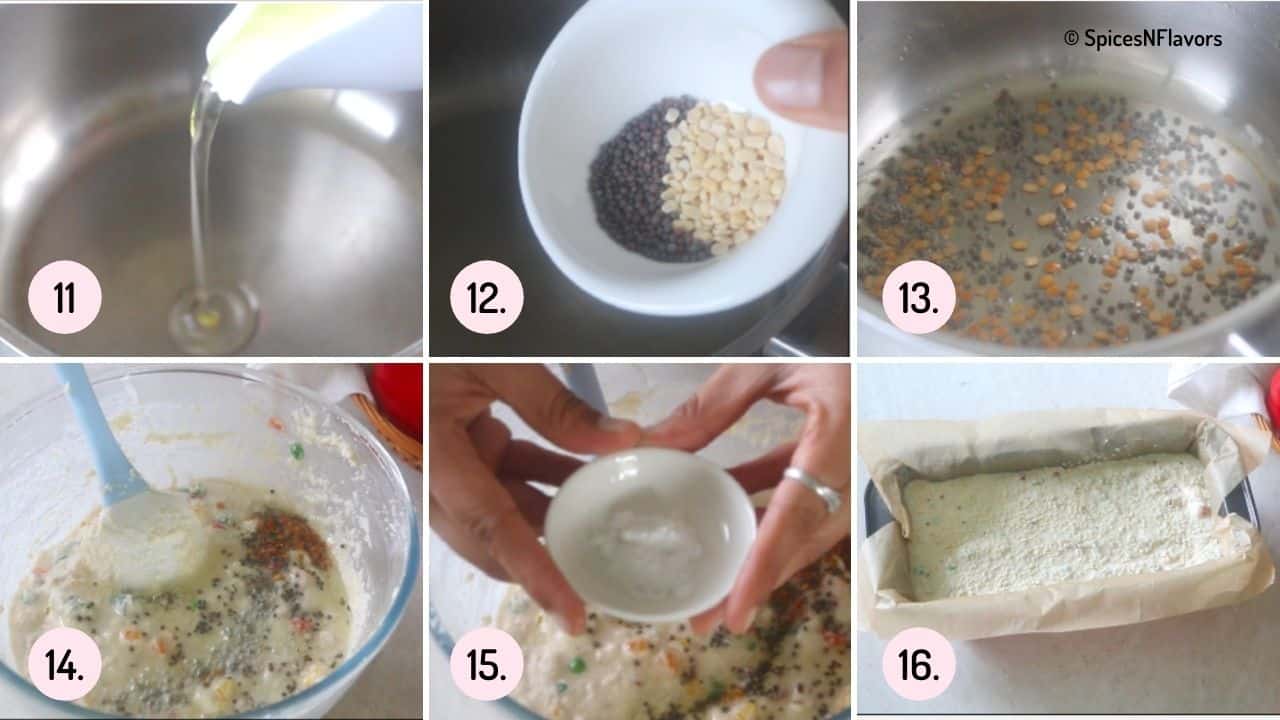
In a separate pan, heat some oil.
Once hot, crackle the mustard seeds and urad dal until golden brown.
Transfer it to the bowl along with baking soda.
Working quickly mix everything into a cake batter like consistency and pour it into the prepared cake pan (images 11-16) .
The size of the pan that I am using today is 7x3 inches.
Level the top off.
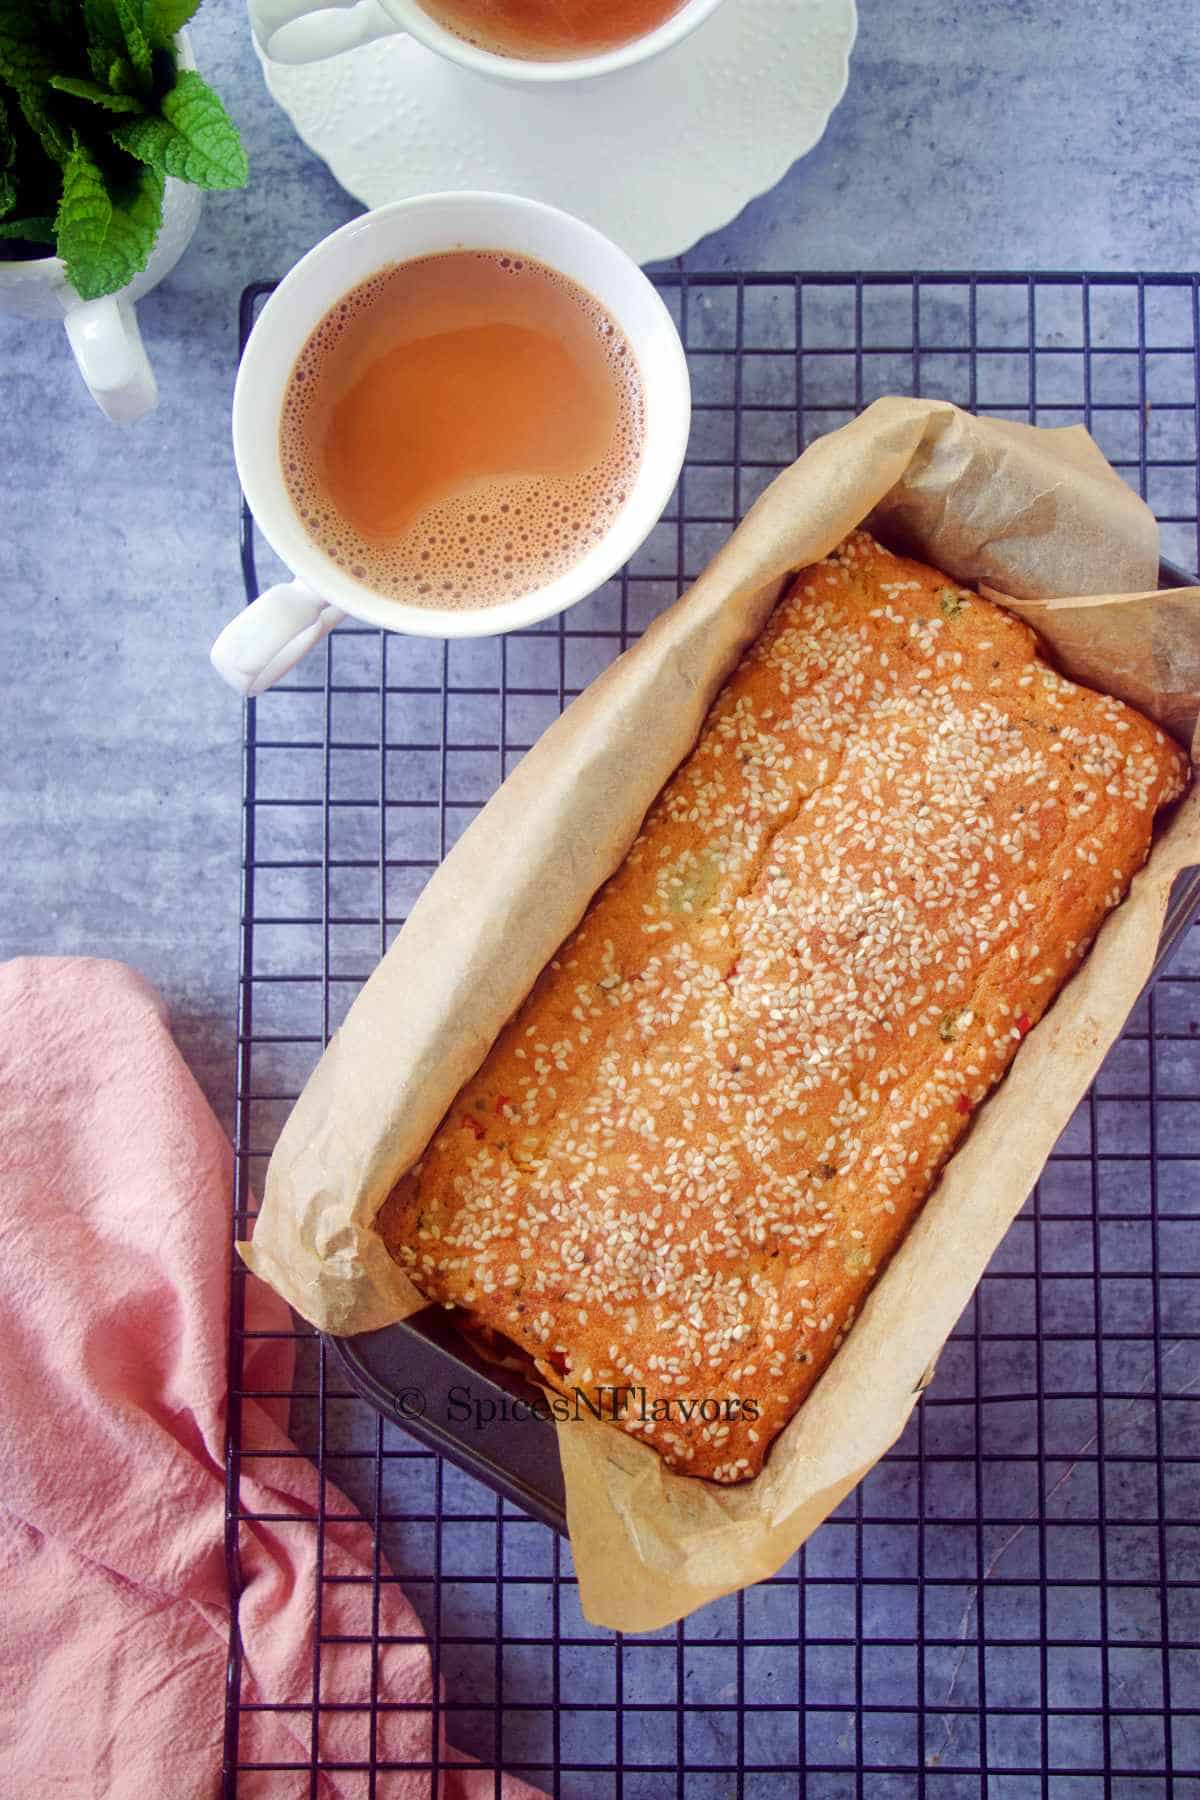
Sprinkle some sesame seeds to garnish.
And quickly off it goes to baking in a preheated oven of 180°C for 45 to 55 mins or until a skewer inserted in the centre comes out clean.
Let it sit in the pan itself for 3 mins then allow the cake to cool completely in the wire rack before slicing and enjoying it with your favourite cup of tea.
Recipe Tips:
- The most important thing is to not use too much water. As that would make the batter too wet; it would take a longer time to bake in the oven and also would be sticky to eat.
- It is necessary to let the rava and yogurt mixture to sit for atleast 10 mins so that the rava gets time to absorb the liquid.
- Once you add the baking soda, do not let the batter sit for a longer time on the countertop. Working quickly transfer it to your prepared loaf tin and into the oven at the earliest.
- Chop your veggies finely so that it is easier for kids to bite into it. Use a selection of different coloured veggies to make it attractive.
Storage Instructions:
You can store the Vegetable Cake in an air tight container at room temperature for upto 2 days.
You can also freeze it for upto a month in a freezer friendly container.
Related Savory recipes:
Healthier Cake Recipes:

Wish to Join US for the love of BAKING? Subscribe to our newsletter and Youtube channel. Follow along on Facebook, Instagram, and Pinterest for all the latest updates!

Vegetable Cake | Savoury Semolina Cake
Ingredients
- 1 cup (175 gms) Semolina / Rava
- 1 cup (200 gms) Yogurt or Dahi
- 1/4 portion each of tri coloured peppers
- 5-6 Beans
- 1/4 cup Green Peas
- 1/2 tsp Grated Ginger
- 1 Green Chiili, finely chopped refer notes
- 3/4 tsp Salt
- 1/2 tsp Baking Soda
- Water as needed refer notes
- 1/2 tsp Sesame Seeds
For the Tadka/Seasoning
- 1.5 tbsp Oil
- 1/2 tsp Mustard Seeds
- 1/2 tsp Urad Dal
Instructions
- Mix together the rava and yogurt until combined. Let this sit on the countertop for at least 10 mins.
- Meanwhile, chop all the veggies, grate the ginger, chop the green chillies and keep it ready.
- After 10 mins, add the veggies into your rava batter. Give it a mix.
- In goes the salt, green chilli, ginger. Mix everything and add little water around 2-3 tbsp to get it into a batter like consistency.
- Prepare the tadka. For which heat up the oil and once hot add in the mustard seeds and urad dal. Let it crackle. And then transfer to the rava batter.
- Add in the baking soda also. Give everything a final mix and quickly without wasting any time transfer it to the prepared loaf tin. Sprinkle the top with some sesame seeds.
- Bake in a preheated oven of 180°C for 45-50 mins or until a skewer inserted in the centre comes out clean.
Video
Notes
- Absolutely any veggies of your choice can be used. No hard and fast rule there.. 🙂
- But there is a rule for the usage of water.. hehe.. I would recommend you guys to not use more than 5 tbsp of water for this recipe. Now I cannot give you an exact measurement of water here because it all depends upon the consistency of curd and the quality of rava that you are using. Add 1 tbsp at a time. I have used 3 tbsp in total. Remember the batter will get a runny consistency upon addition of baking soda so add water carefully.
- Too much water in the batter would make the cake wet and would also take longer to bake in the oven. Even after baked it would still feel wet.
- You can skip the green chillies if you are making it for your little ones. The spiciness from the ginger would be enough for them but definitely add finely chopped chillies if you are making it for the entire family.
- If you are planning to make it for breakfast the next morning or for packing it into their lunch boxes then I would highly recommend you guys to chop the veggies the previous night to make your work lot easier and smoother in the morning.
- Do let the rava and curd batter let sit for 10 mins so that the rava can absorb the liquid.
- One more point to note is that once you add the baking soda, act quickly do not let it stand for a longer time on your kitchen counter. Working quickly, get it into the oven at the earliest.
Well, it tastes delicious. And even though I agree with the fact that we eat with our eyes first but let's be honest at the end of the day my taste buds wins over my eyes. An absolute must try recipe in terms of taste and health 😀
Nutrition
Note: This recipe was first published on Jun 18, 2018 now updated with a detailed video, step by step tutorial with pictures and more tips and tricks on Jan 4, 2020.
Trudy says
Hello,
I am looking forward to making this recipe. It looks delicious but I am unfamiliar with what urad dal is. When I googled, it said it was lentils. Is this correct?
Thank you
sushma iyer says
Hi Trudy.. Yes that is correct.. Urad Dal is basically split and skinned black gram which is mainly used for tempering in South Indian cuisine. However you need not worry about that ingredient as it would not make much of a difference if you do not use it while tempering.
Abinaya NNarasimhan says
Hi Sushma. I tried this recipe and turned out awesome. I made muffins instead of cake thereby making it easy to munch on without the hassle of cutting. This is surely a keeper. Very healthy since there is no apf and sugar.
If others also would like to make muffins like me, I would suggest them to bake for 20 mins at 356 deg F. (356 is the exact google conversion of 180). U will get around 9 regular sized muffins. Thanks for the healthy and tasty recipe Sushma 🙂 🙂
sushma iyer says
Hello Abinaya.. That is so generous of you to take the time out to try and most importantly share it here as well. Thank you so much for the honest feedback appreciate it <3
SanT says
Tasted well, but baking was a real mess. Was raw even after 50 min at 180 degrees. Had to keep it for another 30 min at 250 degrees. Was also stuck to the liner.
sushma iyer says
Hi SanT.. Did you try the skewer test at 50 mins?? It might look raw if you had added too much water however it would have been baked well.. there was no need to bake it further actually
diana says
did you bake 180⁰ celcius (350⁰ F) or at 180⁰F?
sushma iyer says
Hi Diana.. It is 180°C or 350°F 🙂
Shobha says
Mine turned out a disaster, did everything as recommended, it came out like upma.
sushma iyer says
Hi Shobha.. Sorry to hear that.. did you use the thick part of yogurt?? And how many tbsp of water did you use? Did you rest it?? Asking so many questions so that I can help you with the same.. 🙂 thank you
Nisha says
Hi Sushma,
Great recipe. I was wondering if it is possible to make this gluten free by substituting rice rava for bombay rava.
Thanks
Nisha
sushma iyer says
Hi Nisha.. I haven't tried.. I am not an expert in gluten free baking..Sorry
Sunita Chandarana says
What is nos beans
sushma iyer says
Hi Sunita..
Sorry for the confusion. It means the number of beans I have used in this recipe 🙂 Hope this helps
Barbara says
I don’t understand the NOS, so how many beans did you use???
sushma iyer says
Hi Barbara..
I am sorry for the confusion and inconvenience caused.. It simply means numbers.. I have now edited the recipe though.. So use 5 or 6 beans..
Regards
Sushma
Lalita says
Delicious recipe.
Made it today and eveeyoje loved it.
One question, how can we make it more crispy?
sushma iyer says
Hi Lalita..
Thank you so much.. so glad to learn that you liked the recipe..
May be try baking it little longer to make it crispy. Never really gave a thought about the same.. I will try it one more time and let you know if it worked..
Regards
Sushma
Kanchan says
Thanks for this delicious recipe. Can we make it in microwave & for how much time.
sushma iyer says
Hi Kanchan..
so pleased to learn that you liked the recipe.
I believe you can make this in the microwave too because of the simple ingredients used in the recipe. However, I have not tried it personally so not sure about the timing. sorry
Mukta says
Can I make it without yogurt?? My toddler is allergic to milk!
sushma iyer says
Hi Mukta..
sorry but yogurt is essential in this recipe..
Regards
Sushma
Priya says
Excellent recipe, came out perfect and the textures were really good with the crusty top and softer inside (not at all mushy or undercooked!). I would suggest using roasted sooji (coarse rava) instead of semolina which is fine sooji. Also just a pointer since I had to quickly refer 180C=350F
sushma iyer says
Hi Priya..
Thank you so much for taking the time out and sharing your wonderful feedback with us. I am so glad to learn that you and your family enjoyed this.
I will try with roasted sooji too and update this recipe. Thank you for the suggestion. And going forward will try to post the temperature in both F and C. Thank you.
Regards
sushma
Ravitha says
Hi , thanks for savoury cake ....I was searching for the recipe. Can make this batter in muffin tray ? For how Long i have bake in muffin tray ? Plz guide
sushma iyer says
Hi Ravitha..
Yes definitely you can bake this in a muffin tray. Follow the exact procedure and bake it for 20-25 mins or until a toothpick inserted comes out clean. Looking forward for your feedback in case you give it a try.
Regards
Sushma
Kiran says
Awesome and healthy recipe, you inspires me to do more baking , which I love to do but with full time work and 2 little kids , it gets difficult to find out time for baking .
Will sure try this recipe and share the veggie cake with my colleagues .
sushma iyer says
Hi Kiran..
I totally understand how hectic it can be. I too have a little one at home and with full time blogging it does get difficult to do what we love. I love baking and do it only on weekends when hubby is home or else it is not possible with a super active kiddo.. 😀
And thanks a bunch for your kind words. Will be waiting to hear your feedback on the veggie cake 😀
Oh and by the way since you said you are a working mom; I have another post for you that might be useful. Sharing here just in case you want to have a look: https://spicesnflavors.com/best-breakfast/
Regards
Sushma