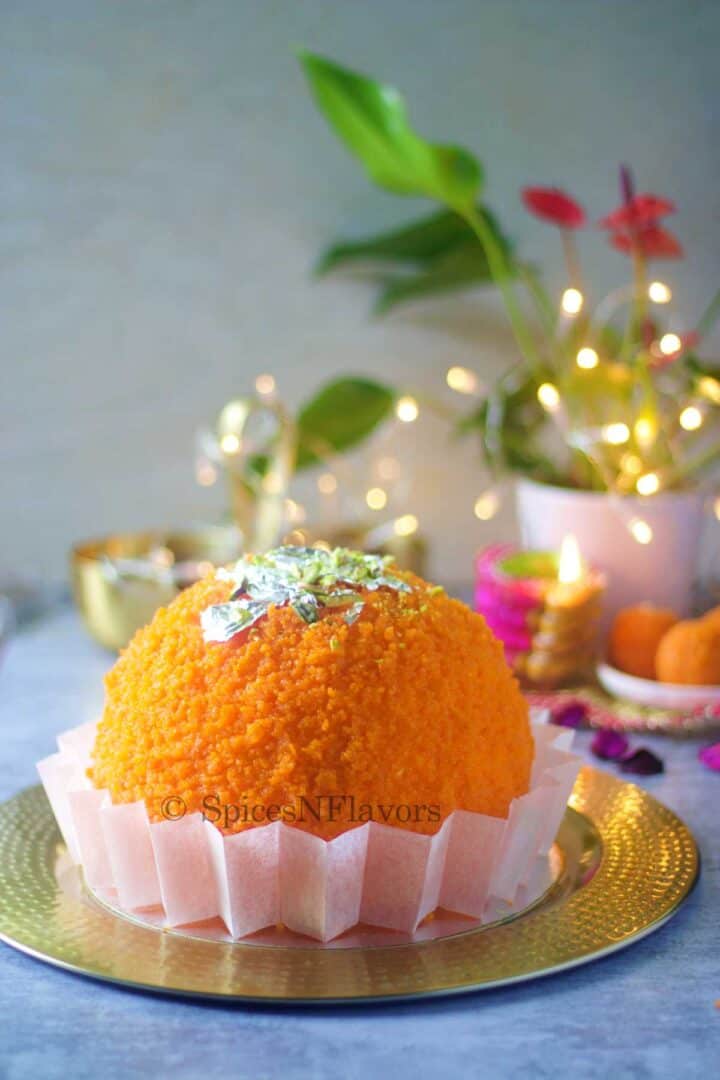
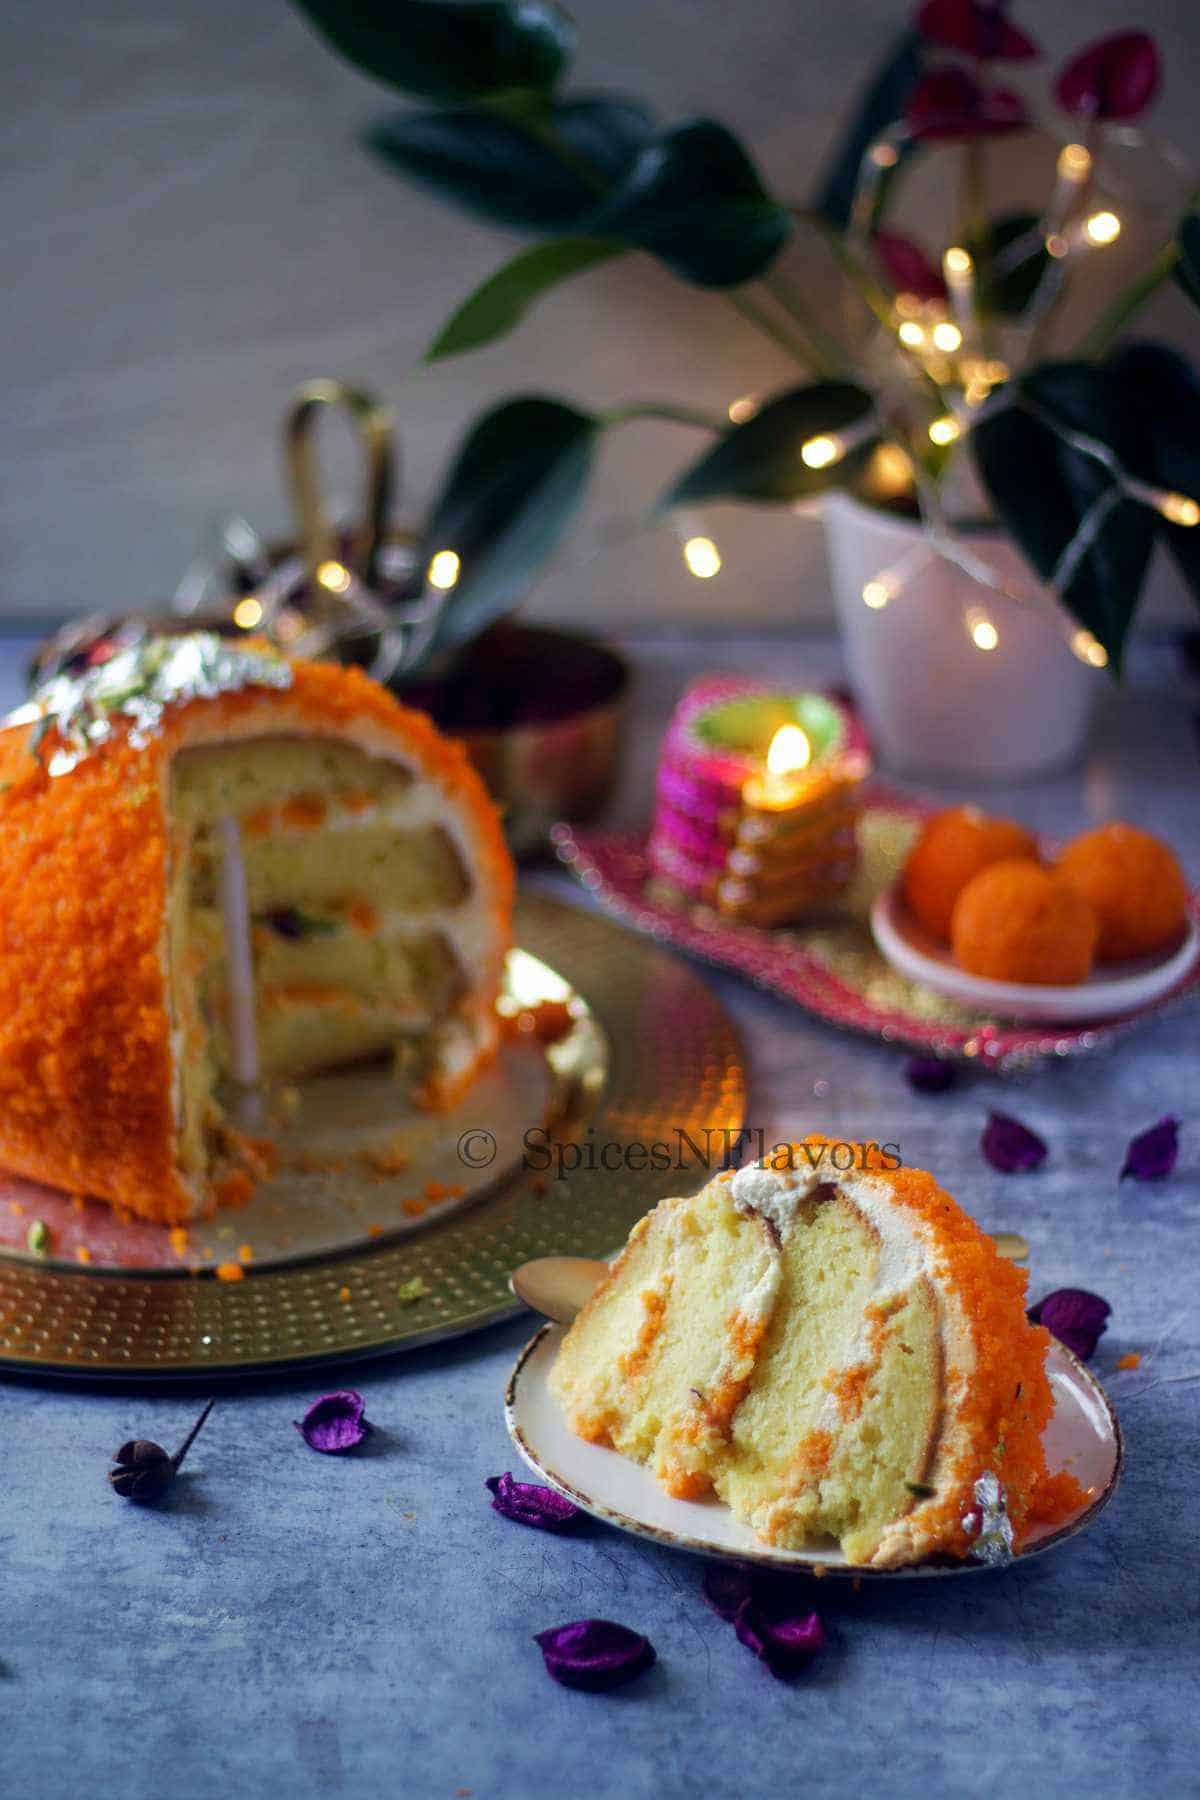
Drumrolls please.. Make way for the stunning show stopper dessert - Motichoor Ladoo Rabdi Cake; which is going to blow your mind with its flavour, texture, taste and can we just take a moment to appreciate how pretty does it look!!!
What is Motichoor Ladoo?
Motichoor Ladoo is a round or ball shaped Indian sweet made of tiny granules of fried chickpea flour which are then soaked in sugar syrup and then formed into balls. The striking orange colour and the tiny granules are its stand-out feature.
What is Rabdi?
Rabdi or Rabri is again a remarkable Indian sweet which is prepared by reducing the milk to 1/4 of the original amount that you started with which is then flavoured with exotic spices like cardamom and kesar and topped with rich nuts on top as garnish.
What is Motichoor Ladoo Rabdi Cake?
Motichoor Ladoo Rabdi Cake is a stunning cake flavour where in the motichoor ladoo crumbs and sweetened rabdi (prepared using a cheat method) is sandwiched between layers of rabdi flavoured cake and frosted with a silky smooth and melt in mouth whipped cream.
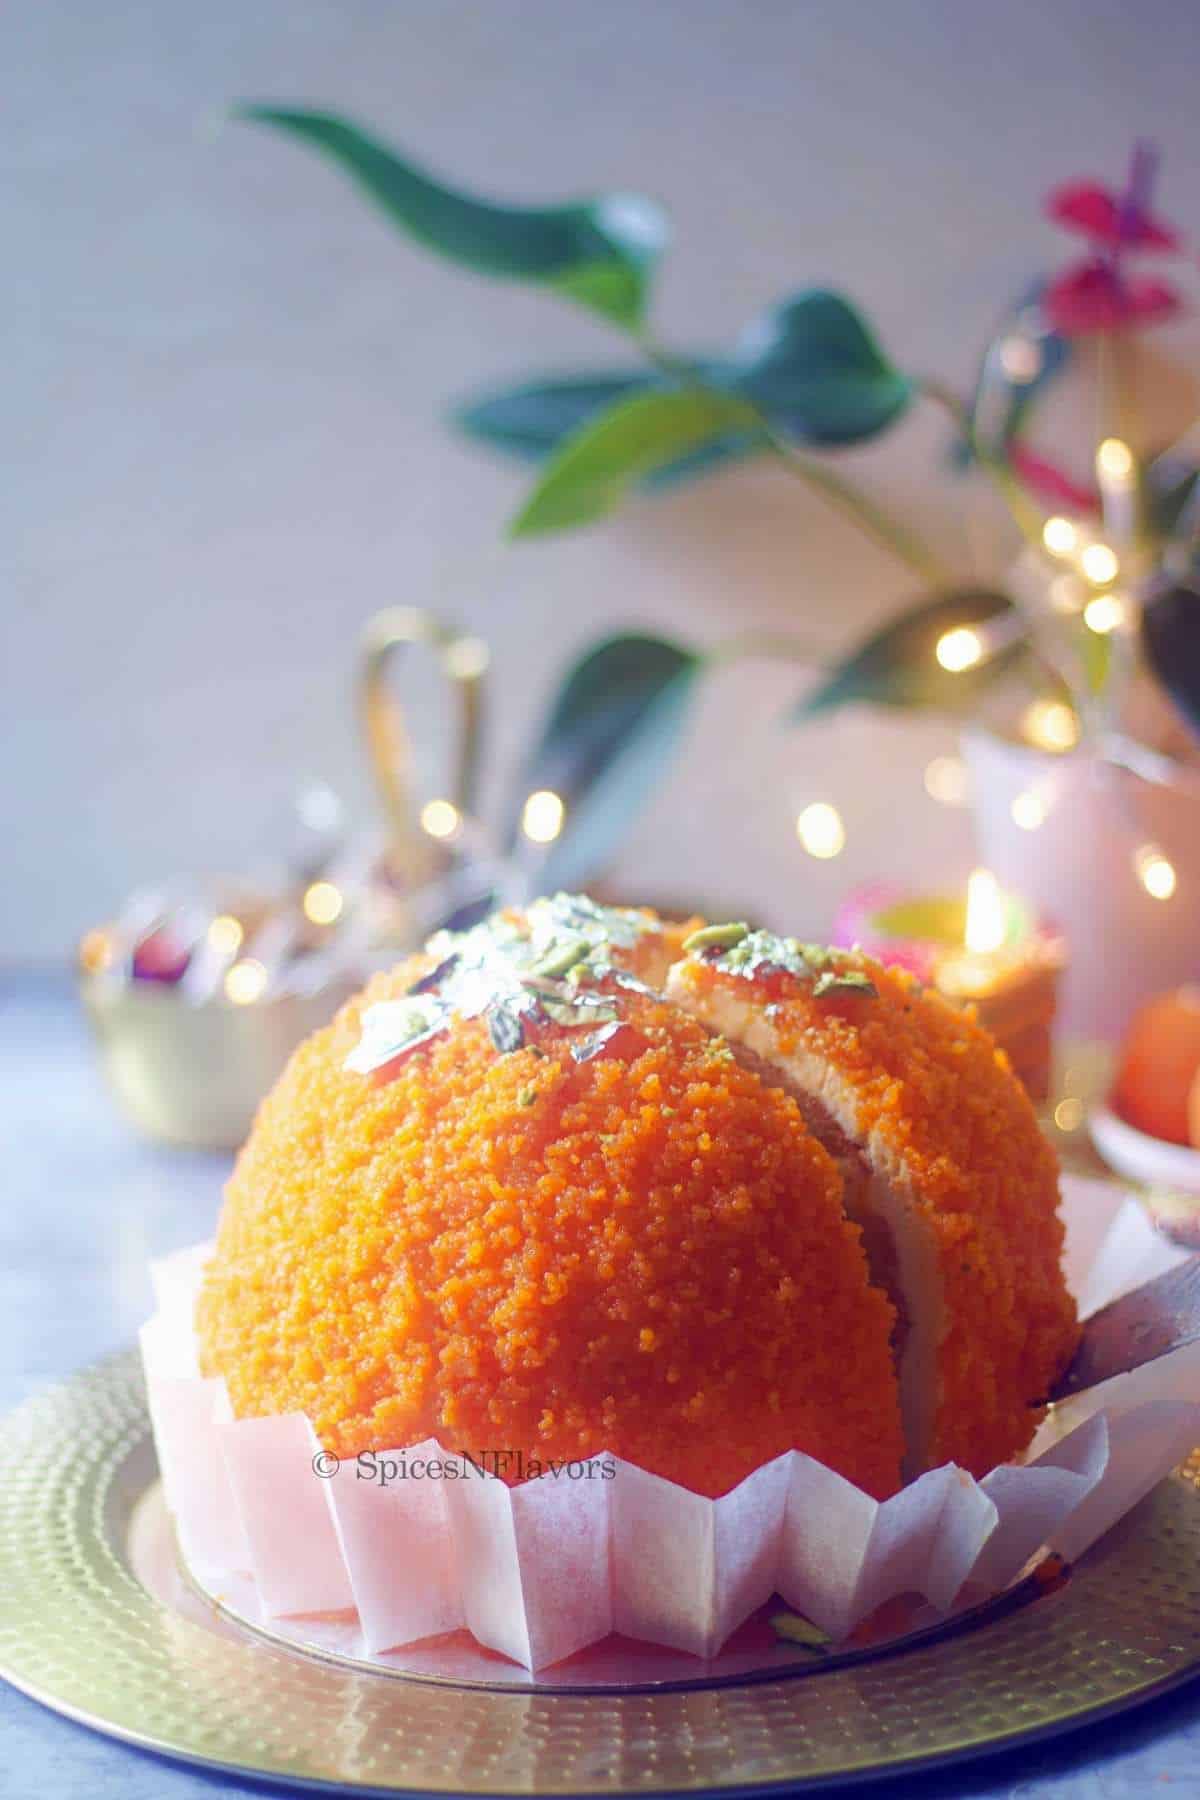
To make it more appealing to the eyes I have made it in a way that it resembles a giant ladoo. Isn't that striking?
Why Make this Recipe?
- Indian fusion desserts are on all time demand at the moment. And won't this cake stand-out?
- Though this cake has a combination of two Indian desserts, trust me when I say this it is not overly sweet at all.
- How astonishing does it look? Anyone would be blown away by it.
- Festive season calls for some new and unique dessert right?
- The best part this recipe is totally eggless. Who doesn't like an eggless cake?
Now I won't lie to you, this cake does take few additional steps and ofcourse time as compared to a regular Indian flavour like Pineapple Cake or Butterscotch Cake but trust me when I say this every bit would be worth it.
And this recipe is so special - You know Why?
This is the cake flavour that I had made for my final assessment of my year long Bakery Course that I did here in Christchurch, New Zealand.
Of course I had to share an Indian flavour and it took me 4 trials to perfect this recipe. And the filling of this cake is exactly the same that I had made in my course.
So here is a step by step tutorial for you.
Step by Step Tutorial
Step 1 - Prepare the Cake Pan.
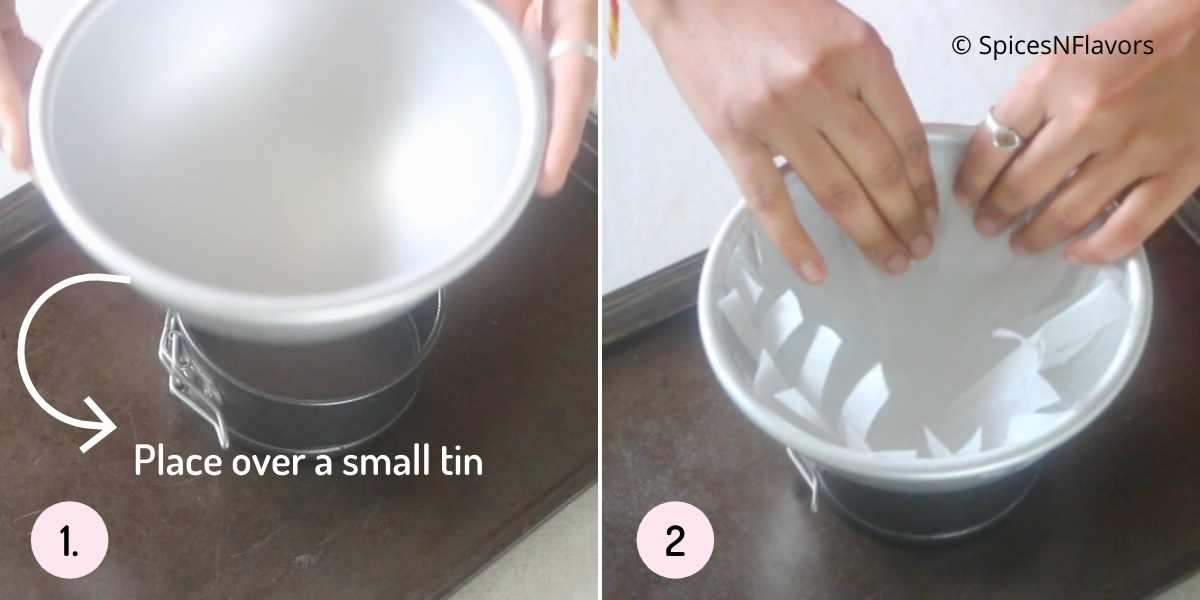
Place a sphere shaped cake pan on top of a tiny cake tin. (image 1)
Take a square shaped parchment paper, fold it to form a rectangle and then fold again to form a square again.
Now fold twice to form a triangle and make some slits in the centre to create this curved pattern.
Spray the pan and line the base with the prepared parchment paper. Set aside. (image 2)
You can also choose to butter and flour the pan instead but I always recommend adding a parchment paper to ensure that the cake does not stick to the pan.
"Parchment paper is your best friend". Line the base of the pan with it and your cake will never stick to the pan once baked.
Step 2 - Prepare the Cake Base
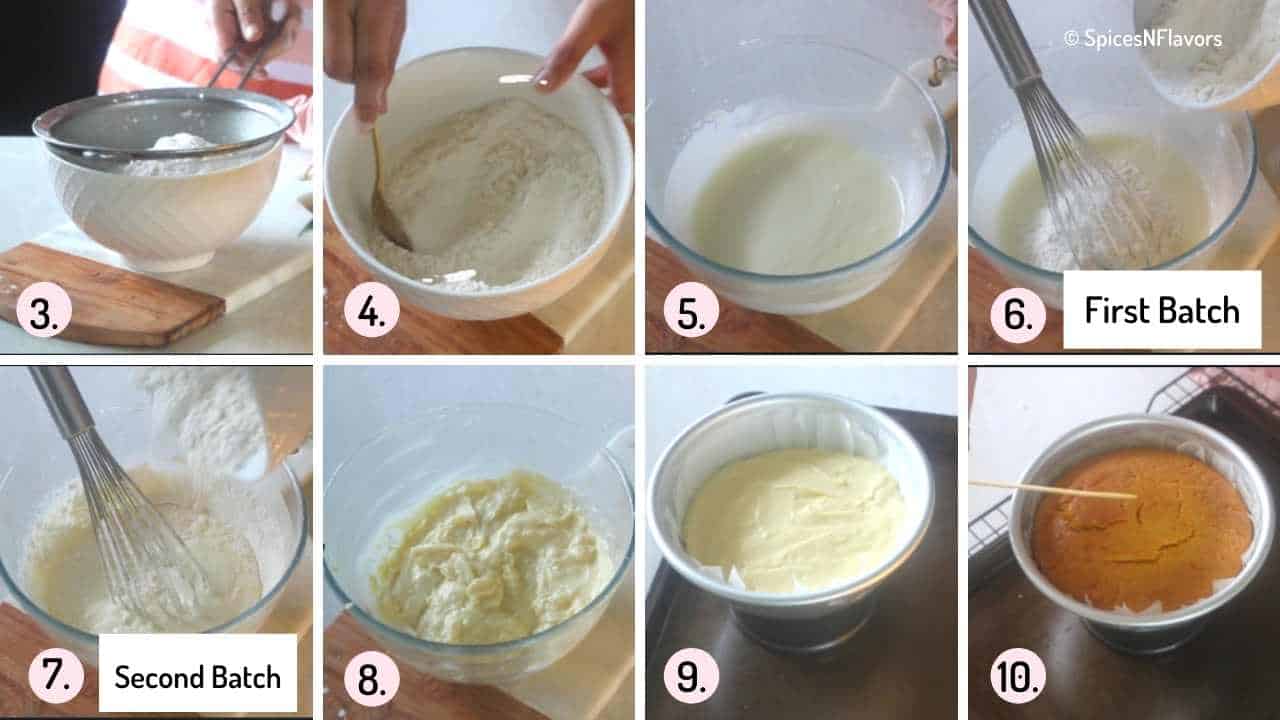
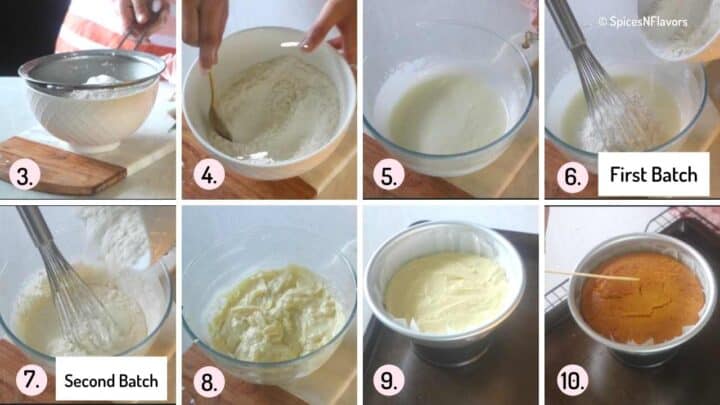
This Motichoor Ladoo Rabdi Cake begins by sifting together the dry ingredients - APF/Maida, custard powder, baking powder, baking soda and some salt. (image 3)
You can use cornflour in place of custard powder if you want to.
Give a quick mix (image 4) and set this aside while we work on the wet ingredients.
In a separate bowl, whisk together the yogurt and sugar until homogenous.
Then whisking continuously add in the oil, milk and rabid essence. (image 5)
Once mixed, fold the dry ingredients into the wet in two batches, this ensures that there is no over mixing of the batter. (image 6-7)
This and few other tips has been explained in my free baking tips ebook which you can download by clicking here.
Transfer the smooth batter into the prepared cake pan and bake in a preheated oven of 180 degree Celsius for 45 to 55 mins or until a skewer inserted in the centre comes out clean. (image 8 - 10)
Let this sit in the pan for another 5 mins and then invert to release the cake.
Allow it to cool completely.
Step 3- Sugar syrup.

To make the sugar syrup take equal quantities of sugar and water in a saucepan.
We will be adding cardamom pods to flavour the syrup.
Simply boil everything together until the sugar melts (images 11 -14). Do not over boil.
Just heat until the sugar melts and then take it of the flame and allow it to cool too.
Step 4 - Rabri Layer
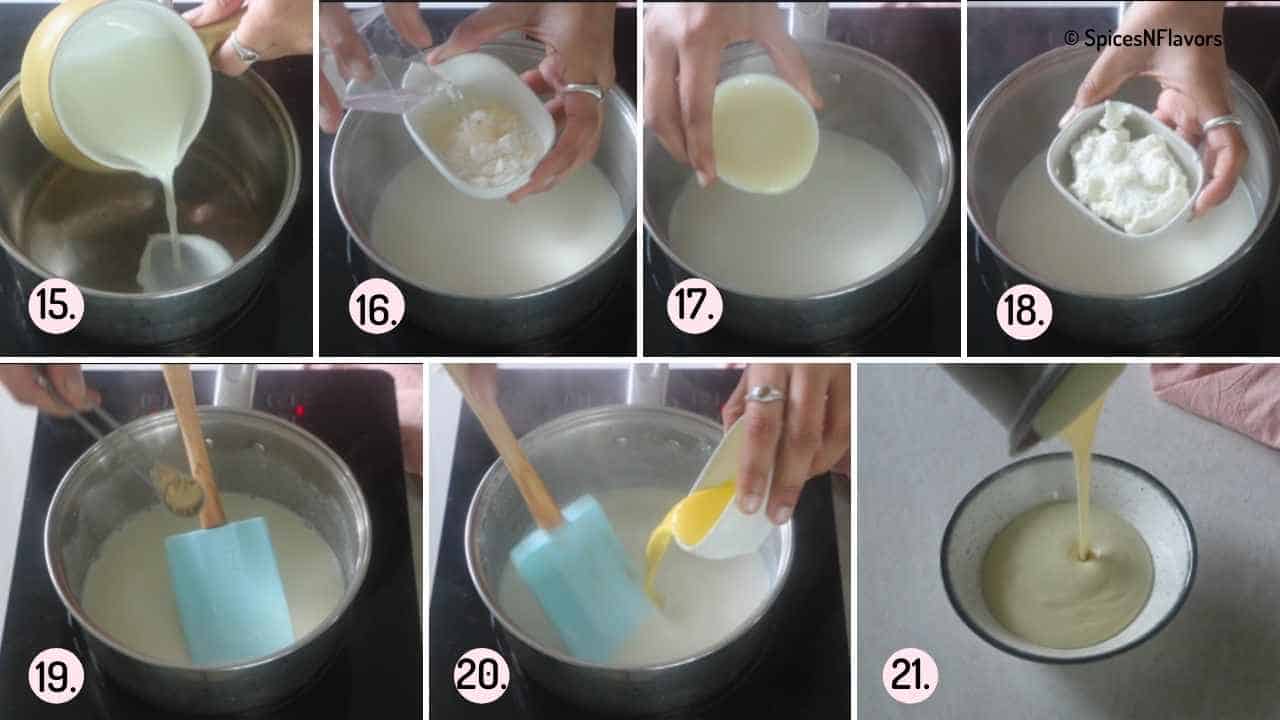
In a saucepan add in the milk and bring it to a boil. (image 15)
While the milk is boiling in a separate bowl, combine together the custard powder and water to form a slurry. This is our thickening agent here. (image 16).
If not custard powder you can also use cornflour. Set this aside until needed.
Once the milk is boiled add the condensed milk, ricotta cheese and cardamom powder. (image 17 -19)
(For those of you who do not have easy access to ricotta cheese you can use milk powder and bread crumbs to give it the same texture).
Mix and again bring everything to a boil.
At this stage add in the prepared slurry (image 20) and cook until everything thickens well for about 4- 5 mins and then transfer to a bowl (image 21), cover with a cling wrap so that it touches the surface of the rabdi and allow to cool.
The rabdi will thicken further in the fridge.
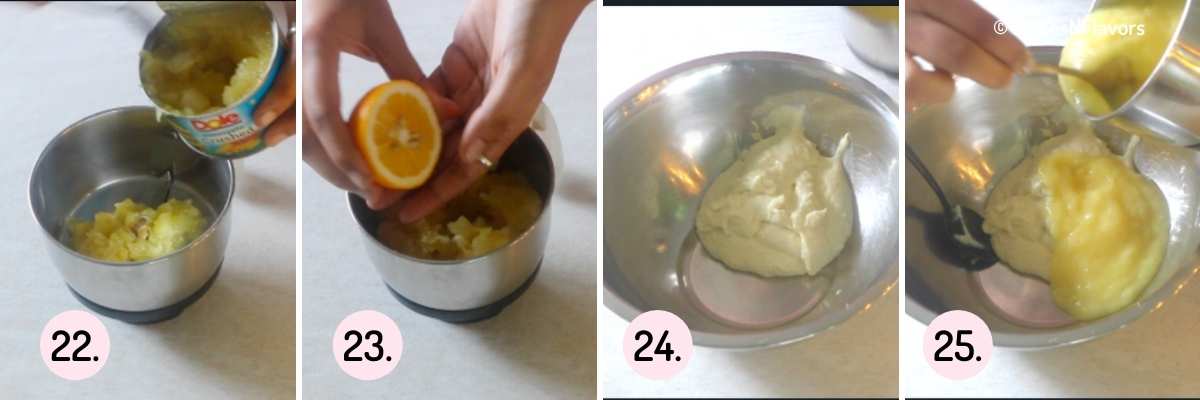
Meanwhile, blend some pineapples along with lemon juice without adding any water to a thick paste like consistency. (image 22 -23)
Now take the chilled and thickened rabbi in a bowl, add the pureed pineapple and mix. (image 24 -25)
The pineapples will cut the sweetness and also will provide freshness to the cake. But it is not so much that it will overpower everything else so rest assured.
This is your rabid filling ready. Ket us set this aside too.
Step 5 - Whipped Cream Filling
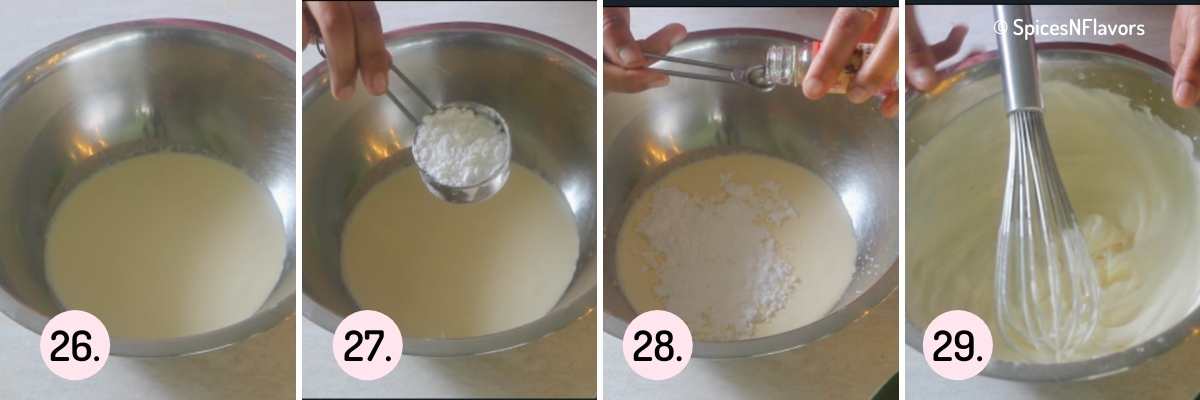
To make the whipped cream for filling, I am using dairy whipping cream along with sugar and rabdi essence and then whip until stiff peaks.
If you are using sweetened whipping cream then definitely you can skip adding the sugar.
Step 6 - Assemble
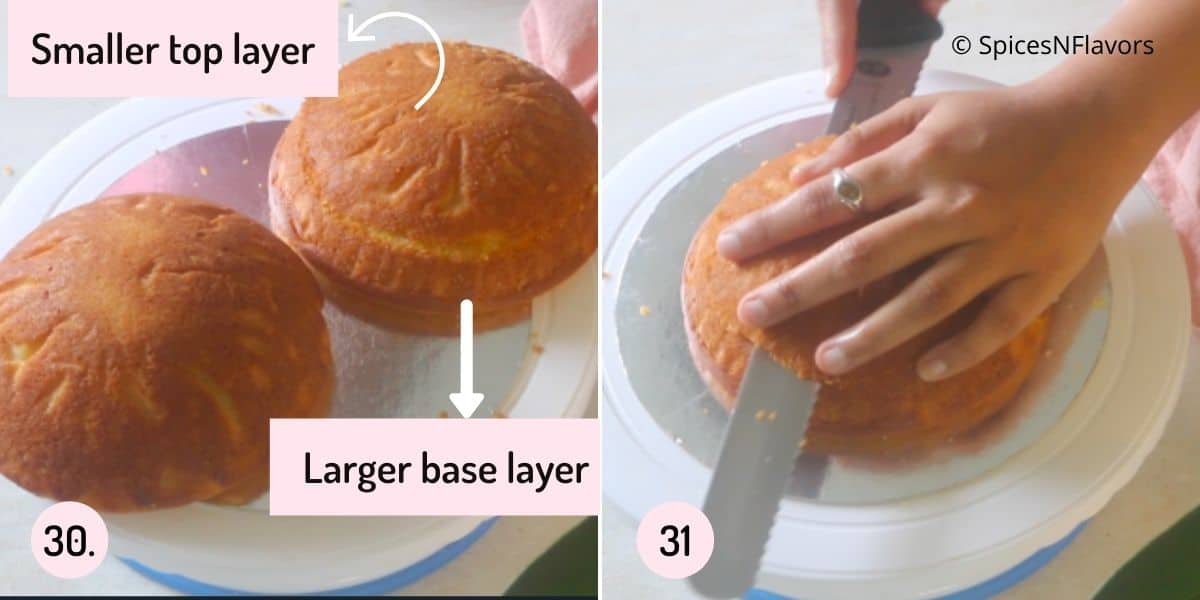
Start by trimming the cake layer and dividing it into two. (image 31)
To make a ball or ladoo shape we would need two half semi spheres, since I just have one pan I made one cake at a time to get 2 cakes.
If you have two such pans then you can bake them together for the same time just by doubling the recipe quantities.
So I am going to trim and cut the other cake too.
So now you will have two smaller size cake layer and two bigger size cake layers. (image 30)
Take the smaller one and trim the curved base to flatten it so that it is now stable to hold the rest of the layers.
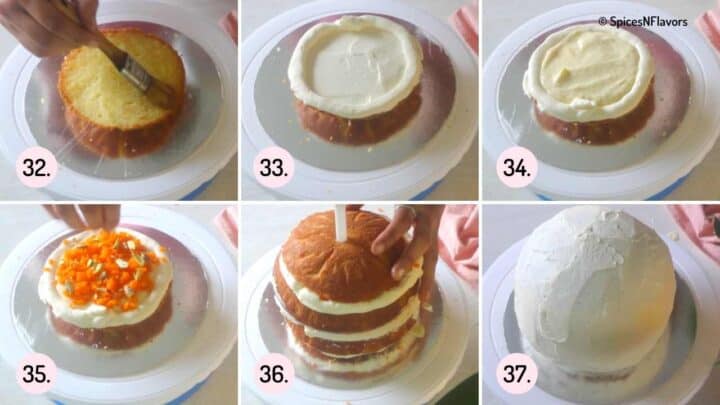
Apply some sugar syrup this would keep the cake moist for 3 to 4 days. (image 32)
In goes a quarter portion of the whipping cream and spread it evenly. (image 33)
Add a border with a cream as the rabdi is little free flowing this border will hold the rabdi in its place.
3 to 4 tbsp of rabdi and then spread that too. (image 34)
Crush some ladoo to make bondi and add a layer of it on top. (image 35)
Finally some slivered pistachios. One of the larger cake layer now goes on top.(image 35)
So repeat the process until we reach the very top.
To secure everything into its place we would be placing a dowel in the centre. (image 36)
Always inform the clients about the same when you are taking an order.
With whatever cream is left out crumb coat the cake.
You need not be perfect here as this is just the base coat.
Wipe the cake board and let it sit in the fridge for a minimum of 15 mins. (image 37)
Step 7 - Stabilized Whipped Cream
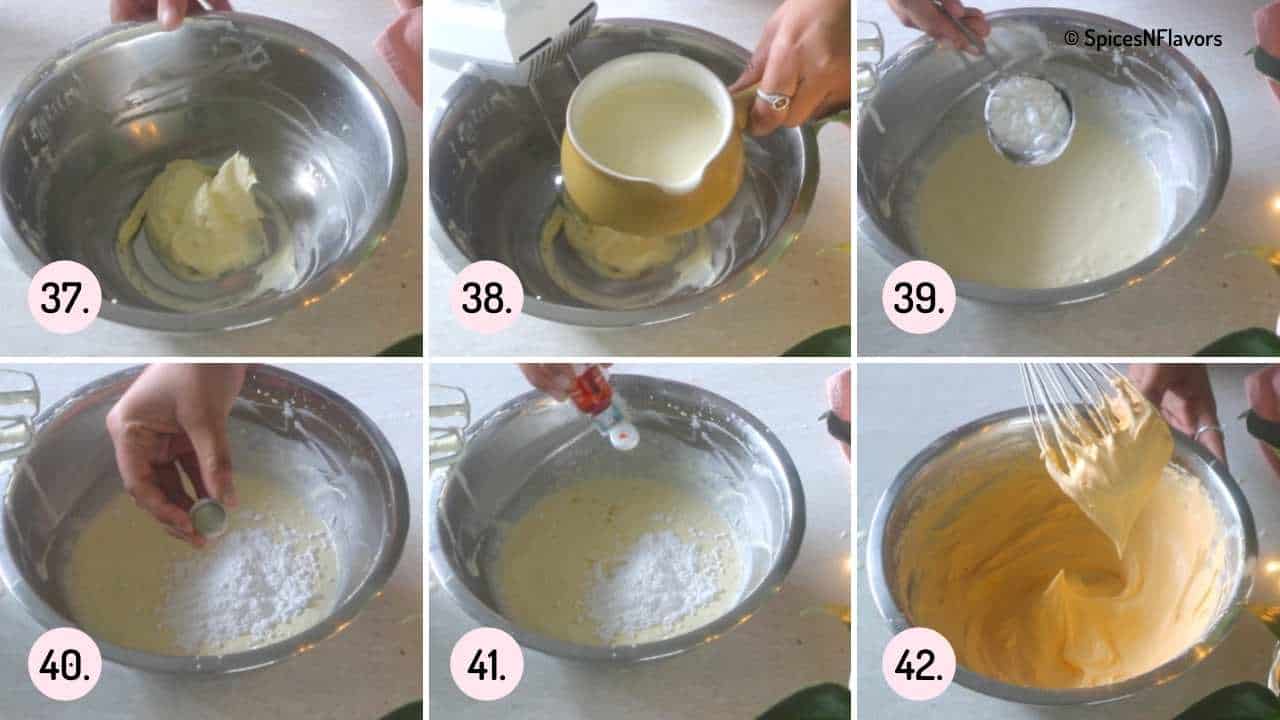
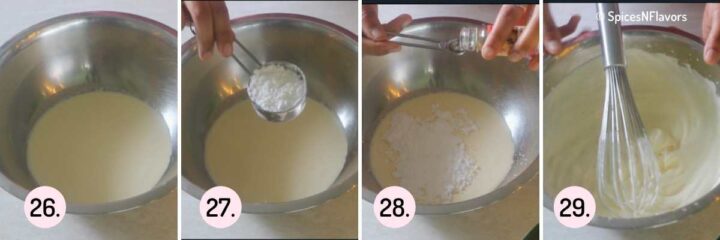
Beat the softened cream cheese until smooth. (image 37)
I have a detailed video on how to make stabilised whipped cream you can watch that for detailed instructions.
Then whisking continuously add the cream, mix that through (image 38)
Finally sugar, Rabdi essence and a bit of orange colour. (image 39 - 41)
Whip the cream until stiff peaks. (image 42)
Transfer it to a piping bag with round nozzle and frost the cake with the same.
To level the cake we will be using acetate paper, this is easily available at stationery stores, I have shown you the Modak Cake using the same technique before.
For this cake you have to start at the base and proceed upwards for a smooth finish. Watch the video tutorial for a visual understanding.
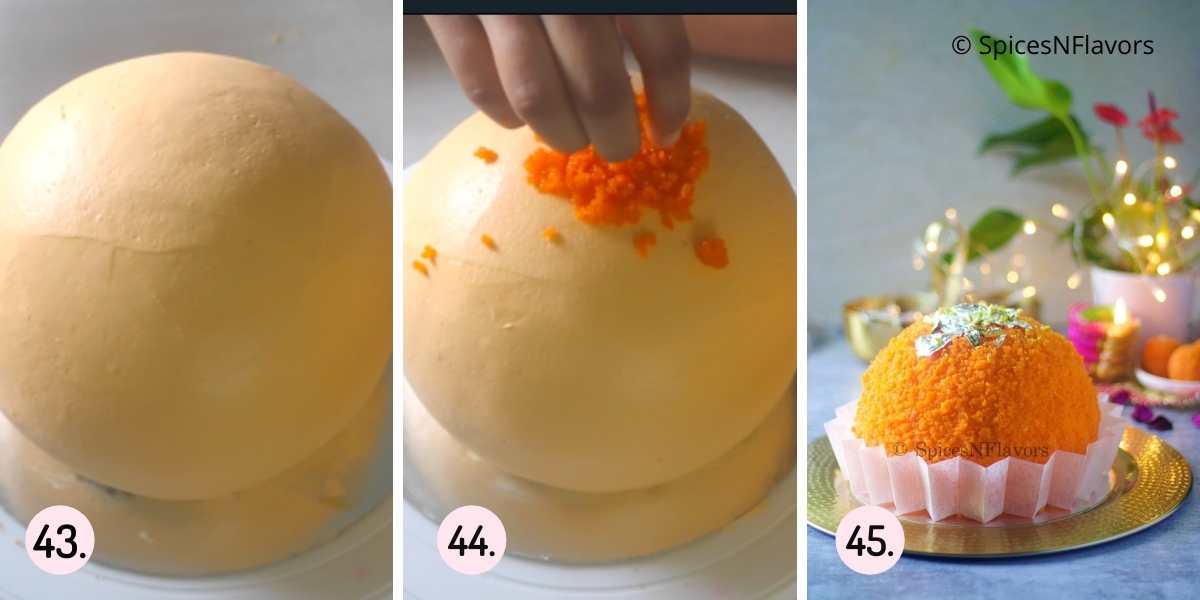
Once you are happy with the shape of the ladoo simply cover the entire cake with ladoo crumbs. (images 43 - 44)
The only thing to note is to not press the ladoo crumbs too much as you will lose that typical grainy and coarse exterior of the laddu.
To make it look authentic we would decorate it with parchment paper. Just fan the paper and make a circle of it around the ladoo.
Stick the ends of the parchment paper with some glue.
Top the ladoo with edible silver foil and slivered nuts and voila your Motichoor Ladoo Rabdi Cake is all ready to be devoured.
Recipe Tips:
- Always line the base of the cake pan with parchment paper so that the cake does not stick to the pan once baked.
- The right way to avoid over mixing of the cake batter is by adding the dry ingredients in two batches. Add the second batch when the first batch is not completely mixed. This is explained even better in our ebook. Click here to download for free.
- Once baked, do not allow the cake to sit in the cake pan for long as due to condensation the base of the cake will go soggy.
- While making the sugar syrup, boiling it for longer will thicken the syrup and your cake wont absorb the syrup and will remain dry.
- It is always advisable to taste the ingredients first. In this case taste the pineapple first and then adjust the addition of lemon juice to ensure it is perfectly sour before adding it to the milk mixture.
- Over-beating the whipping cream will lead to curdling of it. So whip to the right stage.
- Using a dowel will provide stability to the cake.
- Do not press the ladoo crumbs way too much on top of the cake. Or else you will lose the coarse and grainy look of the ladoo.
Storage instructions (Shelf Life)
This cake will stay good in the fridge for 4-5 days.
Recipe FAQ's
No this cake is not overly sweet. The pineapple cuts down the sweetness without overpowering the rabdi and ladoo layer.
Yes ofcourse. You can make it as a regular tier cake instead of a ladoo shape cake. For a 6 inch cake, you can follow the recipe from our butterscotch cake by replacing the butterscotch essence with rabdi essence. The filling and frosting measurements mentioned in this recipe would be sufficient for the tiered cake too.
More Indian Fusion Dessert Recipes:
Wish to Join US for the love of BAKING? Subscribe to our newsletter and Youtube channel. Follow along on Facebook, Instagram, and Pinterest for all the latest updates!

Motichoor Ladoo Rabdi Cake
Ingredients
For the Cake Base
- 1 cup (120 gms) APF/Maida
- 2 tbsp Custard Powder
- 1 tsp Baking Powder
- 1/4 tsp Baking Soda
- 1/4 tsp Salt
- 3/4 cup (184 gms) Yogurt
- 1/3 cup (70 gms) Sugar
- 1/4 cup + 2 tbsp (82 gms) Oil
- 3 tbsp Milk
- 1/2 tsp Rabdi Essence
Sugar Syrup
- 1/4 cup Sugar
- 1/4 cup Water
- 2 Cardamom Pods
Rabdi Layer
- 2/3 cup (165 gms) Milk
- 1/2 tbsp (5 gms) Custard Powder
- 2 tbsp Water
- 1/4 cup (75 gms) Condensed Milk
- 1/4 cup (62 gms) Ricotta Cheese
- 1/2 tsp Cardamom Powder
- 115 gms Pineapple crushed in juices (tin)
- Juice of half lemon
Whipped Cream Filling
- 1 cup + 2 tbsp (275 ml) Whipping Cream
- 1/4 cup Icing Sugar
- 1/4 tsp Rabdi Essence
Stabilized Whipped Cream Frosting
- 100 gms Cream Cheese
- 250 ml Whipping Cream
- 62 gms Icing Sugar
- 1/4 tsp Rabdi Essence
- 2 drops orange food colouring (optional)
1/2 kg Motichoor Ladoo
Instructions
Step 1 - Prepare the Cake Pan
- Place the sphere cake tin over a small tin so that nothing topples upon the addition of cake batter.
- Spray the pan with oil and line with a parchment paper. The video here explains an easy way to line the base with parchment paper. Set aside.
Step 2 - Prepare the Cake Batter
- Sieve together flour, custard powder, baking powder, baking soda and salt. Give a quick mix and set this aside while we work on the wet ingredients.
- In a separate bowl, whisk together the yogurt and sugar until homogenous. Then whisking continuously add in the oil, milk and rabdi essence.
- Once mixed, fold the dry ingredients into the wet in two batches, this ensures that there is no overmixing of the batter.
- Transfer the smooth batter into the prepared cake pan and bake in a preheated oven of 180 degree Celsius for 45 to 55 mins or until a skewer inserted in the centre comes out clean.
- Let this sit in the pan for another 5 mins and then invert over wire rack to release the cake. Allow it to cool completely.

Step 3 - Sugar Syrup
- To make the sugar syrup take sugar, water and gently crushed cardamom pods in a saucepan.
- Simply boil everything together until the sugar melts. Do not over boil. Take it of the flame, transfer to another container and allow it to cool too.


Step 4 - Rabdi Layer
- In a saucepan add in the milk and bring it to a boil. While the milk is boiling over in a separate bowl, combine together the custard powder and water to form a slurry. This is our thickening agent here.
- Once boiled add the condensed milk and ricotta cheese. Mix and again bring everything to a boil.
- At this stage add in the prepared slurry and cook until everything thickens well for about 4-5 mins. Transfer to a separate bowl. Cling wrap in a way that it touches the rabdi to avoid formation of skin on top. The rabdi will thicken further in the fridge.
- Meanwhile, blend some pineapples along with lemon juice without adding any water to a thick paste like consistency.
- Now take the chilled and thickened rabbi in a bowl, add the pureed pineapple and mix. The pineapples will cut the sweetness and also will provide freshness to the cake. But it is not so much that it will overpower everything else so rest assured.
- This is your rabid filling ready. Set this aside too.
Step 5 - Whipped Cream Filling
- In a mixing bowl, whip together whipping cream, icing sugar and rabdi essence until stiff peaks form.
Step 6 - Assemble
- Start by trimming the cake layer and dividing it into two. (To make a ball or ladoo shape we would need two half semi spheres, since I just have one pan I made one cake at a time to get 2 cakes. If you have two such pans then you can bake them together for the same time just by doubling the recipe quantities.)
- Trim and cut the other cake too. So now you will have two smaller size cake layer and two bigger size cake layers.
- Take the smaller one and trim the curved base to flatten it so that it is now stable to hold the rest of the layers. Apply some sugar syrup this would keep the cake moist for 3 to 4 days.
- In goes a quarter portion of the whipping cream and spread it evenly. Add a border with a cream as the rabdi is little free flowing this border will hold the rabdi in its place. 3 to 4 tbsp of rabdi and then spread that too.
- Crush some ladoo to make bondi and add a layer of it on top. Finally some slivered pistachios. One of the larger cake layer now goes on top. So repeat the process until we reach the very top.
- To secure everything into its place we would be placing a dowel in the centre.
- With whatever cream is left out crumb coat the cake. You need not be perfect here as this is just the base coat. Wipe the cake board and let it sit in the fridge for a minimum of 15 mins.
Step 7 - Final Frosting
- Beat the softened cream cheese until smooth.
- Then whisking continuously add the cream, mix that through Finally sugar, Rabdi essence and a bit of orange colour. Whip the cream until stiff peaks.
- Transfer it to a piping bag with round nozzle and frost the cake with the same. To level the cake we will be using acetate paper, this is easily available at stationery stores, I have shown you the Modak Cake using the same technique before.
- For this cake you have to start at the base and proceed upwards for a smooth finish. Watch the video tutorial for a visual understanding.
- Once you are happy with the shape of the ladoo simply cover the entire cake with ladoo crumbs. The only thing to note is to not press the ladoo crumbs too much as you will lose that typical grainy and coarse exterior of the laddu.
- To make it look authentic we would decorate it with parchment paper. Just fan the paper and make a circle of it around the ladoo.
- Stick the ends of the parchment paper with some glue. Top the ladoo with edible silver foil and slivered nuts and voila an amazing cake is all ready to be devoured.
Video
Notes
- I highly recommend watching the video tutorial and also the step by step process shots in the blog post before attempting this recipe.
- Always line the base of the cake pan with parchment paper so that the cake does not stick to the pan once baked.
- The right way to avoid over mixing of the cake batter is by adding the dry ingredients in two batches. Add the second batch when the first batch is not completely mixed. This is explained even better in our ebook. Click here to download for free.
- Cornflour can be substituted in place of custard powder in the recipe.
- Similarly in place of rabdi essence you can use rasmalai, kulfi, badam, pista or kesar essence. IF nothing is available simply add 1 tsp cardamom powder and saffron strands to the cake batter.
- Once baked, do not allow the cake to sit in the cake pan for long as due to condensation the base of the cake will go soggy.
- While making the sugar syrup, boiling it for longer will thicken the syrup and your cake wont absorb the syrup and will remain dry.
- It is always advisable to taste the ingredients first. In this case taste the pineapple first and then adjust the addition of lemon juice to ensure it is perfectly sour before adding it to the milk mixture.
- Over-beating the whipping cream will lead to curdling of it. So whip to the right stage.
- Using a dowel will provide stability to the cake.
- Do not press the ladoo crumbs way too much on top of the cake. Or else you will lose the coarse and grainy look of the ladoo.
- This cake stays good in the fridge for upto 5 days.
Alia says
Please elaborate on the substitution of ricotta cheese, how much milk powder and bread crumbs do I need to add? Please reply soon as I wish to make this on diwali
sushma iyer says
Hi Alia..
I have not tried this recipe with Milk Powder and Bread Crumbs but I do know for a fact that Instant Rabdi can be made with them and hence giving an idea for someone who wants to try. As of this recipe, guess you will have to experiment the same on your own. 🙂 Thank you for your interest wishing to see your trial on the same 😀