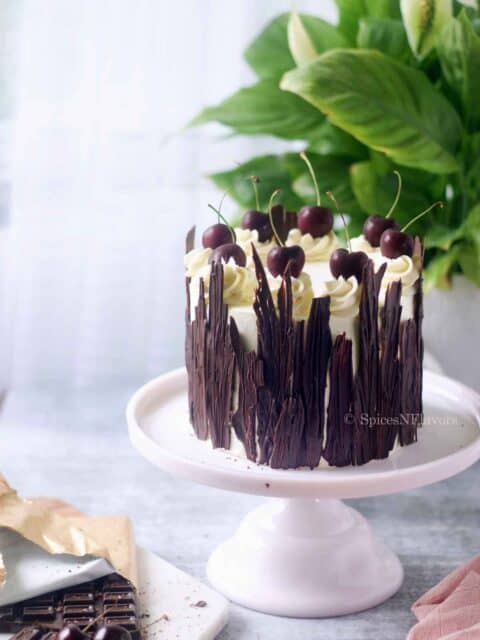
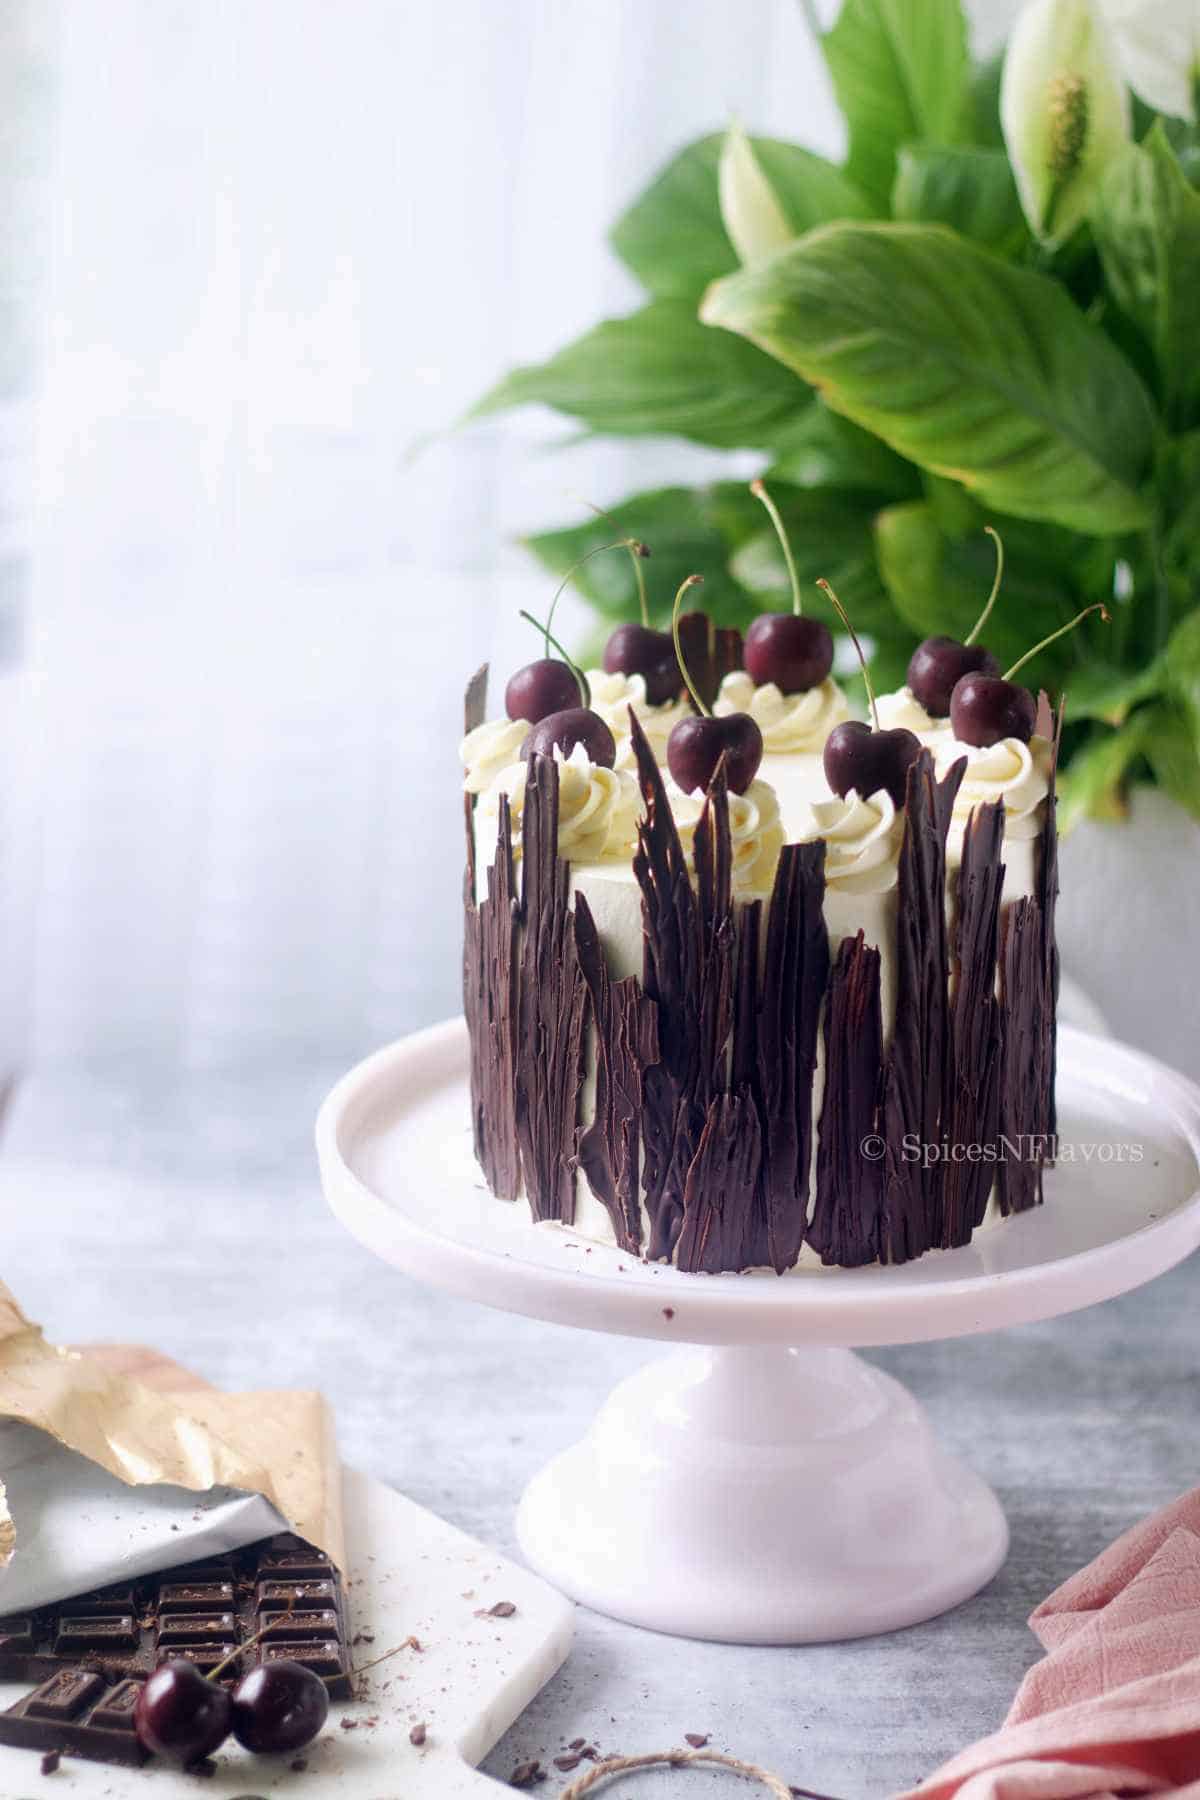
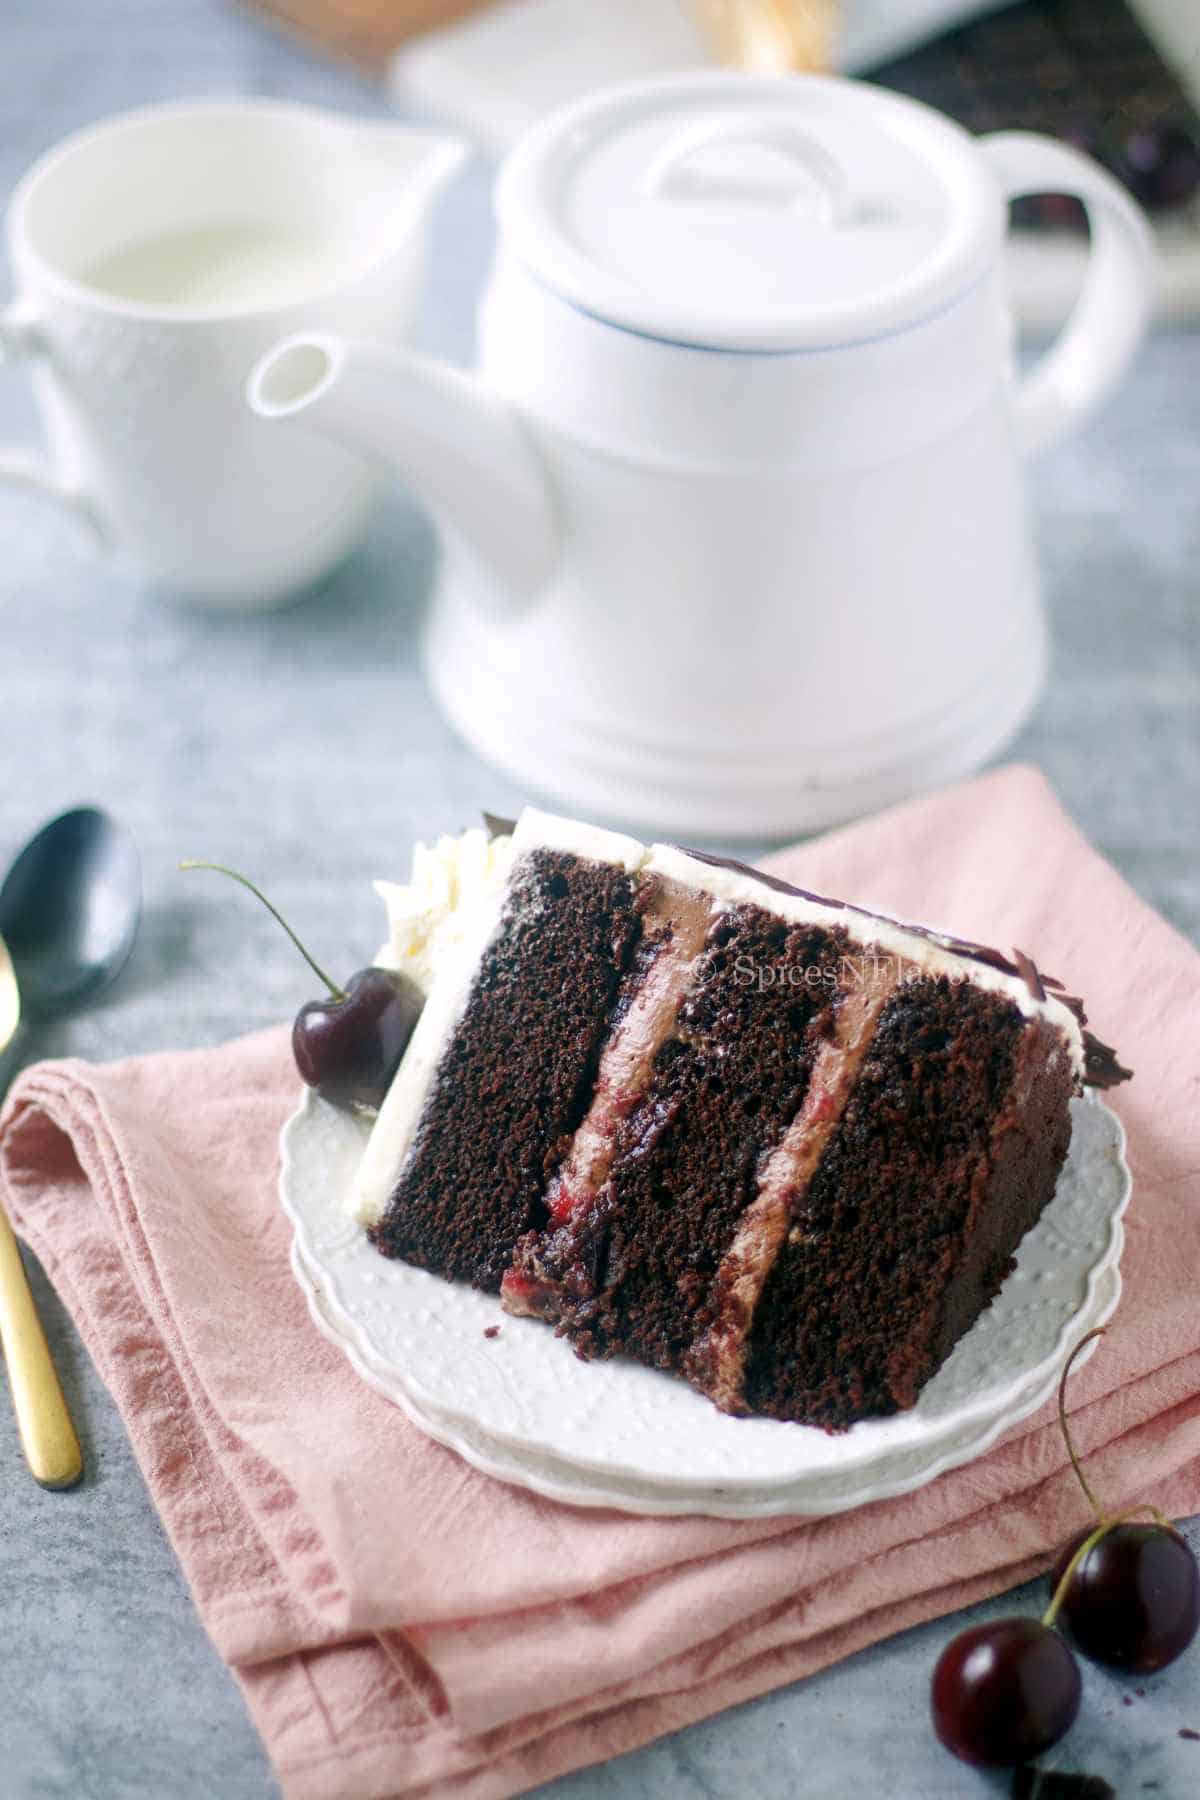
I bet you cannot stop at one; this Eggless Black Forest Cake has layers of moist chocolate with rich cherry filling and cloud like frosting.
Sharing the secret New Zealand bakery style Black Forest Cake recipe with you today!!
What is Black Forest Gateaux?
Call a Gateaux or a cake, Black Forest Cake (one of the most popular choice for birthday cakes) is basically a chocolate sponge cake filled with silky smooth chocolaty frosting topped with homemade cherry pie filling and frosted with cloud like, light and smooth and airy whipped cream frosting dressed in chocolate barks; would tempt you to have just one more slice every single time.
Originated in Germany after a dessert named Schwarzwälder Kirschtorte. Kirschtorte is basically an alcoholic beverage made from sour cherries.
So Black Forest Cake is basically a cake known for its feather like whipped cream frosting and also the cherry liqueur.
Why make this recipe?
- This cake has an eggless chocolate cake base unlike the traditional ones making it perfect for anyone with allergies or simply do not eat eggs.
- Have shared both the alcoholic and non alcoholic version in this recipe.
- But the secret is; this recipe was one of our assessment lessons from the baking school that I went to. So this is an authentic New Zealand Bakery style Black Forest Cake recipe just adapted to make the eggless version.
Ingredients Needed:
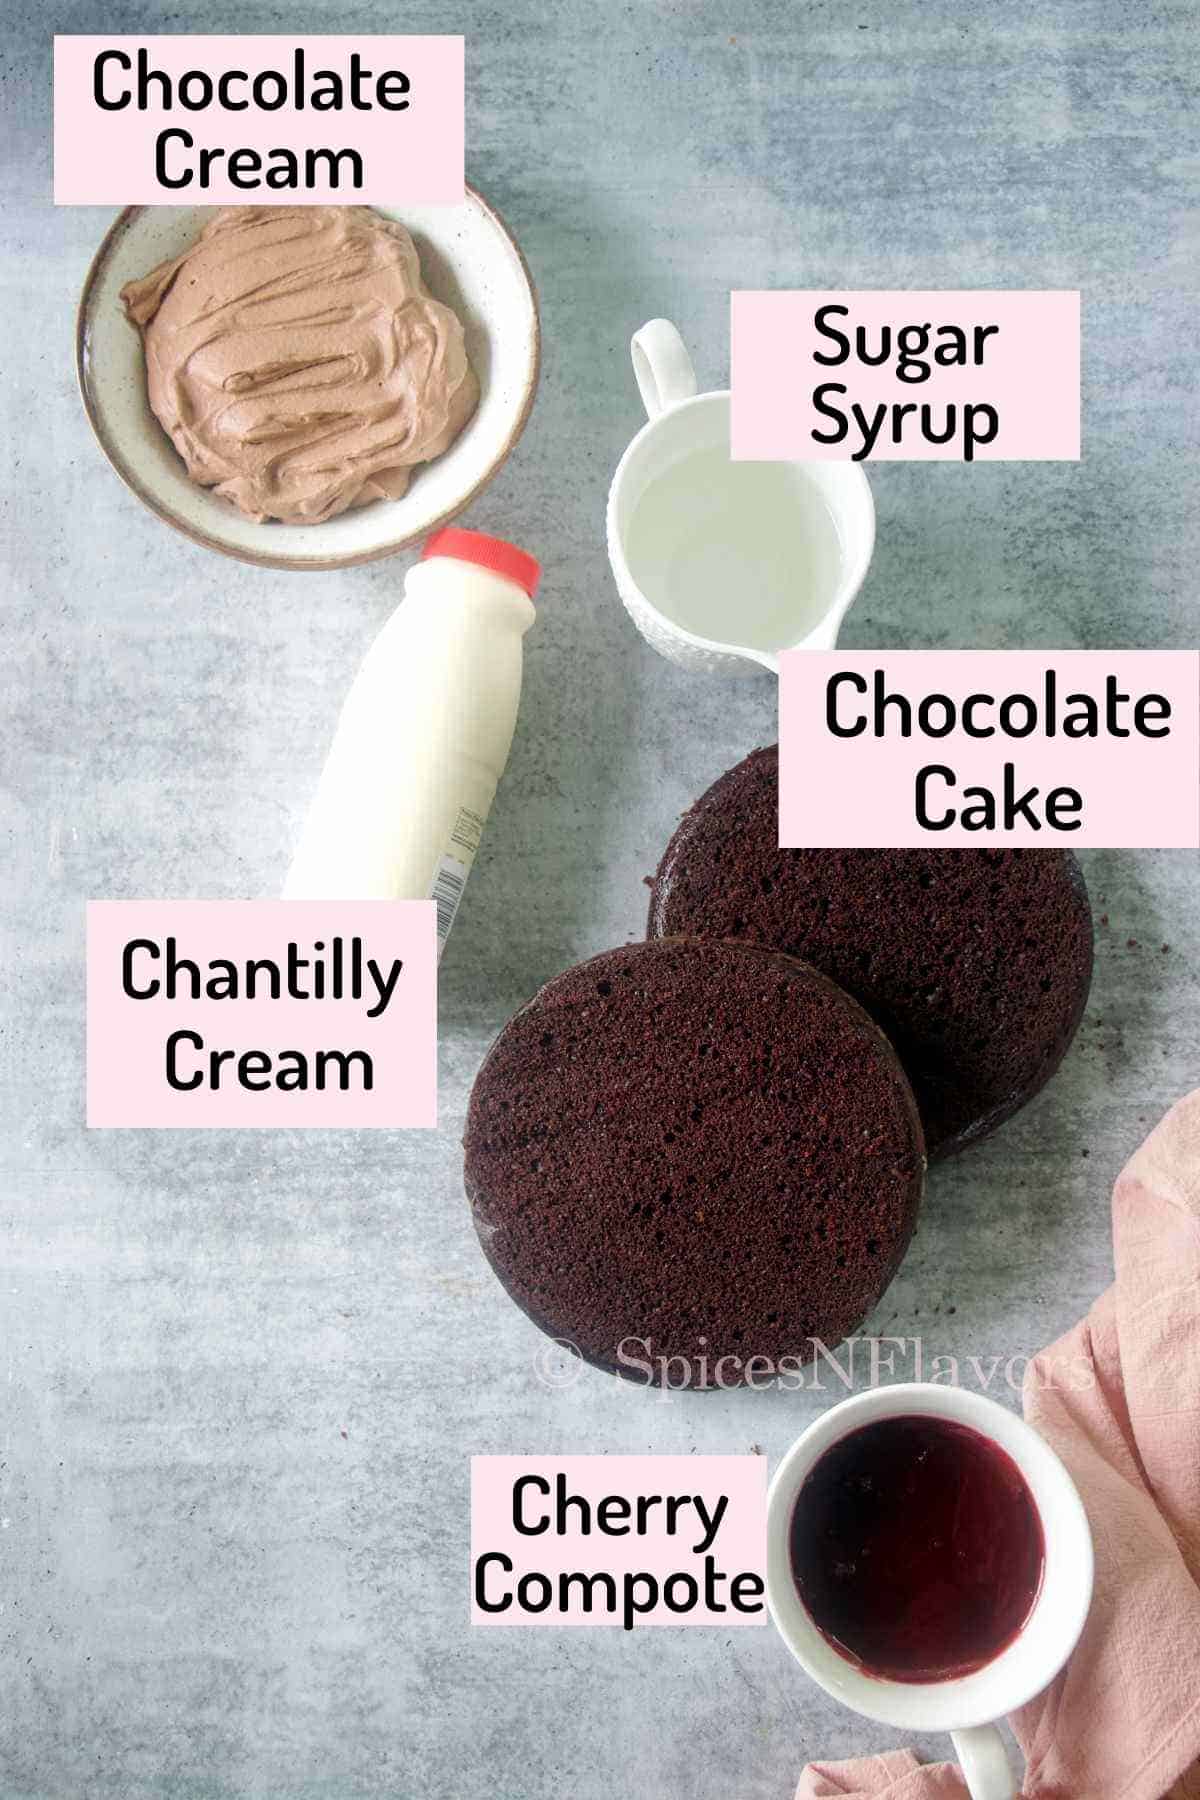
The picture above outlines the things you need to build the cake. Please note that the recipe covers in depth about how to make each element from scratch.
Since this recipe has a lot of components I thought it would be ideal to post the elements needed as sharing each and every ingredient might intimidate few.
- Chocolate Cake: As mentioned I am using the eggless cake base. You can use your favourite chocolate cake recipe here or even use my chocolate hot milk cake instead.
- Whipped Cream: Ideally black forest cake calls for whipped cream for filling as well as for frosting. But in my baking school, we did chocolate flavoured whipped cream for filling and chantilly cream for the frosting so that is what I am sharing here.
- Cherry Compote: Call it cherry compote or cherry pie filling. It is basically fresh or frozen cherries cooked till thickened. Now certain recipes just call for adding chopped cherries well let's be honest that is not a Black Forest Cake now. You need to prepare your filling.
- Cherry liqueur: I am making the non alcoholic version here, however I have mentioned at what step you need to add the liqueur, how much and cook for how long in the recipe card.
Step by Step instructions:
There are actually 5 basic steps to make Eggless Black Forest Cake:
- Baking the cake base
- Preparing the Sugar Syrup (alcoholic or non alcoholic is upto you)
- Chocolate Whipped Cream filling
- Preparing Cherry Compote
- Whipped Cream Frosting
I am not including the step for decorating Black Forest Cake as I leave it upto you. You can go for a simple design using chocolate shavings or make chocolate barks as I have shared.
Step 1: Prepare the Cake Base
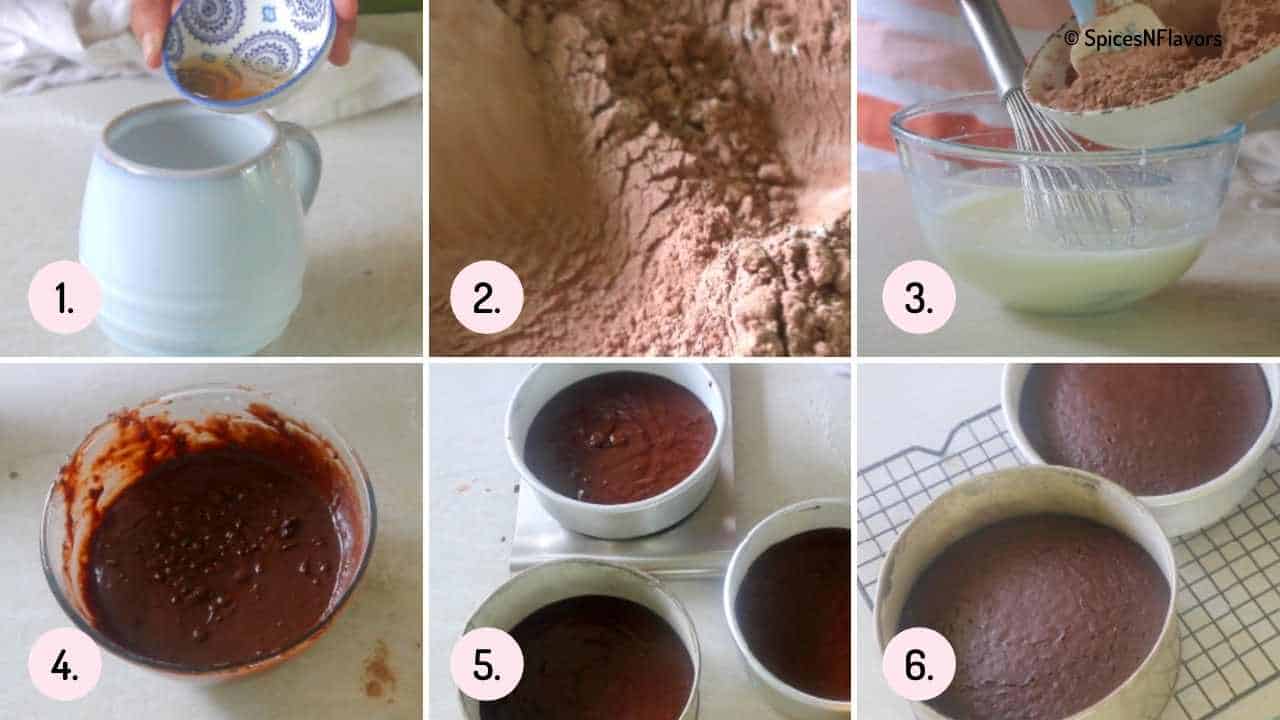
Add the vinegar to the warm milk. Stir and let it sit for 5 mins. (This is how you DIY Buttermilk at home) (pic 1)
In a separate bowl, sift together the flour, cocoa powder, baking soda and salt. Set aside (pic 2).
In another bowl add the now curdled milk. Whisking continuous add the sugar followed by oil. Combine until homogenous.
Now transfer the dry ingredients in two batches into the wet and mix until you get a cake batter like consistency (pic 3-4).
Divide it evenly between 3, "6 inch" cake pans and bake in a preheated oven of 180°C for 35 to 45 mins or until a skewer inserted in the centre comes out clean (pic 5-6).
Let it sit in the pan itself for 3 mins and then invert to release the cake onto a wire rack and allow it to cool completely before proceeding.
Step 2: Sugar Syrup
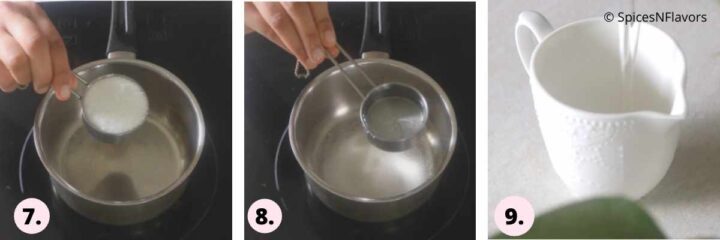
In a saucepan, combine together the water and sugar and heat until the sugar is dissolved and combined. No need to boil it (pic 7-9).
How to make Alcoholic Black Forest Cake
If you want to include alcohol in your cake then this is the stage when you do it.
Add 50ml Kirsch Liqueur along with the sugar and water and allow the sugar to dissolve completely.
Please note that alcoholic content simply evaporates upon heating and what you will be left with is just the flavour of the alcohol.
If you want a really strong flavour then do not allow the alcohol to boil too much or add it once the sugar syrup is ready.
Step 3: Cherry Compote
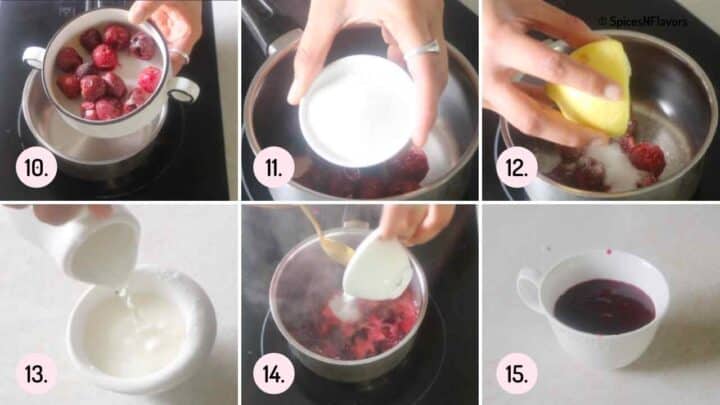
In a saucepan, combine together the pitted cherries, sugar and lemon juice. Cook until the cherries soften. Make sure to stir at all times on med flame (image 10-12).
While that is cooking, on to the side dissolve in the cornstarch in water and keep it ready (image 13).
Once the cherries are softened, do a taste test to adjust.
If it is too sweet add more lemon juice and if it is tart then add sugar to get the perfect balance.
Finally add the cornflour mix and stirring continuously allow the compote to thicken. It would hardly take 3 to 4 mins or even less.
Once thickened transfer it to another container, cling wrap in a way that it touches the compote (this helps prevent the formation of skin on top) (image 14-15) .
Allow it to cool completely. The compote will thicken further upon cooling.
Two types of Cherry Filling:
We used two types of cherry filling in the cake.
- Barkers Cherry filling - these cherries are sweet by nature
- Morello Cherries - these are little tart
That way we get both sweet and tart flavour in the cake.
However I have adjusted the recipe to suit what would be easily available in the grocery store. If you have accessibility to both the type the please do use by all means.
Step 4: Chocolate Whipped Cream
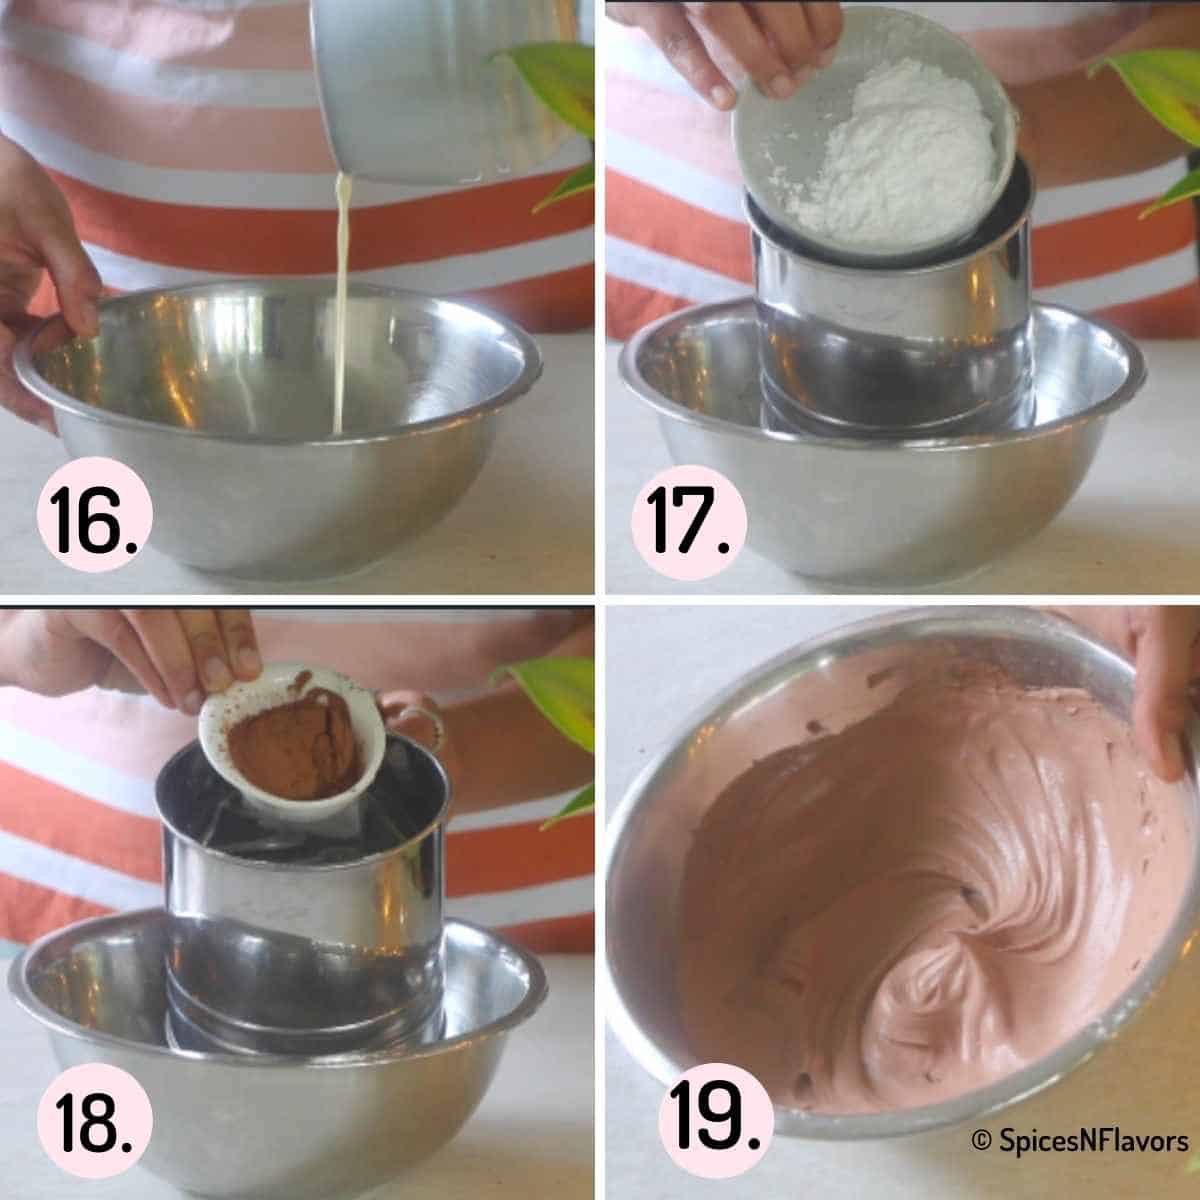
In a bowl, combine together cream, icing sugar and cocoa powder. Whisk until stiff peaks form (images 16-19).
Step 5: Assemble the Cake

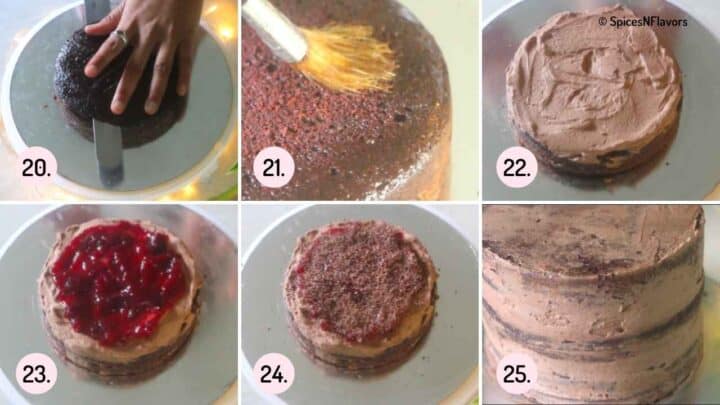
Trim the caramalized part of the chocolate cake. Soak it with sugar syrup taking care to soak the edges well as that is the part that tends to dry out quicker.
Add in 1/3rd of the prepared chocolate whipped cream followed by half of the cherry compote and chocolate shavings.
Repeat the layers until you reach the very top.
With what cream is left crumb coat the cake and let it chill for 30 mins (pic 20 -25 ).
Step 6: Final Frosting
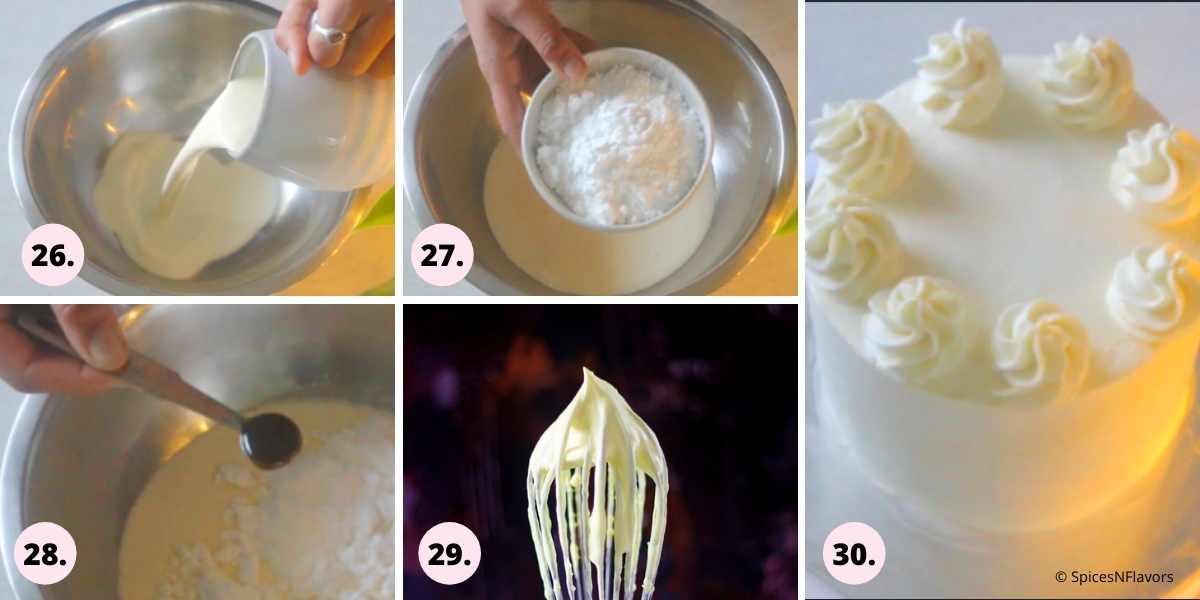
In a bowl whip together whipping cream, icing sugar and vanilla bean paste until stiff peaks form.
Spread it around the chilled cake and go over 2 to 3 times with your bench scraper until you are satisfied with the finishing (pic 26-30).
Consider checking the detailed post on Stabilized Whipped Cream 101 for more details.
You have your blank canvas now ready. Decorate it the way you like.
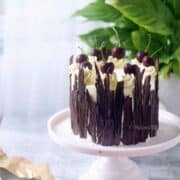
For my Eggless Black Forest Cake design I opted for the chocolate bars on the sides, a swirl on top and few fresh cherries and chocolate designs as garnishes.
To make any chocolate decoration the key is to have the consistency of melted chocolate in the right state. I generally prefer Instant Pot melted chocolate.
You can of course use stove-top too. This video on how to melt chocolates the right way would be so handy for you.
Enjoy your cake for any special occasion or make any day special with this Eggless Black Forest Cake.
Tips and Tricks:
- This recipe is perfect for 3, 6 inch cake pans or 2; 8 inch cake pans. If you are using any other pan size or you are using just 1 pan instead of 2 or 3 then in that case the baking time would vary accordingly.
- It is necessary to pre-heat the oven every single time you use it for baking. Please note that be it cake batter or bread dough it needs to enter the hot oven for the leavening agents to work properly.
- Do not over boil the sugar syrup and thicken it, you want it to be thinner consistency so that the cake can soak it well.
- Use pitted cherries to make the compote so that you have a smooth compote without seeds in them.
- Each batch of cherries are different even if you use them from one single packaging as each cherry would be hand picked at a different stage of ripening. So it is always advisable to taste test the compote to adjust the sweetness or tartness accordingly as mentioned in the post.
- Wrapping the cling wrap over the compote in a way that it touches the surface of the compote prevents the formation of skin on top.
- You can skip the chocolate whipped cream frosting and instead use the chantilly cream to both fill and frost the cake if you like.
- Resting the cake after the crumb coating stage ensures that the cream sets properly.
- Black Forest Cake is known for its light, smooth and air like frosting and that is the reason I have not made by stablized whipped cream frosting here as that is bit heavier comparatively. You can read this blog post to understand more about stabilized whipped cream frosting.
- Chocolate decorations are the key element in decorating the classic cake. Add some form of it in your cake design to get the traditional black forest cake look.
Storage Instructions/ Shelf Life:
Entire Frosted Cake: You can store the entire (uncut) cake in the fridge for upto 3 days. Once cut it would start getting dried out soon.
Unfrosted Cake: Once crumb coated, the cake needs to be refrigerated and it would be good for 2 to 3 days.
Cherry Compote: Cherry Compote can be made a week in advance and can be kept in the refrigerator. You can also freeze it for upto 2 months.
Chocolate Cake Base: The cake base layer can be stored at room temperature in an air tight container or by wrapping in cling wrap for upto 3 days.
You can store it in the fridge for upto a week and can be frozen for upto a month.
Whipped Cream: Whipped Cream cannot be stored as it will start losing its shape. It is recommended to whip the cream as and when need.
The uncut cake stays good for 3 to 4 days in the fridge. Once cut the inside of the cake tends to dry out so I would not recommend storing for more than 2 to 3 days.
FAQ's
Since the cake is frosted with whipped cream, this cake is not suitable for freezing. The texture of the cream changes upon freezing. You can try freezing individual slices but I will not recommend freezing the entire cake.
One of the most common questions that I get for all my cake recipes on Youtube is about the weight. I do not bake cake based on weight but prefer to calculate on the basis of serving. This cake would serve 10 people.
Majority of my readers here are home bakers and you would be interested in knowing the cost of black forest cake. I have a pricing guide coming up soon for you with which you can calculate the price of any dessert. So consider joining the waitlist to receive it by clicking here.
You can consider baking the cake in a cooker. The instructions for baking the cake in the cooker is included in a separate post. Please click here to read the instructions. The time to make it would be around 45 mins. Once the cake is baked, allow it to cool completely and follow the remaining steps as mentioned in the post.
Yes you can.
I have explained it in the step by step tutorial right above or you can also check the recipe card for the detailed explaination.
More Basic Cake Recipes:
Fusion Cake Recipes:
Wish to Join US for the love of BAKING? Subscribe to our newsletter and Youtube channel. Follow along on Facebook, Instagram, and Pinterest for all the latest updates!
Eggless Black Forest Cake
Ingredients
Eggless Chocolate Cake
- 1 3/4 cup APF/ Plain Flour/ Maida
- 1/2 cup + 2 tbsp Cocoa Powder
- 1 1/4 tsp Baking Soda
- 1/2 tsp Salt
- 1 1/4 cup Milk warm
- 1.5 tsp Vinegar
- 1 tsp Vanilla Essence
- 2/3 cup Oil
- 1 1/4 cup Sugar
Sugar Syrup
- 2 tbsp Sugar
- 2 tbsp Water
Chocolate Whipped Cream
- 3/4 cup (175 gms) Whipping Cream
- 1/3 cup (45 gms) Icing Sugar (refer notes)
- 2 tbsp (15 gms) Cocoa Powder, sifted
Cherry Compote
- 90 gms Pitted Cherries fresh or frozen
- 3 tbsp Sugar
- 3-4 drops Lemon Juice
- 1/2 tbsp Cornflour
- 2 tbsp Water
Chantilly Cream Frosting
- 1 1/4 cups (300 gms) Whipping Cream
- 1/2 cup (75 gms) Icing Sugar (refer notes)
- 1/4 tsp Vanilla Bean Paste
130 gms Chocolate for decoration or as needed
Instructions
Step 1 - Chocolate Cake Base
- Preheat your oven at 180 degree celsius.
- To your warm milk, add the vinegar, stir and let it sit for 5 mins to curdle.
- Meanwhile sift together the dry ingredients - flour, cocoa powder, baking soda and salt in a separate bowl. Stir and set aside.
- To the now curdled milk add the sugar and whisk well. Whisking continuously add the oil at a constant speed.
- Add the dry ingredients to the wet ingredients in two batches. Using the cut and fold method combine until you see no bits of dry flour remaining.
- Divide the cake batter equally between 3 pans that has been buttered, floured and pre-lined with a parchment paper.
- Bake in the preheated oven at 180°C for 35 to 45 mins or until a skewer inserted in the centre comes out clean.
- Allow it to sit in the pan itself for another 5 mins then invert on a wire rack and allow to cool completely.
Step 2 - Sugar Syrup
- Heat the sugar and water in a saucepan, until the sugar dissolves completely. No need to boil the syrup.
Step 3 - Chocolate Whipped Cream
- In a bowl, whisk together the cream, icing sugar and sifted cocoa powder until stiff peaks form. Set aside.
Step 4 - Cherry Compote
- In a saucepan, add the pitted cherries, sugar and few drops of lemon juice and cook until the cherries soften, the sugar is all dissolved and the mixture starts bubbling.
- At this stage, do a taste test and if you find that it is too sweet squeeze few more drops of lemon juice and if it is too tart add more sugar.
- In a separate bowl combine together the cornflour and water to make a slurry. Once you are happy with the taste of the compote add the cornflour slurry and stir continuously until the compote thickens.
- Take it out onto a separate bowl and cling wrap in a way that the wrap touches the surface of the compote.
- Allow it to cool completely.
Assemble the Cake

- Trim the top layer of the cake even if you have got a flat top.
- Soak the cake with sugar syrup specially around the corners.
- Add one third of the prepared chocolate whipped cream followed by half of cherry compote.
- I also sprinkled in some chocolate shavings on top of the cherries (simply grate the chocolate in a grater to make the shavings)
- Then place another cake layer and repeat the steps until you reach the very top.
- With the remaining one third of the cream do a crumb coating on the cake and let this sit in the fridge for 30 mins.
Step 6 - Chantilly Whipped Cream
- After 30 mins, whisk together the whipping cream, icing sugar and vanilla bean paste until stiff peaks form.
- Use this cream to frost the cake entirely.
- Using Wilton 1M tip make border on the top of the cake.
- Decorate the cake using chocolate shavings or chocolate barks like I have done today. Decorating the cake is totally up to you.
Video
Notes
- This recipe is perfect for 3, 6 inch cake pans or 2; 8 inch cake pans. If you are using any other pan size or you are using just 1 pan instead of 2 or 3 then in that case the baking time would vary accordingly.
- It is necessary to pre-heat the oven every single time you use it for baking. Please note that be it cake batter or bread dough it needs to enter the hot oven for the leavening agents to work properly.
- Do not over boil the sugar syrup and thicken it, you want it to be thinner consistency so that the cake can soak it well.
- Use pitted cherries to make the compote so that you have a smooth compote without seeds in them.
- Each batch of cherries are different even if you use them from one single packaging as each cherry would be hand picked at a different stage of ripening. So it is always advisable to taste test the compote to adjust the sweetness or tartness accordingly as mentioned in the post.
- Wrapping the cling wrap over the compote in a way that it touches the surface of the compote prevents the formation of skin on top.
- In my bakery school we used two types of cherries - sweet barkers cherry filling and tart morello cherries. I have adjusted the recipe to what ingredients are easily available in the local grocery store.
- You can skip the chocolate whipped cream frosting and instead use the chantilly cream to both fill and frost the cake if you like.
- Resting the cake after the crumb coating stage ensures that the cream sets properly.
- Black Forest Cake is known for its light, smooth and air like frosting and that is the reason I have not made by stablized whipped cream frosting here as that is bit heavier comparatively. You can read this blog post to understand more about stabilized whipped cream frosting.
- If you are using a non dairy based whipping cream which is already sweetened then you can consider skipping the icing sugar mentioned in the recipe.
- Chocolate decorations are the key element in decorating the classic cake. Add some form of it in your cake design to get the traditional black forest cake look. You can use Instant pot to melt the chocolates or watch this video on how to melt chocolates the right way on stove top.
- Start by making the cake.
- While the cake is baking, prepare your sugar syrup and cherry compote.
- Right before assembling the cake prepare the chocolate whipped cream.
- After 30 mins of crumb coating prepare the chantilly cream needed for the final frosting and then use it to frost and decorate the cake.
- Do not allow the alcohol to boil too long or
- Once the syrup is ready add the alcohol after that, mix and use.
SG says
Thank you for sharing this amazing recipe. Can we substitute Vinegar .. I am really interested in this but am allergic to eggs and vinegar. Thanks
sushma iyer says
Yes you can use lemon juice instead
Sonam says
Hi Sushma,
Can you please let me know the approximate baking time it would take if I used one single 8-inch tin. Thank you.
sushma iyer says
Around 40 to 45 mins 🙂
Shruti says
Hi Sushma
Just wondering can I double up your chocolate cake recipe as I will be using 10 inch pan ?
Thanks
sushma iyer says
Yes sure you can 🙂
Sani says
Hi lonely recipe can i use cherry in syrup, frozen and fresh not available here, thx
sushma iyer says
You mean tinned cherry in syrup?? If yes then if you like eating them on their own then you can definitely use them
Sonam Bhatia says
Hello Sushma,
I'll be trying out your black forest cake recipe as it looks perfect to me. I am not an experienced baker so planning to bake and keeps things ready ahead of time. Can you please let me know the cup measurement you have used in this recipe so I can follow it accurately in grams. Thanks in advance.
sushma iyer says
Hi Sonam.. 1 cup flour is 120 gms and 1 cup liquid is 250 ml 🙂
Arrti says
Hello Sushma. Thankyou for this lovely recipe. I made the cake on my husbands birthday. It was amazing. Not too sweet. The sponge was very easy to make and your detailed recipe made all steps easy to follow. Thankyou once again. A great recipe .
sushma iyer says
That sounds fantastic Arrti.. Glad that the recipe worked out well for you.. thank you for sharing your detailed feedback with us.. appreciate it 😀
Noreen says
Hi Sushma, thank you so much for sharing such an amazing recipe in great detail.
This is eggless version, how about if we want to use eggs, then how many it would be, also would it be better to beat eggwhites and yolk separately?
Thanks Noreen
sushma iyer says
Hi Noreen..
Thank you.. glad to know that you liked the recipe. yay!! And coming to your query as of now the egg based recipe is not on the blog yet but I am soon going to share the recipe will then update it to you. Sorry about that..
Haritha Ramesh says
Loved it 🥰🥰
sushma iyer says
Thank you Haritha.. <3