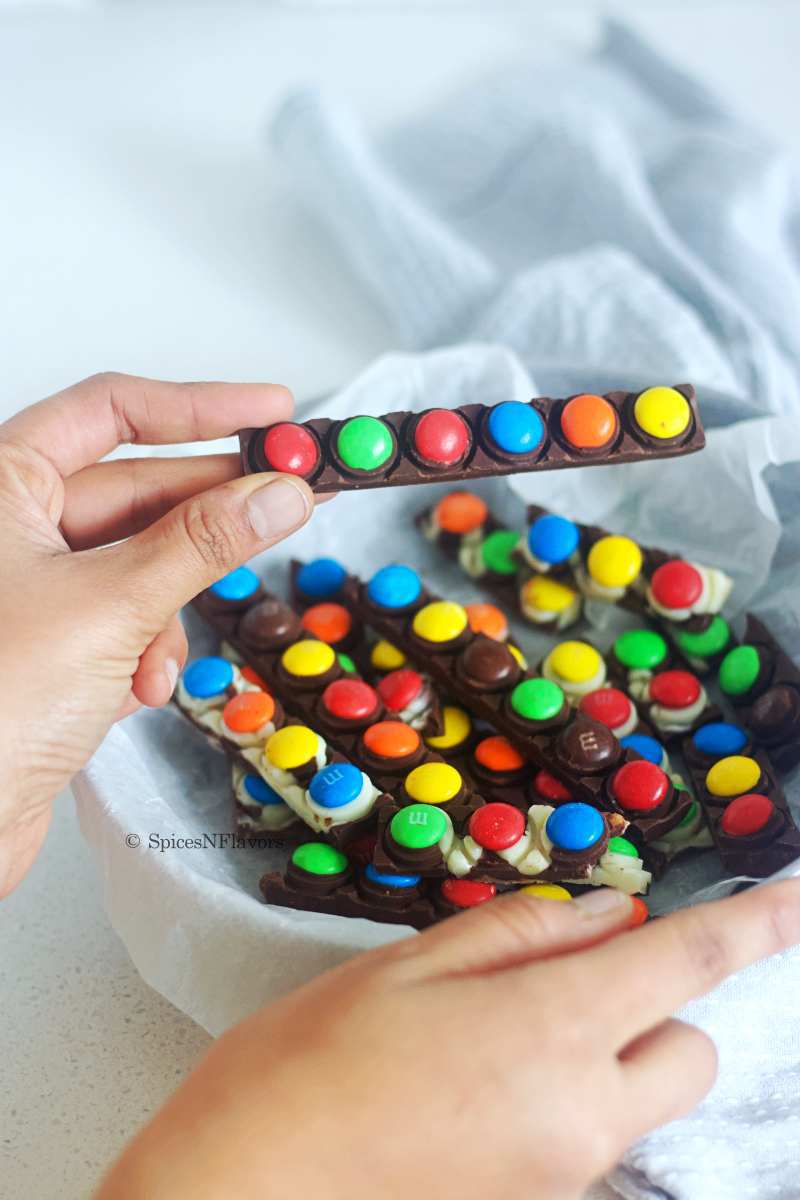
This Chocolate Pop it made using the Rainbow Pop it Fidget Toy is the next trending recipe that is taking the food industry by storm. You would be surprised to know that you just need 2 ingredients and less than 5 mins of your time to make it.
A ridiculously easy recipe to make!!
If you have still not heard about it, then girl seriously you are living under a rock.
So what is Chocolate Pop it?
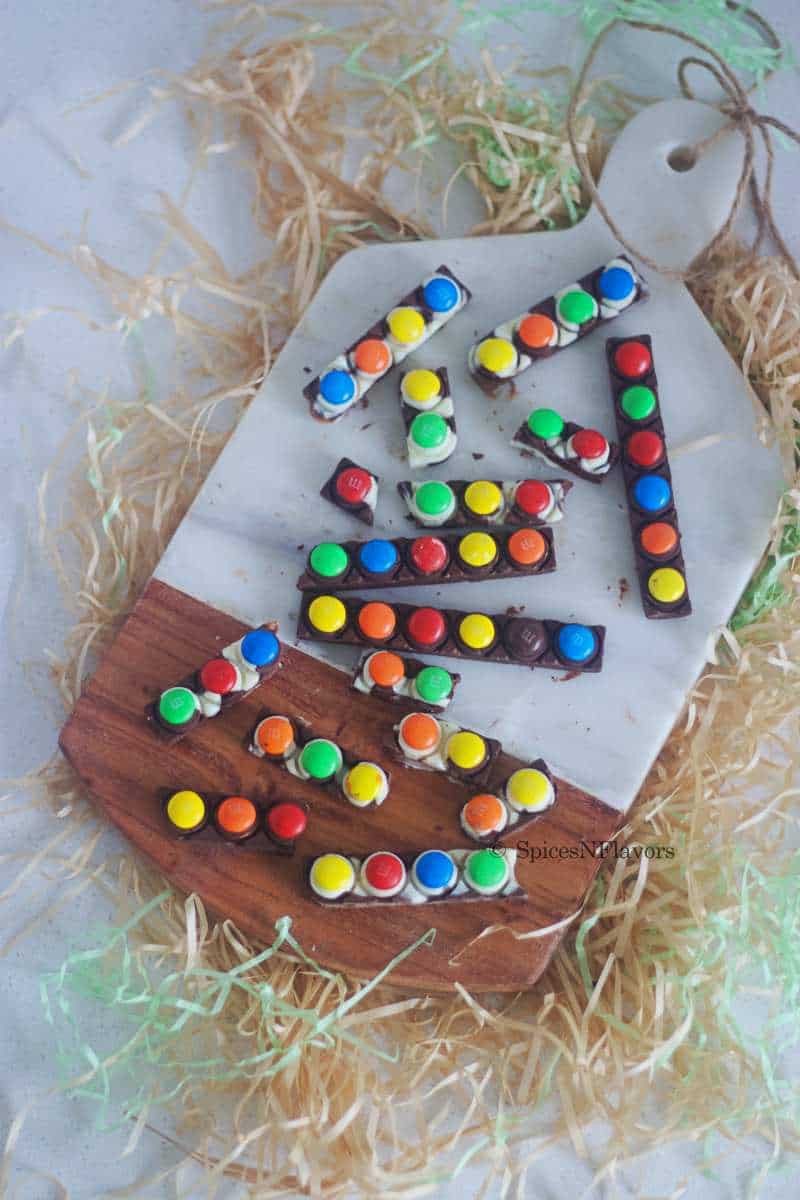
Rainbow Pop it Fidget is a toy designed to develop the sensory action of touch. It is game that has little tiny bubbles which you can push and "pop". As it is made of silicon it makes an amazing mould for creating some homemade flavoured chocolate bars that you can fondly call as "Chocolate Pop it" going by its name.
Things needed to make it:
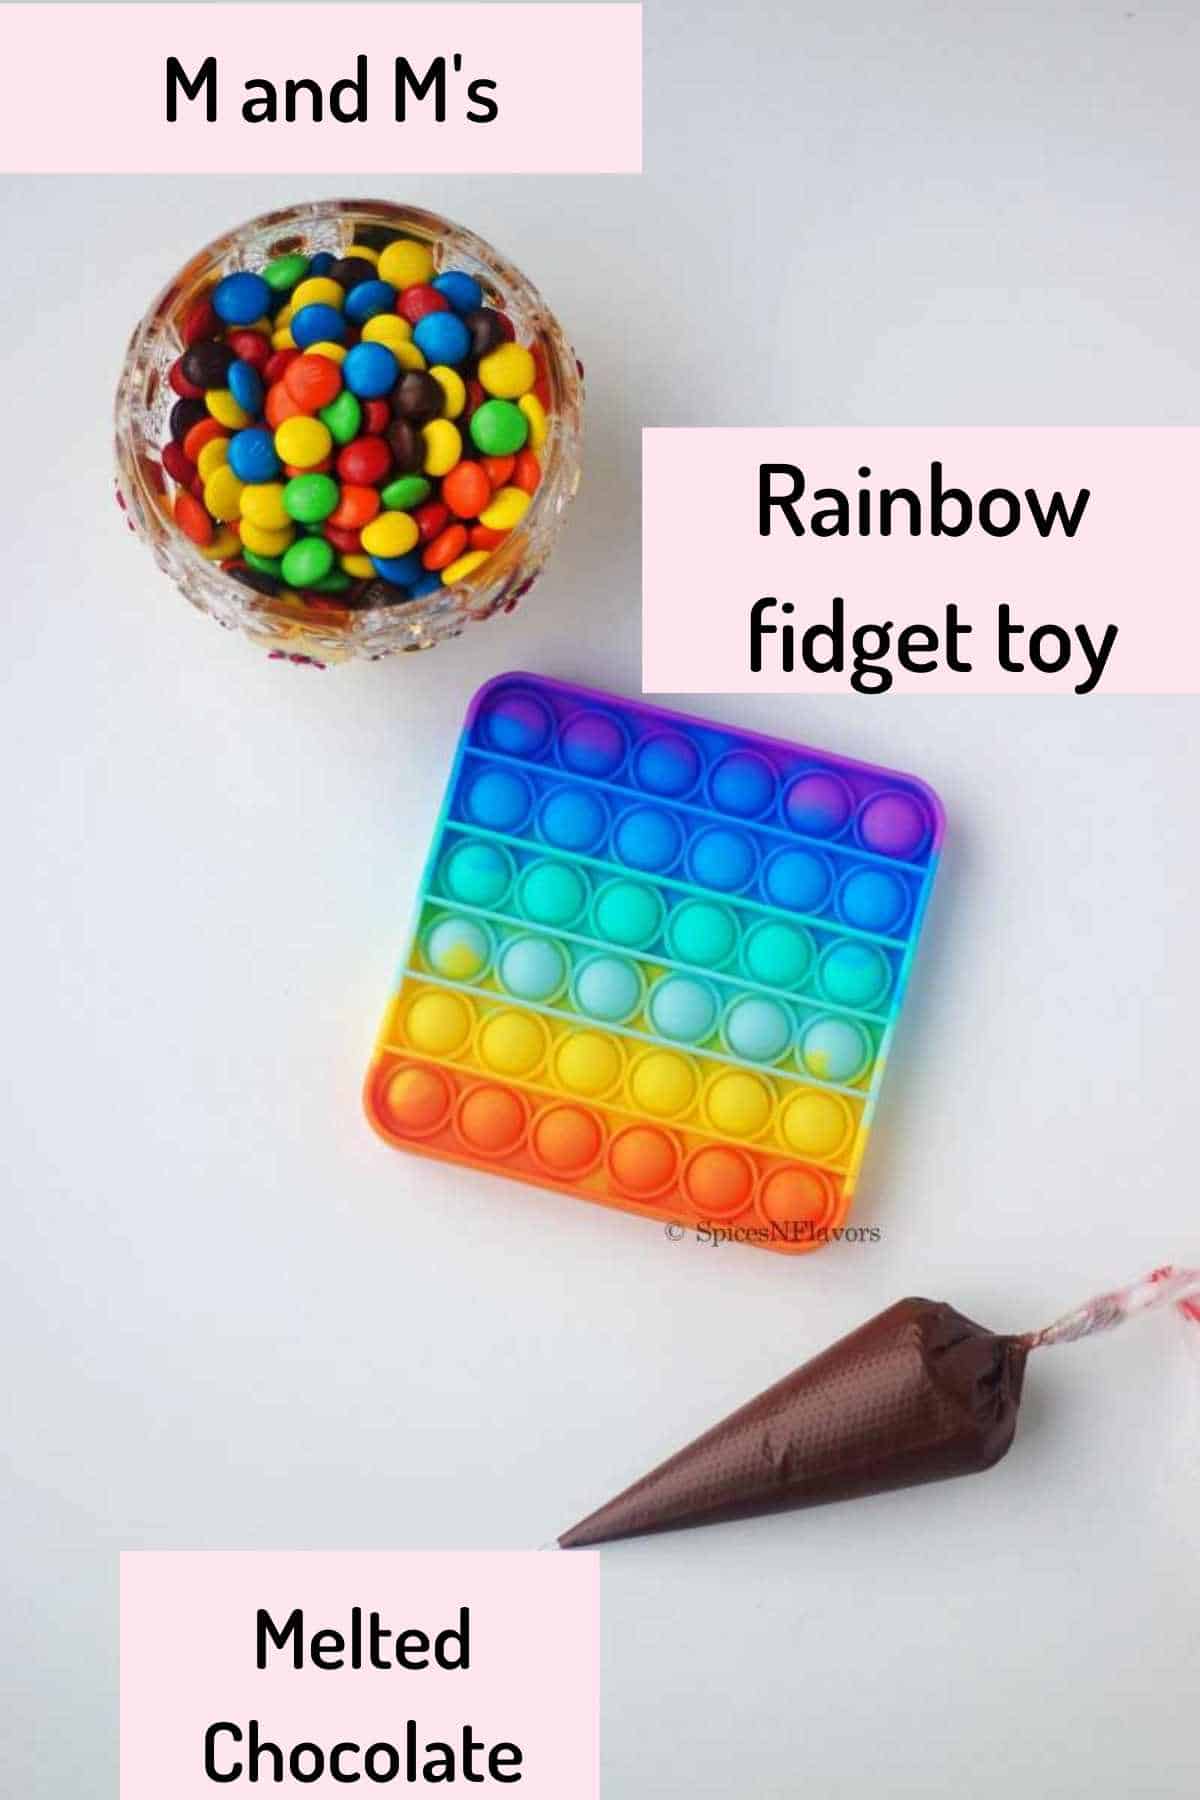
- Rainbow Pop it Fidget: Comes in different shapes and sizes. You can literally use any depending upon the theme you are going after.
- Chocolate: I have used compound chocolate melts here in dark and white. Feel free to use Milk Chocolate melts or a combination of any. If you are using couverture chocolate make sure to temper it before proceeding with the recipe.
- M and M's: Literally any variety like skillets, gems etc can be used.
Why make the Chocolate Pops?
- Customisable: Like I said as the fidget pop comes in variety of shapes, you can totally customise the shapes, colour and pattern to suit your theme.
- Theme Parties: Would make a perfect addition to any theme parties as it literally comes together in a matter of time.
- Home Schooling: Yes you read it right!! This would be a great way to teach your kids about traffic lights because of its shape. Just use red, yellow and green skillets or M and M's.
- Flavouring: Just add a flavour of choice to the melted chocolate and this could be another item that you can add to your home business menu.
- Tiktok Trends: Honestly Tik Tok trends are worth a try as they come together really quickly with amazing results.
Step by Step Tutorial:
Step 1 - Washing the Fidget
Whether you are buying a brand new one or borrowing it from your kids make sure to wash it before using them to make the chocolate pops.
Step 2 - Melt the Chocolate
I have shared the recipe for melting the chocolates so many times on this blog. You can do it by the double boiler method, microwave method or use your instant pot.
Click the respective links for detailed instructions on how to melt the chocolate right way.
Transfer the melted chocolate into a cone.
PRO TIP: Ensure that the chocolate is not hot at this stage as it might melt the cone or it might even melt the M and M's.
Chocolate should be in the melted state but not hot.
Step 3 - Assemble
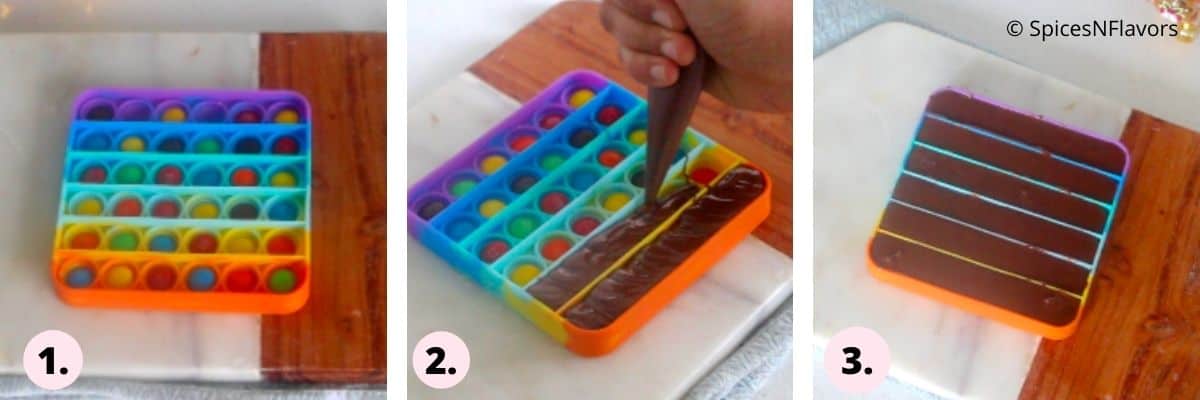
Add a layer of M and M's in colour of your choice in each bubble of your fidget toy.
Cover the bubbles with melted chocolate to form an even layer on top.
Tap gently to even the chocolate and also to remove any air bubbles
Refrigerate the fidget until the chocolate is just set (images 1-3).
PRO TIP: Remember not to refrigerate the chocolate for long or else it would sweat once you take it out. Refrigerate only till the chocolate is set and firm.
Step 4 - Demoulding
Work with gentle hands.
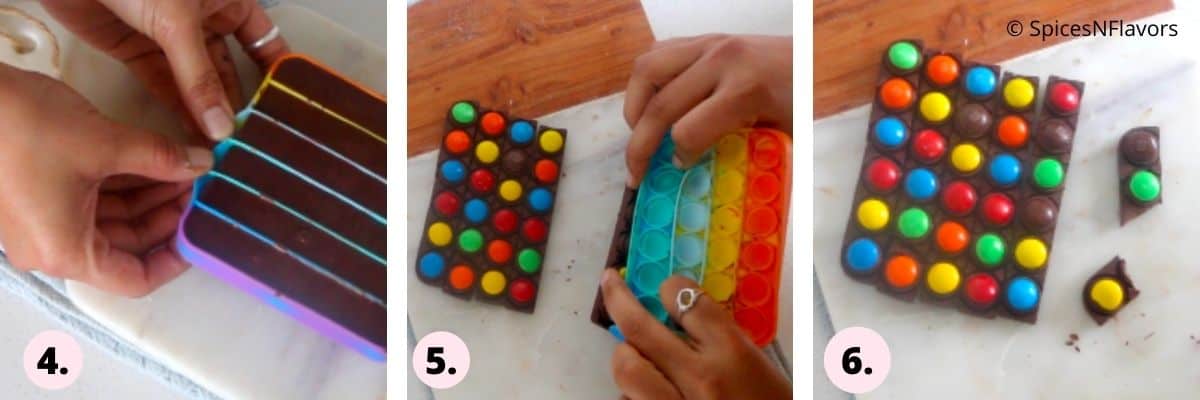
Pull the silicon mould away from all the four sides first before inverting it and laying it on to a flat surface (image 4).
Then gently pull the silicon mould towards you releasing the chocolate pops (image 5).
Please note as it is chocolate some of it might break if you apply too much pressure. So just be careful while unmoulding.
Leave it as it is or use it to decorate the sides of your chocolate cake.
Flavouring your Chocolates:
I have a separate post on how to flavour homemade chocolates you can take that as an inspiration to create many flavours of you choice.
Baker's Tips:
- Please note the temperature of the water (if using stove top version to melt chocolates) should not be boiling as that might seize the chocolate. It should be just warm enough to melt the chocolates.
- Again the temperature of the chocolate itself while pouring into the mould should not hot or else it might melt the M and M's.
- You should not refrigerate the pop it for long in the refrigerator or else the chocolate would sweat at room temperature and would not hold its shape for long. Refrigerate till the chocolate is just set and firm enough to unmould.
- While de-moulding do work with gentle hands. It is always a better idea to release it from the edges first and then unmould it completely. Too much pressure would break it so be mindful of that.
FAQ's:
I have used Dark and White Compound Chocolate melts here. You can use milk compound chocolate too. Make sure to use melts or cooking/baking chocolate for the recipe. Chocolate Chips won't melt easily and you won't be able to work with it. If you are using couverture chocolate, make sure to temper it first before proceeding with the recipe.
Please refer this post on 4 unique ways to flavour Homemade Chocolates for additional details.
You can use anything to flavour it - nutella, caramel sauce, food essence etc.
Related Recipes:
- How to Melt Chocolate the right way?
- Instant Pot Melted Chocolate
- Flavoured Homemade Chocolates
- DIY Smashable Chocolate Heart (Pinata Heart Cake)
Wish to Join US for the love of BAKING? Subscribe to our newsletter and Youtube channel. Follow along on Facebook, Instagram, and Pinterest for all the latest updates!

Trending Chocolate Pop it Recipe
Ingredients
- 150 gms Melted dark or white chocolate
- 36 M and M's
Instructions
- Wash your Rainbow Fidget Toy well before using it for the recipe.
- Add one MandM's in each bubble of the fidget toy.
- Top it with a layer of melted chocolate.
- Tap the fidget toy gently to even the chocolate and also to release any air bubbles.
- Refrigerate until the chocolate is set and firm.
- Release the sides of the silicon fidget toy first before inverting it on to a flat surface. Gently pull the silicon mould towards you to release the chocolate pop its or the chocolate bars.
- Enjoy it on its own or use it to decorate the sides of your chocolate cake.
Video
Notes
- To make a Marble Effect - use dark and white melted chocolate and randomly add a dollop of it in each rectangle. Make a swirl and refrigerate it to set. Unmould carefully to get a marble effect.
- Rainbow Colour - To make a Rainbow colour, colour your white chocolate in different colours and make the bars one of each colour or use the marble effect technique if you wish to use two or more colours in single row.
- In place of M and M's you can use Skillets or Gems.
- Please note the temperature of the water (if using stove top version to melt chocolates) should not be boiling as that might seize the chocolate. It should be just warm enough to melt the chocolates.
- Again the temperature of the chocolate itself while pouring into the mould should not hot or else it might melt the M and M's.
- You should not refrigerate the pop it for long in the refrigerator or else the chocolate would sweat at room temperature and would not hold its shape for long. Refrigerate till the chocolate is just set and firm enough to unmould.
- While de-moulding do work with gentle hands. It is always a better idea to release it from the edges first and then unmould it completely. Too much pressure would break it so be mindful of that.
- Wish to make one single pop it like the car in the picture below? In that case fill the fidget toy till the the brim with chocolate instead of just filling each rectangle and then follow the recipe as mentioned.
Leave a Reply