
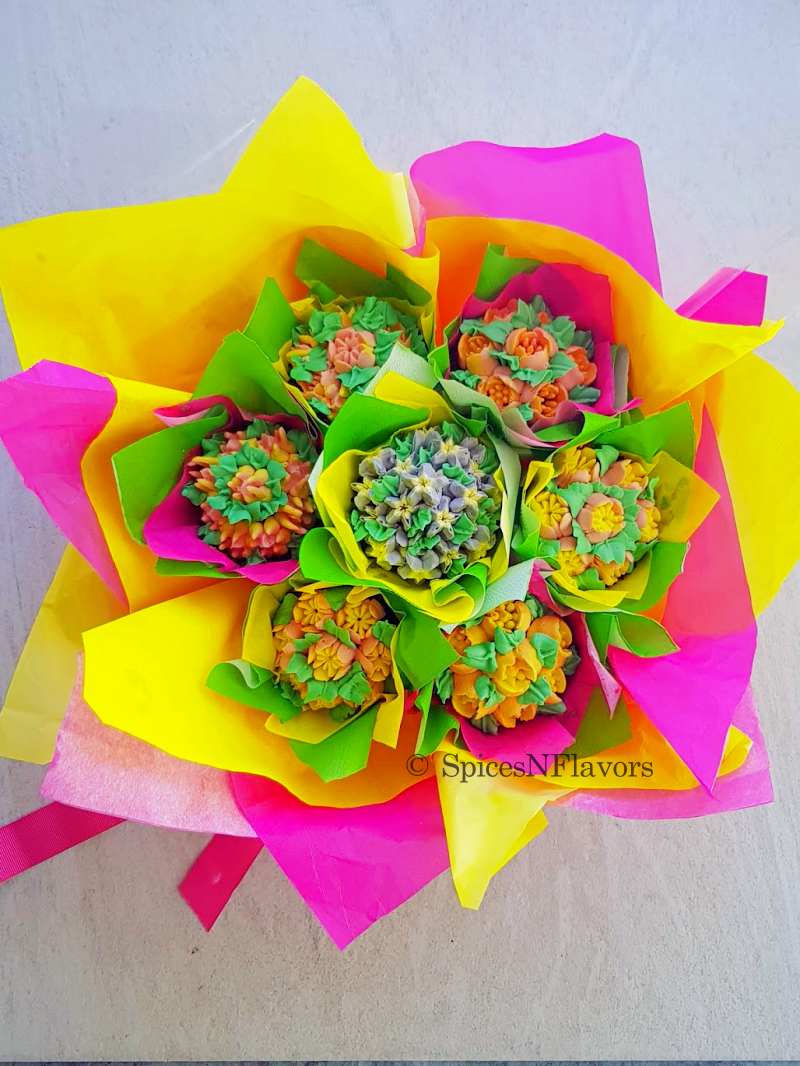
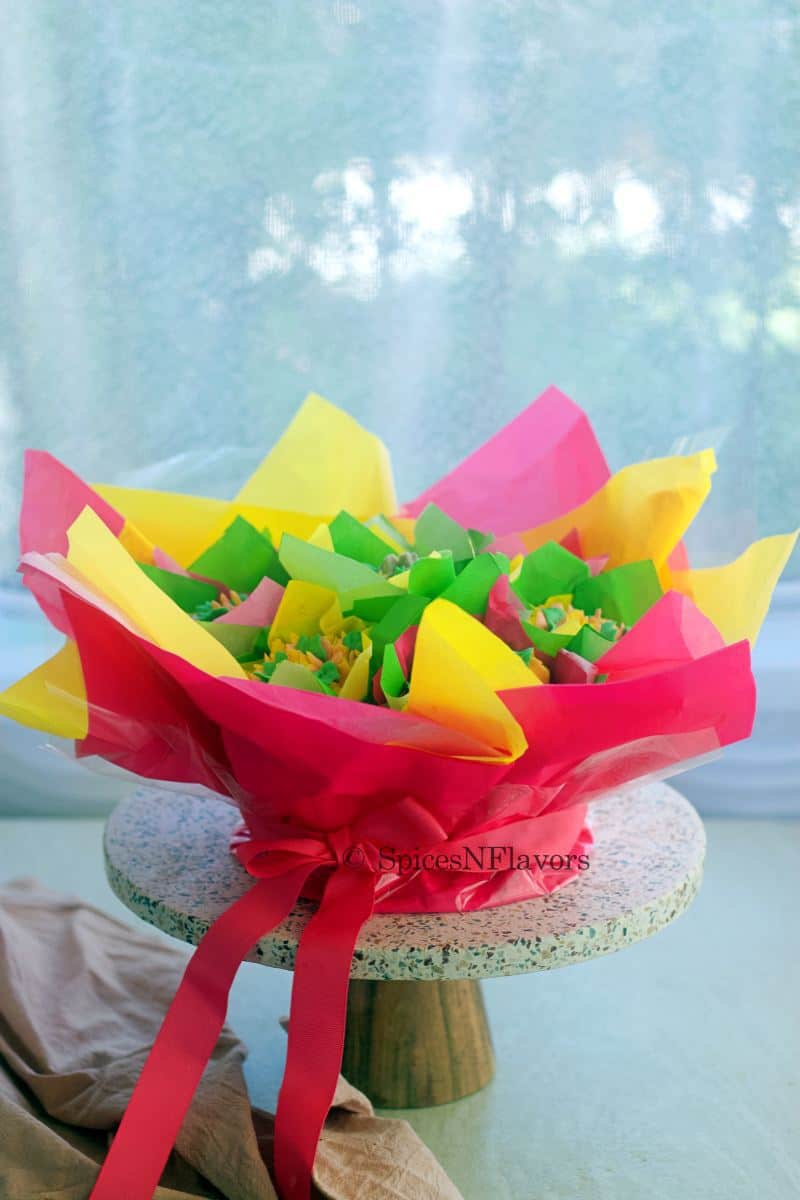
Cupcake Bouquet is one of the most elegant edible gift that you can consider gifting to someone be it on Mother's Day, Valentine's Day, Birthdays, Baby Showers or just any occasion. Find detailed step by step instruction for piping the cupcakes as well arranging it into a bouquet in the post.
What you will learn?
As intimidating as it may sound you won't believe how easy it is to make these bouquet using cupcakes.
I am trying my best to break this down in such a way that you will have all the list of things needed, recipe, frosting techniques etc in a step by step manner along with the mistakes that I made so that you will have an easy upper hand at making these.
Here is what you will learn:
- Recipe of the cupcakes and the frosting.
- Frosting technique to make the gorgeous looking flowers on top.
- Cupcake Bouquet Kit aka tools needed to make.
- How to arrange the cupcake to make it look like bouquet.
- The mistakes that I made so you don't make.
So let's divide the post into three parts:
- How to make the Cupcake Flowers?
- How to construct the Bouquet?
- Finally assemble everything.
Things you will Need:
- Cupcakes - As ridiculous as it may sound you would of course, need to make the cupcakes or you can also choose to buy them. I have used my favourite Eggless Chocolate Cupcake recipe. Feel free to use any of your choice like vanilla cupcakes, strawberry cupcakes etc.
PRO TIP: I would consider using a chocolate base cupcake for making these. Even though the cupcake would be covered by frosting on top, if by any change anything peeks out it would resemble the colour of soil owing to its chocolate colour and would look natural as if a flower is blooming from the ground.
- Frosting - I like to use my all time favourite 2 ingredient Buttercream Frosting for piping as it is much sturdier than the dairy base whipped cream. Feel free to use any frosting of your choice.
- Piping Nozzles - This being the third part in our buttercream series I have made use of Russian Nozzles to create the flowers. If you do not have one you can check the Part 1 Buttercream Flowers post where I have explained in much detail about how to pipe flowers using regular piping tips.
- Piping Bags - Some piping bags to hold your buttercream.
Colouring your Buttercream
Whenever you are making a simple bouquet like we did in the Buttercream flowers post or in this case a cupcake bouquet with plastic cups the key point to note is the choice of colour palette.
I would recommend using at least two colours to make your flowers.

This is very important specially if you are using Russian Nozzles as you can see there are intricate designs in them, so when you use dual colours then the petals would get one colour and the inner design would get another colour making it more attractive.
So do remember to divide your buttercream into different bowls and colour them lightly as I believe too much colour would make it look unnatural.
Green Buttercream: I would like to highlight this because no matter what you do make sure to dye a small amount of buttercream with green food colour.
As this is what would bring the whole cupcake design together which you will see in the step by step piping instruction and also helps in hiding the flaws.
How to Pipe using Russian Nozzles?

Start by attaching the desired nozzle to a piping bag (image 1).
Now instead of adding the buttercream all at once, take a small portion in a spoon or spatula and apply it on to the sides of the piping bag to create a cavity in the centre (image 2).
And fill the cavity with a second colour buttercream to get the dual piping effect (image 3).
So one particular colour on the sides of the piping bag and a contrasting colour in the centre of the piping bag.
I am using Pink and Yellow for making the first design.
Once the piping bag is ready do not pipe directly on the cupcakes.
PRO TIP: Do a test run on a parchment paper to allow the dual colours to merge and flow the right way through the nozzle.
Now take your cupcake and start piping.
The key to pipe using a russian nozzle is the pressure applied and the time.
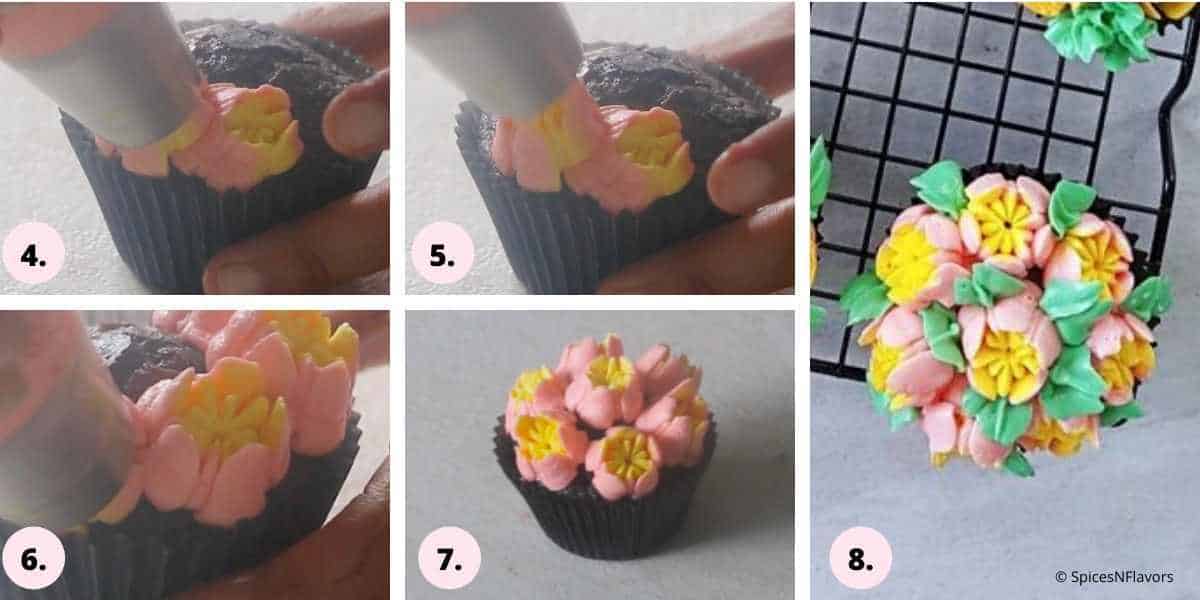
So start piping by applying some pressure and do not pull your hand immediately. Wait for few seconds giving the buttercream a little time to fold and sit on the cupcake, once you see that pull your hands upward and release (images 4-6).
The more you pull the bigger the length of the petals will be.
Repeat this until you cover the entire cupcake (image 7).
Do not panic if there are gaps or some of the petals broke.
Either you can wipe that one and pipe again or this is where the green buttercream that I mentioned above comes handy.
To a piping bag fitted with leaf tip add the green buttercream and start filling the gaps in the cupcakes by piping leaves (image 8).
You can also use it to hide any flaws like broken petals.
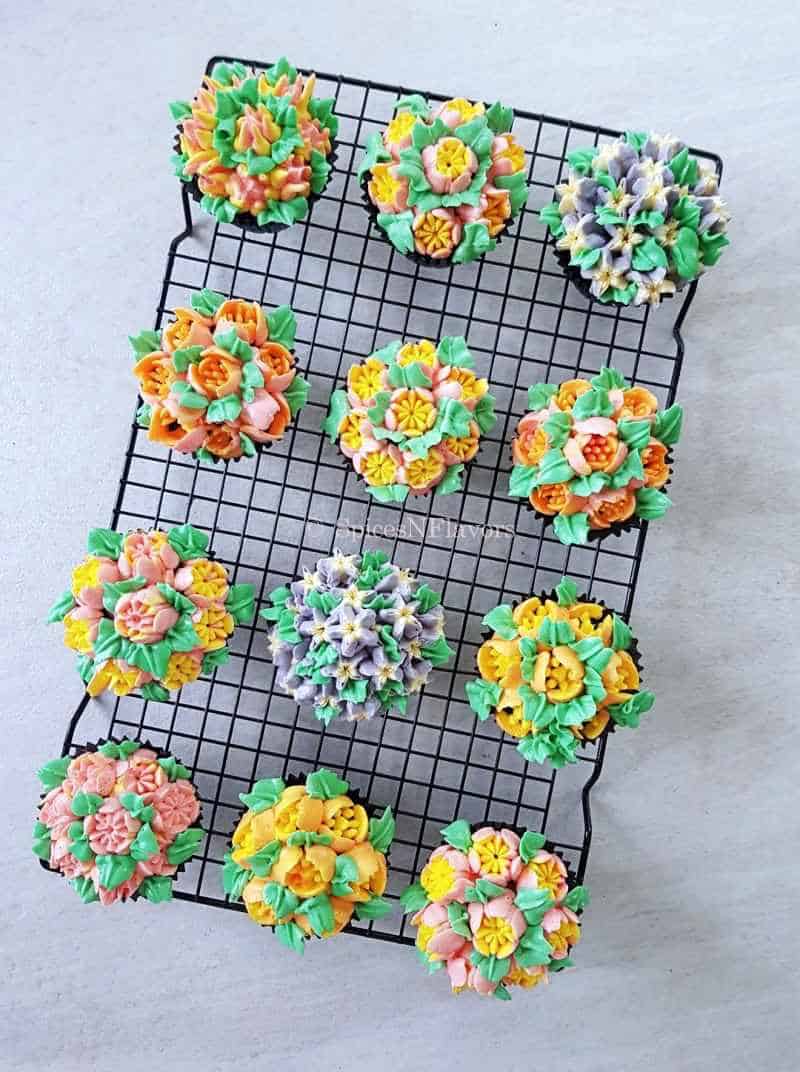
Using the same technique of dual colours, pipe all the cupcakes with a different pattern in each one.

Once piped keep all the cupcakes in the refrigerator for a minimum of 30 mins for the buttercream to firm up.
It is important to work with chilled buttercream so that you do not mess up with the designs while assembling them into a bouquet.
And like I said if you do not have the russian nozzles consider piping the hydrangea flowers and rose flowers as shared in the buttercream flowers post and use that to make the bouquet.
How to make the Bouquet?
Tools needed:
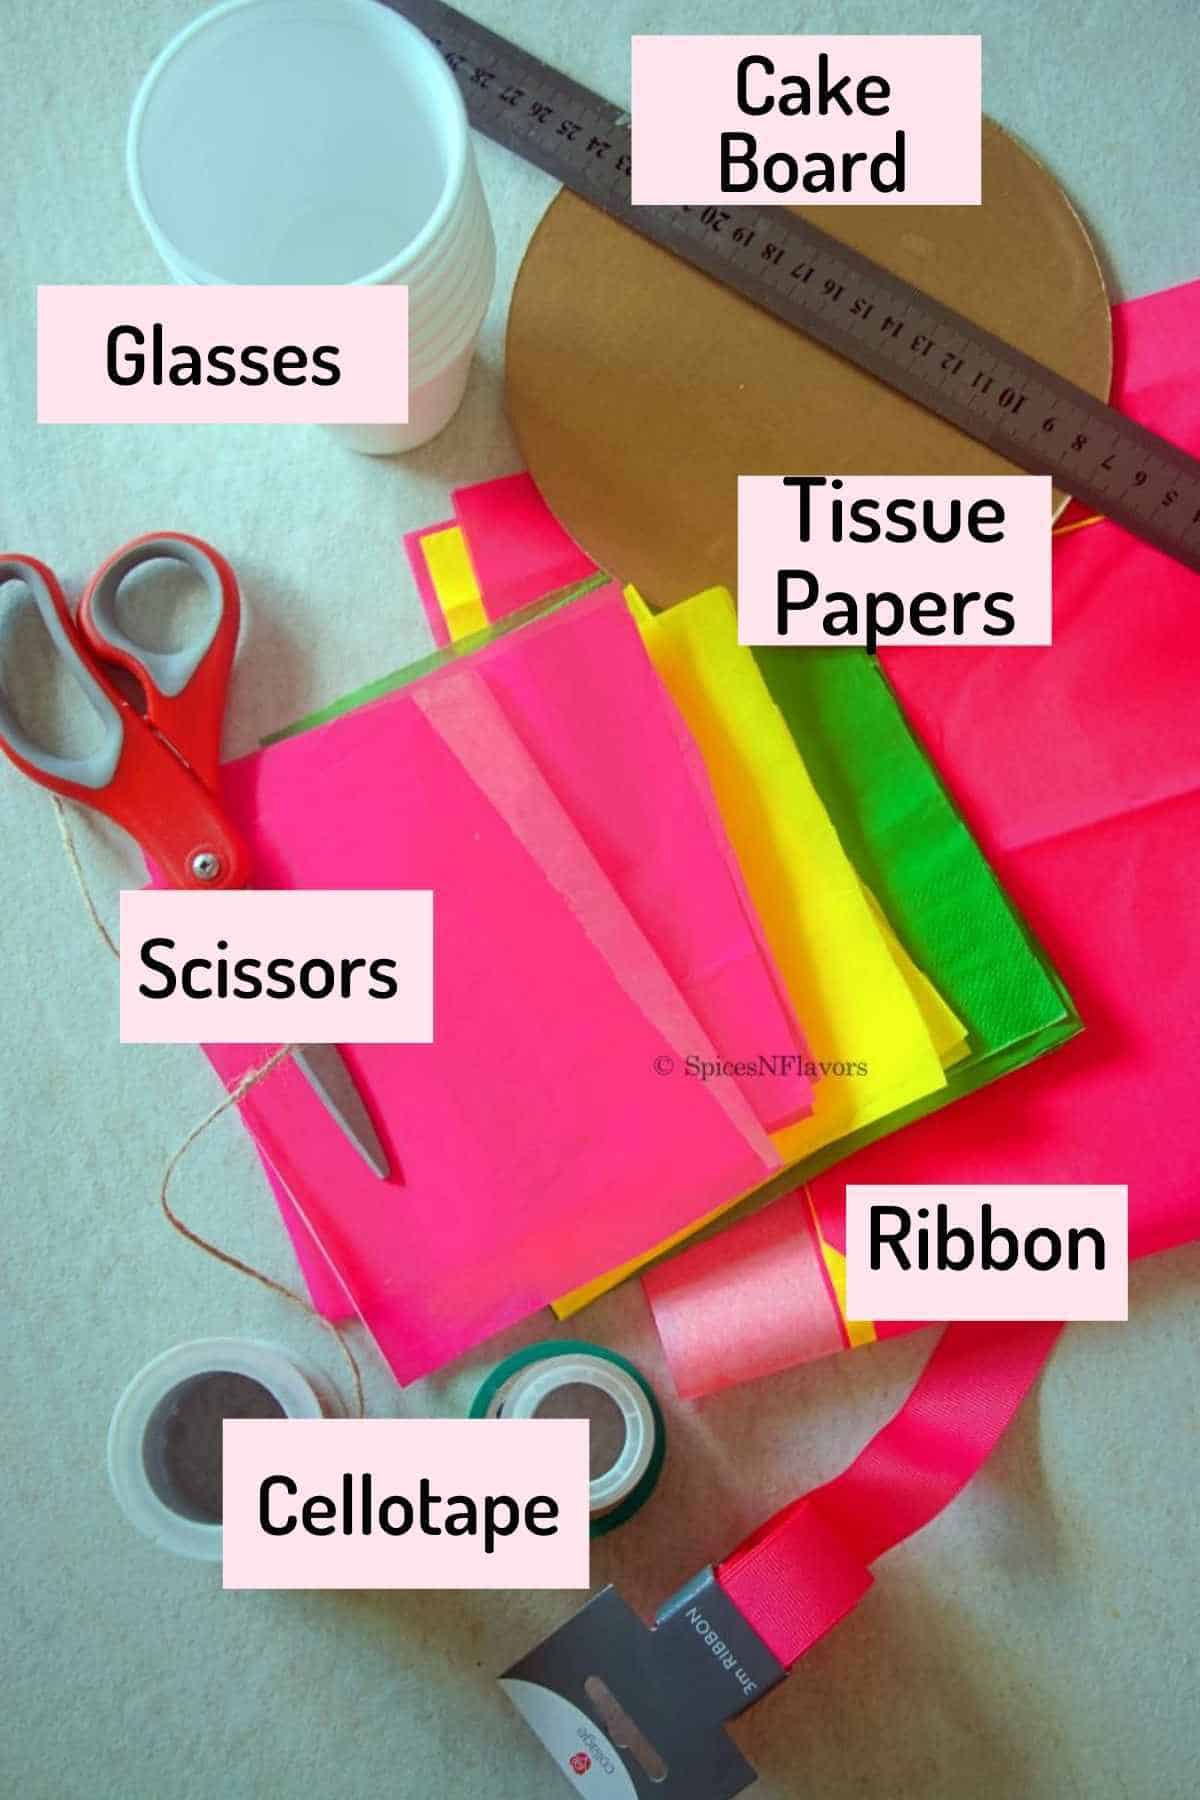
- Cellophane paper measuring 45x45 cms in dimensions.
- 4 Tissue papers measuring 45x45 cms and also a smaller square ones to enclose the cupcakes measuring approximately 6 inches.
- Green Tissue paper - Again green tissue paper is a must to enclose the cupcakes to give the visual appearance.
- 7 Cups or Glasses - Since this tutorial is on making the bouquet without styrofoam ball I am using foam glasses here, you can use plastic cups too.
- Cake board - A place for the cups to sit on.
- Cellotape - Heavy duty and regular ones.
- Ribbons - Rope and ribbons to decorate.
- Scissors
Step by Step Instructions:
Start by gluing together the plastic cups.
Arrange the plastic cups on your worktop with 1 in the centre and 6 cups surrounding it.
Since I am using a foam cup here I was not able to pin it together using a stapler pin so I opted for a heavy duty cellotape.
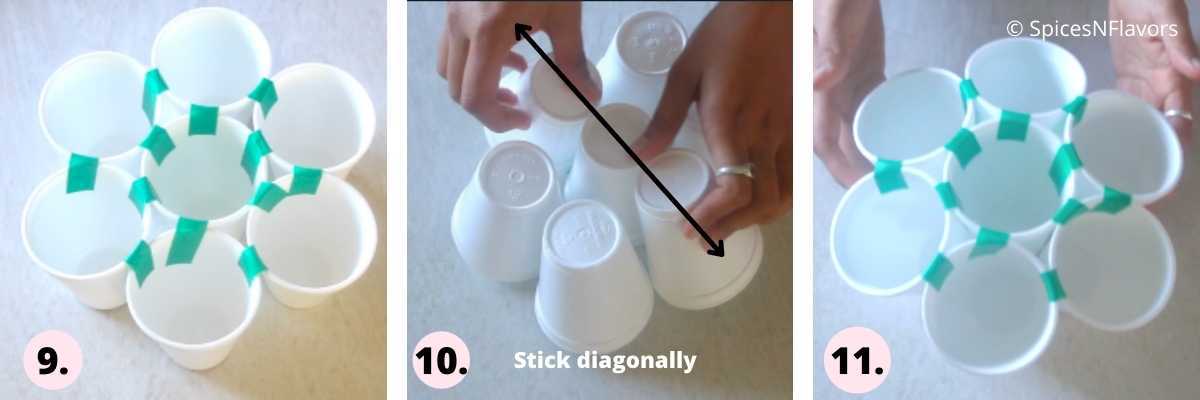
Tape two cups adjacent to each other and also tape it to the centre cup. So each cup will have a total of 3 cello-tapes; two on the sides and 1 in the centre (image 9).
Turn the cups upside down and then stick three cups that are lined diagonally together. This would cause the cups to bend towards each other in the base giving it a bouquet effect (image 10-11).
Place the cellophane sheet on the top of your worktop.
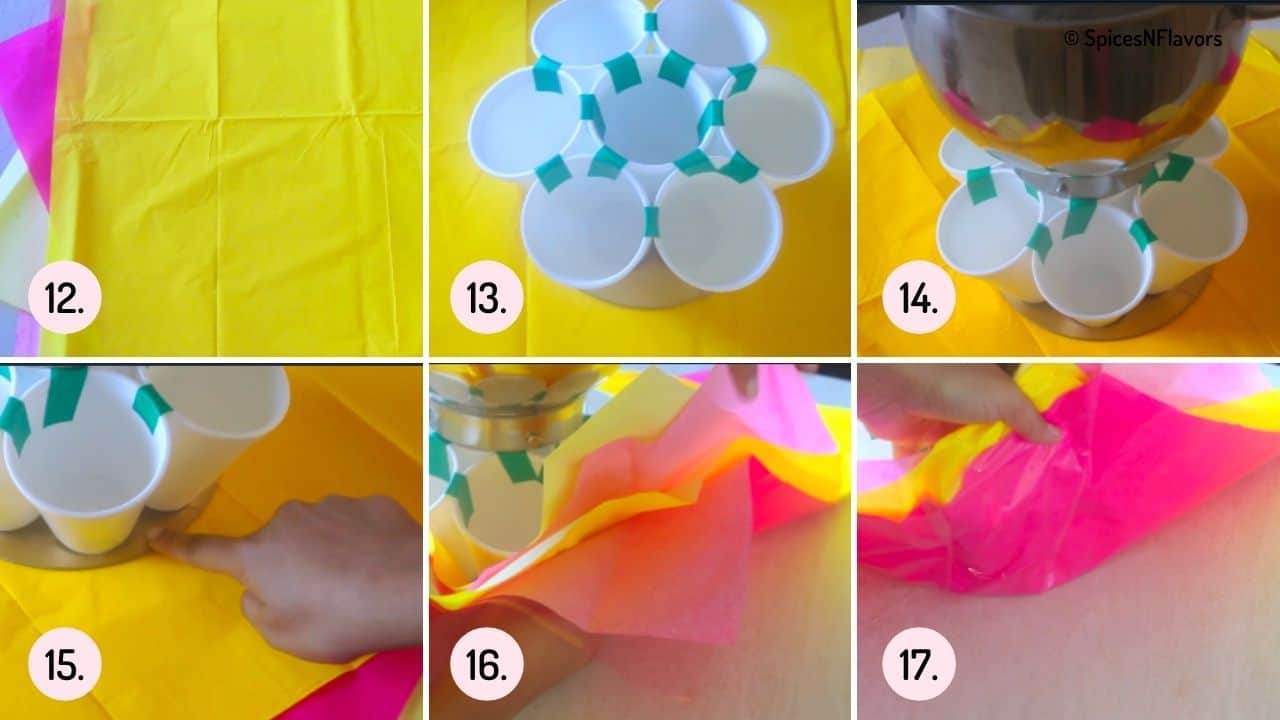
On top of that place the tissue papers diagonally to each other followed by the cake board and the prepared plastic cups (image 12).
Place any heavy object on top so that the cups doesn't move while you are working with the tissue papers (image 13-14).
Now choose the midsection of the two cups and draw an imaginary line to reach the end of the cellophane (image 15).
Gather the cellophane and tissue papers together and bring it closer to the cups, overlapping the sides on top of each other. Seal it with a cello tape (image 16).
Repeat until all the cellophane and tissue papers is stuck to the cups.
This is the way to hide the cups that are going to hold the cupcakes giving a very presentable look to the cupcake bouquet and to make people wonder what is holding the cupcakes 😉
Tie a rope at the base to further secure everything in place. You can hide the rope by tying a ribbon on top.
And voila the base is ready, now you just need to assemble everything.
How to Assemble?
Take the smaller green tissue paper here.
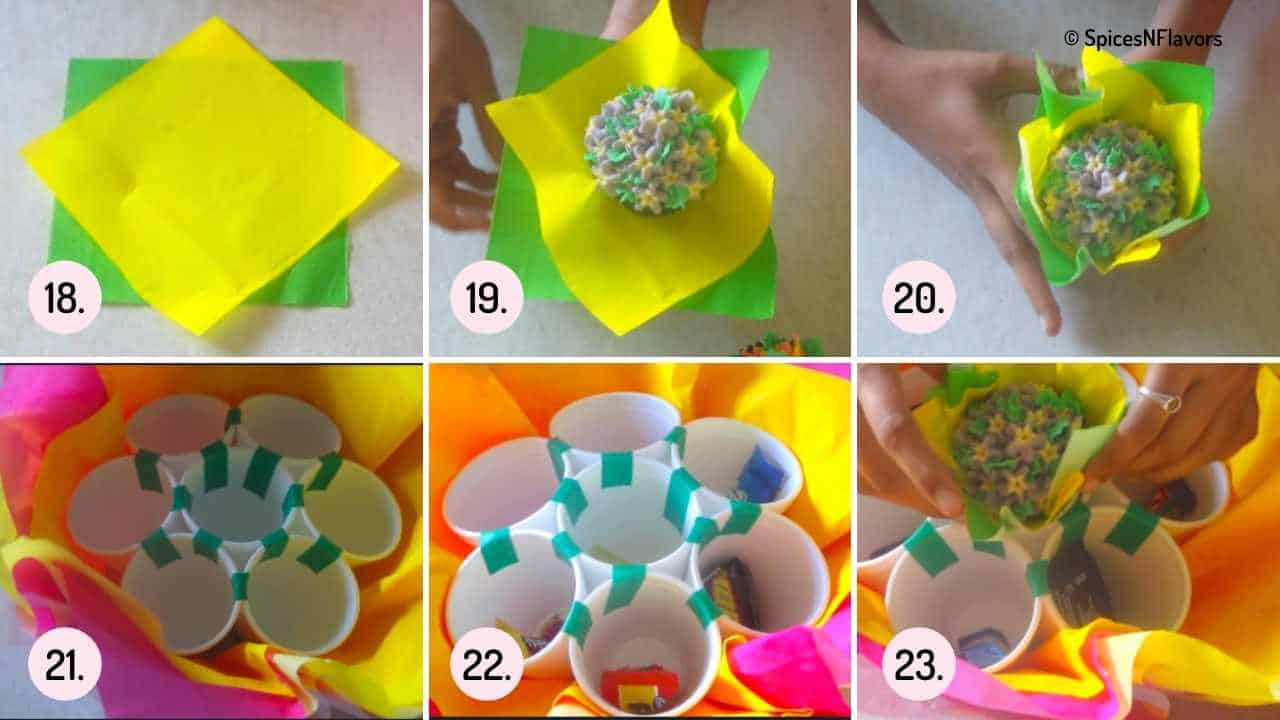
I am additionally adding in another smaller tissue paper in contrast to the colour of the cupcake but this is optional you can only use the green coloured one if you want to (image 18).
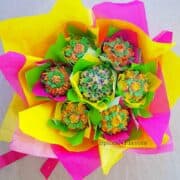
Place the cupcakes on top. Bring the tissue paper closer to wrap the cupcakes (image 19-20).
But before placing the cupcakes in to the glasses you can add in some chocolates into the cups as a little surprise (image 21-22).
So add your chocolates in the glasses then place the cupcakes so the receiver would be surprised to see a little surprise once they pick the cupcakes (image 23).
That's it your beautiful Cupcake Bouquet for Mother's Day, Valentine's Day, Baby Shower, Birthdays is just ready to be delivered to that special person.
Learn from my mistakes
- Colour choice of Tissue Papers:
I would recommend you to first decide on the colours of your flowers and then buy tissue papers accordingly.
The mistake that I made was buying the tissue paper first so I felt the tissue paper colour did not compliment the colour of the buttercream flowers that I had made.
I still used the same papers because I was running short of time.
Also I think a more fancier looking cellophane paper would have further enhanced the look.
So decide on your flower colours first and then buy the tissue papers.
- Size of the papers:
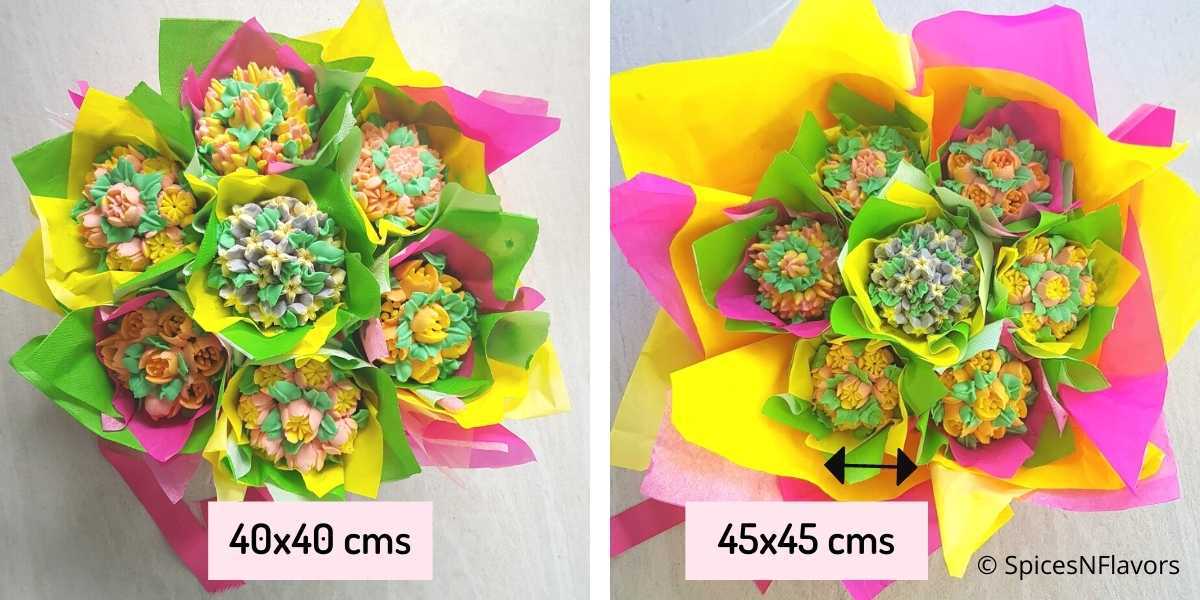
The first time I made this bouquet I used 40x40 cms size paper which I felt was way too small to cover the cups as seen in the image below.
So the next time I used 45x45 which I felt was a little big.
And hence I leave it to you to decide on what size you want the papers to be.
- Gluing the cups to cake board:
Though I did not follow this step but for additional support you can consider gluing the two together using a hot glue gun to secure it tightly in place.
Storage Instructions:
You can store the unfrosted cupcakes in an air tight container at:
room temperature for 2 days
in the fridge for 4-5 days
in the freezer for 2 months.
The frosted cupcakes should always be kept in the fridge till assembling and can be stored for upto 2 days.
Assemble the cupcakes right before delivery or put everything into the fridge until ready to pick up.
Baker's Tip:
- I would recommend using chocolate cupcakes as the base as it would represent the darker colour of soil. But again you can definitely go forward and use any flavour of choice.
- No Russian pipes - no problem. Check this post on Buttercream Flowers where I teach not 1 or 2 but 5 different piping techniques to make flowers using regular piping tips. If not anything you can simply do a swirl frosting on top and use that too.
- Once frosted place the cupcakes in the refrigerator for a minimum of 30 mins. It is always a better idea to work with chilled cupcakes as the frosting won't smear easily while handling the cupcakes and you can be rest assured that the design remains intact.
- No matter what make sure to use green coloured frosting for leaves and green tissue paper for wrapping the cupcakes as that is what will give the bouquet a cohesive look.
- First decide on the colours of the cupcake flowers and then choose your tissue paper colour accordingly.
- A fancier looking cellophane paper on the outside part would further enhance the look of the bouquet.
Recipe FAQ's
Make use of tissue papers and clear or textured cellophane to wrap the plastic cups. Tie a knot and it becomes easier to lift, hold and place in a big cake box. If not this video on wrapping cupcake bouquet explains an alternative way to wrap and transport the bouquet.
You do get styrofoam balls commercially for this very purpose of making the bouquet. The biggest tip for you if you want to use the balls in place of cups is that prick the styrofoam with toothpick first and then attach your cupcakes to it. This would ensure that the cupcakes do not fall off while transporting.
Use the toothpick tip mentioned above to make sure the cupcakes do not fall off the styrofoam ball. If you are making the bouquet with plastic cups or foam cups then in that case the cupcakes sit in the glasses so they do not fall off easily if handled smoothly.
Cut down the tissue paper to 6 inches in diameter. Place the cupcakes at the centre. Bring the edges on the tissue paper and fold to overlap the excess hanging tissue paper. Stick the cupcakes directly into the glasses and your job is done.
Related Recipes:
- Buttercream Frosting 101 - everything you need to know
- How to make Buttercream Flowers (includes tutorial for buttercream hydrangea flowers and also buttercream roses)
- Buttercream Flower Cake
- Eggless Chocolate cupcakes
Wish to Join US for the love of BAKING? Subscribe to our newsletter and Youtube channel. Follow along on Facebook, Instagram, and Pinterest for all the latest updates!
How to make Cupcake Flower Bouquet
Ingredients
- 7 Cupcakes
- 550 gms Buttercream frosting
- Food Colouring of choice refer notes
- 5 Piping Bags
- Russian Nozzles
- 7 Plastic or Foam Glasses or cups
- 1 Cake Board
- 45x45 cms Tissue Papers
- 45x45 cms Cellophane Paper
- 7 "6" inch square green tissue paper
- Heavy Duty and regular cellotapes
Instructions
Cupcake Flower Instructions:
- Decorate any cupcake (preferably chocolate) by using your favourite buttercream or whipped cream frosting.
- Divide the prepared frosting into different bowls and colour accordingly. Just make sure to colour a small amount in green to be used for piping leaves.
- Prepare your piping bag by first adding the nozzle of your choice.
- Take one colour frosting on your spoon and instead of adding all at once, spread it onto the sides of the piping bag to create a cavity.
- Now fill the cavity with a contrasting coloured buttercream. This way the petals that is the sides of the flower would get one colour and the buds or the centre design would be of contrasting colour giving a dual tone effect.
- Instead of piping it directly on the cupcake, do a test run on a parchment paper to make sure the colours are flowing properly then start piping the cupcakes.
- Apply pressure to release the frosting, hold for a few seconds to give time for the frosting to fold on itself and stick to the cupcake and then pull your hand upwards and leave. The more you pull the larger the petals will be.
- Pipe all around the cupcake. Do not worry if there is some gaps or some petal fell off.
- Use the green coloured buttercream with leaf tip to pipe leaves and fill the gaps and hide flaws if any.
- Once frosted, let the cupcakes chill for 30 mins in the refrigerator. Meanwhile start constructing the bouquet part.
Constructing the Bouquet
- Start by gluing together the plastic cups. Arrange the plastic cups on your worktop with 1 in the centre and 6 cups surrounding it.
- Tape two cups adjacent to each other and also tape it to the centre cup. So each cup will have a total of 3 cello-tapes; two on the sides and 1 in the centre.
- Turn the cups upside down and then stick three cups that are lined diagonally together.
- Place the cellophane sheet on the top of your worktop. On top of that place the tissue papers diagonally to each other followed by the cake board and the prepared plastic cups.
- Place any heavy object on top so that the cups doesn't move while you are working with the tissue papers.
- Now choose the midsection of the two cups and draw an imaginary line to reach the end of the cellophane. Gather the cellophane and tissue papers together and bring it closer to the cups, overlapping the sides on top of each other. Seal it with a cello tape. Repeat until all the cellophane and tissue papers is stuck to the cups.
- Tie a rope at the base to further secure everything in place. You can hide the rope by tying a ribbon on top.
Assembling the Bouquet
- Take the smaller green tissue paper here.
- Place the cupcakes on top. Bring the tissue paper closer to wrap the cupcakes.
- Before placing the cupcakes in to the glasses you can add in some chocolates into the cups as a little surprise.
- And then place your wrapped cupcakes in each of the glasses and voila a beautiful cupcake bouquet is ready to be gifted.
Video
Notes
- Please note that the amount of buttercream frosting mentioned in the recipe card needs to be taken as approximate value as the amount would depend on which nozzle you are using and what design you are making.
- For the designs seen in the images I have used 350 gms of Butter and 150 gms Condensed Milk. Find the instructions for making it in our Buttercream 101 post.
- If you do not have Russian Nozzles you can still make this with any regular nozzles that you own. Check this post on Buttercream Flowers - Part 1 for additional details of making buttercream flowers using regular nozzles.
- In place of using Plastic or Foam cups, you can also use styrofoam balls that is available commercially. The constructing instructions would vary in that case.
- I would recommend using chocolate cupcakes as the base as it would represent the darker colour of soil. But again you can definitely go forward and use any flavour of choice.
- No Russian pipes - no problem. Check this post on Buttercream Flowers were I teach not 1 or 2 but 5 different piping techniques to make flowers using regular piping tips. If not anything you can simply do a swirl frosting on top and use that too.
- Once frosted place the cupcakes in the refrigerator for a minimum of 30 mins. It is always a better idea to work with chilled cupcakes as the frosting won't smear easily while handling the cupcakes and you can be rest assured that the design remains intact.
- No matter what make sure to use green coloured frosting for leaves and green tissue paper for wrapping the cupcakes as that is what will give the bouquet a cohesive look.
- First decide on the colours of the cupcake flowers and then choose your tissue paper colour accordingly.
- A fancier looking cellophane paper on the outside part would further enhance the look of the bouquet.
Anbi says
This is really helpful Sushma. Warm wishes from Chennai 😊. Can I frost the cupcakes with stabilised whipped cream (using gelatin)and make the bouquet? Wondering how long it will be stable in Chennai weather - room temperature😕
sushma iyer says
Hi Anbi.. If from chennai the non dairy whipping cream does not need any stabilizer. So you can skip the gelatin.. about stability just do not place it under direct sunlight and it should be good