This Buttercream Flower Cake is an easy floral design cake perfect for any occasion - Wedding, Birthday or Anniversary. Making buttercream flowers is easier than you think.
In this tutorial learn how to make this beautiful Cut-Out Cake decorated with hand-piped buttercream roses that cover the detailed tips and tricks on piping tips, buttercream frosting consistency and the one way to get it right EVERY SINGLE TIME!!!

This Buttercream Flower Cake Tutorial Breaks down into 3 steps:
- Making Buttercream Roses
- Layer, Fill and Frost the Cake
- Decorate the cake with the trending CUT-OUT pattern
After going through the tutorial of this floral buttercream cake, I believe that you will become more confident with frosting the cake and trying the Watercolour Buttercream Technique, piping simple buttercream flowers and finally adding the magical touch to make your cake look straight out of the bakery or even better.
Even though I will be discussing a lot of factors in depth in this post, I would still recommend you to go through two of my earlier posts on the Buttercream Series which will help you even more namely:

Buttercream Frosting 101:
Now before you even start to make the frosting for making the cake, I would highly recommend you guys to check out my tips for how to make the perfect Buttercream Frosting. In this post, you will find answers to all your questions namely:
- How to make buttercream frosting that is not overly sweet yet holds its shape perfectly well.
- The buttercream frosting ingredients tips that ultimately results in the desired results.
- 5 important tips to help you perfect your Buttercream Icing
- How to colour and stiffen your Buttercream
- Troubleshooting Common Buttercream Frosting Problems
- How to store and re-use them
How to make Buttercream Flowers on Cupcakes:
The major take-aways from this particular post will include:
- The best buttercream for piping flowers.
- Buttercream Consistency and Temperature
- Buttercream Flower Tips - The basic piping tips you need to make buttercream icing flowers
- How to make Cupcake Bouquet
Since I have covered the majority of the things in the two mentioned posts, I will not repeat all those points once again or else this post would become too long and it might happen that I might miss writing the other things you need to know or you are so bored by the length of the post that you just GO BACK!!!
So WAIT.. please don't leave just go through this and I promise that you will find what you came looking for. 😀
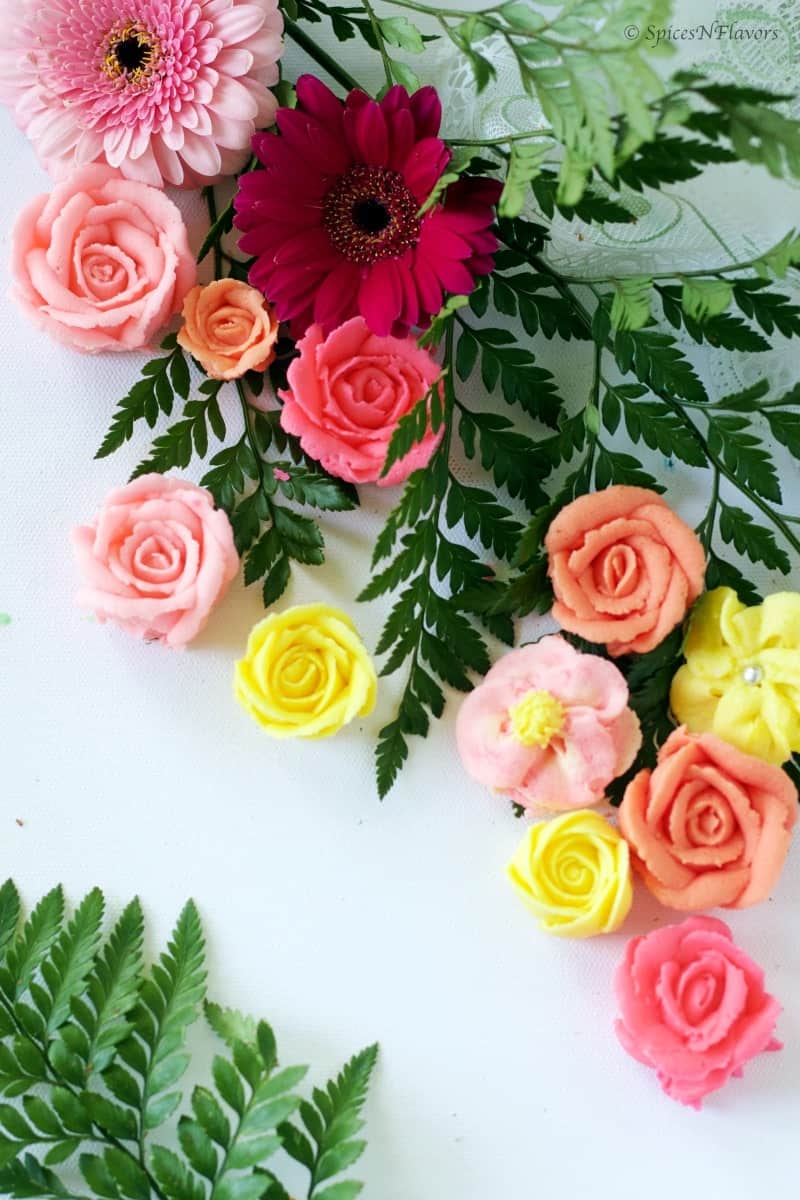
STEP 1: Making Buttercream Roses
2 pointers to note before you start piping buttercream roses:
- The stiffer the buttercream, piping buttercream flowers becomes so much easier. If you are planning to follow my favourite Buttercream recipe then I would suggest you guys use 1:3 butter to sugar ratio for making this buttercream rose cake.
- Make sure you are working in a relatively cool area. Warm hands and ambient temperature would give you a tough time making buttercream flowers.
Here is a step by step guide to making the Buttercream Roses:
Things you will need:
- Piping Bag fitted with Petal Nozzle like Tip 104
- Buttercream Frosting that I have coloured in pink.
- Flower Nail
- Parchment paper cut into small squares.

With your frosting ready in the piping bag fitted with the petal nozzle start by squeezing just a bit of it directly on the flower nail. This would act as a glue for the parchment paper to stick on and won't allow the paper to move while you are piping the buttercream flowers.
Start by piping a dollop of the prepared buttercream frosting in the centre of the nail to create a bud. This would just look like a blob at the centre.
Next, go a 360° round around the blob of frosting closing the inner blob to represent a bud.
The inner-circle should have exactly 3 petals. The technique of making the petal involves creating an arch from left to right overlapping the first arch.
The next circle should have 5 petals. The technique remains the same. And one more thing is that start by creating a smaller arch at the beginning and then increase the size as you finish the petal.
Let the flowers chill in the fridge until set.
Watch it in the video format would be even easier.
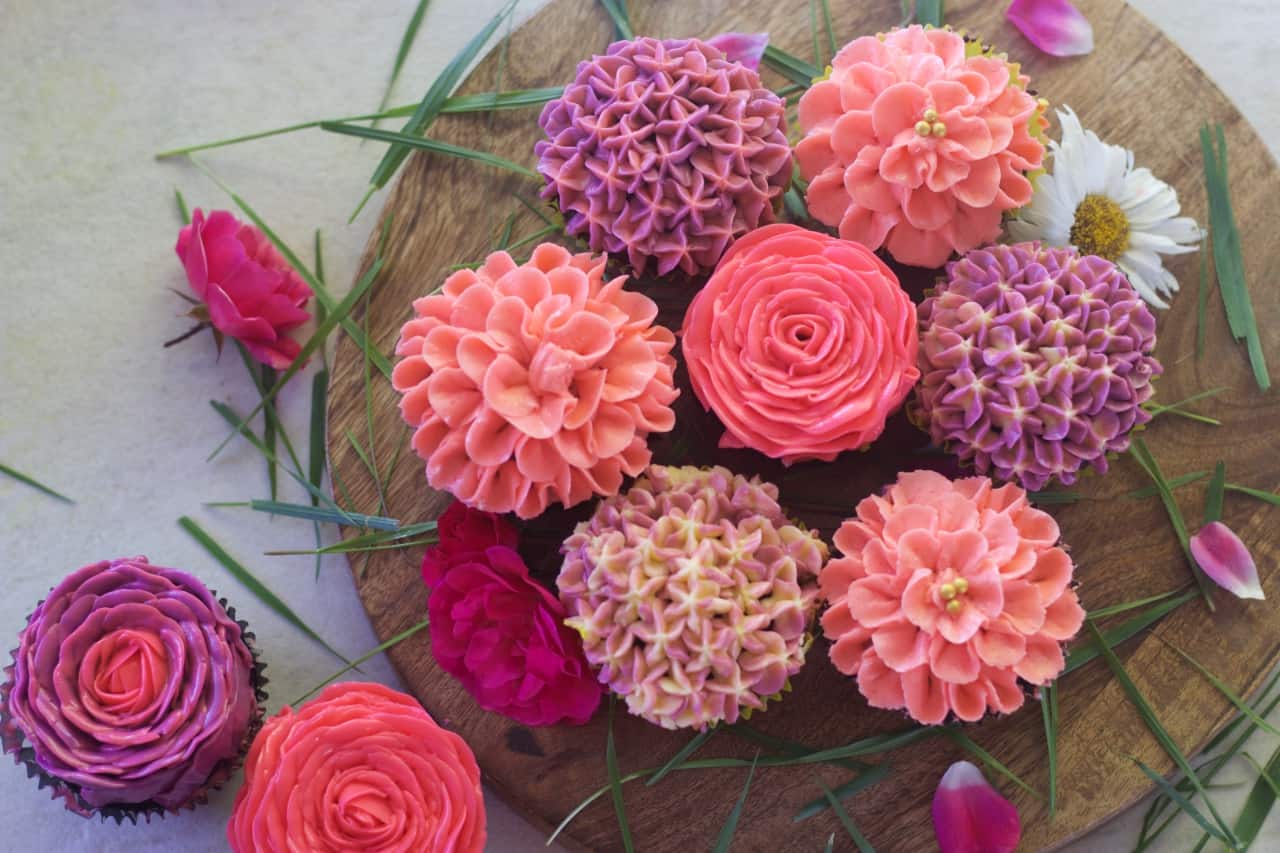
For the sake of decorating this Buttercream Flower Cake, I have just made roses of different sizes. The primary colours used in making the roses are pink, peach and yellow.However please note that the video has 3 additional flower-making procedure which would be super helpful too. 😀
Piping tips for buttercream flowers:
As a beginner, it would totally stress you out when you just begin to make your first buttercream flower. Be patient here, with a little practise you will get there. And I promise by the end of making 5 flowers you will gain the speed you need.
But here are certain tips and pointers to keep in mind while making the roses. Not only roses this will work for other flowers too.
- The warmness from your hands would surely soften the buttercream and you might find it difficult to pipe the petals. This can happen if the ambient temperature is also relatively hot. To avoid this chilling the buttercream for 5 mins every now and then totally helps.
- Make use of small parchment paper squares and pipe the roses on it. The parchment paper makes it easier to handle the flowers.
- Always chill the roses until the butter is set completely. That way it becomes so much easier to handle the flowers and place them on the cake.
Everything you need to know about Freezing Buttercream Flowers:
How to Freeze Buttercream Flowers:
Once you pipe the flowers you need just place the parchment paper squares on to the cookie tray. Place the tray in the freezer for 10 mins.
And when they are frozen (becomes super easy to handle), simply place them in an airtight container. You can even stack them one above the other.. Nothing will happen till they are in the freezer.
Once they are out of the freezer, make sure to separate the flowers as they tend to thaw pretty quick and would then stick to each other.
However, if you are planning to use the buttercream flowers on the same day itself then simply chill them in the fridge until set no need to freeze in that case.
How long can you freeze the Buttercream Flowers:
You can store the buttercream flowers in the freezer for up to a week. Nothing will happen if you store more than that but I haven't tried storing beyond that point and so won't recommend too.
Can you make the Buttercream Flowers ahead of time:
Yes definitely.
That's the whole point of me writing this section and also mentioning to make this easy Buttercream Flowers right at the start.
Make the buttercream flowers 2 to 3 days prior and store them in the freezer as mentioned above.
Collective pointers to remember while making the Best Buttercream Flowers for a beginner:
- Avoid working in a hot and humid condition.
- Place the frosting in the fridge every now and then for 3 to 4 mins to avoid softening of the buttercream due to the warmness of your hands.
- Make use of small parchment paper squares - makes it easier to handle the flowers.
- Use stiff buttercream for piping the flowers. My go-to ratio is 1:3 butter to icing: sugar.
- Always make the flowers ahead of time. Makes you feel relaxed while decorating the cake. Chilled buttercream flowers are easier to work with.
- Pipe the flowers in odd numbers for the realistic look.

Step 2 - Buttercream Cake Tutorial/Watercolour Technique
For this Buttercream Flower Cake tutorial, I have made use of my go-to simple Vanilla Cake Recipe.
I have used 1.5 times of the recipe and baked it in 3, 6-inch cake tins for the same time interval.
Once cooled trimmed the top off and applied my simple syrup so that the cake remains moist all the time.
Filled with my all-time favourite smooth and not so sweet Vanilla Buttercream Frosting and Tutti Frutti and also frosted the cake with the same frosting just dyed it peach.
Watercolour Technique:
To give the watercolour technique simply take the frosting of your choice and colour it as you like. I have used pink and yellow colour.
Using a spatula apply the colours at random places on top of your cake. Once you are happy with the colouring, take a spatula and smoothen it out in one or two go maximum so that the colours remain distinct.
If you would go on smoothening the frosting then the colours would blend with each other and would not remain distinct.
Chill it for 10 to 15 mins makes it so much easier to work with while you reach the decorating part.
One major Tip:
Always make the frosting more than what you think would be needed.
Apart from the filling and frosting you also need frosting to make the flowers. So keeping that in mind make sure you always have excess in hand. I hate it when I am just about to finish the cake and realise that there are no more frosting left.
For this particular cake, I used nearly 600 gms of butter and 1500 gms of Icing sugar from start to finish.
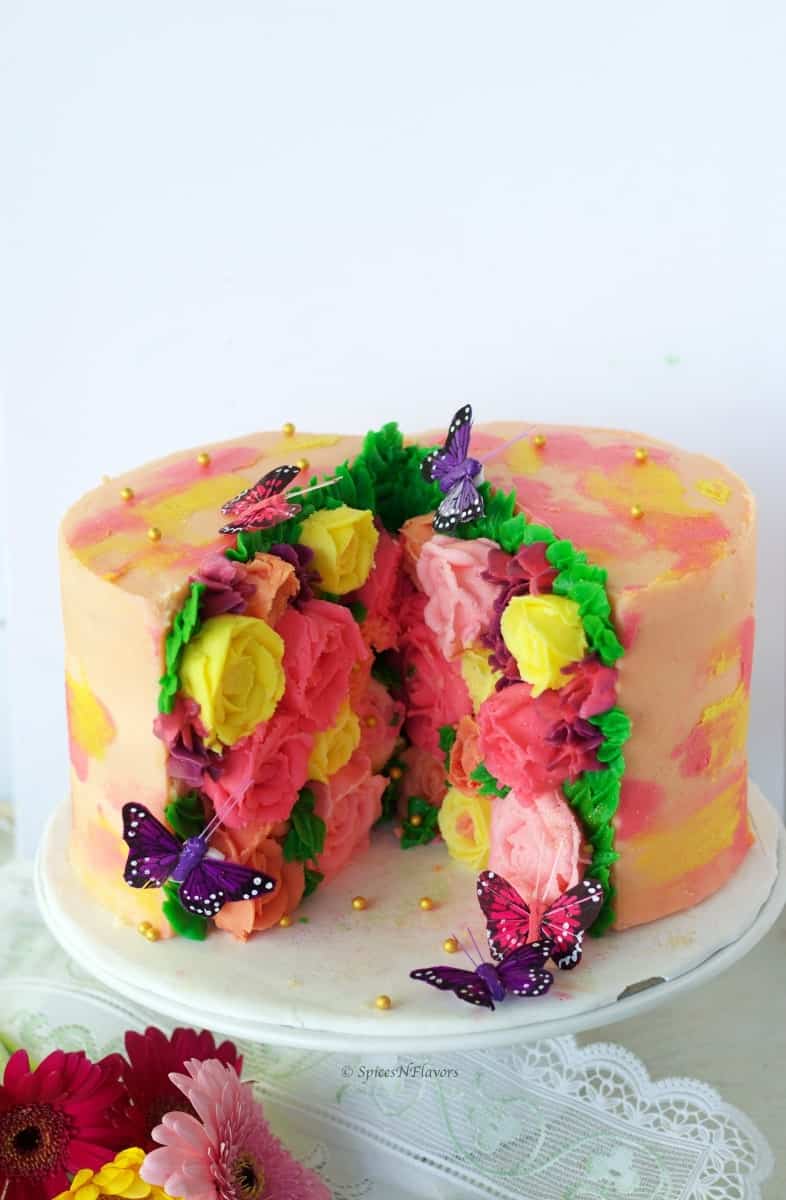
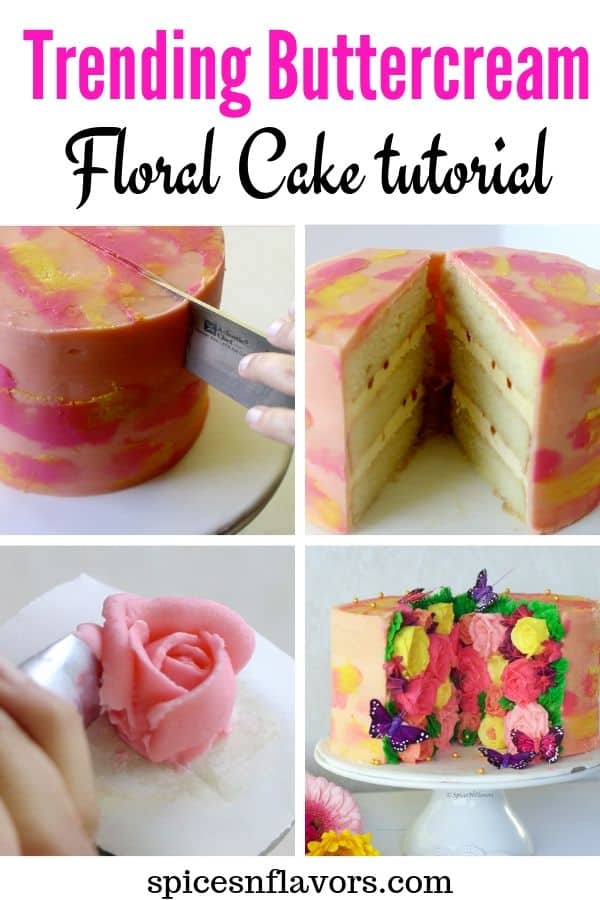
Step 3 - Assembling the Buttercream Flower Cake/ Trending Cut-Out Cake:
Now that you have the required buttercream flowers ready and the cake is also chilled and ready and placed on the cake board of your choice, time to decorate the cake.

Using a sharp knife, (Insider's Tip: I like to dip my knife in hot water before slicing any cake for clean cuts) cut the cake halfway keeping the end portion still intact. (Refer the video)
With the help of the spatula or a knife move the half slices to the edges of the cake board creating a centre gap.
Using the same frosting, frost the now exposed sides of the cake. This would also act as a medium or glue for our buttercream flowers to stick on.
Using a leaf tip and green coloured frosting make leaves on the centre end of the cake where the cake is still joint to each other.
Now look at your buttercream flower sizes and place them on the cake in the colour pattern you like or according to the space available.
Do not worry about the little gaps that you can see we will fill those up too.
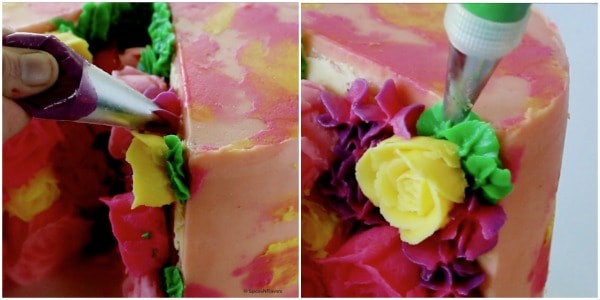
So once you are happy with the placements of flowers, using tip 1M make hydrangea flowers on the gaps that are super evident.
Finally, add some leaves using the leaf tip to cover up any faults or still exposed cake parts.
To add the magical touch, place some butterflies on the cake, add edible gold glitter and sprinkles.
Voila, the most beautiful cake I have made until now. What do you all think?
Besides making the Cut-Out cake you could also have chosen to simply place the flowers on top of the cake to make a wreath design. Buttercream flower wreath cake is quite a popular cake design trend too.
Please Note:
While placing the roses on to the sides of the cake some of them might fall. Do not panic simply press the roses a little harder to the frosting and it will stick. If not add some frosting to the back of the rose and then place it.
I hope you guys found my detailed post on this Buttercream Flower Cake Tutorial helpful and you are now at least a tidbit confident about making a three-layer cake.
If so then definitely do share your thoughts with me on Facebook messenger or Instagram or Twitter. I would love to hear from you guys.
Pin this for later
I will see you soon with yet another recipe
Until then
Hugs
Sushma
Smitha says
Wow thats a beautiful cake. Love the colors. I made quite a few cakes these days on my blog. But my floral cupcakes always the highly appreciated ones.
sushma iyer says
Thank you so much Smitha.. 🙂