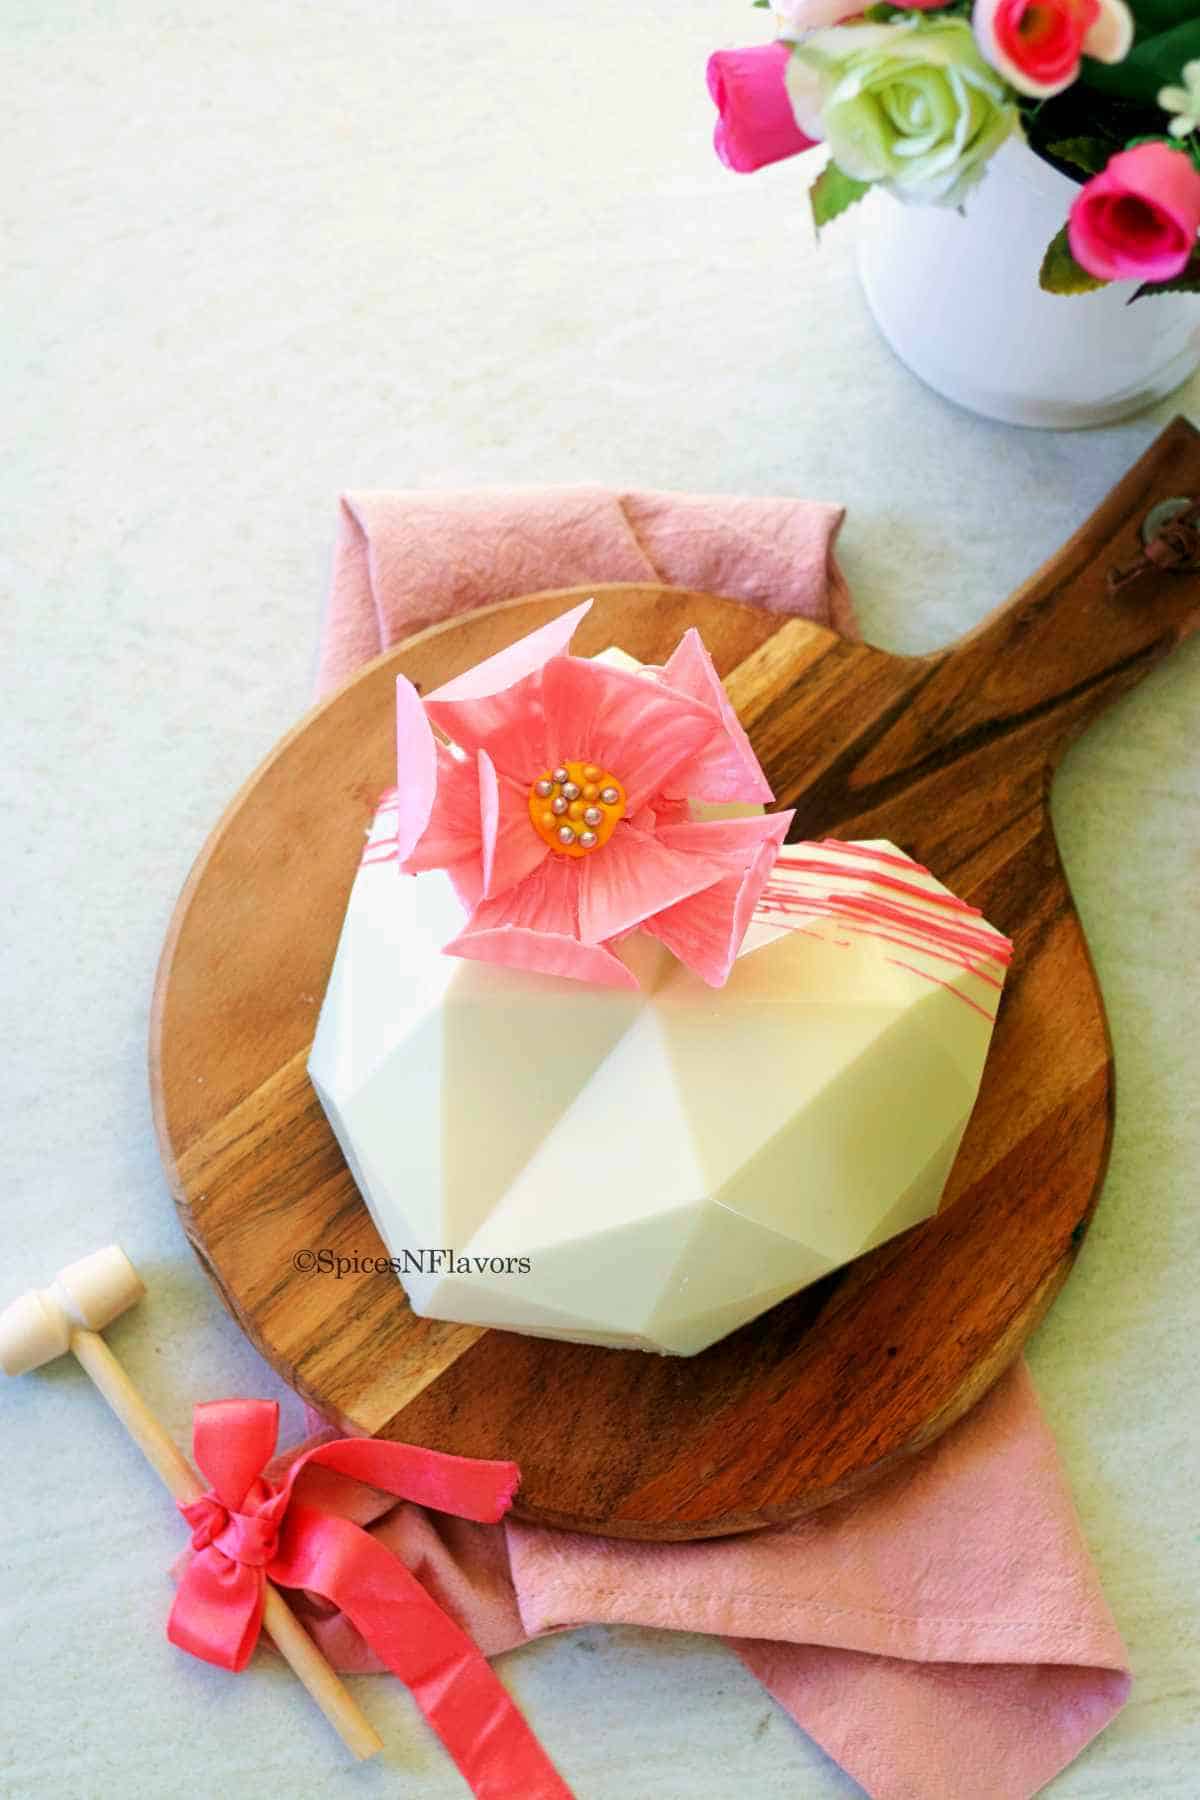
Learn how to make these trending Smashable Chocolate Heart using just 1 ingredient. This Breakable Chocolate Heart Cake is not only easy to make but so much more fun to break using hammer and get to your surprises!!!
What is Chocolate Smash Heart?
Chocolate Smash Hearts, are basically a chocolate case shaped in the form of a heart, that comes with a cavity to be filled in with candies, cakes, chocolates, non edible gifts just about anything.
This is then smashed using a hammer to reveal the surprise inside just like a regular pinata cake. It is uber fun to smash rather than the traditional cutting. Trust me!!!
Things needed to Make the Pinata Cake:
You basically just need 1 ingredient to make this smashable chocolate heart which is obviously white chocolate right!!
However, the other thing you need is a heart shaped silicon mould (commonly known as pinata cake mould) with a hammer since we are making pinata heart shape cake.
You also get a semi-circular pinata mould which I used to make Frozen Pinata Cake for my daughter's Frozen Theme Birthday Party.
That being said, the same process can be applied to make chocolate shells of any shape like may be a round pinata cake or mini hearts.
And edible gel food colours depending upon what colours you want.
How to make Pinata Cake?
Here is a step by step tutorial to make this easy pinata cake recipe.
Step 1: Melting the Chocolate.
It is very important that the chocolate has the right consistency.
I have detailed video on, How to melt chocolate the right way which you can watch to understand better.
Click here to know how to melt chocolate in the Instant Pot.
Step 2: Making the Pinata Chocolate Shell
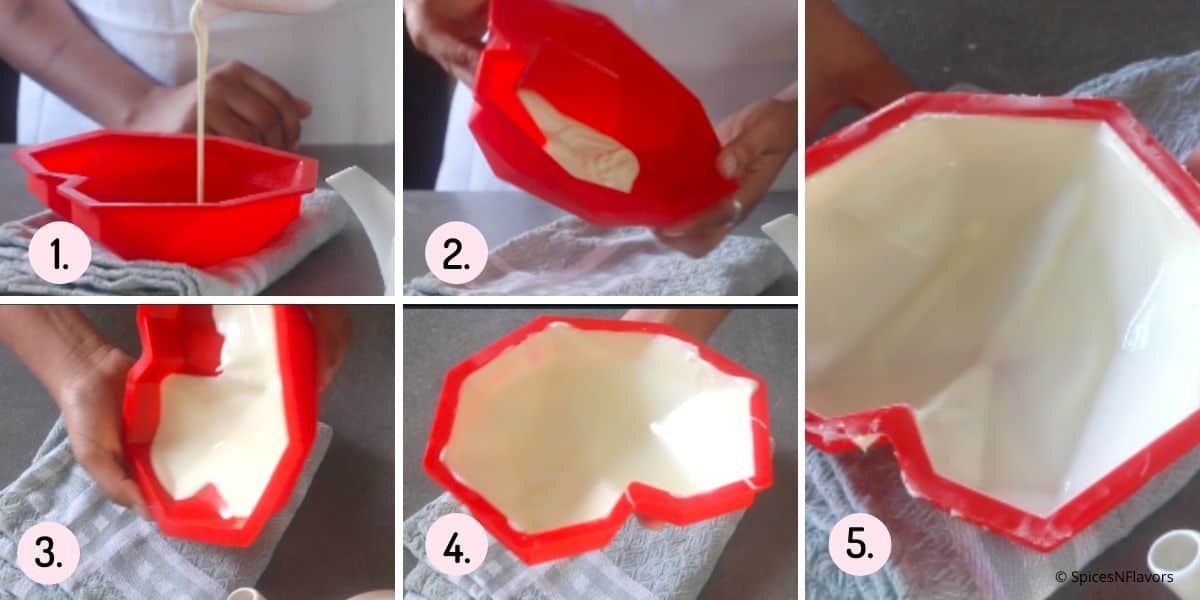
Pour about 130 gms of chocolate into the silicon mould (step 1).
Swirl the mould in all directions in a way that the chocolate coats the mould entirely (step 2-5).
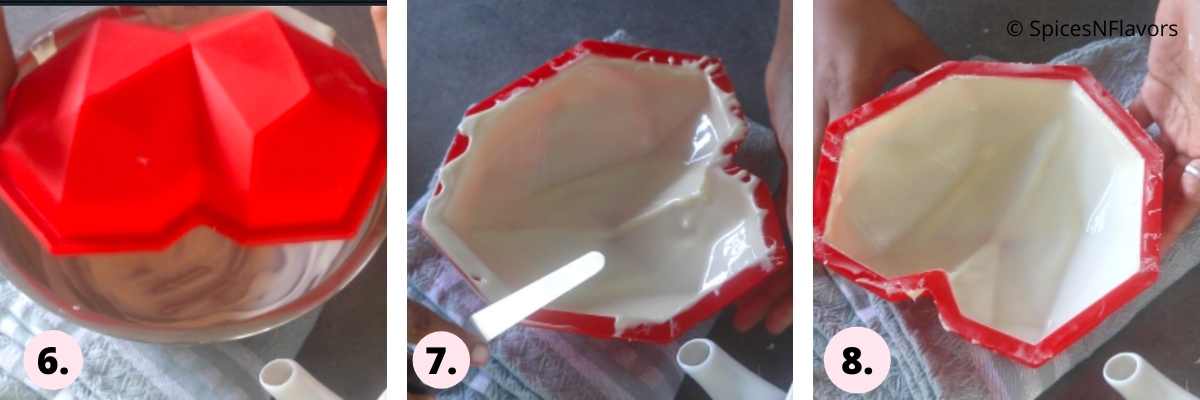
Then slide the mould to drip away the excess chocolate over a bowl (image 6).
Clean the edges and let it sit in the refrigerator for 5 mins until it sets completely (image 7-8).
BAKERS TIP: Take it out and do a second coating in places where you feel that the chocolate is thinly coated and might break while demoulding taking care of the edges specifically.
Again allow this to set in the refrigerator for 5 to 8 mins until set completely.
Step 3: Demoulding
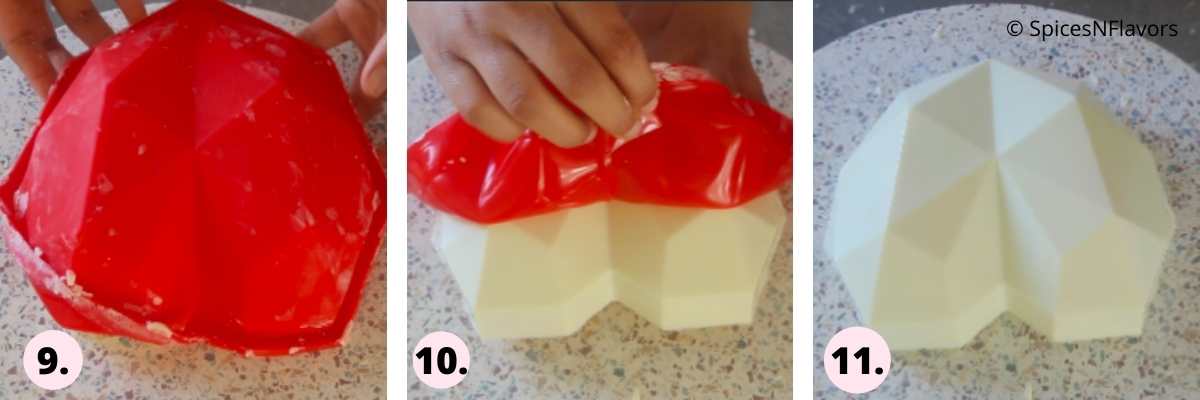
It is not difficult to demould but it is important to use gentle hands.
Slightly release the chocolate from the edges in all directions.
Then place it on a flat surface and pull the silicon mould towards you gently releasing the chocolate (image 9-10).
Decorate the chocolate heart as you like.
Chocolate Flower Tutorial:
I choose to decorate the pinata cake with easy chocolate flower.
Click here to watch the tutorial for the same.
How to Serve Pinata Cake:
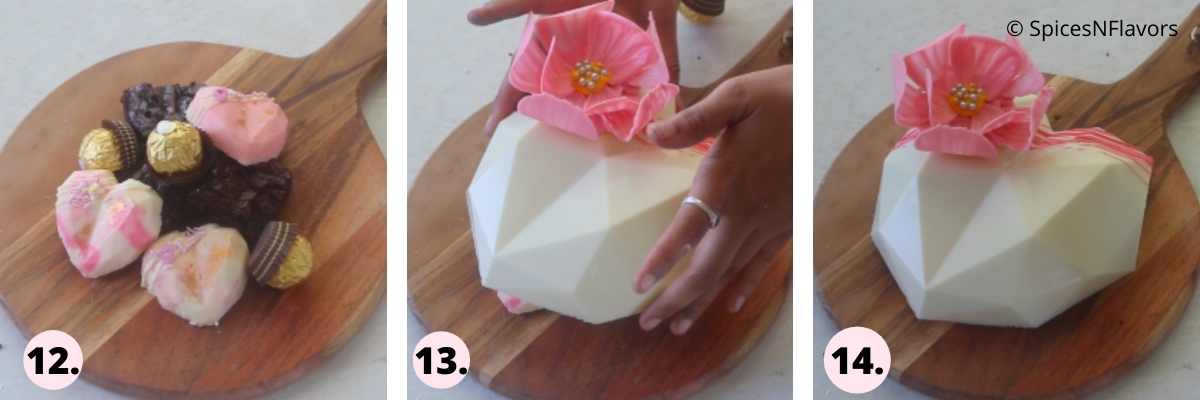
Place a wooden serving board (like a pizza board). You can use cake board if making it for clients.
Add the fillings of your choice (image 12).
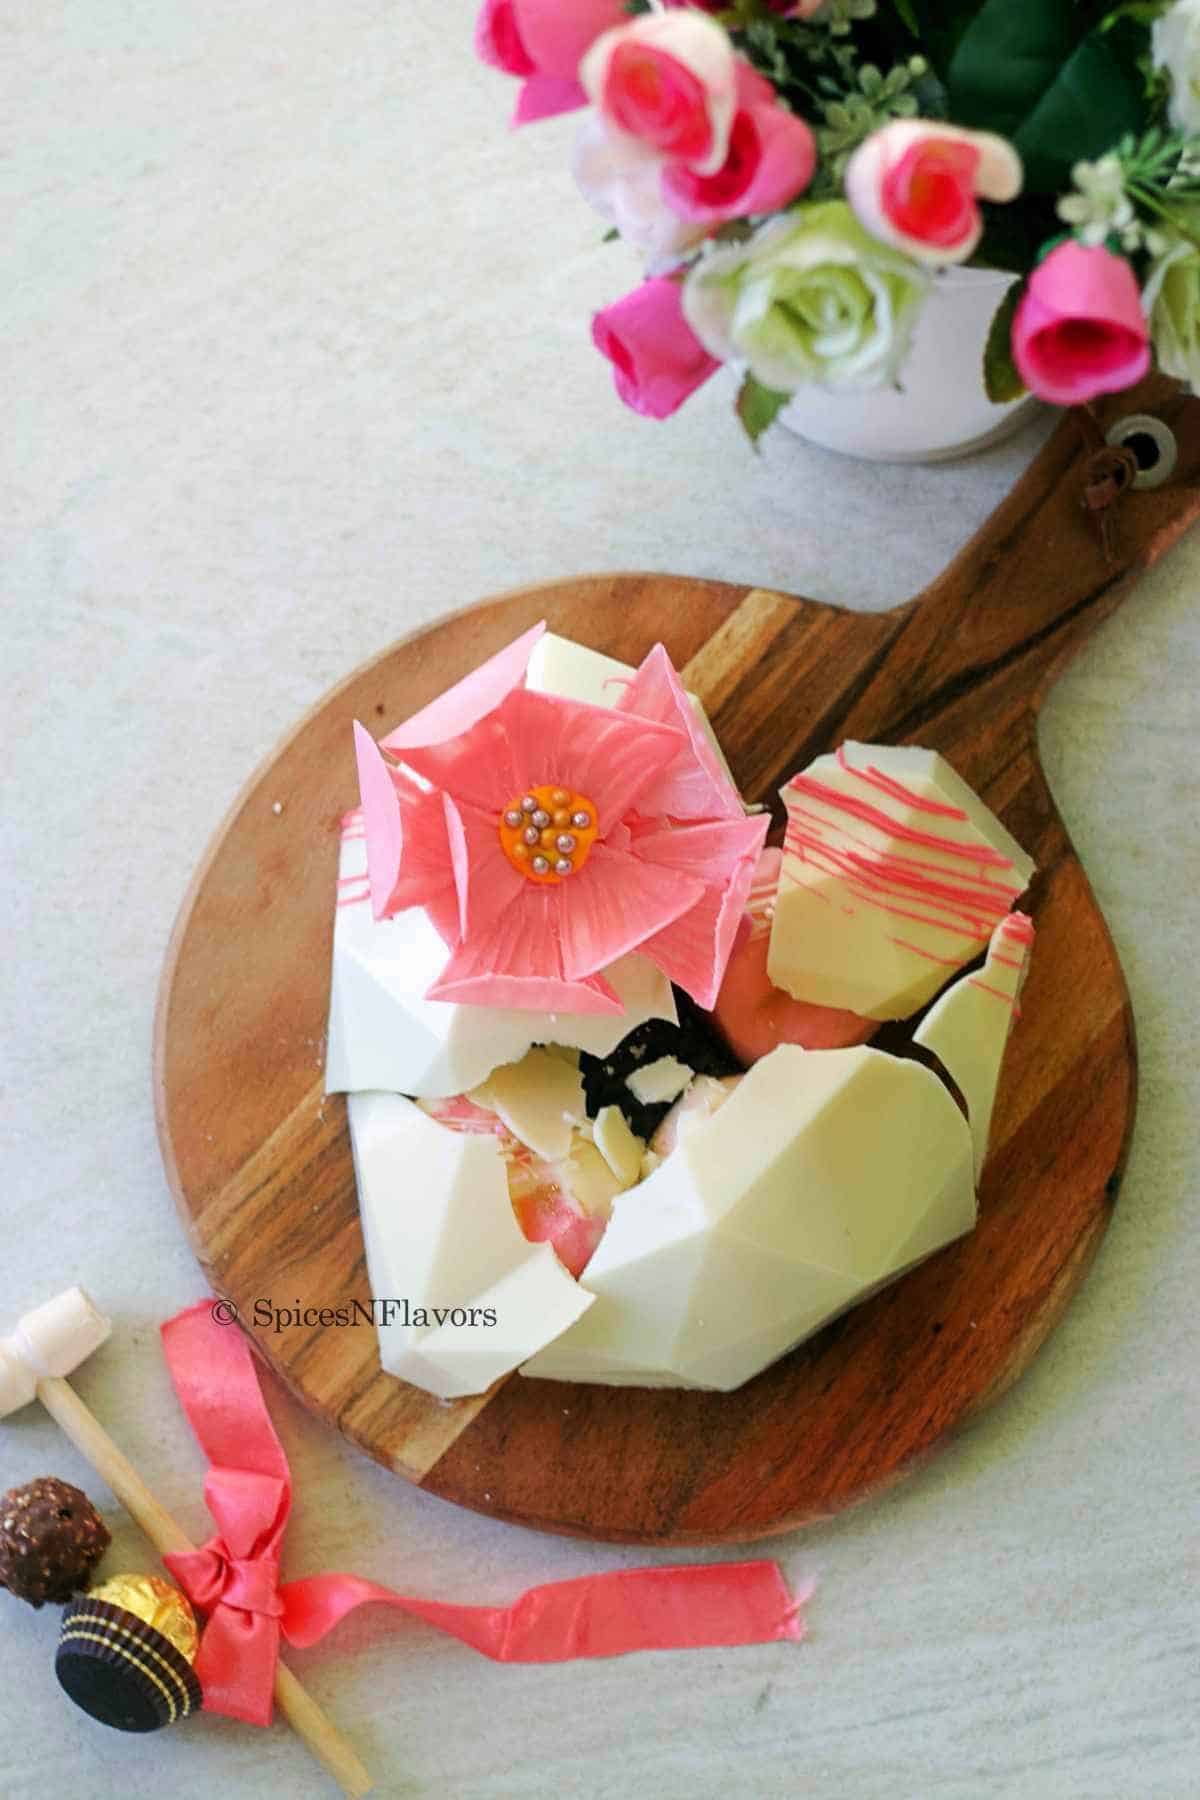
Place the decorated chocolate shell on top with a hammer on the side (image 13-14).
Do remember to tie a ribbon to your hammer to make it special.
Pinata Cake Fillings:
- Chocolates: Place any of your favourites. The most easiest and best option. Make it customisable by making homemade flavoured chocolates.
- Brownies: This would make an amazing homemade edible gift.
- Cheesecake: Consider placing this no bake cheesecake enclosed in chocolate shells.
- Non-edible gifts: Absolutely a fun way to impress your loved one. Place any gifts like watches, gift cards, earrings or place a ring to propose.
Basically just place anything and everything.. hehe. What a fun it is to make breakable heart cake with hammer!!
Baker's Tips:
- Do not place your chocolates on boiling hot water to melt (if following the stove top version of melting chocolates), that might seize your chocolates.
- Do a second coating of chocolates especially around the edges or any areas where you feel the chocolate is thin and might break while demoulding.
- Always release the edges first while demoulding to ensure that you are not applying too much pressure later which can break the chocolate.
FAQ's
I am using compound chocolate here. You can use couverture too but that would need to be tempered first before using and hence I prefer the compound chocolate which are easier to use.
Absolutely anything and everything. Check out the paragraph named, "Pinata Cake Fillings" for detailed ideas.
Related Recipes:
- How to Melt Chocolate the right way
- Frozen theme Pinata Cake
- No Bake Cheesecake in Chocolate Shells
- Trending Chocolate Pop it recipe.
- Top Forward Cake Tutorial.
Wish to Join US for the love of BAKING? Subscribe to our Youtube channel. Follow along on Facebook, Instagram, and Pinterest for all the latest updates!
Trending Smashable Chocolate Heart (Pinata Cake)
Ingredients
- 200 gms Melted White Chocolate
- Fillings for Pinata Cake
- 3D Geometric Heart Mould
Instructions
- Add about 150 gms of melted chocolate onto your pinata mould reserving some for second coating or chocolate decorations.
- Swirl the mould in all directions in order to coat the mould completely with the melted white chocolate.
- Turn the mould onto a bowl to drip off the excess chocolate. Clean the edges and allow it to set in the refrigerator for 5 mins.
- After the first coating, do a second coating only on places where you find the chocolate to be thinner using a pastry brush or the back of a spoon.
- Allow this to set for another 5 -8 mins.
- Once set, release the edges first and then place the mould onto a flat surface and pull it towards you to release completely.
- Decorate the mould as and how you like.
How to Serve the Heart Pinata Cake?
- Place a wooden serving board or a cake board if making for clients.
- Top it with the fillings of your choice.
- Enclose the fillings using the prepared chocolate mould and place a hammer on the side. Do tie a ribbon on the hammer to make it special.
Video
Notes
- I am using Compound White Chocolate here. You can use couverture too but make sure to temper it beforehand.
- Chocolate is really sensitive to handle. So be gentle or it might break while demoulding. If it breaks simply re-melt the chocolate and follow the steps again until you get the perfect mould.
- Instead of decorating the mould with chocolate flower you can simply use sprinkles to decorate it and reduce your work 😀
- If you are going to colour your white chocolate then only use gel food colour in minimal quantity and also add 2-3 drops of oil so that the chocolate doesn't seize.
- Use gentle hands and release the chocolate around the edges first before attempting to demould it completely.


Sheila Moonsamy says
Thank you for this recipe nd your time. My name is Sheila Moonsamy from South Africa and I run a Foundation named the Human Rights Screened Foundation. Our current project is a Gender Based Violence Project and I am raising funds and thought of the smashed chocolate idea and used the two pics in the article in my posts on Facebook Page. I hope its ok. If not I will remove it. Thanks again for the tutorial and taking the time to share it with the public.
God Bless, Sheila
sushma iyer says
Hi Sheila.. sorry it is not ok.. please remove it
Heather Piper says
Thank you for the wonderful vedio’s. How can one seal the bottom? Using what ? Thanks in advance. .
sushma iyer says
Hi.. you mean you want to stick the chocolate to the cake board? You can do that using melted chocolate itself.
Bhaswati Biswas says
Why my chocolate mould is breaking
sushma iyer says
Hi Bhaswati.. Make sure the edges are sturdy. Apply two layers of chocolate on the edges if need be in the beginning. Try this and see
Tamanna says
Hello Mam,
I am a home baker, and i want to know that for how long pinata cake lasts/survives? Can it will be survive on room tempreture? And for how long?
sushma iyer says
Hi Tamanna.. If you have set the chocolate at room temperature then it should last for months. If you are talking about the pinata cake once filled, then it depends on the filling inside. If you have just added chocolates inside then it should last for long whereas if you have placed a cake or any perishable item inside then it won't last long.
Regards
Sushma
Korena says
Hello,
Can I make this in advanced? For how many days? And where do I store it? In the fridge? Or in a cool area?
Thank you!
sushma iyer says
Hi Korena.. the chocolate shell can be made weeks ahead of time. I would store it in an air tight container or in the cake box in a cool area but never in the fridge. Chocolate should never be stored in fridge.
Regards
Sushma
Hannah says
Hi how do I keep my chocolate hearts solid I kept it out in room temperature in covered and it’s gone soft. Will having it in a cake box be enough to stopping it from going soft as I do t have room in fridge or freezer, making them for friends and family 14 of them am a little stuck please help x
sushma iyer says
Hi Hannah.. It wont go soft if set properly. Did you allow it to sit in the refrigerator for long when you made it?? If yes then do not allow it to stay in the refrigerator for long. Max 5 to 8 mins. IF more than that then only the chocolate will melt when you take it out of the fridge. Avoid that and you should be fine. Also hope you are using compound chocolate. If couverture then make sure to temper it.
Dharna says
Hi Sushma
What is the weight of the cake which could go inside a 7 inch or a 8 inch pinata mould? Both for a single shell heart and a double shell heart. I end up with just 200 gms that fits in with little bit of frosting.
Dharna
sushma iyer says
Hi Dharna.. Sorry but I have never really weighed my cakes.. so won't be able to answer your query at this stage.. but I am going to make a pinata cake for my daughter's birthday on first week of March. I will update it to you then..
Carrie says
I love your tutorial, very easy to follow, I do have a question. the mold lies flat when turned upside down but the hearts I have made do not - am I doing something wrong?
sushma iyer says
Hi Carrie.. glad to know that you found the tutorial easy to follow. Thank you 🙂
Coming to answer your query; there might be few things that you might have not noticed:
1. Did you clean the mold from top before refrigerating? Watch the video linked in the recipe card @2:09 to understand what I am asking.
2. Are you sure neither of the edges were broken while unmoulding.
3. Are you sure the edges were evenly coated?
Take a note of these things. Now what you can do is if you feel one side is extended than the other, use hot knife to trim that portion and level it off.
Hope this helps
Regards
Sushma