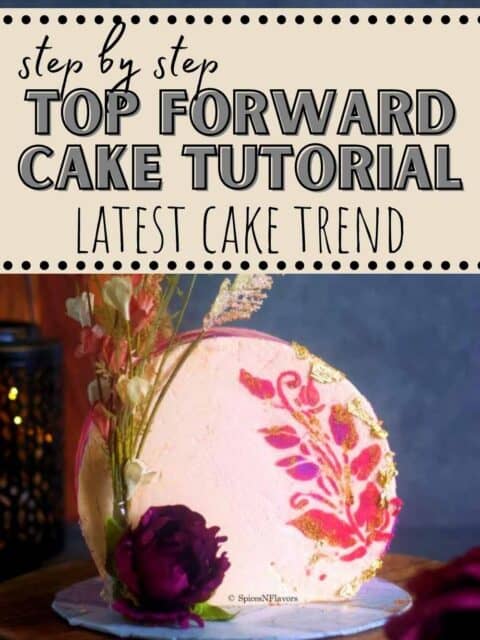
As a baker or cake decorator, we all love to try new cake trends – whether that’s in the texture, pattern, theme or colour and this Top Forward Cake is the latest trend in cake designing. Read the post for a step by step tutorial that also covers all the mistakes that I did so you don't have to.
Recently we reached 10K mark on Instagram. And I absolutely grabbed the moment to try my hands on this trending cake design <3
What is Top Forward Cake?
Also known as Standing Cake, Top Forward Cake is basically a round cake that is made to stand to on its sides resembling a semi-circle by cutting a small base portion on the sides. Since the top of the cake is now facing you, it gets its name.
If you have been following us, you know I love trying baking trends be it Pinata Cakes (also made Frozen theme in the same), Chocolate Pop it using Rainbow Fidget, 3 ingredient muffins and what not.
I have an entire playlist dedicated to it.. lol..
But this trend has to be my favourite so far. Only because of the versatility of designs one can make on top of it.
Things you would need
- Cake of choice. I am using Chocolate Cake as my base.
- Preferably Buttercream Frosting
- Silicon Mat, Parchment Paper, Mousse Rings, Acetate Sheets, Off-set Spatula, Turntable
Step by Step Tutorial
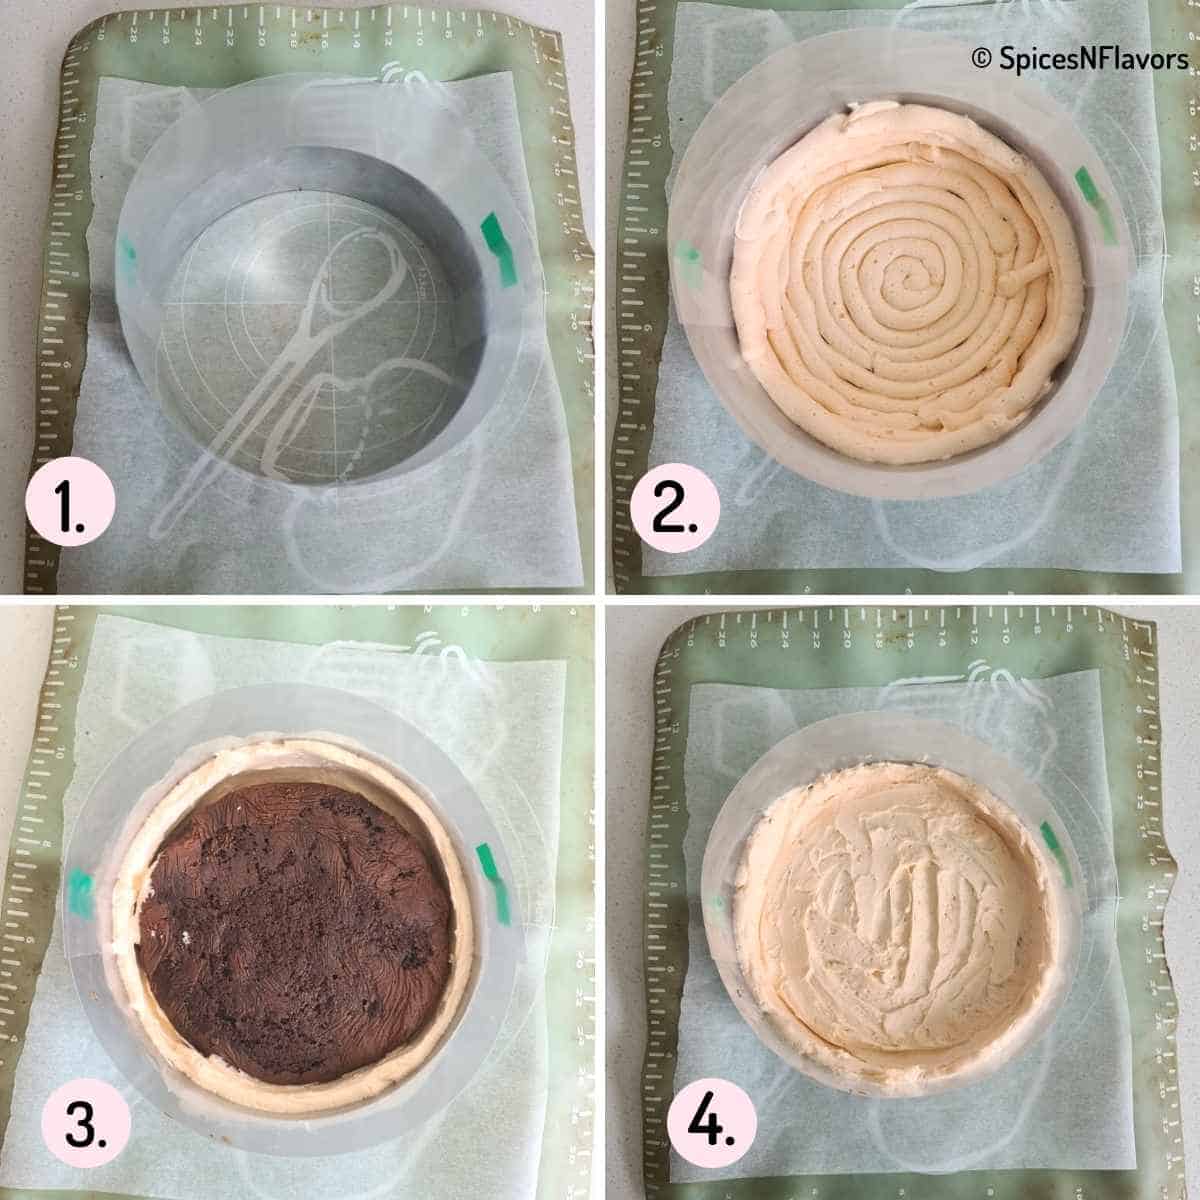
Start by laying a silicon mat on top of your baking tray followed by a parchment paper.
This would help us transfer the cake on to the cake board later so don't miss it.
Then I am taking a mousse ring of 17 cms diameter. Line the inside of the cake tin with acetate sheet (image 1).
It helps in demoulding the cake easily.
Take your frosting in a piping bag and apply it on to the base. Also add a layer on to the sides (image 2).
Using a spatula smooth the frosting really well.
Take your sweet little time here and make sure you are pressing the frosting well on to the sides and bottom.
Certainly you do not have to follow this method, you can do the regular method of making the cake which is to first crumb coat and then do a final coating.
But I felt this would be an easier way to cover the top and bottom of the cake especially for beginners.
Add the first cake layer (image 3).
Now again fill the gaps around the cake really well. This is essential or else you will get gaps all around the cake once you demould it.
Basically the point to remember is to squeeze out the frosting really well taking care to cover it all.
Add a thin layer of frosting on top of the cake and smooth it out too (image 4).
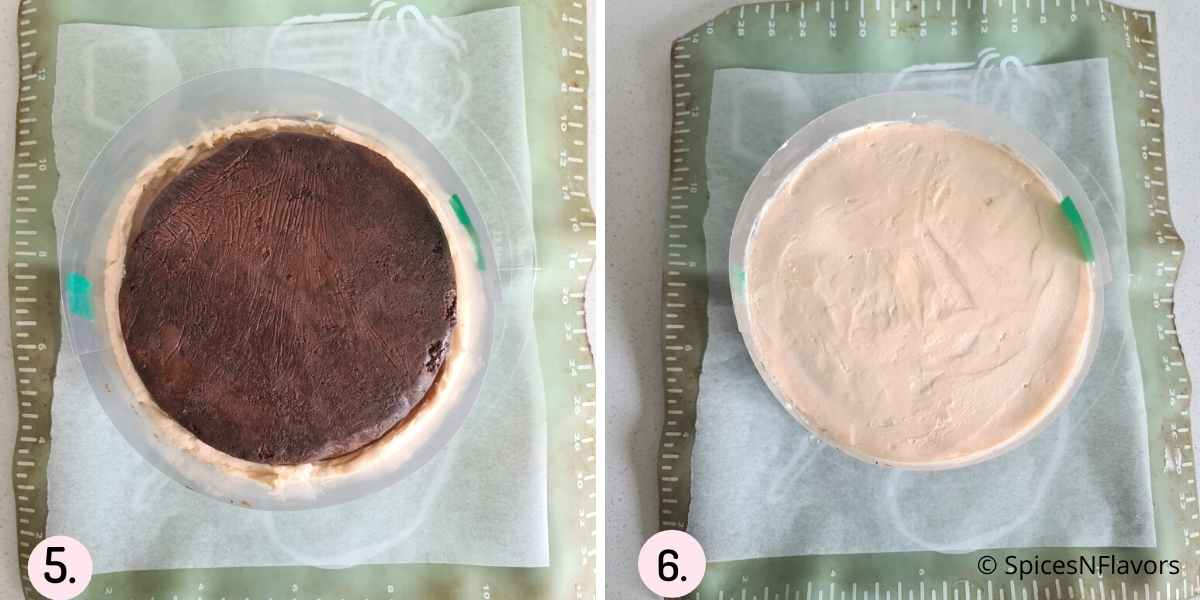
Place the final cake layer (image 5) and repeat the steps of filling the sides and top of the cake well.
Smooth out the frosting.
To smoothen it well, dip your spatula in hot water, wipe off with a paper towel and then use this warm spatula to smooth the frosting on top (image 6).
Freeze the cake for 2 hours.
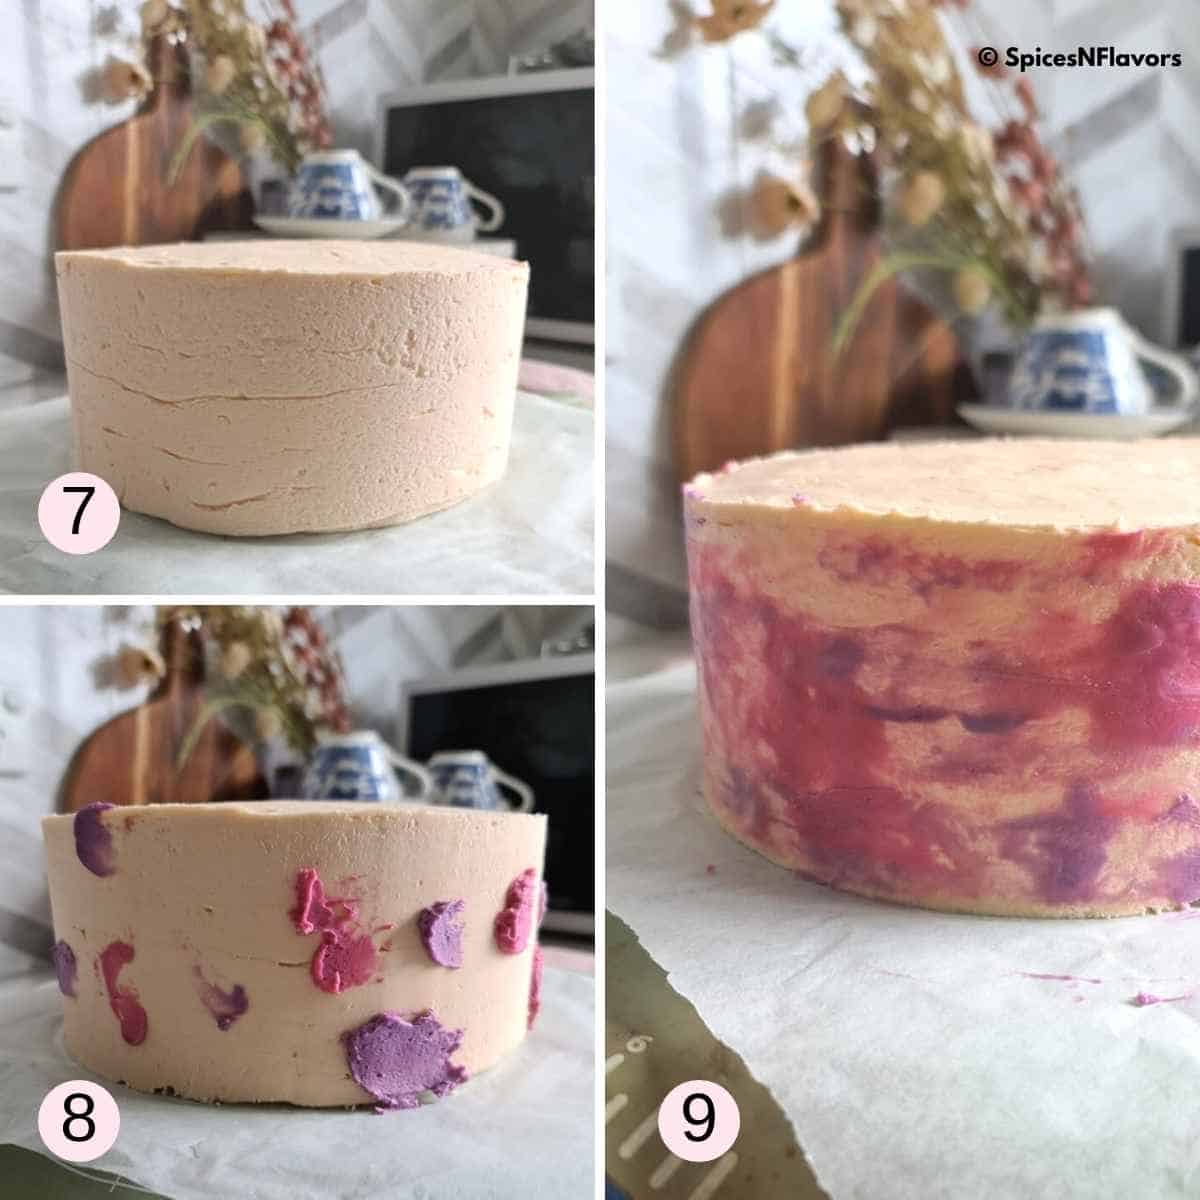
With the help of the silicon mat move the cake to a rotating turn table.
Then easily slide the cake ring off, remove the acetate sheets to a perfectly frosted cake.
But as you all can see, there are gaps all around my cake (image 7) that is because I did not fill it well, will discuss more on this in the Mistakes section.
To hide this now I am going to do a watercolour technique.
Take any complimentary coloured buttercream and add it at random spots on the cake (image 8).
With a bench scraper just smoothen. Do not go overboard as you do not want to smudge the colours (image 9).
So just one or two rounds around the cake should be fine.
Now since the cake base is frozen it would be difficult for you to do the job so use warm bench scraper to do the job.
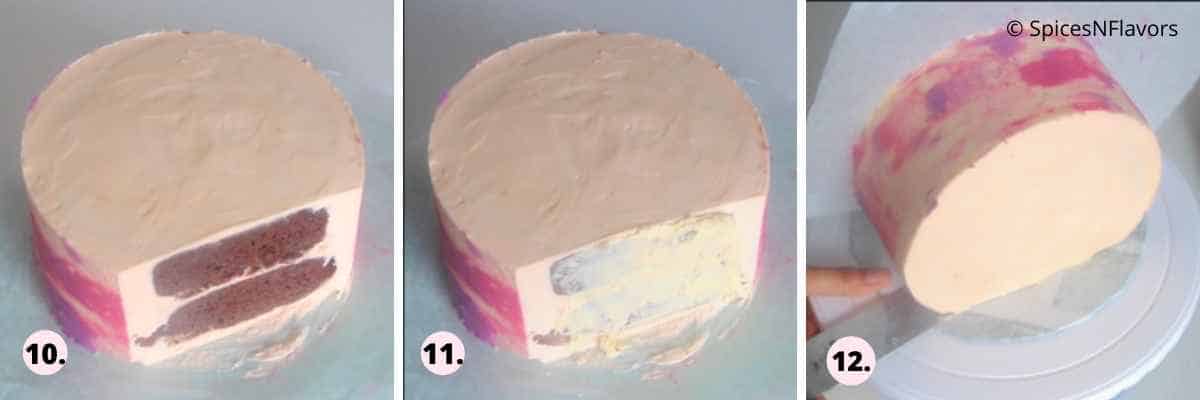
Then to make the standing cake, slice off one end of the cake, just a small portion (image 10).
Frost the base lightly (image 11).
Time to make the cake stand.
Keep your Cake Board ready. I have diyed mine. You can watch this Instagram Reels for the easy procedure.
With the support of the parchment paper lift the cake and using the help of a spatula easily and confidently transfer the cake on to the board. Since the cake is frozen this step becomes so easy (image 12).
Peel off the parchment paper.
Smooth the front of the cake with a warm bench scraper.
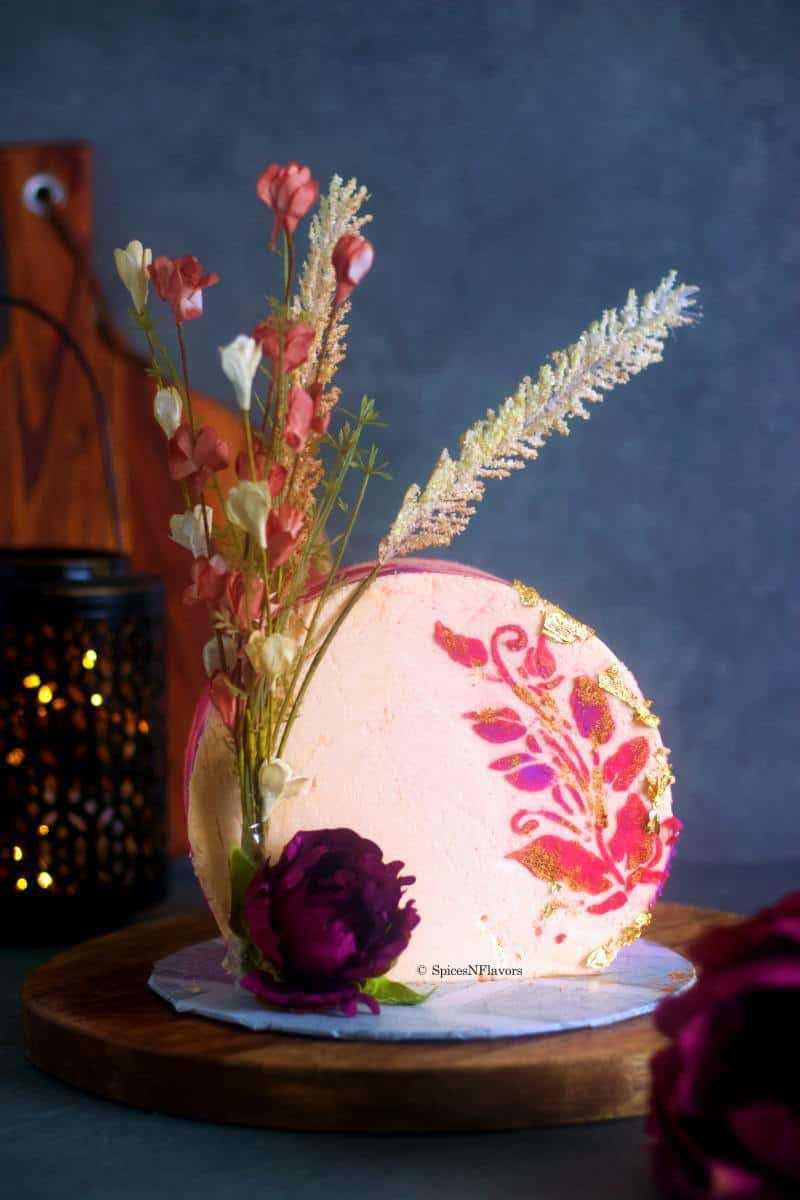
Once you are happy with the finish, you get a blank canvas and feel free to decorate as you like.
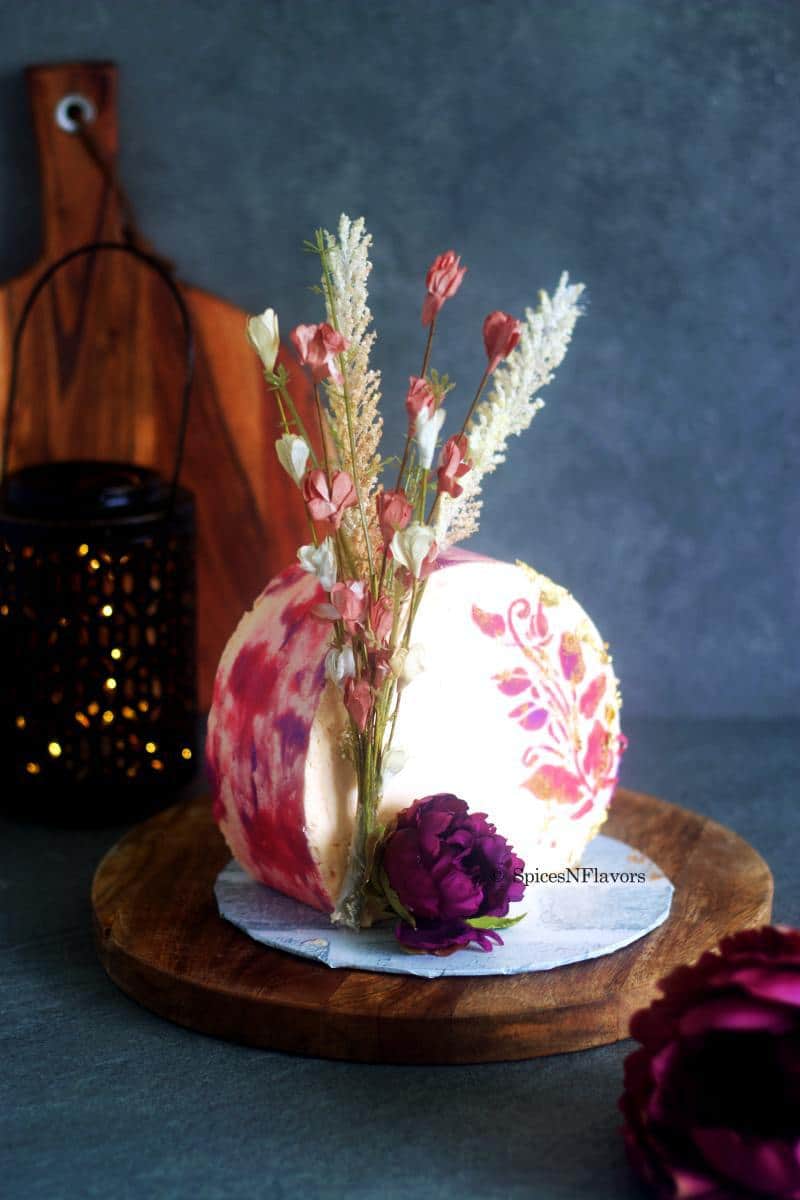
Top Forward Cake Design
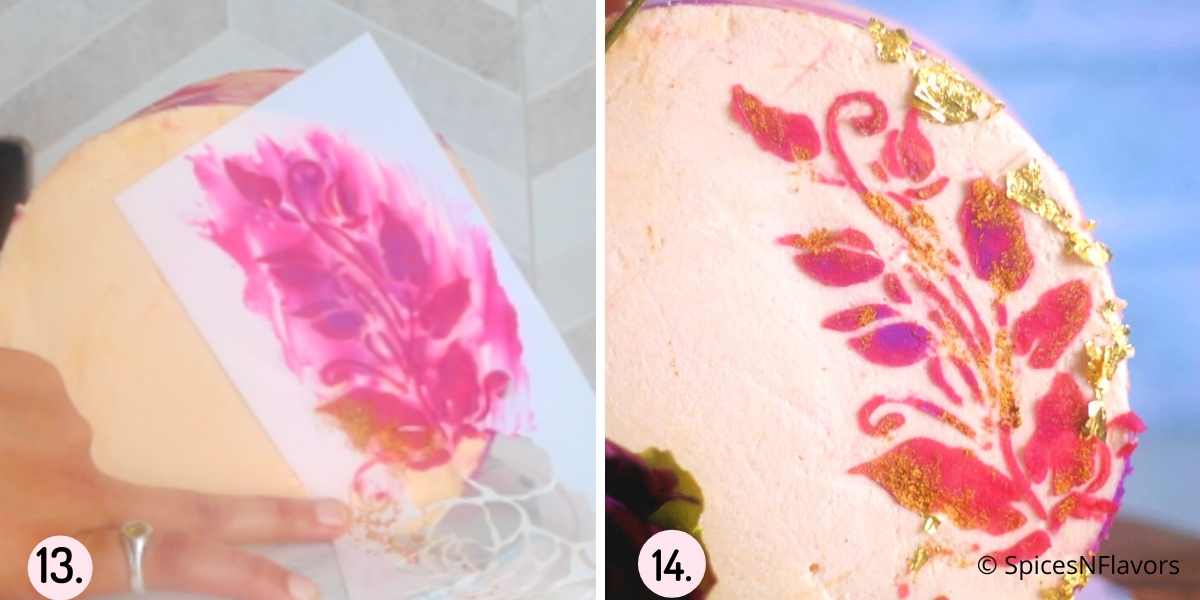
These days use of dried flowers on the cake is trending too so I went for that look. For which first using a stencil I am applying a very thin coat of buttercream on one side of the cake.
This is a very important tip which is to apply a thin coat of frosting because if you apply thick the frosting will peel off when you remove the stencil and nothing will stick to the cake so do note that (image 13).
Then I am using the second complimentary colour and apply it on top at random places.
Finally using gold lustre dust to give it a shiny touch.
Remove the stencil to reveal a beautiful design (image 14).
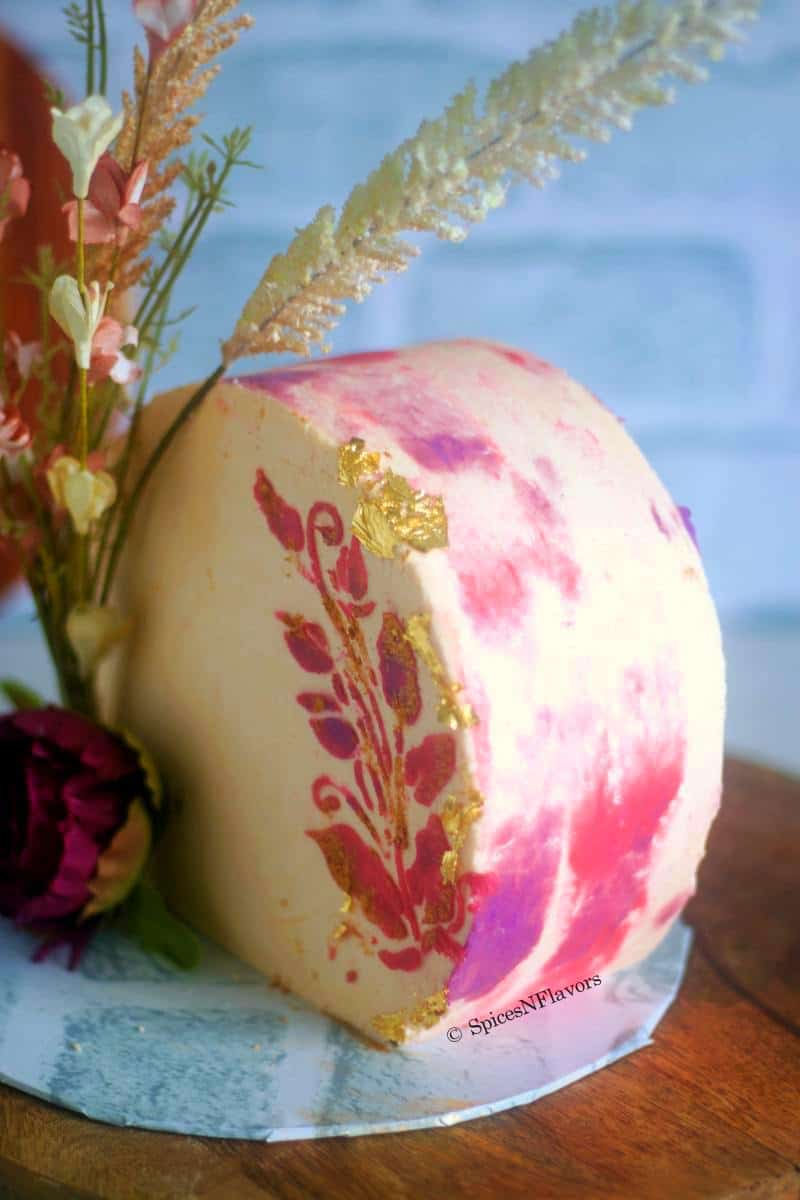
For the flowers I am using artificial flowers the choice is yours though if you wish you can use real dried flowers too. Just make sure to tape it well, again you can watch how I arranged this from our Instagram reels.
So thats our finished cake.
Learn from my Mistakes:
Mistake 1: Not making enough Frosting
I have used 15 cms cake as the base but I am assembling it in 17 cms mousse ring.
But I calculated the frosting based on the cake. And hence I fell short of the same.
The point to remember here is that make frosting as per the tin in which you are assembling and not as per the cake size.
Mistake 2: Not Pressing Enough Frosting on the Sides
When you use your piping bag make sure to squeeze really well on to the sides of the tin to avoid formation of any gaps.
Basically squeeze frosting till you see it overflowing on to the cake layer so you know the sides are filled well.
Baker's Tips:
- My number 1 tip for this cake, is obvious from my above mistakes portion, which is to make enough frosting to fill the sides of the cake really well. Since it is buttercream, even if you make more you can easily store it for future, so nothing goes waste.
- If you are going to store the prepared cake for long or making it for selling it to clients then do soak the cake to keep it moist for at least 3 days.
- Once the cake is frozen, it would be hard for you to smooth the sides or the top of the cake. So using a warm bench scraper or spatula would work better or wait for the cake to come to room temperature a bit and then smooth the sides.
- If you are going to follow the stencil method of designing, then make sure to apply just a thin coat of frosting on top. If you apply thick the frosting will peel off when you remove the stencil and nothing will stick to the cake.
- We get this acetate sheets for a ridiculous price at craft shops so buy it from there and not from bakery stores as they totally rip us.
- Wrapping the stem of the dried flowers using a cello-tape and then placing it on the cake is always a good idea.
- If you are a homebaker and would like to learn how to price this Top Forward Cake for selling then do consider checking this post on Cake Pricing Guide.
Related Recipes:
Wish to Join US for the love of BAKING? Subscribe to our newsletter and Youtube channel. Follow along on Facebook, Instagram, and Pinterest for all the latest updates!
Top Forward Cake Tutorial
Equipment
- Silicon Mat, Parchment Paper,
- Mousse Ring, Acetate Sheets
- Turntable
- Off-set Spatula, Bench Scraper
- Cake Board
- Dried Flowers and Stencil for Decoration
- Food Colouring and gold lustre dust (optional)
Ingredients
- 6 inch Chocolate Cake (2 layers)
- 5 cups Buttercream Frosting
Instructions
- Start by laying a silicon mat on top of your baking tray followed by a parchment paper. Place the mousse ring in the centre lined with acetate sheets.
- Take your frosting in a piping bag and apply it on to the base. Also add a layer on to the sides. Using a spatula smooth the frosting really well. Make sure the frosting sticks to the acetate sheet evenly.
- Add the first cake layer. Now again fill the gaps around the cake really well. This is essential or else you will get gaps all around the cake once you demould it.
- Add a thin layer of frosting on top of the cake and smooth it out too. Place the final cake layer and repeat the steps of filling the sides and top of the cake well. Smooth out the frosting.
- To smoothen it well, dip your spatula in hot water, wipe off with a paper towel and then use this warm spatula to smooth the frosting on top.
- Freeze the cake for 2 hours.
- After 2 hours, with the help of the silicon mat move the cake to a rotating turn table. Then easily slide the cake ring off, remove the acetate sheets to a perfectly frosted cake.
- Take any complimentary coloured buttercream and add it at random spots on the cake. With a bench scraper just smoothen. Do not go overboard as you do not want to smudge the colours. This is known as Watercolour Technique.
- Then to make the standing cake, slice off one end of the cake, just a small portion. Frost the base lightly.
- Time to make the cake stand. Keep your Cake Board ready.
- With the support of the parchment paper lift the cake and using the help of a spatula easily and confidently transfer the cake on to the board in a way that it is standing on the sliced portion. Since the cake is frozen this step becomes so easy. Peel off the parchment paper.
- Smooth the front of the cake with a warm bench scraper. Once you are happy with the finish, you get a blank canvas and feel free to decorate as you like.
Top Forward Cake Design
- Using a stencil I am applying a very thin coat of buttercream on one side of the cake. Adding a secondary colour at random spots to create marble effect. Dabbing the corners of the design with gold lustre dust.
- Remove the stencil to reveal a beautiful design.
- For the flowers I am using artificial flowers the choice is yours though if you wish you can use real dried flowers too. Just make sure to tape it well using cello-tape before placing on the cake.
- So thats our finished standing cake or top forward cake.
Video
Notes
- My number 1 tip for this cake, is obvious from my above mistakes portion, which is to make enough frosting to fill the sides of the cake really well. Since it is buttercream, even if you make more you can easily store it for future, so nothing goes waste.
- Certainly you can avoid all this and follow the method for frosting the cake the usual way which is crumb coating and then frosting. But when you make the cake stand it becomes a little difficult to frost the back side of the cake smooth so I prefer this method.
- If you are going to store the prepared cake for long or making it for selling it to clients then do soak the cake to keep it moist for at least 3 days.
- Once the cake is frozen, it would hard for you to smooth the sides or the top of the cake. So using a warm bench scraper or spatula would work better or wait for the cake to come to room temperature a bit and then smooth the sides.
- If you are going to follow the stencil method of designing, then make sure to apply just a thin coat of frosting on top. If you apply thick the frosting will peel off when you remove the stencil and nothing will stick to the cake.
- We get this acetate sheets for a ridiculous price at craft shops so buy it from there and not from bakery stores as they totally rip us.
- Wrapping the stem of the dried flowers using a cello-tape and then placing it on the cake is always a good idea.
- If you are a homebaker and would like to learn how to price this Top Forward Cake for selling then do consider checking this post on Cake Pricing Guide.
Swathi says
Hello
From where can I purchase cake stencil.none of the ones I saw are appealing. Could you share a print link of yours? 🥺 Please
sushma iyer says
Hi Swathi.. I got it from a local store named Arife. Where do you live?? Try visiting them they have a branch in almost all the cities.