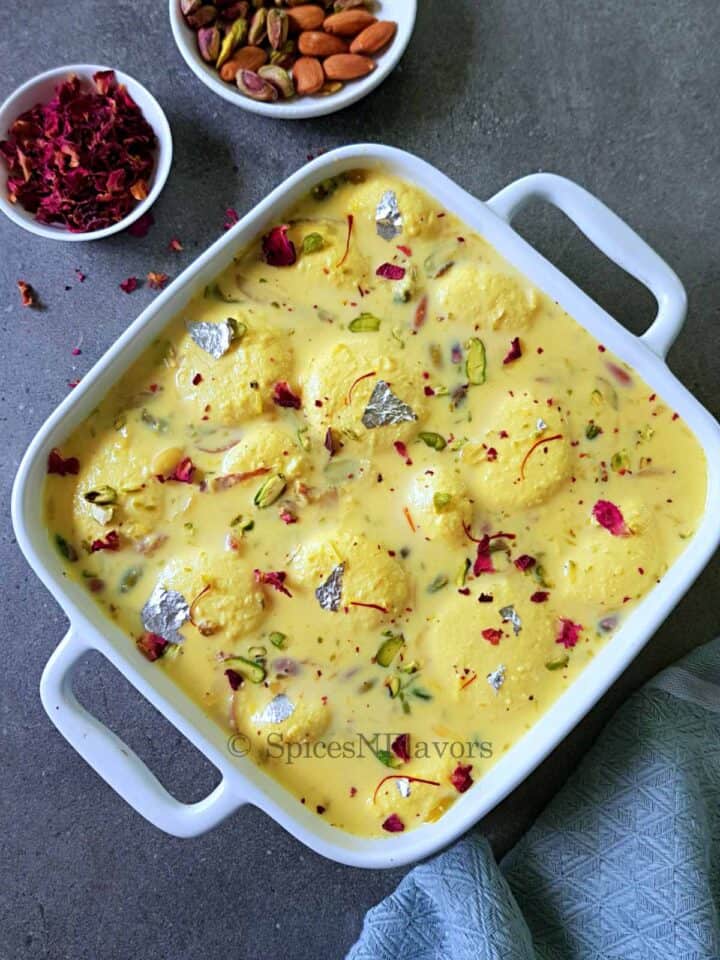
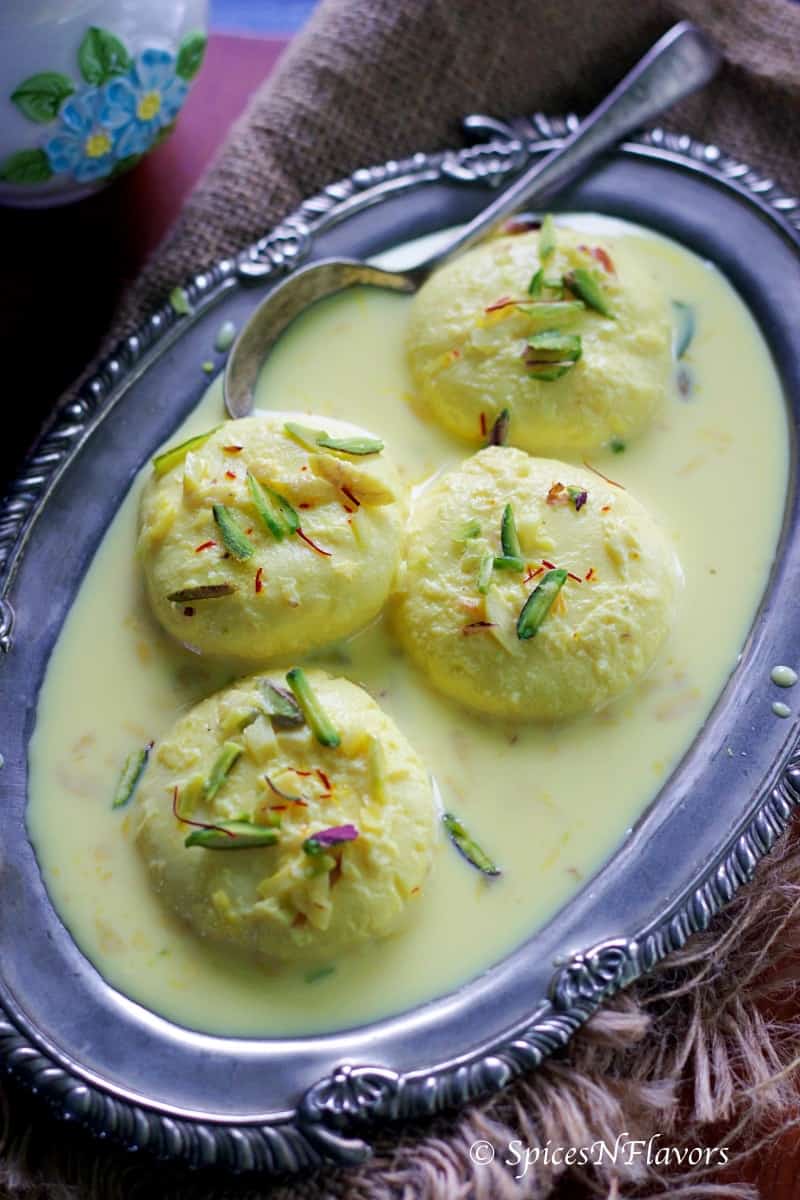
Amazingly soft and cushiony cottage cheese balls dunked in silky sweet milk; Rasmalai is a Majestic Royal Indian dessert that would grace any occasion and be the star of the PARTY!!!
Don't forget to check the 9 secrets to make the perfect spongy balls that no one ever explains!!!
What is Rasmalai?
Originating from the eastern regions of the Indian subcontinent, Rasmalai also known as Rossomalai or Roshmolai (in Bengali), literally translates to Ras meaning Juice (Milk in here) and Malai meaning the flattened cheese balls dunked in the milk.
A striking Indian dessert where everything is made from scratch - the milk is curdled to separate into the paneer (also known as chenna) and whey, shaped into balls then cooked in sugar syrup which is then allowed to soak the milk that has been flavoured with exotic spices like saffron, cardamom and rich nuts.
Though it sounds all glamorous the most common problem one faces is - Rasmalai turning hard, chewy and rubbery. I have tackled all those in a very effortless way for you guys so just sit back and read along and be ready to gather all the praises for making a perfect one.
Ingredients needed:
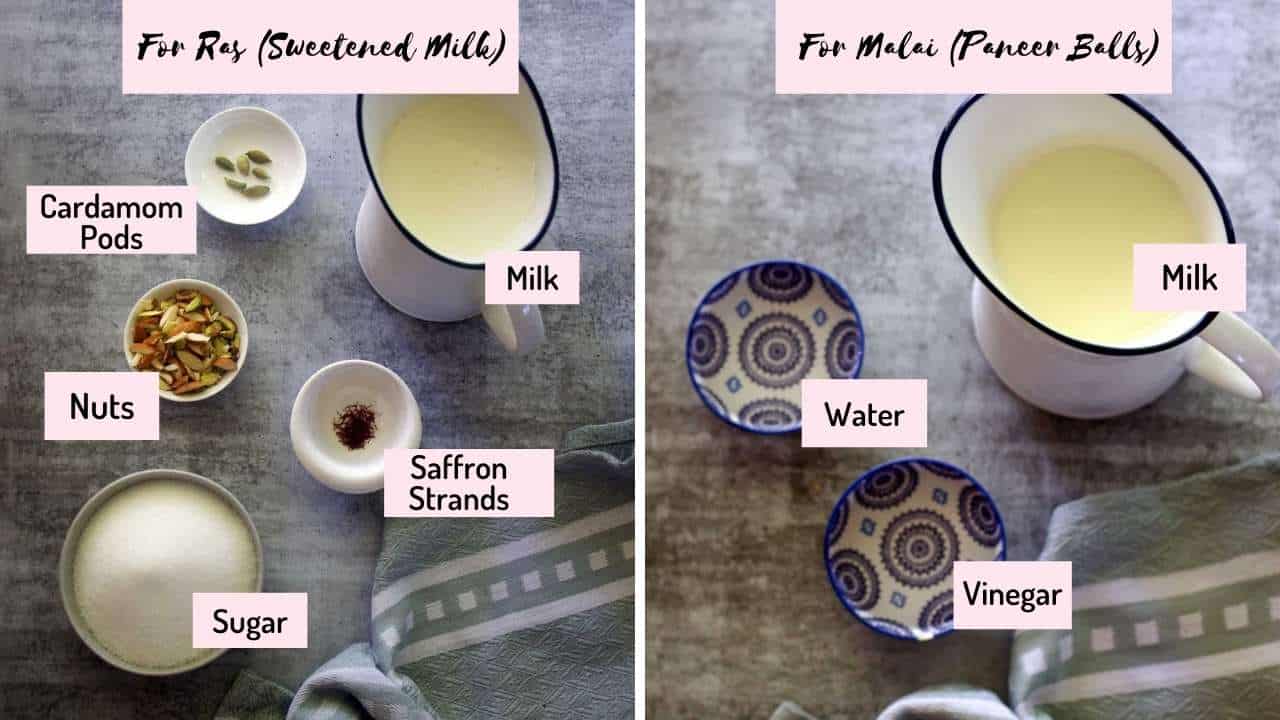
Ingredients Notes:
- Milk: Use full-fat milk to make the Ras (skimmed or 2% won't be suitable). And for the Cheese Balls use only Cow's Milk (Buffalo Milk won't work)
- Acidic Agent: I recommend and prefer using only Vinegar. However lemon juice or citric acid can also be used.
- Cardamom: Please grind cardamom pods to make fresh cardamom powder and then use it as that is what will make the Ras flavourful.
My Failed Attempts:
I have made this Indian dessert before; not exactly like the traditional ones but a different malai sandwich with so many components and plating - Malai Sandwich with Kesar Mousse and Cardamom Crumble. That was one amazing plated desserts that I have made.
And it came along like a breeze, call it a beginners luck or what no idea.
But when I made it again for Diwali back in 2018 it was a disaster, the paneer turned pasty and I couldn't even shape it and that's when my friend Dhwani from cookingcarnival.com shared her tips with me and I could then nail it.
This recipe was first published on May 2, 2018 and fast forward to Oct 2020, I now make this every single month in my home (All my Instagram fam just wait for that time of the month.. 😉 ) and I have learned so many things that I had to update this post with all my tips and tricks and also what I have learned through my Failed Attempts:
Trial One:
Even after hanging the paneer for 40 mins, it still remained so wet that the entire thing turned pasty and I could not even shape it into a dough rest cooking.
I realised that I had added too much water to wash the paneer before hanging and it won't turn crumbly no matter how long I allowed it to dry.
Trial Two:
My paneer balls remained dense and hard and did not get cooked in the water.
I realised that I had not kneaded the dough well and it was not the right consistency. And so I have an amazing trick for this step (just hang on)
Also the temperature of the boiling water fluctuated a lot while cooking. So I rectified that next time.
Trial Three:
Finally after two failed attempts I could nail this recipe and that is exactly what I have shared below so that you can nail it in your first attempt itself.
Do check out the secrets that no one shares which I believe might help you.
Step by Step Tutorial:
There are essentially three steps to make the Rasmalai
Step 1: Preparing the Ras
Let us get started with the first step which is to make the Ras of the Rasmalai. Trust me this is the easiest part of the whole recipe.
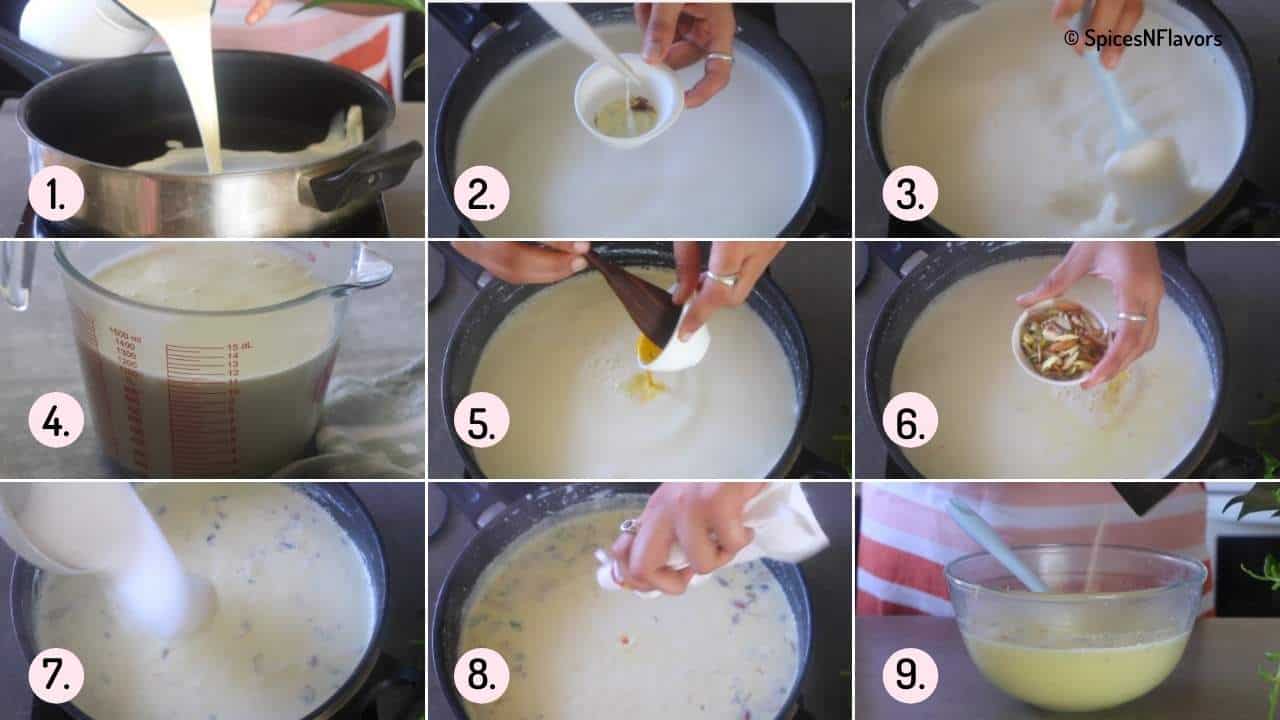
All you have to do is take the milk in a wide mouth heavy bottom pan (image 1), that way it becomes easier and quicker to reduce the milk.
On Medium Flame stir the milk to reduce it to around 70 percent of what you started with.
This would take approximately 30 to 4o mins of your time depending upon how much milk you have started with.
Do remember to scrape the sides of the pan as that is where the malai gets stuck to (image 3). So scrape that and mix it along with your milk, this is how you will get the grainy texture in the milk which shows up on the cheese balls whilst soaking making it richer and creamier.
Secret 1 - Trick to make the Rasmalai creamier
Scrape the sides of the pan to get the malai and then mix it with the milk and that is how you will get the grainy texture in the milk making it even more creamier.
When you see the milk has started simmering take some of it and add it to the saffron strands (image 2). Mix and allow the saffrons to release all its flavour in the milk.
Stir the milk in regular intervals as you do not want the milk to burn at any cost (image 3).
For making the Ras of the Rasmalai make use of full fat or buffalo or cow’s milk. Do not use the skimmed one or 2% one.
Do not allow the milk to reduce longer. And this is where some of you might be making a mistake of reducing the milk way too much and hence the rasmalai fails to soak the milk and remain juicier and moist.
Secret 2 - Keep the consistency of the milk thinner or else the paneer balls won't be able to soak the milk and remain juicy and moist.
Now that the milk has reduced (beginners can check by transfering it to a measuring jug - should be around 1100 ml - image 4), add the saffron milk and nuts (image 5 and 6).
Give a quick mix and add the sugar. Mix it as well. Finally add yellow food colouring if using, mix and allow this is to boil for another 7 to 10 mins and transfer it to another bowl to cool completely (image 7 to 9).
Before we proceed to next step, grind some cardamom pods.
A tip here that My Mom had shared with me was to add just a pinch of sugar to it and that way it becomes super easier to grind the pods in your mortal pestle.
Add the cardamom powder to the milk (image 9). Stir and let it cool completely.
Step 2 - Preparing the Paneer Balls
This also starts with boiling the milk.
Which type of milk to use?
For this part you have to use ONLY Cow’s Milk. Do not use Buffalo Milk as you won’t get soft chenna or paneer.

Ok transfer your milk to the saucepan and bring it to a boil. Again do stir in between if need be.
Once it has boiled, switch of the flame and let it sit in the counter top to cool just a bit say about 5 to 8 mins (image 10 - 12).
Secret 3 - Curdling milk when it is too hot leads to a chewy and rubbery chenna resulting in a rubbery and chewy Rasmalai.

In the meantime let us prepare few things like diluting the vinegar with equal amount of water that way there won’t be any after taste in your paneer. (image 15 -17)
Keep a bowl with a strainer ready. Place a muslin cloth on top of it to strain the paneer (image 13-14).
When to curdle the milk?
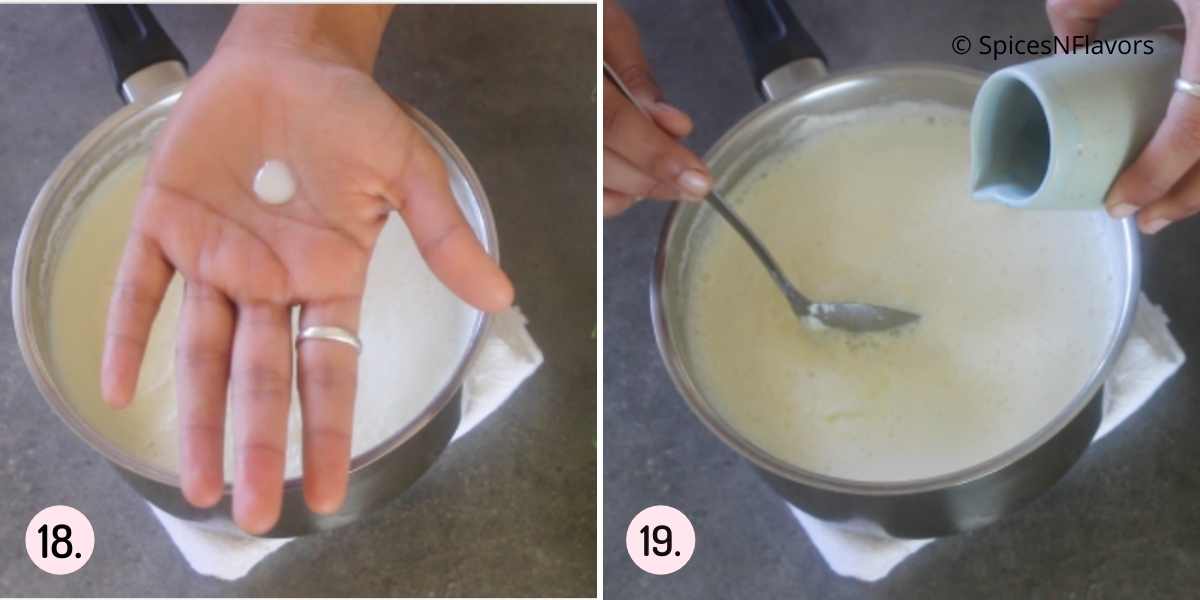
After about 5 to 8 mins, just take some milk in your palms (image 18). You should definitely feel it to be hot but still be able to bear the heat and not like boiling hot.
How to Curdle the milk?
Just add a small amount of diluted vinegar mix to the milk. Stir. Add again and mix. Continue this step of adding a little vinegar at a time and then stirring until you see the milk is completely curdled (image 19).
After a while you will see the paneer starting to form. Do not strain the milk yet.
Secret 4 - Straining the milk too early will not give you soft Rasmalai.
Please continue adding vinegar until you see the whey separated completely the clear indication for the same is when it turns green in colour.
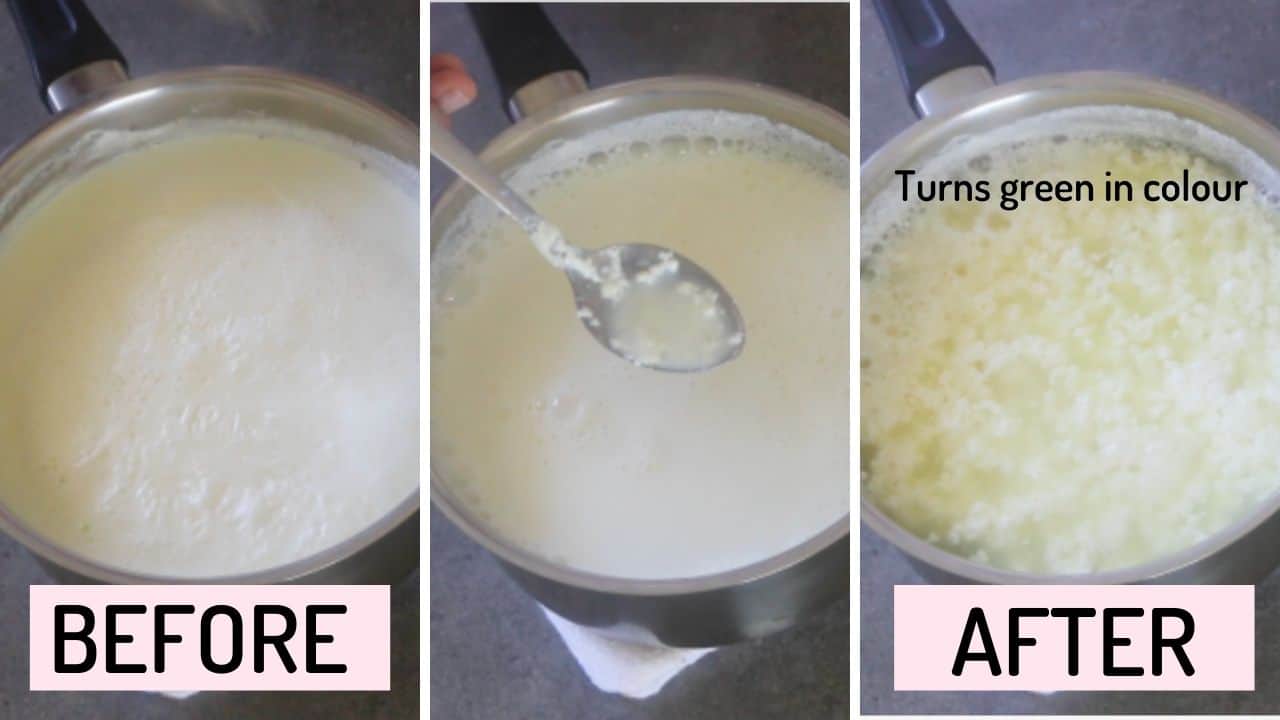
So this is how we started with (before image), upon addition of vinegar the milk separates a bit (middle image) and when it turns green like this (after image) is when the paneer is ready completely.
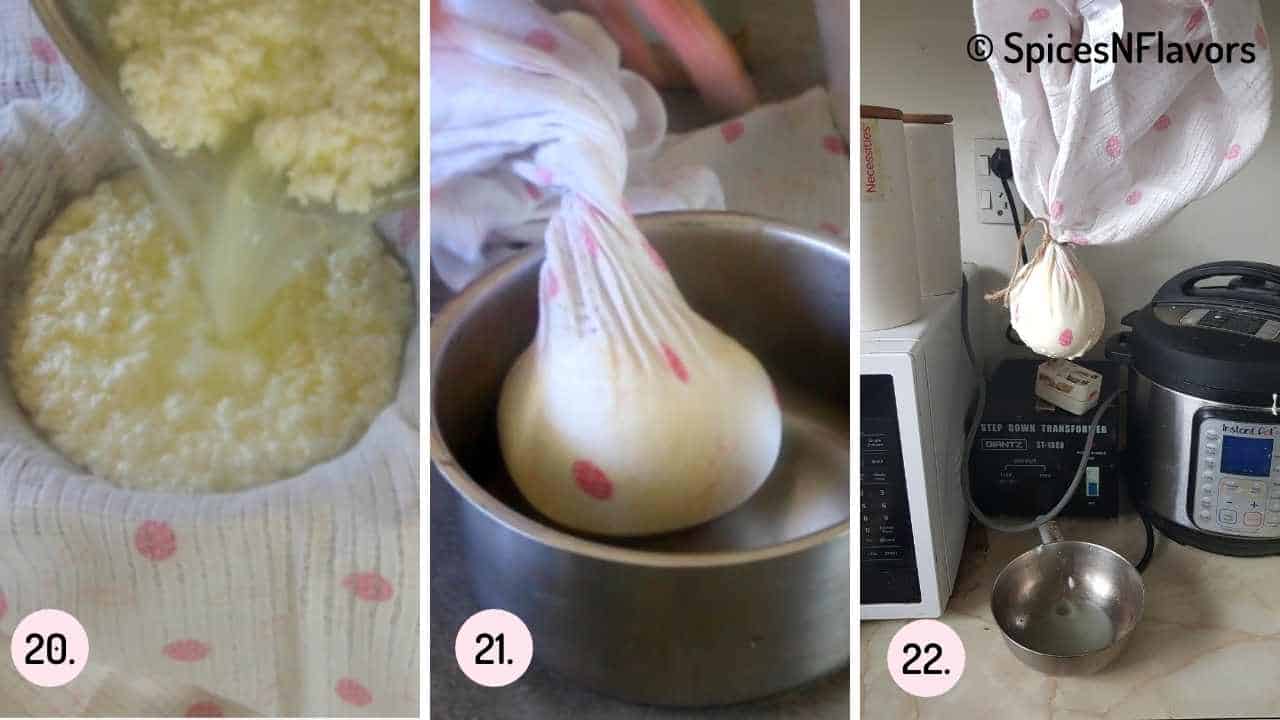
At this stage you can add ice cubes or cold water to stop the paneer from cooking further or strain immediately (image 20). Hence it is advisable to keep the strainer ready first.
Secret 5 - If you leave the paneer in the whey itself for long your resultant rasmalai will be chewy.
Gather the muslin cloth and squeeze out the excess whey as much as you can. Tie a knot and let it hang in your kitchen for around 20 to 25 mins by the clock. (image 21-22).
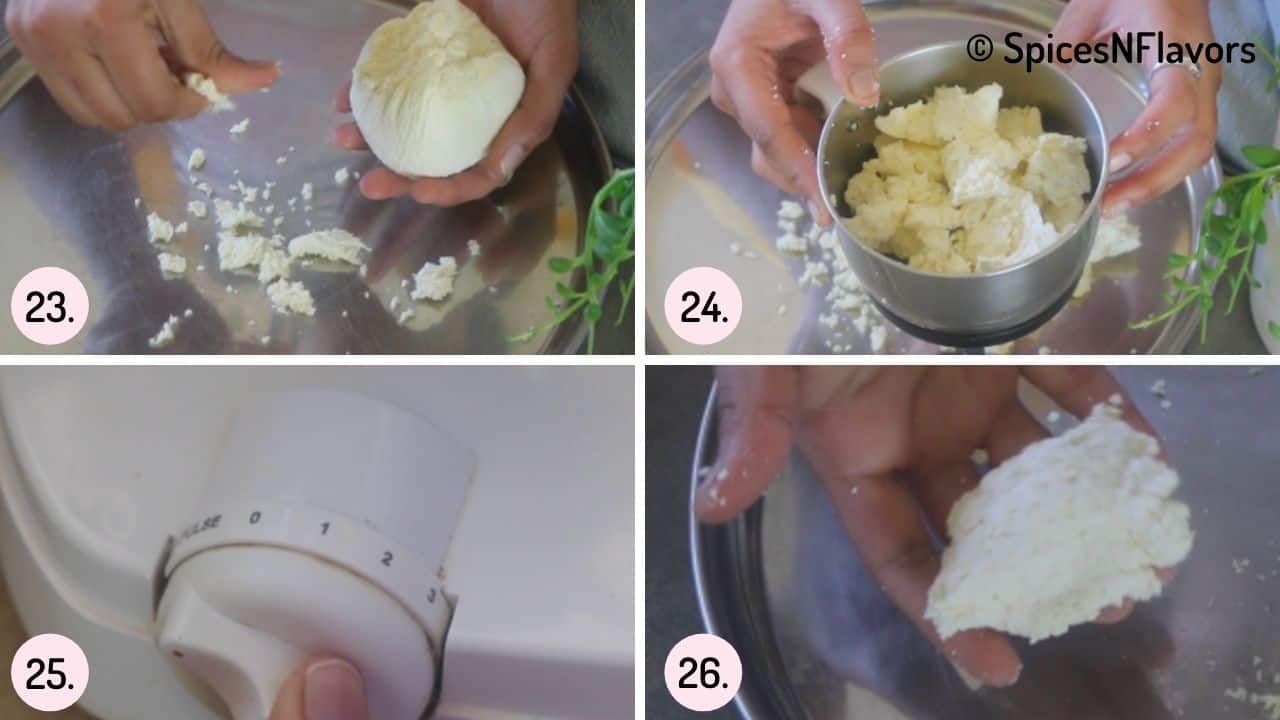
After 20 mins the paneer should be crumbly as seen but when you press it between your fingers it should feel wet and moist like you would hear that chip chip sound when pressed together (image 23).
Secret 6 - If at this stage the whey is not drained then your rasmalai might break while boiling.
Ok the other part where most of you go wrong is kneading the paneer.
I have an amazing trick for you all to do. Simply take half portion of the paneer in your mixer jar. Pulse it 4 to 5 times and that’s it. Take it out of the jar. Repeat the same with the other half of the paneer. (images 24-26)
Now just knead the paneer for another 4 to 5 mins by the clock.
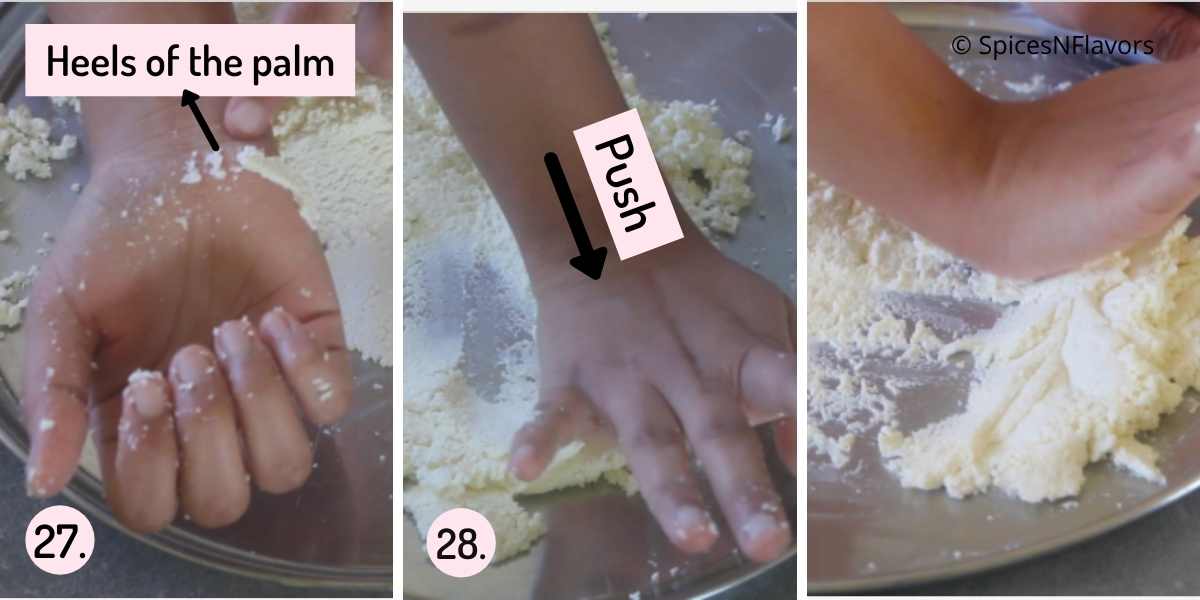
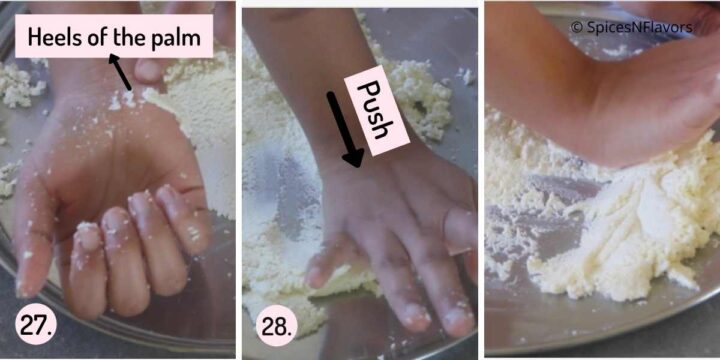
You would have to knead it with the help of your heels. Do not apply too much pressure. Knead like the way you can see in the video. (images 27 -28)
If you do not wish to pulse the paneer in the mixer then you would have to knead it for around 15 to 20 mins or so until the paneer comes together as a dough.
A good way to test is take a small portion of it in your hands and form a ball if it holds its shape without any cracks on the surface then you are good to go.
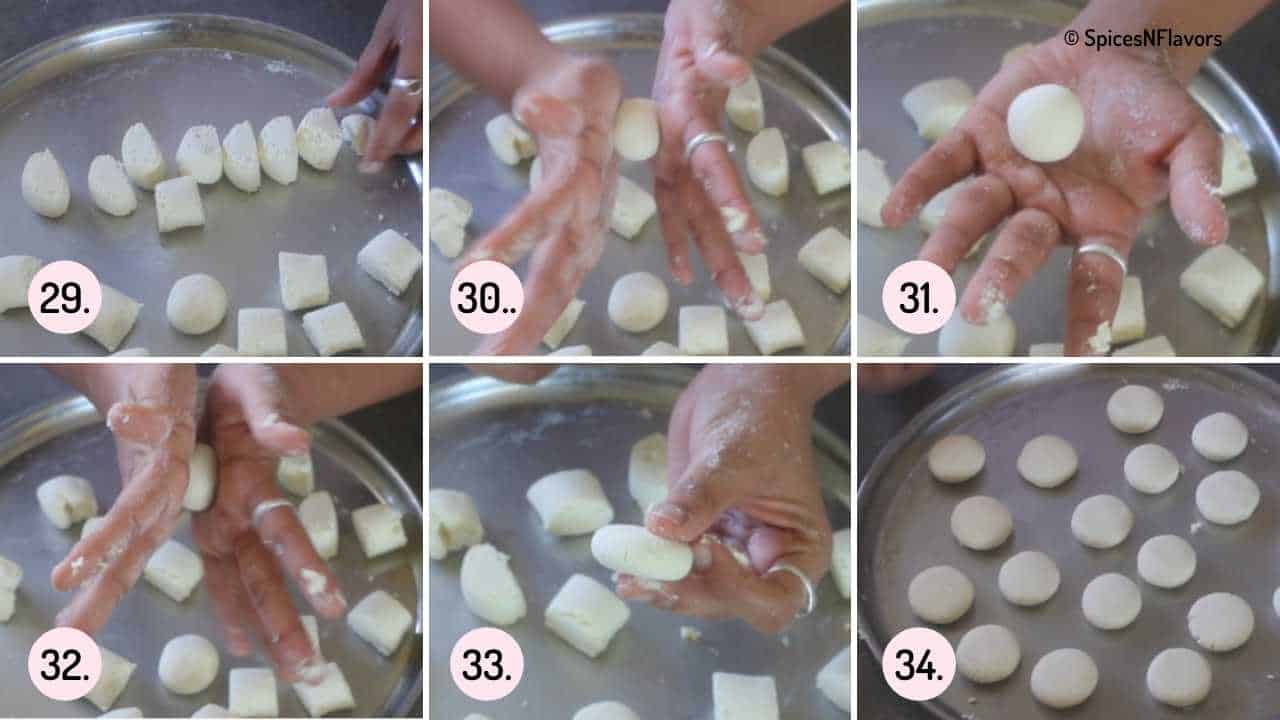
Now divide it evenly into 19 balls. (image 29)
Simply take one portion of it roll it in between your palms to give it a round shape first. (image 30 - 31)
You would stop here if you were to make a rasgulla. But for rasmalai just press it gently between your palms to flatten it. If there are any cracks visible simply cover it to make it crack free (image 32 - 34).
Secret 7 - If you leave the cracks there then this would cause your balls to break in the boiling water.
WORD OF CAUTION:
If by any chance you left the paneer balls to hang for a longer duration leading it to dry out then simply add a tsp of warm water to the paneer while kneading to retain the moisture.
Ok so just shape all the balls. (image 34).
Let us now proceed to make the sugar syrup needed to cook the paneer.
Always keep the paneer or chenna covered at all times with the muslin cloth. This way it won't dry out.
Secret 8 - Tip to avoid your Rasmalai from becoming dry is to keep the paneer covered all the time
Step 3 - Cooking the Paneer Balls
Use a wide mouth and a deep pan for cooking the paneer balls.
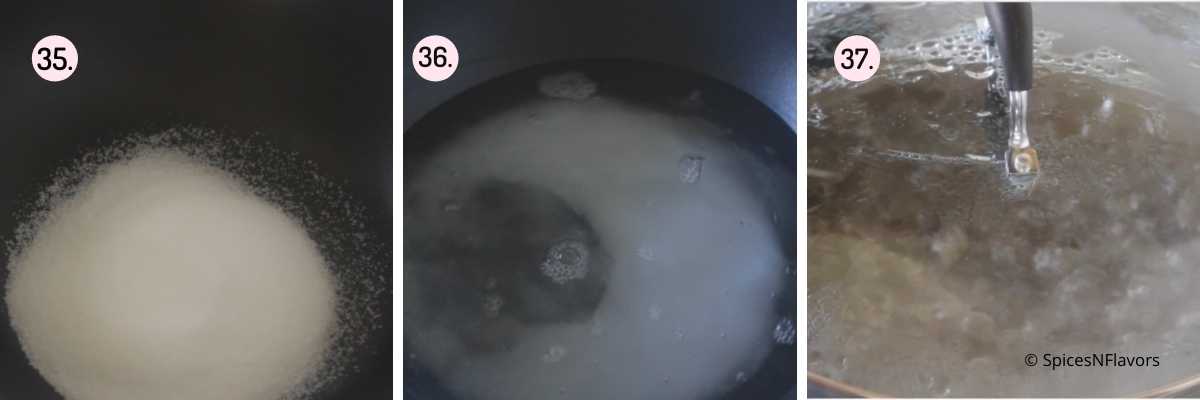
Add the sugar and water and bring it to a rolling boil (images 35-37) .
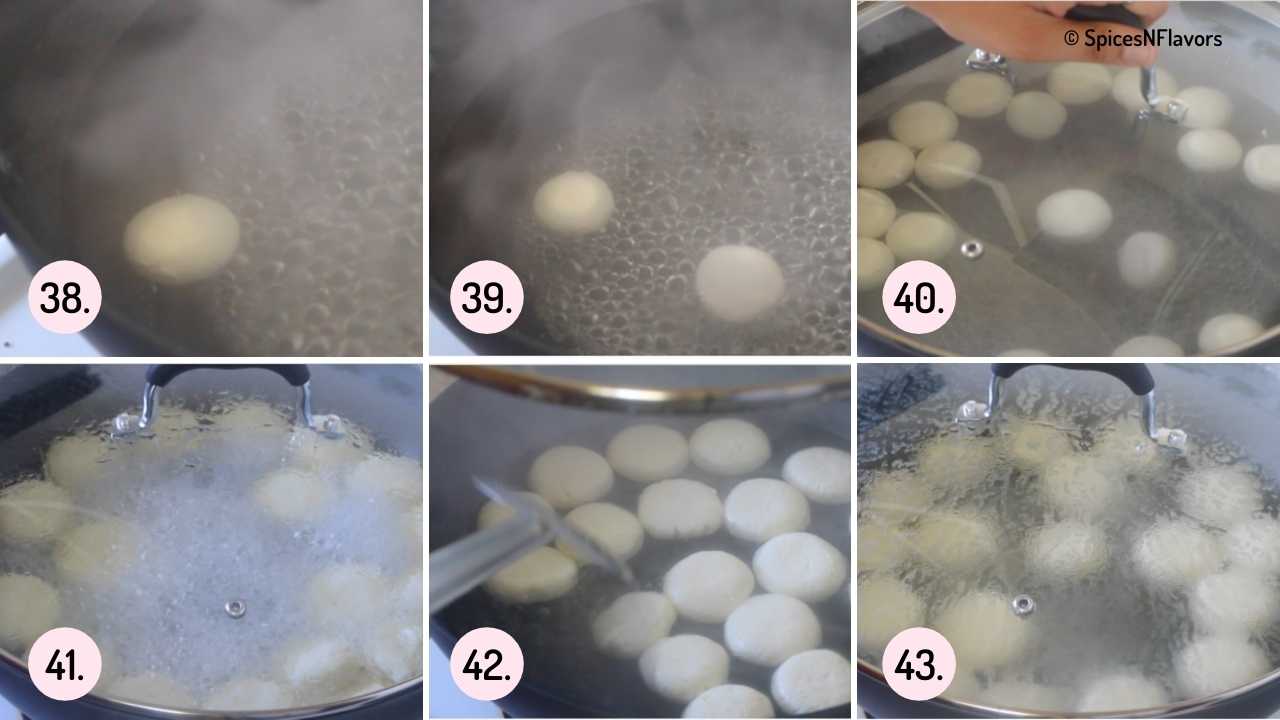
Once it starts boiling, drop a paneer ball (image 38) wait for few seconds and then add the next one (image 39). The water should be boiling at all times.
Secret 9 - Adding all the paneer balls at once would alter the temperature of the water which would mean the paneer will not be cooked properly and would remain dense.
Cover with a lid and let it cook on med high flame for 10 mins (image 40).
After 10 mins, when it is doubled in its size (image 41) take the lid and with feather like hands note it feather like hands in a super gently way stir the balls once then (image 42) place the lid back on lower the flame to medium and cook it further for another 5 to 8 mins (image 43).
Switch off the flame and let the balls be like that itself without any disturbance for 15 mins.
Now if you wish to skip all of this and try a shortcut method, then consider checking our rasmalai with rasgulla post for more details.
Step 4 - Assembling the Rasmalai
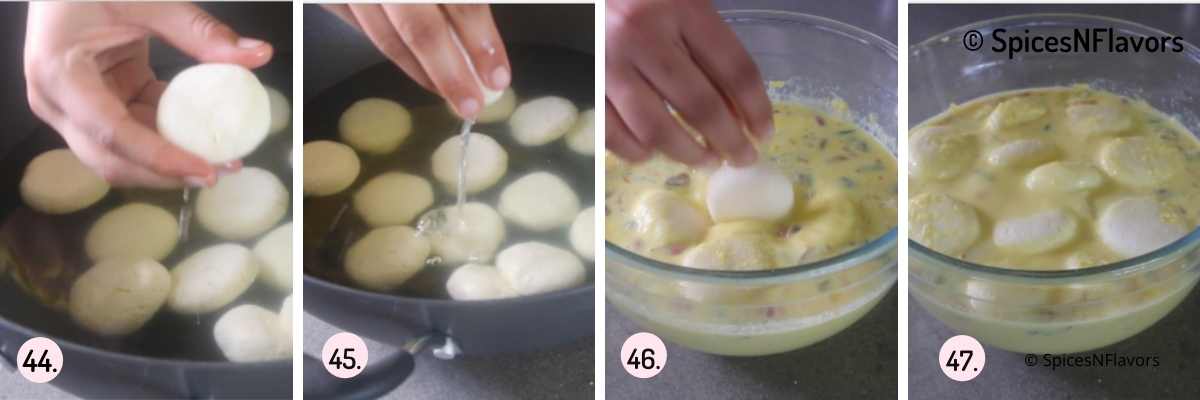
After 15 mins. Take the balls squeeze out the water gently from it and then add it to the prepared ras (images 44 - 46).
Let it sit in the fridge for a minimum of 4 hours (image 47).
Serve the Rasmalai Cold.
Points to Remember (TIPS)
- Point 1 - Use full fat milk to make the Ras of the Rasmalai and keep the consistency of the milk to 70% as seen in the video
- Point 2 - Always scrape the sides of the pan while making the ras to get a creamier texture.
- Point 3 - Use only Cow's Milk for making the paneer.
- Point 4 - Do not curdle the milk when it is boiling hot, allow it to cool for about 5 mins.
- Point 5 - Add a little diluted vinegar mixture at a time to curdle the milk.
- Point 6- Allow the milk to curdle completely and only then strain (clear indication of it is the milk turning green in colour)
- Point 7 - Do not leave the paneer in the whey for long, strain immediately.
- Point 8 - The paneer should be crumbly and yet a little moist once it has been allowed to drain. If too moist it will disintegrate into the boiling water.
- Point 9 - While shaping, form a crack free paneer ball every single time.
- Point 10 - Keep the paneer covered at all time to avoid it from drying out.
- Point 11 - The type of vessel used to cook the paneer also plays a key role. Please use wide mouth and deep pan.
- Point 11 - Do not drop all the paneer at once. Drop it one by one in the hot boiling water to cook.
Recipe FAQ's
The paneer balls break if the whey has not been drained out properly and the paneer still has lot of moisture content in it. To avoid the rasgullas (paneer balls) disintegrating in the boiling water, one must avoid washing it once it has been strained out and ensure that the paneer is hanged for a sufficient time for it to dry a little bit but still remain moist and NOT WET.
Also ensure making a crack free paneer ball while shaping, the cracks can also cause it to break while boiling.
Here is a list of things that makes the paneer balls turn hard, rubbery, chewy and dense. If you avoid that you will get the most softest and spongiest paneer ever!!
1. Do not curdle the milk when it is too hot.
2. Allow the milk to curdle completely and only then strain.
3. Give sufficient time to drain the moisture from the paneer once strained.
4. Keep the chenna covered with the cheese cloth till it is ready to be cooked.
5. Do not add all the paneer balls at once to the boiling water to cook. Add one at a time.
Made from freshly prepared paneer, both the Indian dessert undergo the same process of curdling the milk, separating out the whey, shaping and cooking in sugar syrup. The difference is that the sugar syrup used for cooking the rasgulla is sweeter as compared to rasmalai because in case of the later, the paneer balls once cooked is further dunked into sweetened milk which makes it even more sweet. Which means you can actually make rasmalai using rasgullas. Check this post on rasmalai using store bought rasgullas for more details.
Using a tooth-pick prick some holes in the paneer balls. Gently bring the ras to a boil. Put the pierced paneer balls into it. Cover with a lid and let it soak for a couple of hours. This would cause the paneer to soak the milk through the pierced holes and become a bit softer and juicier comparatively.
Do not get disheartened that your paneer balls disintegrated in the boiling water even after following all the instructions. Just strain it out. Allow everything to cool completely. Add 2 to 3 cups of the prepared Ras to it. Blend it in the mixer jar. Transfer to kulfi moulds or any cups and freeze overnight and enjoy the most delicious kulfi ever!!! You can do this step if your rasgullas are hard and not cooked properly.
Storage Instructions (Shelf Life):
Milk Based Desserts like Kheer, Rasmalai etc need to be refrigerated unlike the regular pedas or burfi. You cannot leave it at room temperature for long.
Store it in an air tight container for about 3 to 4 days in the refrigerator.
You can also freeze it in a freezer safe container for about 1 month. Just thaw it in the refrigerator the night before and then use.
Few Cheat Tricks:
I understand that not everyone has the time to make this recipe the authentic and traditional way. So here are some short cut method to make your work easier.
- From Store-bought Rasgullas: Squeeze out the syrup from the rasgullas and simply dunk them in the prepared ras and let it chill for 2 hours and voila it is ready to be served.
- From Bread: Simply cut the white bread into roundels using a cookie cutter. Pour the ras when you are ready to serve. The bread would soak the milk and when eaten would resemble the texture of the malai that is paneer balls.
- From Ready-Mix Packets: You can use the ready mix packets to make the ras quickly. Just follow the instructions in the packet for the same.
Can I use Store-Bought Paneer to make the process quicker?
No. The recipe will not work with store bought paneer because of the moisture content. So either choose from the short-cut method mentioned above or you follow the recipe from scratch.

Other Indian Sweets Recipe:
- Rasmalai Trifle
- Rasmalai Cookies
- List of 23 Indian Sweets that can be made under 30 mins. (Bonuses included)
- Rasmalai Trifle
- Rasmalai with Rasgullas
Wish to Join US for the love of BAKING? Subscribe to our newsletter and Youtube channel. Follow along on Facebook, Instagram, and Pinterest for all the latest updates!
Rasmalai Recipe - 9 Secrets No One Shares
Ingredients
"Ras" - Sweetened Milk
- 1.5 litre Full Fat Milk
- Big pinch of saffron
- 3-4 tbsp Chopped Nuts (depending upon your preference)
- 1 cup Sugar (or to taste)
- Drop of Yellow Food Colour (optional)
- 5 Cardamom Pods
Paneer Balls
- 1.5 litre Full Fat Milk
- 3 tbsp Vinegar
- 3 tbsp Water
Sugar Syrup
- 1.5 cups Sugar
- 6 cups Water
Instructions
For Ras - Sweetened Milk
- On med flame, in a wide mouth heavy bottom pan, cook the 1.5 litre milk until you see steam coming out or sufficiently heated. Keep stirring in between

- Once it starts steaming, take a couple of tbsp milk and add it to the saffron strands. Mix. Allow it to release its flavour. Let this stand until ready to use.
- Keep stirring and cooking the milk until it has reduced to 70% of the original quantity that we started with. This would take around 30 to 40 mins depending upon the type of pan used, flame in which you are cooking etc.
- Once the milk is reduced, add the saffron milk, nuts and sugar. Mix well and again cook it for further 10 mins, do stir in between so that the milk does not stick to the bottom of the pan and burn.
- Finally add the yellow food colouring if using. Mix and bring it to a boil Switch off the flame and transfer it to another bowl.
- Grind the cardamom pods with a pinch of sugar to fine powder. Discard the skin of the cardamom pods and add the rest to the prepared ras. Let it cool until ready to use.

Paneer Balls
- Bring the 1.5 litre milk to rolling boil on med flame.
- Once boiled switch off the gas and allow it cool a bit say around 5 mins on your kitchen counter top.
- Meanwhile combine the vinegar and water in a separate bowl and set aside. Place a bowl with a strainer on top. Line it with muslin cloth or cheesecloth and keep this ready too.
- After about 5 mins, start adding the diluted vinegar little by little stirring continuously. You will observe that the paneer and whey would start separating. Keep on adding and mixing until all the paneer is separated; the clear indication of this is when the milk turns green in colour.
- At this stage either add ice-cold water to stop the cooking process or simply strain immediately (that's what I do). And that is why it is advisable to keep everything ready before starting with curdling of the milk.
- The paneer would get collected in the muslin cloth. (Collect the whey and use it to make chapati dough, dal, kadi etc). Gather the ends of the cloth and squeeze it to release all the excess water. Tie a knot and hang it somewhere to allow the excess water to drip off completely say another 20-25 mins.
- After 25 mins, you will see that the paneer is crumbly yet feels a little moist when pressed between your fingers. (You would hear that chip chip sound when pressed) take it out onto a blender and using the pulse functionality pulse it (just 4 times) to form a paste smooth dough in two batches.
- Take it out on to the plate and knead for another 4 to 5 mins by gently pushing it using the heels of your hands.

- Then divide the dough into 19 equal sized balls. Give it a round shape and then flatten it out by gently pressing in between your palms. Ensure that there are no cracks. IF you see any simply press it again to make it crack-free. Prepare all the balls. Cover and keep until the sugar syrup is ready

Sugar Syrup
- In a wide mouth and deep pan, bring the sugar and water to rolling boil.
- Add the prepared flattened balls one by one (leaving sufficient time interval between each addition), cover with the lid and allow it to cook for 10 mins on medium high flame. After 10 mins with gentle hands stir the balls once. Then reduce the flame to medium and cook for another 10 mins. You would see it swelling and dancing in the syrup.
- Switch off the gas, and let it cool completely in the sugar syrup itself for another 15 mins.
- After that squeeze out the excess sugar syrup by gently pressing the paneer ball and then transfer to the cooled ras - sweetened milk. Let it sit for 3-4 hours until the balls absorb the milk preferably in the refrigerator.
- Enjoy it chilled

Video
Notes
- I highly recommend watching the detailed video instructions as well as reading the step by step instructions from above before starting with the recipe.
- For making the Ras: Use Full Fat Milk and reduce it to just 70%. Keep the consistency thinner because only then the paneer balls would be able to soak the ras and stay juicy and plumpy.
- While Making Paneer:
- Use Cow's Milk Only.
- Do not curdle it when it is boiling hot, wait for 5 mins and then start adding the diluted vinegar mix to curdle the milk.
- Wait for the milk to go green completely and only then strain. Stain immediately though.
- The paneer once hanged should resemble a crumbly texture but yet be a little moist (NOT WET) when pressed between fingers. Look for that "chip chip" sound when pressed.
- The easiest way to knead the paneer is by pulsing in the mixer. Just pulse for 4 to 5 times and not more or you might accidentally end up with a pasty consistency (over-kneading) which you do not want.
- Shape the balls to a crack-free surface.
- Always keep the paneer covered to avoid it from drying out.
- Do not alter the temperature of the boiling water by adding all the paneer at once to cook. Drop it one by one.
- Allow the paneer to soak the milk before serving for a minimum of 4 hours in the refrigerator.
- Rasmalai is always served cold.
- Rasmalai can be eaten during Fast if made the authentic and traditional way as shared in this blog post.
- Do not get disheartened if your paneer balls disintegrate into the water while cooking or it turns hard even after following all the instructions. I have mentioned the alternative for the same in the post. Please consider reading the post once.
- Reasons for the Rasmalai turning hard, chewy, dense and dry has also been explained in the blog post. Please avoid all that to get the most amazingly soft and spongy dessert.
Nutrition
This post was first published on May 2, 2018 now updated on 30 October 2020 with better pictures, step by step instructions with images along with new tips and tricks.
Dia says
I used your tip of pulsing the chenna but it made the chenna pasty. That too on diwali day. Your post was so detailed ans helpful otherwise but sadly this tip is not worth its while.
sushma iyer says
Hi Dia.. That could mean two things: 1. Your paneer had too much moisture in it, it was not dried up in the first place. 2. You pulsed it for longer or accidentally used the regular mode of mixing rather than pulsing. I use this method every single time and it is such a saver and so many of my readers have sworn for this. I am sorry this did not work for you..
Padmapriya says
Hi Sushma… thank you very much for all the tips and tricks ..
the rasgullas really turned out very well
Your post just motivated me to give a try to this receipe
And it worked out beautifully for me
Once again thank you very much 🙏😊
sushma iyer says
Wo hoo.. thats awesome Padmapriya.. so pleased to know this.. thank you
Varsha Bhosekar says
Hi Sushma, I followed your recipe and tried making Rasmali today. It’s delicious except rasmali balls are little hard.i boiled paneer balls in water for about 25 mins. Did I boil really long?
sushma iyer says
Hi Varsha.. First of all, great job trying rasmalai—it’s not an easy dessert 😊 I’m glad you liked the taste. The hardness usually doesn’t come from boiling; it happens during the kneading stage. The paneer needs to be well-drained and slightly dry before kneading, and it should be kneaded gently. If it’s too moist or over-kneaded, the balls can turn hard. Hope this helps for next time!
Ranjani says
Hi Sushma, thanks for the amazing tips. It came out well for me but only one thing, the rasagullas didn't absorb all the milk even after leaving it for more than 8 hours. what could be the reason?
sushma iyer says
Did it swell? And upon squeezing was it having enough liquid in it? if yes then it is right consistency only.. Rasmalai won't absorb all the milk that you have soaked it in..
Sohesna says
Thanks for sharing this wonderful recipe with very helpful tips. I tried this dish first time and followed every step in your recipe. It turned out perfect and super delicious. All stars to you.
sushma iyer says
That sounds fantastic.. thank you for sharing your experience with us 🙂
Ali says
Hi! Please can you tell me, do you mix cornflour with the chenna? Thank you! Great tips
sushma iyer says
Hi Ali.. No I don't. But you can if you want to specially if you feel that the chenna has some moisture in it. there is nothing wrong in it.
Neeta Vaghela says
I made this and it was really good even my husband commented (which rarely happens).
Thank you very much for sharing this recipe great. The tips were very useful.
Thank you
Neeta
sushma iyer says
Yay!! That is amazing.. I am glad you guys enjoyed it.. thank you for sharing your feedback Neeta.. appreciate it <3
Sridevipriya says
Simply Spectacular... Thanks alot for sharing this amazing recipe.... You Simply Captivated everyone who loves this sweet... Keep Rocking...
sushma iyer says
Hi sridevi.. yay!! So pleased to know that you liked it.. thank you
Anushri Desai says
Hey Sushma, your Rasmalai is super perfect . I followed your step by step instructions & it’s turned out awesome. Going use it for my Rasmalai cake. Thank you so much for sharing amazing recipes with us. I am a big fan of your recipes. Good luck 👍🏻
sushma iyer says
Yay!! that is so cool.. thank you for leaving a comment.. <3 Glad that the post was helpful 🙂
Mansi says
Hi
Tried your recepie today as I want to make a rasmalai cake.. Turned out perfect taste wise and softness wise but have one doubt...
when I squeezed the water out of rasgullas to put in the rasmalai ras , it didnot regain back its shape but turned flat, didnot disintegrate either !! Could you explain why?
Thanks for a wonderful and easy recepie!!
sushma iyer says
Hey Mansi..
The water content in the paneer is what makes it plump so when you squeeze the water it will become flat only comparatively and when you put it in the milk it will re-absorb the juice and become plump again. Do not squeeze all the water altogether next time
Sandhya Patel says
I just spent all morning making this rad malai and the paneer balls are hard as rock when I ate one right now. Taste good and everything else is good. Help what was wrong with my paneer balls?
SP
sushma iyer says
Hi Sandhya.. There are many reasons where you could have gone wrong - not kneaded it well or overkneading and undercooked or overcooked results in hard chenna..
Sangeetha says
Sushma, I loved how you have provided all the tricks to get this rasmalai right. Thank you so much for that! I tried it and it came out sooo good. The Chenna was perfect, it didn't crumble neither turned rubbery. I did not pulse it like you had suggested but kneaded it with my hand for about 20 minutes. I used half a can of condensed milk for the Ras and reduced the sugar to 1 cup. It turned out awesome, thank you so much once again❤
sushma iyer says
Hi Sangeetha.. that is great.. glad to know the experiments worked out perfectly fine for you. Thank you for sharing 🙂 Enjoy
Regards
Sushma
Harnoor kaur says
Hello ma’am
Thank you so much for this recipe.
My rasmalai turned out to be great.
It tasted exactly like the ones that we buy from the store
Lots of love to you ♥️
sushma iyer says
Wo Hoo.. That is amazing Harnoor.. Thank you for trying and sharing your experience with us.. appreciate it 🙂
Rad says
Hi Sushma,
Trying your rasmalai recipe now. After straining the chenna for about 45 mins i took and found it to be crumbling with that chipak sound! Then pulsed in mixer for 3 tyms and started kneading. This is where the prob starts! Its not crumbly now like urs! Its like a paste and even after kneading it for 10 mins der is no change! Please let me know how to proceed!! Since i already prepared the ras i m not sure how to bring back the paneer to rasgulla stage now😭! Pls help!!
sushma iyer says
Hi Rad.. I think we had a discussion about the same on Instagram too. I think it has been over-kneaded here, plus there was too much moisture still left in the paneer and thats why turned pasty. You can do nothing about this batch. You will have to start over again. Sorry about that.
Amber says
For the first time in 10 years my malai finally turned out perfectly. Thank you! Thank you! Thank you!!!!! I can’t tell you the number of gallons of milk I have gone through trying to make my favorite dessert.
I found your recipe just in time for Diwali celebrations that we are doing with a close set of friends tomorrow.
Thank you for the very detailed explanations. They were PERFECT!
sushma iyer says
Aww Amber.. I cannot tell you how happy I am reading your comment.. Wow.. I have tears of joy, I can literally imagine you doing a little dance.. haha.. I am glad that the tricks, tips and steps mentioned in this post was helpful. thank you for taking the time out to try and share your wonderful feedback with us.. appreciate it 🙂
Regards
Sushma
Arista Ramphall says
Hi my milk isnt curdling properly can you assist? It splits into small curdles but never forms proper chunks and the water isnt green or close to that. How long after adding the vinegar do i have to wait?
sushma iyer says
Hi Arista.. Use more of the vinegar in that case.. You have to keep adding a little at a time until you get that green colour. So you add a little, stir, then add and again stir. Keep adding till you get the green colour 🙂
Niru says
Turned out awesome. Having a non sweet loving husband and kids, they all gulped them. Thank you for sharing tips and tricks. Recommended my sis and mom to also try.
Wish I can share pic.
You are amazing, inspiring! Best wishes.
Niru says
I Was very skeptic to try rasmalai at home. I followed your instructions to T. Turned out yummy. My non sweet loving husband and kids gulped so many. Amazing. Love you for sharing the tricks. Now I feel rasmalai is an easy cake walk. I've suggested my sis and mom to also try.
sushma iyer says
Hi Niru.. that is awesome.. so good to hear such a lovely feedback from you.. glad to know that the recipe worked wonders for you.. thank you 😀
Bageshri Naik says
Can I used ready made paneer for this recipe
sushma iyer says
Hi Bageshri
No store bought ones won't work here.. sorry
Sara Yaseen says
Hi, there was a tip by another blogger that some water should be left in the paneer if we want the rasgullas softer. You are saying the opposite of that. I am confused. Plz help.
sushma iyer says
Hi Sara..
Everyone has a different experience.. may be you can give both the methods a try and see what works best for you.. We squeeze the water out of rasgullas so that it has space to absorb the milk in which it will be dunked in it later. that is the reason why we do that step.. try both ways and see what works for you 🙂
Nikita says
My paneer balls disperse in sugar water, can you please guide me on this?
sushma iyer says
HI Nikita..
so that happens if there is too much water in the chenna to begin with.. make sure that the chenna is dry and you knead it really well before shaping and cooking them.. if hanging the paneer does not dry them you can also place some weight on top of it to drain all the water.
Seema Surana Rajesh says
Thank you so much for such a lovely and easy recipe ..tried it and the outcome was awesome
sushma iyer says
Hey Seema..
That sounds great.. I am so glad to learn that this recipe worked out so well for you.. Thanks for sharing..
Regards
Sushma
bindu says
how many days will it last
sushma iyer says
Hi Bindu
In my home it does not last for more than 3 days.. so definitely stays good till then 🙂
Regards
Sushma
Kulsum says
Hi. I tried this n the ras malai turn out perfet. Thank u for recipe n the tips.
sushma iyer says
Hi Kulsum..
That sounds amazing.. so pleased to learn that this recipe and tips worked out for you.. <3
Regards
Sushma