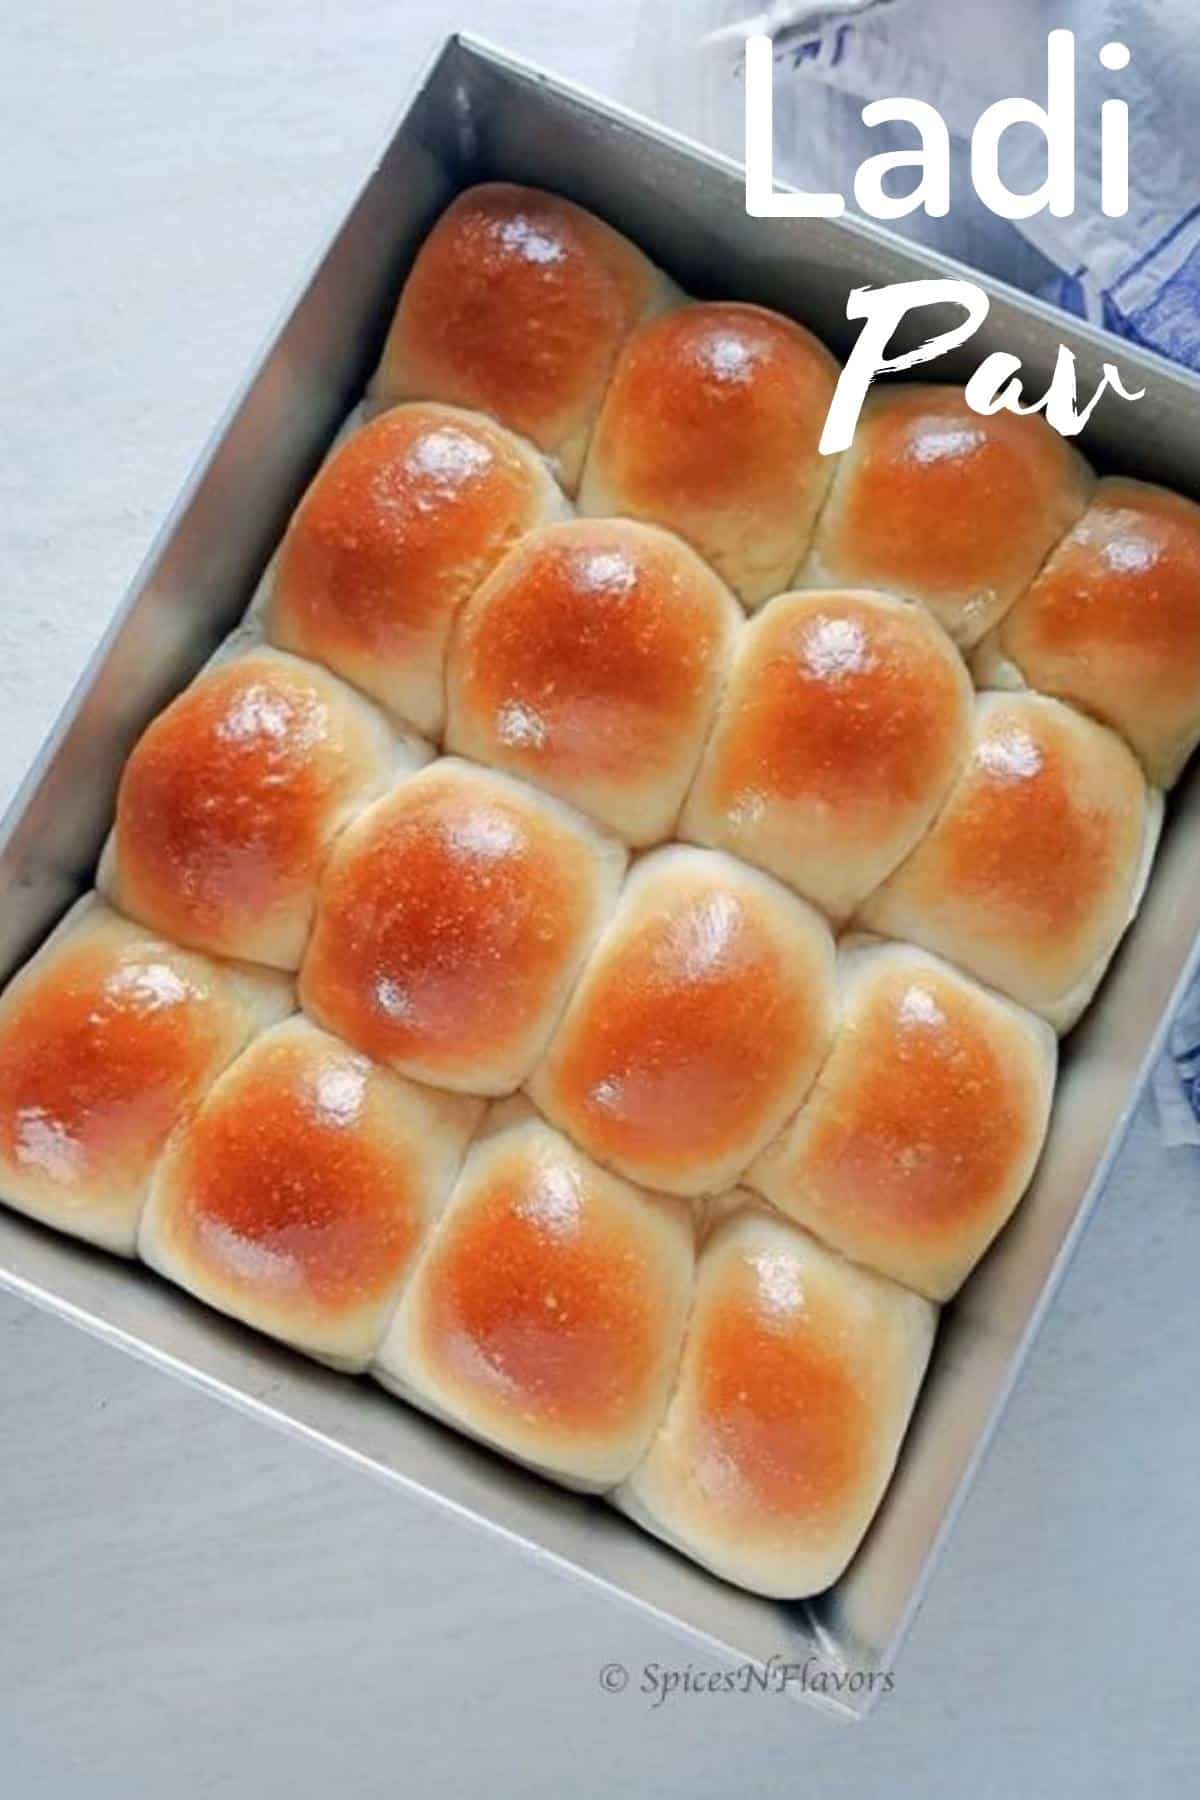
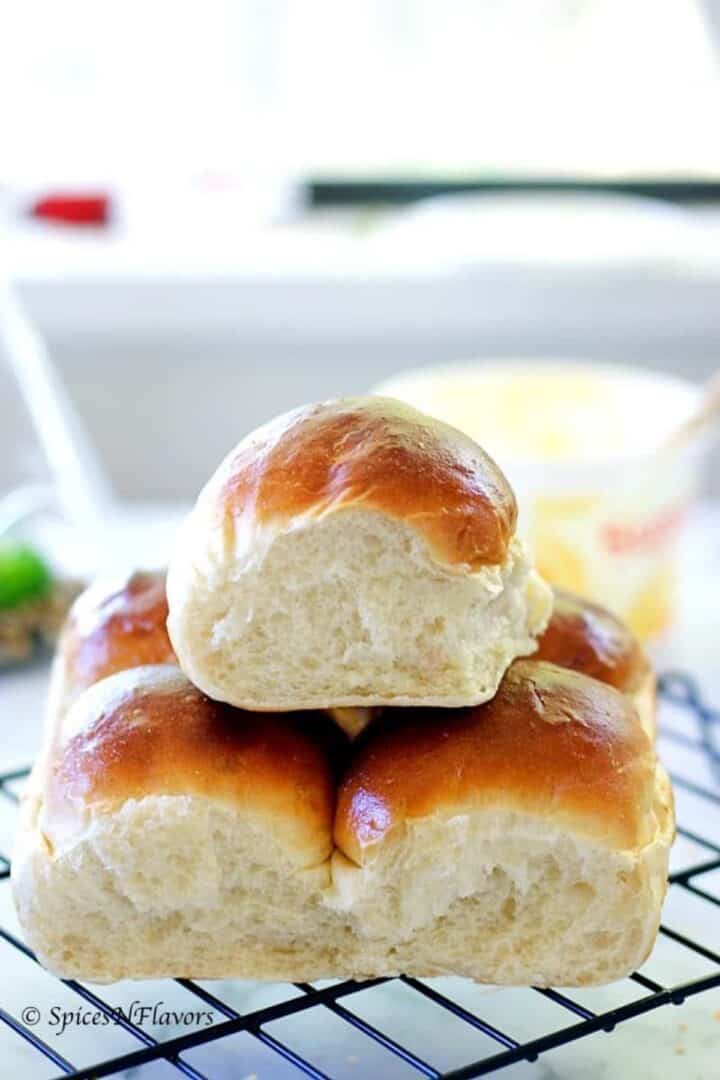
Soft, Light, Fluffy and Rich; these Ladi pav aka homemade dinner rolls are so addictive that you would keep coming back for more.
This ladi pav recipe post has got you covered with 5 mistakes that you probably are making that ruins your homemade pav experience.
Who doesn't love the aroma of a freshly baked bread?
What is Ladi Pav?
Ladi literally means a group or in continuity and Pav refers to Bread in Hindi.
So to put it simply Ladi Pav in English means a group or a row of bread stacked adjacent to each other similar to the Dinner Rolls in the US.
The only difference being the former is much lighter and less sweeter than its US counterparts.
And this Dinner Rolls recipe is such a basic one that you would end up making it every other week.. psst.. psst.. these are Eggless too but bet you no one would ever know 😉
Ingredients needed:
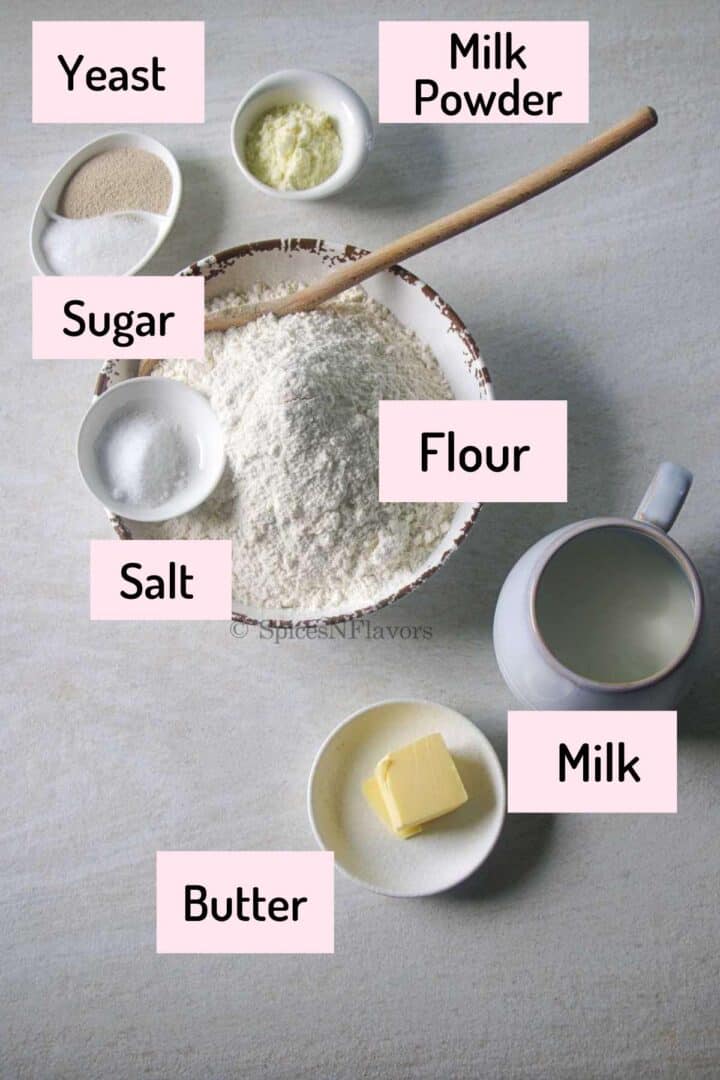
Ingredients notes:
- Milk Powder: Also retailed as Powdered Milk, acts as an enrichment in this recipe. Use unsweetened full fat milk powder.
- Yeast: I recommend using Instant Yeast as it can be directly added to the flour. However you can also use Active Dry Yeast, just make sure to activate it before proceeding. If using Fresh Yeast use three times the amount of what the recipe calls for.
- Milk: Water can be substituted for milk. Or Milk and Water can be used in the 50:50 ratio.
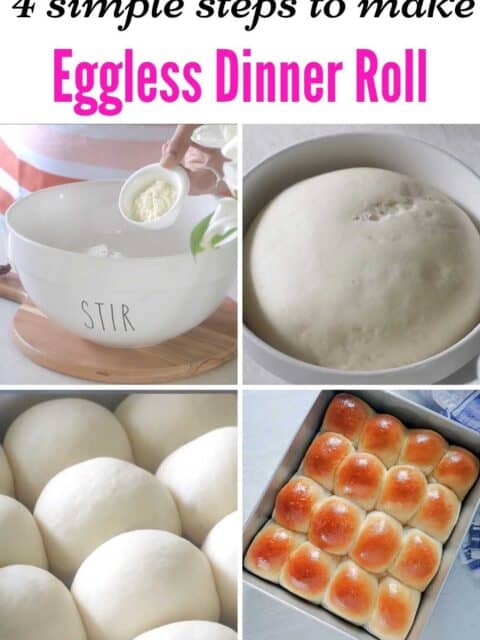
Step by Step Tutorial:
Step 1: Prepare the Dough
Onto a mixing bowl, add the salt, flour, milk powder, sugar and yeast. Give a quick mix using a spatula. (Pic 1-5)
Ok finally to bind everything into a dough today we will be using Luke Warm Milk (pic 6).
I have made this recipe with just water and also water and milk in 50 50 ratio and it turns good every time so you can use any liquid but I would recommend milk here.
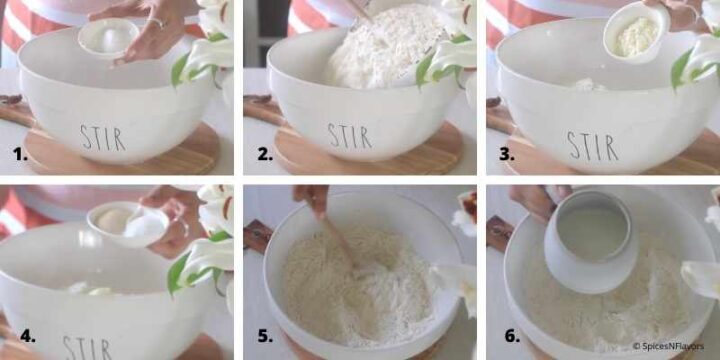
At some point you will have to ditch the spatula and switch over to your hands to combine everything into a dough and then transfer to your work top to knead it.
Remember we have not added any butter as of now and that is the reason you might find the dough to be a bit dry so you can add additional 1 to 2 tbsp of milk to combine it into a dough.
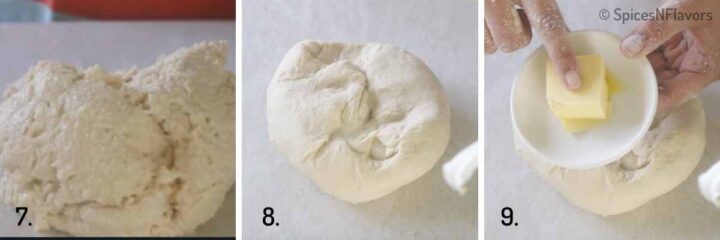
Transfer the dough on to a lightly dusted worktop (image 7).
And start kneading the dough (image 8). Click here to watch the right way of kneading a bread dough.
So after about 10 mins we would be adding butter (image 9). The butter should be soft that way it would be easier to incorporate it into the dough.
This technique is known as Delayed Fat Method - Find the detailed explanation of the same in my Bread Baking Queries video.
Once you add the butter it would be a little messy Job to knead the dough but keep kneading and in another 5 to 10 mins you will observe the bread coming together.
The final consistency of the dough should be tacky and it should feel moist and hydrated.
You may have to add additional few tbsp of lukewarm milk to get that moist dough.
It is fairly easy to knead the dough in a Stand mixer.
How to knead the dough using Stand Mixer?
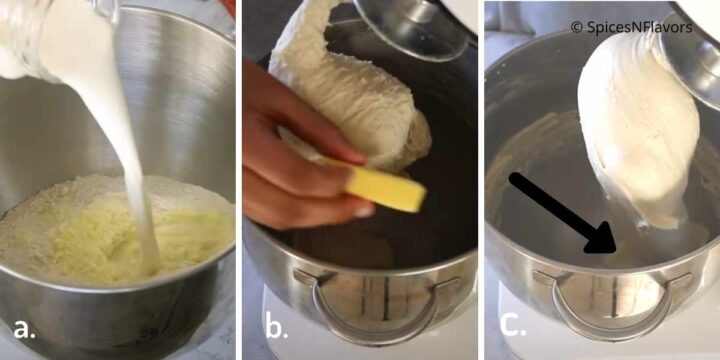
Add the dry ingredients - Salt, Flour, Milk Powder, Yeast and Sugar. Finally add the milk and knead everything into a dough for 6 mins (image a).
Next add the butter (image 4) and knead for another 4 mins. If need be add in additional few tbsp of milk and knead.
When you lift the dough hook of your stand mixer, a blob of dough should be sticking to the base of your bowl (image c).
Step 2 - First Proofing
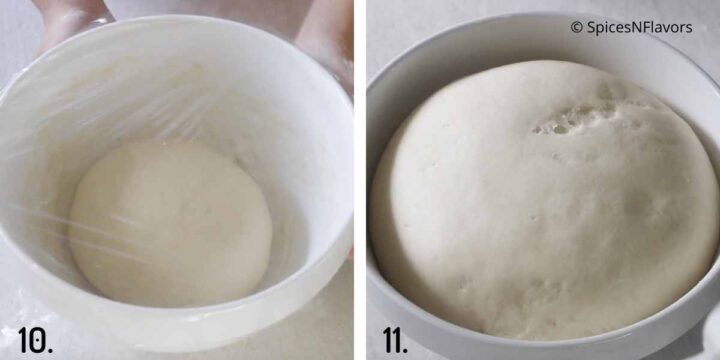
Oil the bowl in which you kneaded the dough and then transfer the prepared dough into it (image 10).
Cover it with a tea towel or cling wrap and allow it to proof for 1.5 hour on your counter top until it is doubled in volume (image 11).
How to Proof Dough in the Instant Pot?
Alternatively, you can also proof the dough in your instant pot. I own an Instant Pot Duo 6 plus and love it.
Proofing dough in the Instant Pot has become my favourite hack!!
I have written an entire blog post on can you proof dough in the instant pot? Do check it for a detailed instructions.
For now,
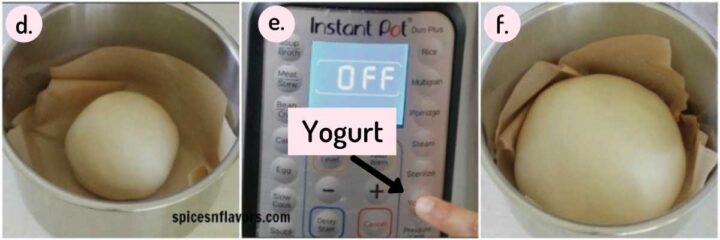
Simply oil the inner pot of your instant pot or place a parchment paper.
Place the dough into it (Image d).
Close the lid. Choose yogurt mode and set the timer to 45 mins(image e).
Step 3: Shaping
Ok so After proofing punch down the dough to release the gases and take it out. At this stage you can weigh the total volume of the dough and divide it evenly to get 16 pav buns or you can eye ball and simply divide it into 16 balls too.
However, to get an even shape and size I always and always like to weigh my dough.
I recommend you guys to invest in a measuring scale (have been using mine for 4 years now and still going strong) and then divide the dough into 16 balls.
From this recipe you can make 12 to 16 balls depending upon the size of your baking pan.
This step is the key to make good ladi pavs which so many of you commit a mistake in.
Let me teach you how to shape ladi pavs. The same technique applies to making dinner rolls or crusty rolls or milk buns.
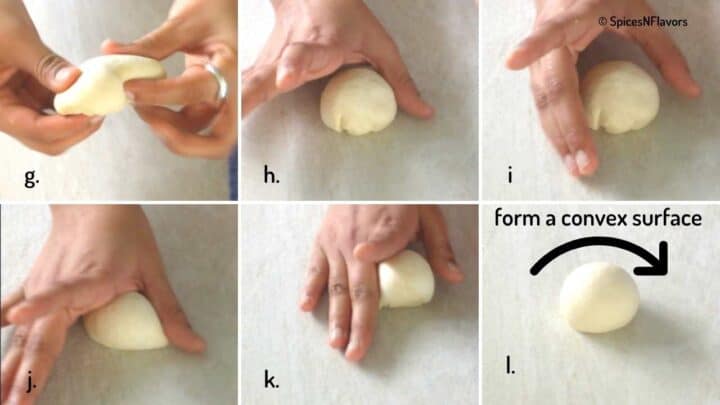
So you take the dough that you weighed first. Tuck the sides beneath (image g) and observe how I am holding my hands enclosing the dough - thumb from one end (image h) and fingers on the other. (image i)
Then you push with your thumb (image j) and roll with your fingers (image k).
It would take around a minute or two just roll and shape.
Refer the video to understand it in a better format
This ensures that it is a tight roll and create tension in the dough so it would hold that curved shape while baking too.
If you find it difficult to roll it then wet the surface with a tissue towel.. not too wet or else the dough would become sticky.
You would literally feel the dough becoming stiff and taking a convex shape (image l).
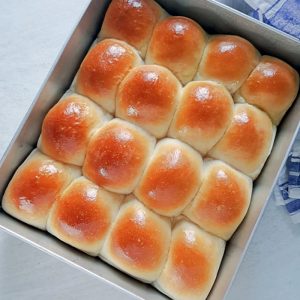
So once you feel that place it in a greased pan in which you will be baking later on.
Place your pav buns close to each other and allow for second proofing.
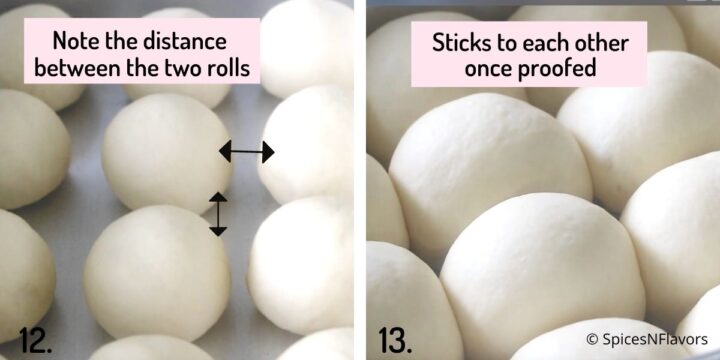
For second proofing do not go by the time observe the pav it should have risen and doubled in volume filling the gaps and sticking to each other. It took me 45 mins to reach this stage
By the way, if you are looking to jazz up your everyday bread rolls recipe then you must check this super crunchy and show stopper tiger bread rolls too.
Step 4 - Baking
Now if you like a brown crust or if your baked goodies does not caramelise well then now is the stage to brush the top of your pav with some milk before baking.
I have now stopped doing it because of the dairy based products which is milk and milk powder that we use to make the pavs which gives this soft pale colour once baked which is generally the colour of pavs that we get in the market but if you like yours to be more caramelised then go for milk wash.
Bake in a preheated oven of 200°C for 18 to 25 mins.
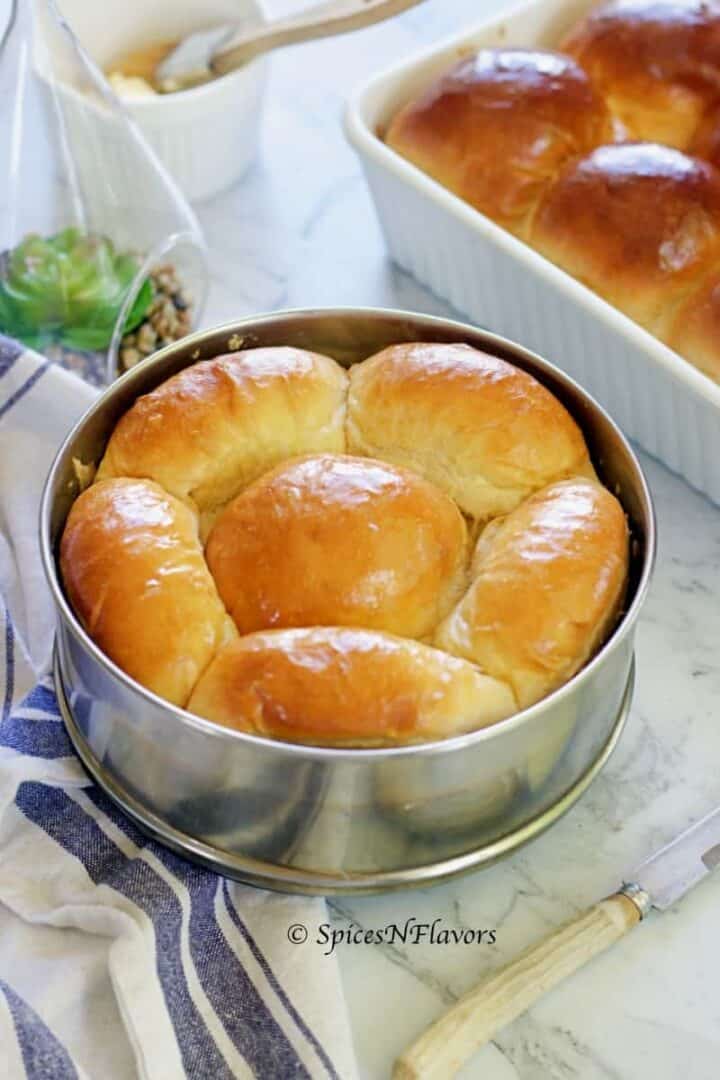
If you had shaped your pavs smooth then you would get an evenly baked pav buns with a smooth store bought finish on top. To get the glossy shine Once baked immediately brush the top with some butter. this also ensures that your top remains soft.
Let it sit in the pan for another 5mins then invert to release the pav.
How to make Ladi Pav in cooker or Kadahi?
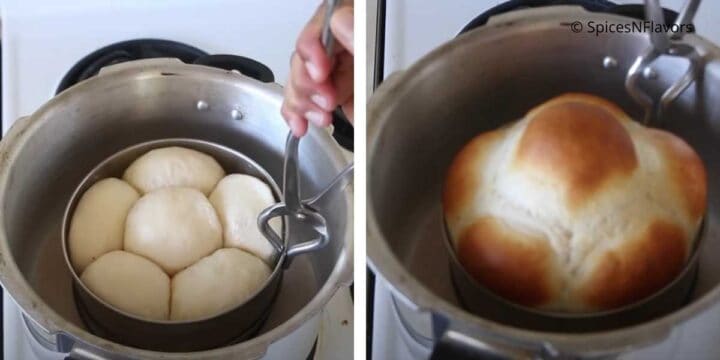
Preheat your cooker on medium flame and add salt to the base. Place a trivet and preheat on med high flame for 12-15 mins without any gasket or whistle.
Then place your pan with proofed pavs in it and bake on medium flame for 16-20 mins..
Upon baking if you see a hump like this then while still warm use a tea towel to press it down to get an even sized pavs as seen in the image below.
5 Mistakes to Avoid (PRO TIPS):
Mistake 1: My dough doesn't rise properly during the first or second proofing!!
You might have mixed the salt with yeast or added the butter too soon. Salt and Butter retards the activity of Yeast and hence the dough doesn't rise properly. The right way to add salt is to mix with the flour and the right time to add butter is after kneading for initial 6 mins in a stand mixer or 10 mins by hand. OR you might have killed the yeast altogether by using hot milk.
Mistake 2: Dried Pav Issue?
You might have added too much flour while kneading the dough which makes the pav dry. The best alternative is to grease the worktop with some oil. Refer this video for more inputs on the same.
Mistake 3: Afraid of adding moisture!!
A pav dough needs to be well hydrated. Do not be afraid to add more milk while kneading than what the recipe calls for.
To Test: When you lift the hook of your stand mixer a blob of dough should be sticking to the base of your bowl.
If kneading by hand refer this video to understand better.
Mistake 4: Not tightening the dough while shaping
A good ladi pav has a beautiful smooth surface on top without any bumps, cuts, rough or uneven surface. To achieve this you need to roll the dough to get an even surface with the help of your thumb and fingers as mentioned in the post.
Mistake 5: Placement of the Dough.
The key to achieving soft pav buns is when they have all the four sides attached. This is achieved by placing them near each other so they proof and stick to the adjacent pav buns while Proofing and remains soft once baked.
Some General Tips
- If you are using Active Dry Yeast make sure to activate it first by mixing in the lukewarm milk and sugar first before proceeding with the recipe. DO NOT Proceed if you YEAST is not activated.
- A bread dough always need to hit the hot oven. So ensure to preheat your oven for perfect results.
- Keep your dough covered at all times; while proofing, while shaping, while dividing the dough in order to avoid the drying of the dough.
- Remove the baked pav from the baking pan after about 5 mins and always cool on a wire rack to avoid the base of the pavs from getting soggy due to condensation if left in the pan itself.
Recipe FAQ's
A Bread Dough always needs to hit hot oven to get the beautiful oven spring and bake evenly. If your oven is not pre-heated and is not the right temperature (too high or too low) then your pav bakes unevenly, remains under baked and you get Yeast smell in your bread. And even after following this precaution if you feel that the dough still smells yeasty then in that case you need to reduce the amount of yeast than what is called for in the recipe.
Yes as both of them is made of Yeast based dough. The slight difference depending upon which part of US you are from is that the former is much lighter and sweeter than the latter. Though the way of preparation and the serving is same but sometimes Dinner Rolls recipe do call for eggs as we did in this recipe but just like this recipe we can make the rolls without eggs too.
Follow these tips mentioned to avoid it from getting dry:
1. Ensure that the dough is well hydrated. Don't be afraid to add little extra lukewarm milk than what the recipe calls for.
2. Avoid adding too much flour while kneading the dough instead you can grease your worktop with some oil and knead.
3. Ensure that your oven is not too hot - as that would accelerate the activity of yeast even before the crust is formed and would eventually dry out the dough.
A great trick to make any dough turn out to be light and fluffy is by enriching the dough. The easiest way to do is by adding an egg to your dough - Check our fluffiest pillow soft dinner rolls recipe. If you are looking for an eggless option then simply substitute water with milk or try to add some powdered milk to the flour. All these are the key factors to enrich a dough.
A couple of mistakes that you might have made:
1. Letting the salt come in direct contact with the yeast or mixing the butter too soon - this would retard the yeast activity or using hot milk/water which would have killed the yeast in the first place and hence there won't be enough gas produced to make the rolls light.
2. Adding too much flour while kneading which causes the dough to dry making it harder.
3. Not kneading the dough enough thereby no gluten formed resulting in a dense and heavy crumb.
4. If your oven runs hotter than the specified temperature then the crust of the pav would get harder. Try to use an oven thermometer in that case.
Follow the tips mentioned in the post to avoid all of this.
Other Basic Bread Recipes:
Wish to Join US for the love of BAKING? Subscribe to our newsletter and Youtube channel. Follow along on Facebook, Instagram, and Pinterest for all the latest updates!
Ladi Pav Recipe - Eggfree Dinner Rolls
Equipment
- Measuring Cups and Spoons
- Kitchen Scale
- Mixing Bowls, Spatula
- Stand Mixer (optional)
- Instant Pot (optional)
Ingredients
- 10 gms (1 tsp) Salt
- 480 gms (4 Cups) Plain Flour
- 15 gms (1.5 tbsp) Milk Powder (refer notes)
- 15 gms (1 tbsp) Sugar
- 8 gms (2 tsp) Instant Yeast
- 300 ml (plus 2-3 tbsp) Lukewarm Milk (refer notes)
- 28 gms (2 tbsp) Butter, softened
Instructions
Step 1 - Prepare the Dough
- Onto your bowl add in salt, flour, milk powder, sugar and yeast. Stir and add the lukewarm milk and combine into a dough.
- Knead for 10 mins and then add in the butter and knead well for another 10 mins.
- Don't be afraid to add additional 3 to 4 tbsp of lukewarm milk while kneading so that you get a well hydrated dough.
How to Knead in a Stand Mixer?
- Don't be afraid to add additional 3 to 4 tbsp of milk as need be to get a moist tacky dough. When you lift the hook of your stand mixer a blob of dough should be sticking to the base of the bowl.
- Add all the ingredients salt, flour, milk powder, sugar, yeast and milk to the bowl of your stand mixer. Knead for 6 mins. Then add the softened butter and knead for another 4 mins.
- Place the dough in an oiled container for it to prove and double in size for an hour.
- Once proved divide the dough evenly into 14 equal size portions. Roll it out to give a proper shape. I have shown the exact way to do it in the video check it out. And place it onto an oiled container close to each other and prove for another 30-35 mins (during summers) and nearly an hour (during winters). (refer video for clear picture)
- After the second prove bake this in the preheated oven of 200°C for 15-18 mins or in a preheated cooker for 16-20 mins on medium flame
How to Proof Dough in Instant Pot
- After the 4th step instead of oiling a big bowl, oil the inner pot of your Instant Pot. Place the dough inside. Close the lid.
- Choose the yoghurt button. Set the time to 30 mins.
- Once the timer goes off, open the lid and see the magic - the well rise dough. Continue the steps as mentioned above from dividing the dough, rolling, shaping and baking; same as the oven method.
Step 2 - First Proofing
- Once the dough is tacky, oil the bowl in which you kneaded the dough and then place the dough in it for first proofing.
- Oil the surface of the dough too to avoid it from drying. Cling wrap and cover with a tea towel and let it prove for 90 mins on your counter top.
- How to Proof in an Instant Pot: Grease the Pot with some oil and place the dough in it. Cover with a glass lid.
- Select the Yogurt Mode and set the time to 40 mins.
Step 3 - Shaping
- Once proofed punch the dough to remove the air bubbles. And then divide the dough into 16 equal parts.
- You can weigh the entire dough and then divide it into 16 parts or you can eyeball and divide too. Keep the dough covered at all times to avoid it from drying out.
- Take one part, tuck the sides beneath to create a roundel. Then using your thumb and fingers start shaping the dough. Push with your thumb and roll with your fingers to tighten the dough. You can watch the video in the recipe card or click here for better understanding.
- Once shaped place them in a greased baking tray adjacent to each other and allow for second proofing. Do not go by the clock here instead observe the dough. It needs to rise and double in volume ultimately sticking to each other. It took me 45 mins to reach this stage.
Step 4 - Baking
- Once proofed, bake in a preheated oven of 200°C for 18 to 23 mins until light golden brown in colour.
- Let it sit in the pan itself for 5 mins then invert on a wire rack to cool completely.
How to Bake in a Cooker?
- Add salt to the base of the cooker and place a trivet inside your cooker and pre-heat on med high flame for 10 mins.
- Then place the baking pan with proofed dough inside the cooker. Reduce the flame to med and bake for 16-20 mins until golden brown in colour and the bottom sounds hollow.
Video
Notes
- The basic dinner rolls recipe just needs water to bind everything into a dough.
Milk and Milk Powder are enriching agents so if you do not have milk powder handy, skip it and use flour instead. Similarly you can use water instead of milk or water and milk in 50:50 ratio too. Pav made using Milk is richer than made using water. - The total quantity of milk is 300 ml. So start making a dough with just that. However the additional 2 to 3 tbsp of milk mentioned in the recipe is to make the dough hydrated. Which means the dough should not be dry or else you will get harder baked buns. Refer my video to understand what exactly I mean by hydrated or please scroll up to read the article.
- If you are using Active Dry Yeast you will have to activate the yeast. To activate the yeast just combine the yeast with lukewarm milk and sugar first. Give a stir and let it sit for at least 10-15 mins till it blooms and froths up. If it doesn't froth and bubble up it means your yeast is dead, discard that batch and start afresh. Since I used instant variety I did not do this step.
- Please note that I no longer follow the method of milk wash or egg wash right before baking. I have observed that the fat and dairy in the dough is enough to give the pale golden colour on top of our dinner rolls. If you do not get that colour in your oven or if you like a darker shade on your pavs then by all means brush it with some milk or egg right before baking.
- A bread dough always need to hit the hot oven. So ensure to preheat your oven for perfect results.
- Keep your dough covered at all times; while proofing, while shaping, while dividing the dough in order to avoid the drying of the dough.
- You can use this same recipe to make burger buns. In that case do not let it proof adjacent to each other place it far apart to make individual buns. Similarly beetroot puree or spinach puree can be added to make beetroot pavs or spinach pavs respectively. Click here for the recipe of Beetroot Pavs.
- Buttery rolls taste best when you serve them warm and freshly baked. You can of course bake it ahead of time, just warm them up by wrapping in tinfoil and placing them in the oven at 300 degrees F for 10-15 minutes. These are just perfect to make ahead for holidays!
- Make sure your dinner rolls are all about the same size. This would mean that they proof and bake evenly giving you the right amount of servings and would also look like a store bought one.
- Check out the post for pictorial step by step recipe and also for the details all the tools and equipment, along with the details of the 5 mistakes to avoid to make the best egg-free dinner rolls.
WORD OF CAUTION :
If you are planning to double the recipe and use Instant pot for proofing make sure not to use the lid and opt for glass lid instead. The reason being the dough can rise too much and push the pin-up of the Instant Pot and lock the lid. So it is better to use a glass lid or a plate.Nutrition
Originally published on Dec 12, 2017. Edited on 02 September, 2020 to add step by step pictorial images along with improvised tips and tricks. Also updated variations to making a plain bread roll.
SpicesNFlavors is a participant in the Amazon Affiliate Program. The Amazon Affiliate Program is designed to provide a means for sites to earn advertising fees by advertising and linking to products on Amazon. The price you pay as a consumer does not change, but if you make a purchase through one of our links, we receive a small commission – and we continue delivering delicious recipes to you!
Vik says
Hi Sushma,
Thanks for such a fantastic recipe and the tips and tricks. I've watched your video multiple times as well as shared with Friends and family. I've not made Pavs atleast 5 times and they are pretty good now. I've 2 questions for you. 1. I've replaced Butter with Oil and will that make any difference on softness and texture? 2) The Pavs become dry after about 36 hours and start to disintegrate when you cut it. Is that any particular ingredient that I'm missing? The 2 changes that I made to the recipe are Milk and Butter. Since US milk does not works for me I'm using water instead of Milk but still using India based Milk powder and the second one I'm using is Oil instead of Butter. Pls. let me know if I can share more details.
sushma iyer says
Hi Vik.. thank you for sharing your honest feedback. 1. Butter actually enriches the dough which means it softens the pav giving a rich taste. Substituting oil for butter would only affect the flavour and nothing else. 2. Homemade bread stays fresh for only 24 hours you cannot expect it to last till 36 hours. If you do you can consider freezing them and thawing in the microwave when needed. Hope this helps 🙂
Tammy says
Made this for the first time and everyone at home was so impressed! Thank you for the level of detail you’ve included. It was worth watching your video on mistakes to avoid. Will definitely be making these again!
sushma iyer says
Hey Tammy.. That is so good to know.. thank you for your lovely feedback.. appreciate it 🙂
Suchi says
Any tricks/tips to include either 50 /50 whole wheat flour /all purpose flour?
Also is additional gluten required?
sushma iyer says
No.. 50/50 does not need any changes.. it works perfectly fine 🙂
Vimla says
Thank you so much.
Vimla Bangera says
Hi Sushma,
I made the ladi pav today and they turned out perfect n yummm. Thank you so much for such a detailed recipe. A small query & request. I recently bought a built in oven. Though i am aware that bread needs to be baked in convection mode (i.e with both rods & fan on ), got little confused as the demo guy told me to bake only with the fan mode on wherein the oven would heat up from all four sides. So can you actually post a video on which mode & temperature to be used in a built in oven for cakes, breads, cookies, pies, tart etc. Would really appreciate any guidance on this.
sushma iyer says
Hi Vimla..if you have fan in your oven, it is good to use fan but in that case reduce the temperature by 20 degree celsius.. so if the recipe says bake at 180°C then bake at 160°C. If you do not want to use the fan then both rods should be on, the baking pan should be placed in middle rack and follow the temperature and time mentioned in the recipe. It would take some time for you to understand your oven. Keep baking and most importantly note down the time and temperature each time for every recipe that you do. If you make a cake, note down everything so next time you can refer back to this and do it as per that. Glad you liked this recipe.. thank you
Falguni Doshi says
Hi Sushma,
How long I need to knead dough if I am using stand mixer. And I have made pav couple of times they came out soft but however they don’t stay open half way, I mean when I try to cut it from middle and toast in skillet it breaks into half. How can I avoid that?
sushma iyer says
8 mins in standmixer would be enough. So first 6 mins mix everything then add butter and knead for another 2-3 mins. Are you cutting it to the very bottom. I am not sure why slicing would be an issue here. sorry
Poornima says
I made ladipavs like the way you said.
It came out in good shape but it was too hard to eat.I made in microwave and baked for 25 mins.pls tell me where I went wrong
sushma iyer says
Hi Poornima..
This recipe is designed to be baked in an oven.. Sorry I have never tried it in microwave
Poornima says
Hi,
I tried ladi paav again and this time it came out well.I reduced the baking time and this time I baked for 15 mins only.It came out soft and had good texture.
Thanks for the tips
sushma iyer says
So good to know this Poornima. Thanks for sharing 🙂
Monalisa says
Can I use bread flour for laadi paav? Will it make a difference in texture or denseness of paav?
sushma iyer says
Hi Monalisa.. Yes you can.. not much difference to be honest..
Monalisa says
Thanks, for the recipe already made with apf turned out very good. Family is asking for it everyday now.
sushma iyer says
That is awesome Monalisa.. Thank you
Ria Bansal says
same, my family ate all of the laid pavs in less than a day. And they ate it plain because the texture and everything was soo good. Thx sooo much
sushma iyer says
glad to know this.. thank you
Imtiaz says
Hi Sushma,
I'm making this now ((2/3/2021 )as we speak and my dough is int he process of first proof. However, it's not soft like yours in the image 10. Mine is more like image 8 while i started the proofing. Hopefully that'll change. If you see this, please let me know if there is anything i might have missed or doing incorrectly.
sushma iyer says
hi Imtiaz.. It is my personal preference to round the dough and allow it to proof.. You need not do that.. it will still proof well.. it is important to shape the dough well before second proofing as far as this recipe goes. Hope it all went well with you.. do let us know how it turned out 😀
Imtiaz says
Thank you for responding, Susham!
The dough is round for sure, it's the soft look - that i dont have it - and i'm following your recipe to the T, so i was curious, if the texture of the dough should be soft to touch or it doesn't matter.
sushma iyer says
Yes ideally it should be soft to touch
Imtiaz says
Ok, in case you are wondering how they turned out, they look perfect - literally.
I got tired of making the perfect balls so i left few as is when i cut them with my pastry scraper.
Another thing i did wrong which i can't believe i didnt think of it beodre was, I didnt convert the 200 C to F which is around 390 something.
So for first 20 mts i cooked at 200 F then i relaized and switched it to 390 F - but then i reduced my cooking time. Yet after all this - they taste and look like a perfect Pav / dinner roll. Perfectly moist inside. Thank you. Let me know if you want to see pics of my Pav 🙂
sushma iyer says
Oh Wow Imtiaz.. I am so glad that it turned out well.. And to think off going forward may be I should try to put both the temperatures.. thank you for your detailed feedback 🙂
Pradnya K says
Hi Sushma,
Thank you so much for your in detailed recipe of Ladi Pav. I tried making it and it came out really really well. Everyone liked it very much. I kneaded the dough with milk and it was so fluffy and soft. The best part was you covered all the nitty gritty and also told the mistakes to be avoided in advance. It helped a lot. Thank you once again.
sushma iyer says
Hi Pradnya..
I am so pleased to read through your comment. Glad to know that you found it useful. thank you for your lovely feedback 🙂
Saloni Shah says
Hi Sushma
I made these laadi pav by using half and half whole wheat and APF . It turned out excellent. Thanks for the recipe.
sushma iyer says
Hi Saloni.. Thats good to know.. glad you liked them.. thank you for trying and sharing it with us.. appreciate it 🙂
Regards
Sushma
Deepa says
Hi, Thank you very much for the detailed recipe.Can I mix the dough in bread maker and then shape it, obviously after first proofing.Thank you in advance.
Deepa
sushma iyer says
Hi Deepa.. I have never used a bread machine so won't be able to guide you on that. Sorry
Aparna says
Hi Sushma,
Where can I buy the baking tim you used to bake the pav?Can you share the link? Hi
Thanks
sushma iyer says
Hi Aparna..
I got it from a local store in T Nagar, Chennai
HIRAL Patel says
Thank you for the great recipe! My pav came out soooooo good.
We loved eating with pav bhaji.
I try to do with wheat flour and oat, but I didn't get the results.
Please uplode recipe using all purpose, oat & wheat or with any other flour how ever you can.
Thank you again 🙂
sushma iyer says
That is amazing Hiral.. Pleased to know that it worked well for you. Thank you for sharing your feedback with us. Appreciate it. And I will try to publish recipe using Whole Wheat. Thank you
Nisa says
Hi Sushma,
I’m very delighted to find out about dough proofing in Instant Pot. You are my HERO !
However, is it possible to do second proofing in the Instant Pot as well? I’m afraid in the cold season I can’t do proofing in room temperature.
Or if it’s not possible, do you have any suggest to do second proofing in winter wothout IP ?
Thanks ! Really looking forward for your reply ! 🙂
sushma iyer says
Hi Nisa..
Thank you.. glad to know that you liked the idea.. If your pan fits in the ip then you can do the second proofing in the pot too without any issues 🙂 Just reduce the time by halve 🙂
Regards
Sushma
Priya says
Made ladipav with your recipe and kept all the tips in mind, knead the dough with milk turnout awesome.next time I will try them with wheat flour instead of APF.
sushma iyer says
Hi Priya..
That is awesome.. so good to know.. thanks for trying and sharing your wonderful feedback with us.. appreciate it.
Regards
Sushma
Ferz says
Hi Sushma! Thanks for a great and easy recipe. But I will be using the convection setting in my microwave which cannot accommodate 16 pavs. Could you please let me know proportions of all the ingredients to be used for 6 pavs? Thanks in advance.
sushma iyer says
Hi Ferz..
Thank you.. glad to know you liked the recipe.. There is an option in the recipe card where it says Servings:16 pavs. If you select that and select the number of pavs you want to make the recipe will be adjusted automatically and you would get the details for the same instantly on the site itself. Hope this helps..
Regards
Sushma
Usha Iyer says
Hi Sushma,
Tried baking Ladi Pav following your recipe, but used 50/50 APF/Whole Wheat Flour. It turned out superb, soft and spongy. Thanks for sharing the recipe.
sushma iyer says
Hi Usha.. that is amazing.. so good to know.. yes this recipe works for 50:50 too have tried it myself and glad that it worked out for you too.. thank you for sharing your experience with us.. appreciate it..
Regards
Sushma
Jyotsna says
Made this today , was so happy to see the pav . Thanks for the detailed recipe with the do’s and don’t . The store bought buns used to kill the taste of the dish .not any more . I don’t have an instantpot or a stand mixer , followed all steps by hand still results were wonderful.
Do you have any recipe with wheat( atta) ,- pav or loaf?
sushma iyer says
Hi Jyotsna.. that is excellent so pleased to know that your pavs turned out well.. thank you for sharing your feedback with us.. and this recipe should work for 50:50 atta to maida but not with 100% wheat flour. I am still experimenting with it.. 🙂
Regards
Sushma
JA says
Great Recipe Sushma,
I followed every single step and the result was amzing! Thank you so much!
Happy baking!!
sushma iyer says
Woohoo.. That is amazing JA so good to know thank you for sharing your thoughts with us.. appreciate it..
Regards
Sushma
Prescy Dias says
Hi Sushma,
Your bread recipes look so yummy. I have a question. What is 1 cup flour equal to in gms.
there are different versions.
sushma iyer says
Hi Prescy.. Glad to know that you are liking the bread recipes.. 1 cup Flour = 120 gms
Regards
Sushma
Shubhada says
I have made this bread without milk many times. Adding milk powder and substituting half water with milk, made them very soft and perfect color! I have replaced my older recipe with this one. Thank you!
sushma iyer says
That is awesome Shubhada.. thank you for sharing your experience with us.. so pleased to learn that the substitutions worked for you.. In case you eat eggs; I recently published a dinner rolls recipe that is the softest ever.. feel free to check it. here is the link: https://www.youtube.com/watch?v=6uglVNFoTxA&t=2s
Regards
Sushma
Anu Amruth says
Hi Sushma
Tried the recipe and it was fantastic.
But the second time i tried with double the proportion and the pav took longer time to cook as well as it became hard. And the bread had a smell and taste which the first srt didn't have. Can you please tell me what may have gone wrong?
Also double recipe is 36 gms of Yeast, isn't that a lot?
Regards Anu
sushma iyer says
Hi Anu.. so pleased to learn that you liked the recipe and had a great success first time..
As far as doubling the recipes, I am assuming that you doubled all the ingredients and used two different baking pans.. In that case, 36 gms is correct.
This recipe can easily be doubled. Did it prove evenly??
You get the yeasty smell and taste when it is not cooked through.. How long did you cook it??
Nisha says
Can I use multigrain (88% wheat, rest other grains) flour instead of APF?
sushma iyer says
Hi Nisha.. I am sorry but have only tried this with 50:50 APF to whole wheat and it turns out good.. not tried any other way so sorry won't be able to comment
Regards
Sushma
Gemma says
Oh wow these look insanely good! Almost as if the photo is from a page in a recipe book - I’m definitely going to try them, the prep time isn’t bad at all xo
sushma iyer says
Thank you Gemma.. You won't believe I took these photos from my S8 unlike the other photographs which are usually taken from my DSLR. Hope you do give it a try soon.. will be waiting for your update 🙂
Regards
Sushma
Sue says
Is this using what we call in UK plain flour, or is it waht we call strong (bread) flour?
sushma iyer says
Hi Sue..
Yes it is Plain Flour even in NZ we call it Plain Flour.. In US referred to as All Purpose Flour or APF and in India Maida.. Strong Flour is different 🙂
Liz says
What setting would I use if I My IP doesn’t have a yogurt option?
sushma iyer says
Hi Liz..
I have read that you can use the keep warm mode to proof the dough but it makes the dough little dry; though I have not tried personally. Apart from that you can follow the non IP method as given in the recipe card 🙂
Aparna says
How do you get the color on the Pav? Looks great. Thanks for sharing!!
sushma iyer says
Hi Aparna..
I have mentioned the same in the recipe that is to brush it with some milk before baking for the golden colour.
However, if you are here from my Facebook post then let me tell you in that I have not brushed any milk on top because I had already replaced the water with milk so I got the colour on its own due to the amount of protein in it.
Rita says
Which flour is to be used?
sushma iyer says
Hi Rita..
This pav is made using All purpose flour or maida
Regards
Sushma
Miragani says
Love you for the so detailed and nice videos.. I’m a big time foodie where I want to keep trying and making palatable dishes myself.. thanks! I have subscribed to your channel
sushma iyer says
Hi Miragani..
That's so kind of you. I am so glad to learn that you found what you wanted. Thank you for sharing your wonderful thoughts with us. <3
Mahesh says
Which milk powder? Can i use Amul spray. Please give link of that stand mixer to buy online in India
sushma iyer says
Hi Mahesh..
1. You can use milk powder of any brand. If you do not have milk powder then you can also use milk in place of water to make this recipe. The purpose of milk powder is to soften the bread.
2. Amul spray for what? For spraying the baking trays then definitely you can use it.
3. You can try other substitutes like molasses or honey as yeast definitely needs sugar to activate so I am not sure whether the sugar substitute would work or not. sorry about that.
4. I own a Brabantia but I believe it is not available in India. The best stand mixer in the market is of course KitchenAid. You can check that.
Regards
Sushma
Pliadisfoto says
Malonu skaityti!
Shilpa says
Superb
sushma iyer says
Thank you Shilpa.. <3
Robin says
I don’t have a yogurt setting on either of my Insta pots. What would you suggest is compatible?
sushma iyer says
Hi Robin.. I have read that you can use the keep warm mode to proof the bread but it makes the dough a little dry; though I have not tried it personally. Other than that I suppose you will have to follow the non IP method as mentioned in the recipe card 🙂