Peppa Pig Birthday Cake - a cake that would help you win over that cute, innocent and naughty little kiddo.
A step by step guide on how to make a number cake without any number tins or pans, rather made using a round cake which is then filled and frosted with whipped cream and decorated with Peppa pig cake toppers.

Raise your hands if your kids spend their evening time watching Peppa Pig on Youtube!!!
It is my daughter's current favourite show so when it was time for her birthday, I had already known what was coming - A Peppa Pig Birthday Cake.
In this Peppa Pig Birthday Cake post you will learn:
- How to layer and crumb coat a round cake.
- Shape the round cake to make a number cake specifically number 3 cake. So this particular Number cake is made without using any number tins or number moulds.
- What piping tips and nozzles to use to decorate the cake.
- Links to making fondant Peppa Pig, Mummy and Daddy Pig cake toppers along with other cake toppers that I have included in this post.
- Finally, I will also try to include details on covering your cake board with fondant.
So this year on Yoshana's Birthday her cake has a little bit of everyone's liking.
She wanted a Peppa Pig Cake - Check
Daddy wanted Pineapple Cake - Check
And mummy wanted to try a number cake - Check.
Haha.. yes a little bit of all our wishes are there in her cake.
Have used my evergreen Pineapple Cake recipe. A detailed recipe for all the components of pineapple cake has already been shared so you can check it out by clicking here.

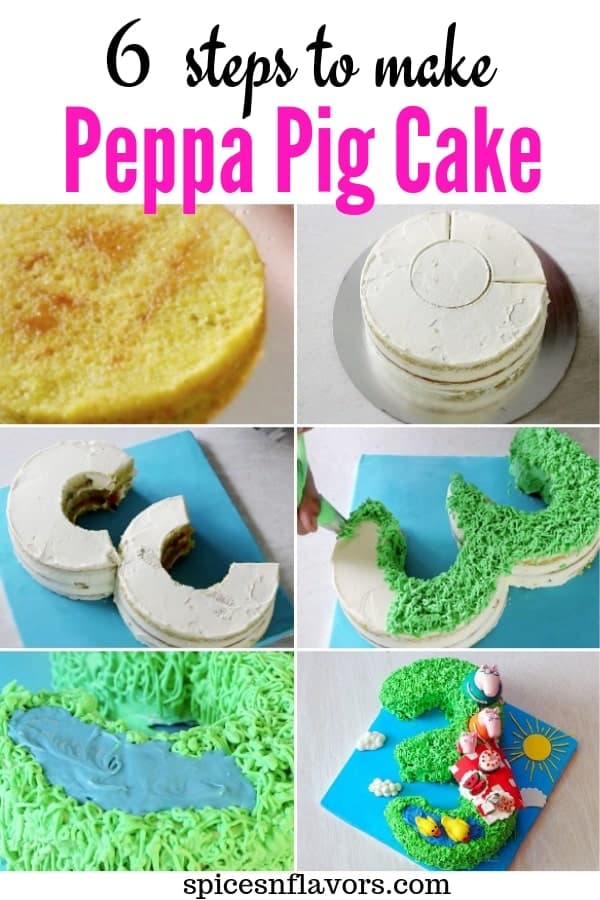
For a better understanding of the assembly of this Number 3 Peppa Pig Birthday Cake, I have divided it into 6 steps which we will go through one by one in a detailed way.
Starting with the first step would be to actually bake the cake and layer it right.. 😀
Step 1 : Layering and Crumb coating
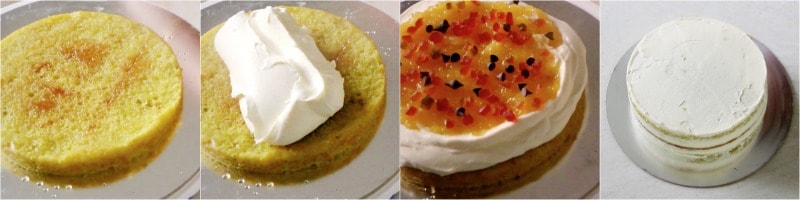
To make this Peppa Pig Cake, I have baked 2 "7 inch" pineapple cake.
Divided it into 3 layers each. So in total now I have 6 layers of cake.
Placed the base layer on the cake board. Then filled it with whipped cream, pineapple compote, tutti-fruity and choco chips. Place the second layer on top and repeated the steps until I reached the very top.
Using the same whipped cream that I used for filling I have now crumb coated the cake as well. Allow it to chill for a minimum of 30 mins.
All these steps are explained in a more detailed manner in Moist Eggless Pineapple Cake blog post. You can also find the detailed recipe from there.
However, the cake flavours totally depend upon your personal liking. You can also go for plain vanilla cake, chocolate cake or chocolate caramel cake etc or as per your client's needs.
PRO TIP:
I would advise to place the 2 cakes side-by-side and do each step simultaneously. This would save a ton of your time.
Step 2: How to cover your cake board with Fondant?
These days home baking, cake baking and cake decorating has gained so much popularity and grown so much that there are new trends and techniques coming up every other day. Be it the cake popsicles or alphabet cake some trends have taken the internet by storm.
One such trend that I have been observing for a really long time has to be covering the cake board to match the colours, theme or decoration of your cake.
It was not very popular when I was a child. Growing up I have never seen this but now you can see it everywhere.
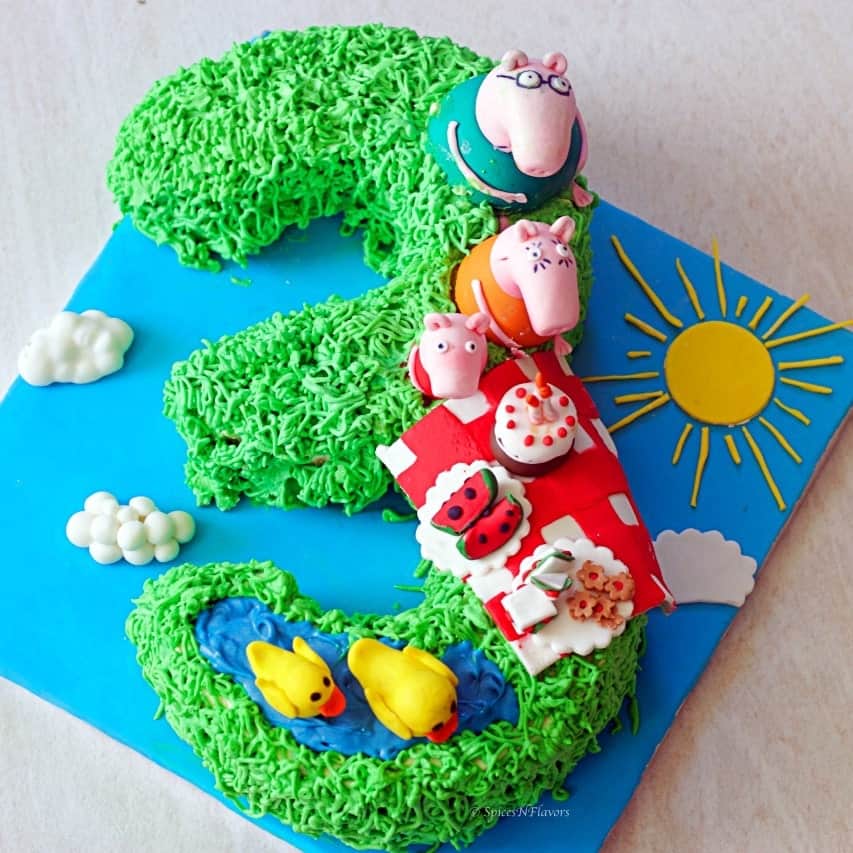
So for our Peppa Pig Birthday Cake, the concept that I choose was that the family goes to a park to feed the ducks and also sit and relax, play and eat together.
This is one activity that the three of us often do in fact every other weekend I must say.
For which the cake has to be green in colour with grass piping and hence I decided the base that is the cake board to be in sky blue colour with sun and clouds around.
And hence I rolled out blue fondant (or mix some blue food colour to your white fondant and use) to the size of my cake board.
So after rolling some portion of it on my worktop I placed the fondant on my cake board and rolled it over to adjust to its size tucking just a bit underneath the board so that I could also cover the sides of the cake board.
Alternatively, you can also choose a ribbon to tie on the sides of the board. Set this to dry overnight.
Step 3: Shaping the Round Cakes to form a Number 3 Cake
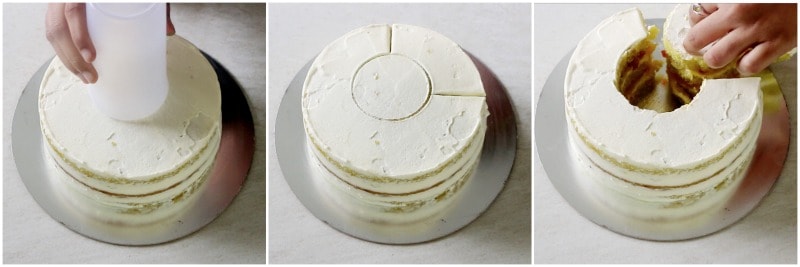
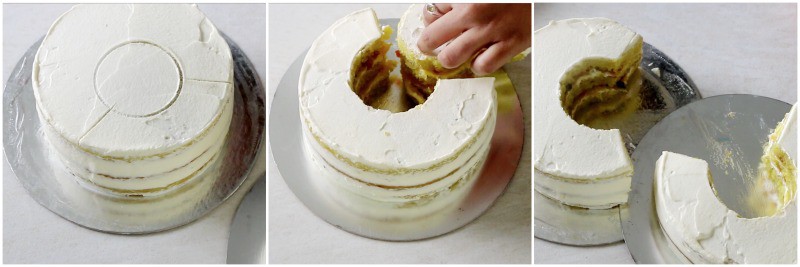
It is actually hard to explain the way to cut your cake in plain words.
So I have shown a diagrammatic representation of the same on a paper which I am attaching here for your reference. Or you can also refer the video below for an even better understanding.
Once you have cut the round cake as shown in the pictures simply place them on your blue cake board to form a number 3 shape.
Step 4: Decorating the Cake
As mentioned I wanted the cake to resemble a park set-up. And hence to pipe on the cake I used a grass tip. Wilton Nozzle no 233 to be precise.
Using my favourite stabilized whipped cream frosting coloured in green and flavoured with pineapple, I simply piped the grasses all over the cake.
However, it was difficult to reach the nooks and corners or to say the inside portion of the cake that is the curved part. So to cover that portion I used a piping bag fitted with a small round tip or nozzle and then simply do random piping all over.. Yes, it would look more like noodles than a grass effect 😉 but still will look good in the end 😀
Step 5: Creating a Lake effect or call it a Pond
You do not have to do this. In place of the water effect, you can also make a small puddle and place your pigs there if you wish.
But in this case for making the Peppa Pig Birthday Cake as per our theme or concept, what I did was, melted some white chocolate, add a drop of blue food colouring along with few drops of oil. Combine it all together. Transfer to a parchment paper cone and just make a random drawing of a lake or pond. Just become a child again.. hehe..
Another detailed video that you must check out has to be how to melt chocolate the right way.
Step 6: Fondant Placements
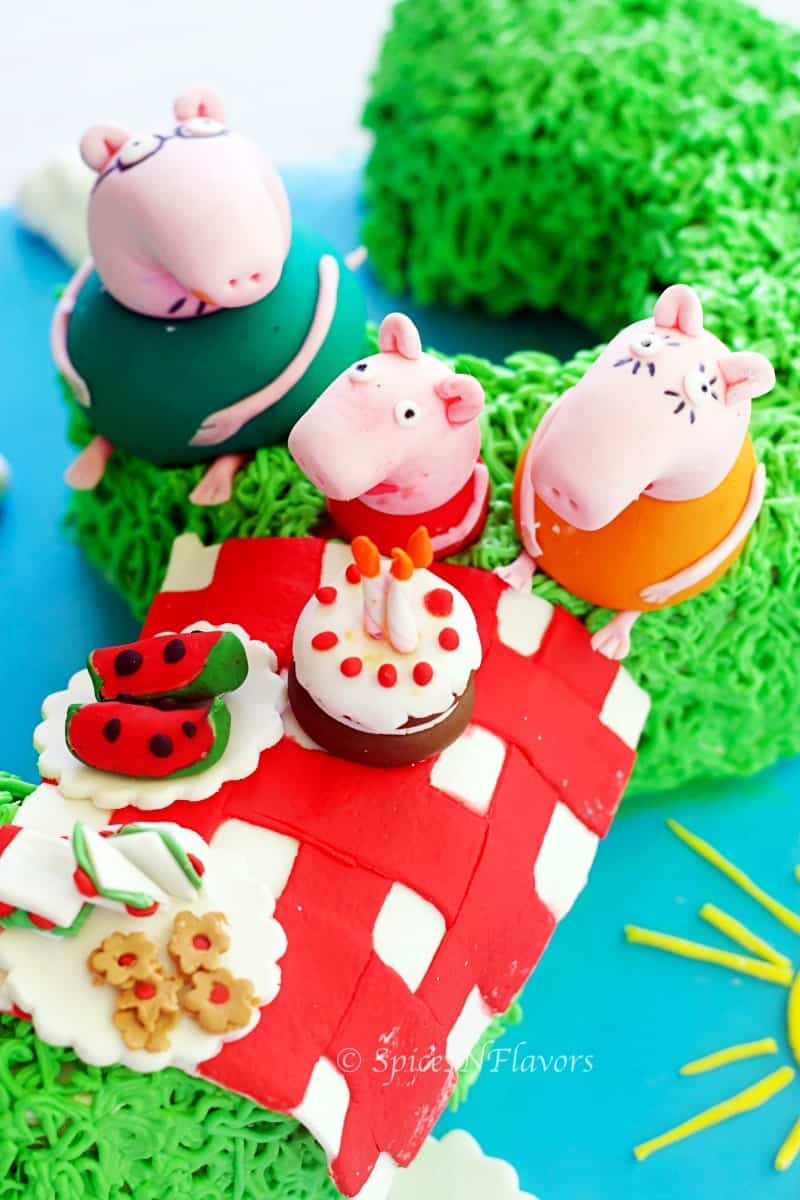
Now I do not consider myself an expert in making fondant designs yet so I have not included the steps or method for making all the cake toppers.
However, here are few Youtube links that I referred to make my cake toppers.
Not including any link for making the sun because it is so simple. Just cut out the round shape using a cookie cutter and thin strips for the rays.
And then place them on top of your cake. Place the sun and clouds on the cake board.
That's it our Peppa Pig Birthday Cake is all done and dusted.
Here is the link to the Peppa Pig Birthday Cake video.
I won't say this Peppa Pig Birthday Cake tutorial is a simple or easy recipe for that matter.
Yes, a bit time consuming and need some practice but totally worth the happiness on the face of your friends and family 🙂
This was a personal and special post for me.
Every year I look forward to this time to create something beautiful and special for my daughter believing it to stay as a fresh memory forever. On her first birthday, we did a Little Krishna Theme party. You can check all the details of the same from here.
Last year on her second birthday we were in India so I could not make anything special for her.
Hope I continue to create more beautiful memories for her through the medium of food.
And I also hope that you guys enjoyed the tutorial too. I know it is not a perfect cake but still a special one forever.
If you ever recreate this then do let me know by tagging me, tweeting me or instagram me. I would love to follow you and your posts..
Pin this Peppa Pig Birthday Cake tutorial to your cake decorating board
I will see you soon with yet another one
Until then
Hugs
Sushma.
GK says
Hi Sushma,
That’s a beautiful birthday cake. Can you please tell me how many people does this cake serve? Also what’s the size of the cake board you’ve used?
sushma iyer says
Hi GK.. the size is 10 inches I believe and this cake would serve 15-18 people