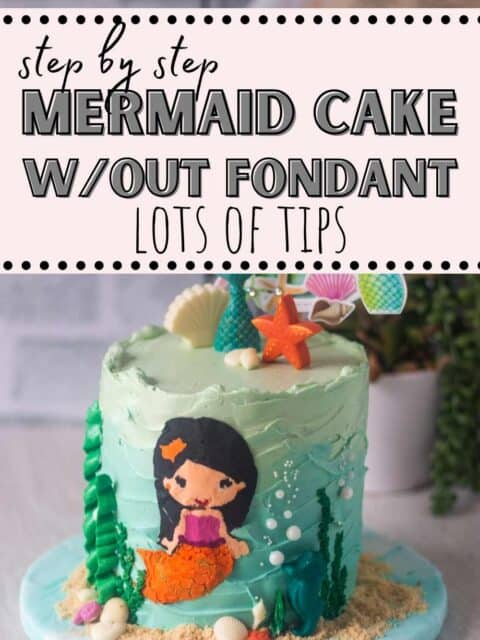
Are you ready to learn how to make a mermaid cake without fondant that is simple but looks like you have been in decorating classes?
Apart from sharing the decorating tutorial I have also covered the basic techniques like fill, stack and frost a cake, buttercream transfer and chocolate decorations in a step-by-step format so be ready to bookmark this page: to learn the basics of cake decoration.
Mermaid Buttercream Cake
This is the most perfect cake for your mermaid-loving little girl! It definitely was for my 6 yr old.
It's simple (if planned right.. don't worry I will help you with that too), homemade, and tall—and it's covered in ombre buttercream that can also go well for any ocean-themed birthday party or even under-the-sea birthday party.
The best part? There's no fondant, so you can eat it without worrying about breaking a tooth (which is always a plus).
So let's make a tall buttercream mermaid cake without fondant step by step.
Little Girl's Birthday Cake Ideas
Ever since my daughter turned 3 she has been asking for a theme cake every single year. Being a baker Mom I had no choice right!!
So here is a list of themed cake that I have made so far:
- Little Krishna Birthday
- Peppa Pig Birthday Cake
- Unicorn Cake (yet to be shared on the blog)
- Elsa Birthday Cake
- Mermaid Birthday Cake
Quick Notes:
Techniques that we are covering in today's tutorial:
- How to Fill and Stack a Cake
- How do you make the icing look like the sea?
- Buttercream Transfer Technique
- Chocolate Decorations
- Final Assembly
If all of this sounds intimidating to you simply click on to Shortcut Mermaid Cake Tutorial from the table below.
- Mermaid Buttercream Cake
- Little Girl's Birthday Cake Ideas
- Quick Notes:
- Things Needed:
- How to Fill, Stack and Frost the Cake?
- How do you make icing look like the sea?
- How do you make a mermaid out of icing
- Chocolate Decorations
- To Assemble
- Time Sheet
- Storage Instructions
- Baker's Tip
- Shortcut Mermaid Cake Without Fondant
- Variations
- Frequently Asked Questions
- Related Recipes:
Things Needed:
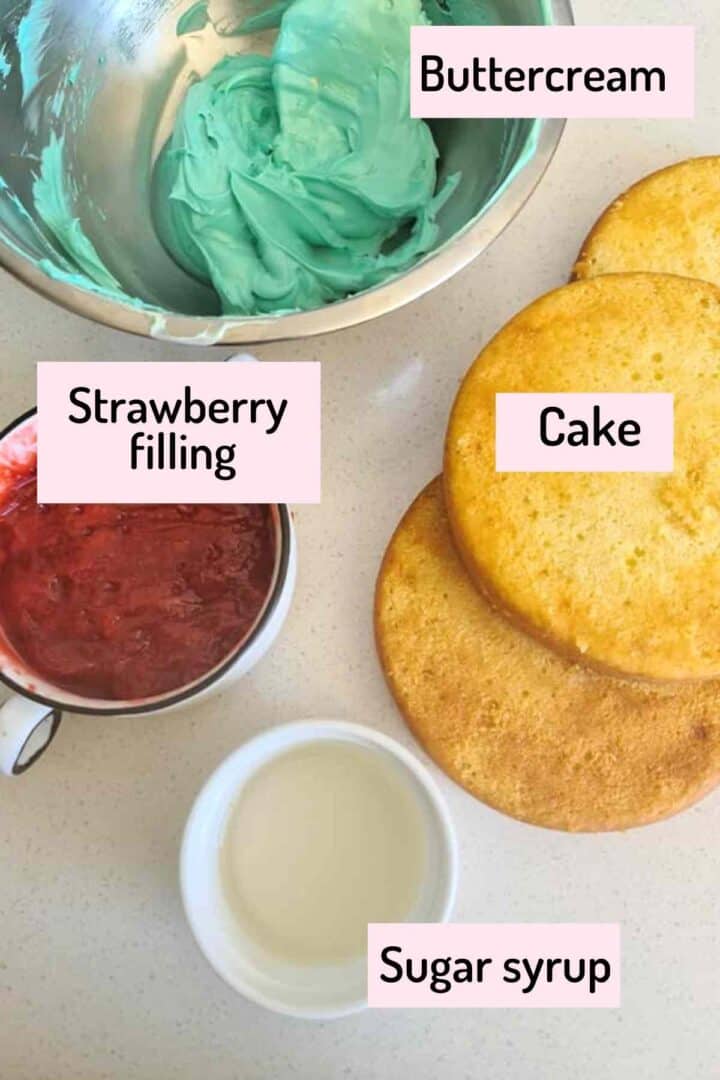
- Cake Base: I am using the Eggless Condensed Milk Cake as the base but to be honest I did not like it as a layered birthday cake when compared to my Eggless Hot Milk Cake which makes an excellent base for birthday cakes.
- Sugar Syrup
- Buttercream: Undoubtedly my Condensed Milk Buttercream is my first preference when we want to make such detailed designs. It is not too sweet and perfectly silky and smooth. You would need different colors which you can prepare in small bowls or use a muffin tray instead.
- Strawberry Filling: This is totally optional but recommended to have an additional boost of flavour. My strawberry filling for cakes covers all the details you need to know about making a filling for a cake.
- Print out of character: You would need a printout of the character that you would like to make for the Buttercream Transfer method which you can simply google and choose. We are obviously going to use a Mermaid design today. But the technique would work for any other characters like Dinosaur, Spider-Man, Masha etc.
- Silicon Moulds: I got a few silicon moulds from Amazon like the shells, fishtail etc to match the theme today which I then used to make the chocolate decorations, which means you would also need melted chocolate.
- You will also need other basics cake decorating items like a bench scraper, an off-set spatula, parchment paper, etc.
How to Fill, Stack and Frost the Cake?
First things first, when you are willing to do a tall cake I would recommend you guys to go for a butter-based cake and not oil-based cakes; oil-based cakes lack sturdiness.
I recommend using my Hot Milk Cake Base.
As for this tutorial I have used my Condensed Milk Vanilla Cake Recipe as the base. It forms an excellent base for travel cakes so I wanted to test whether the same recipe could be used for layered cakes as well.
I doubled the recipe and baked it in 4, 6-inch pans. If you do not have that many tins you can make the recipe in 2 batches which are baked in 2 tins at one time.
Allow to cool and trim the crystallized layer on top.
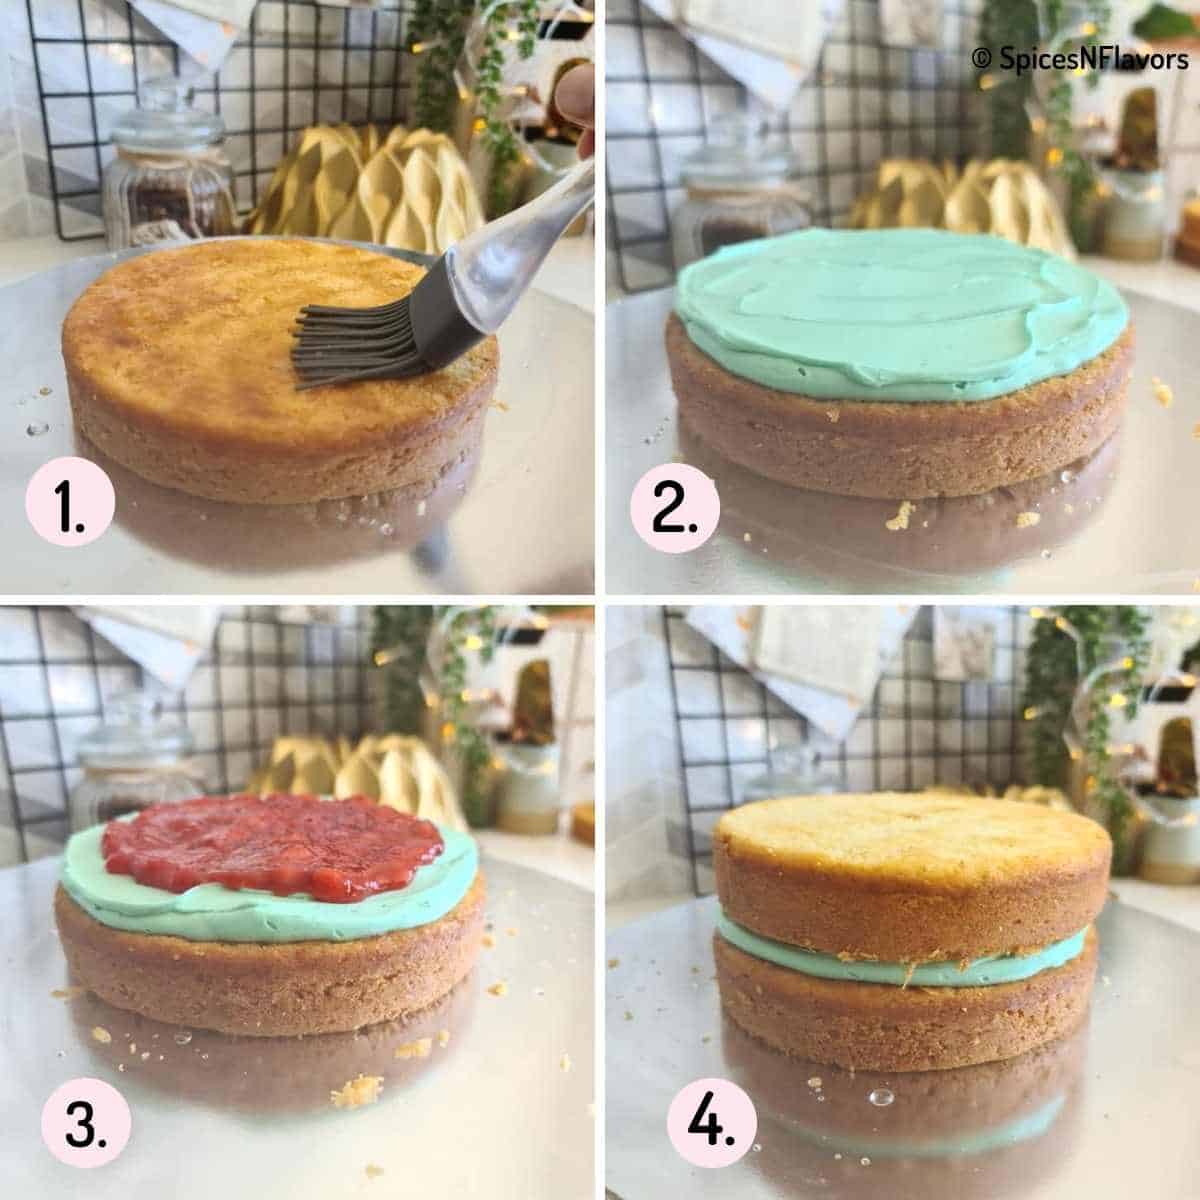
Soak it with sugar syrup really well.
Add a layer of condensed milk buttercream followed by 1/3rd of the prepared strawberry filling.
Then place the second layer and repeat all the steps.
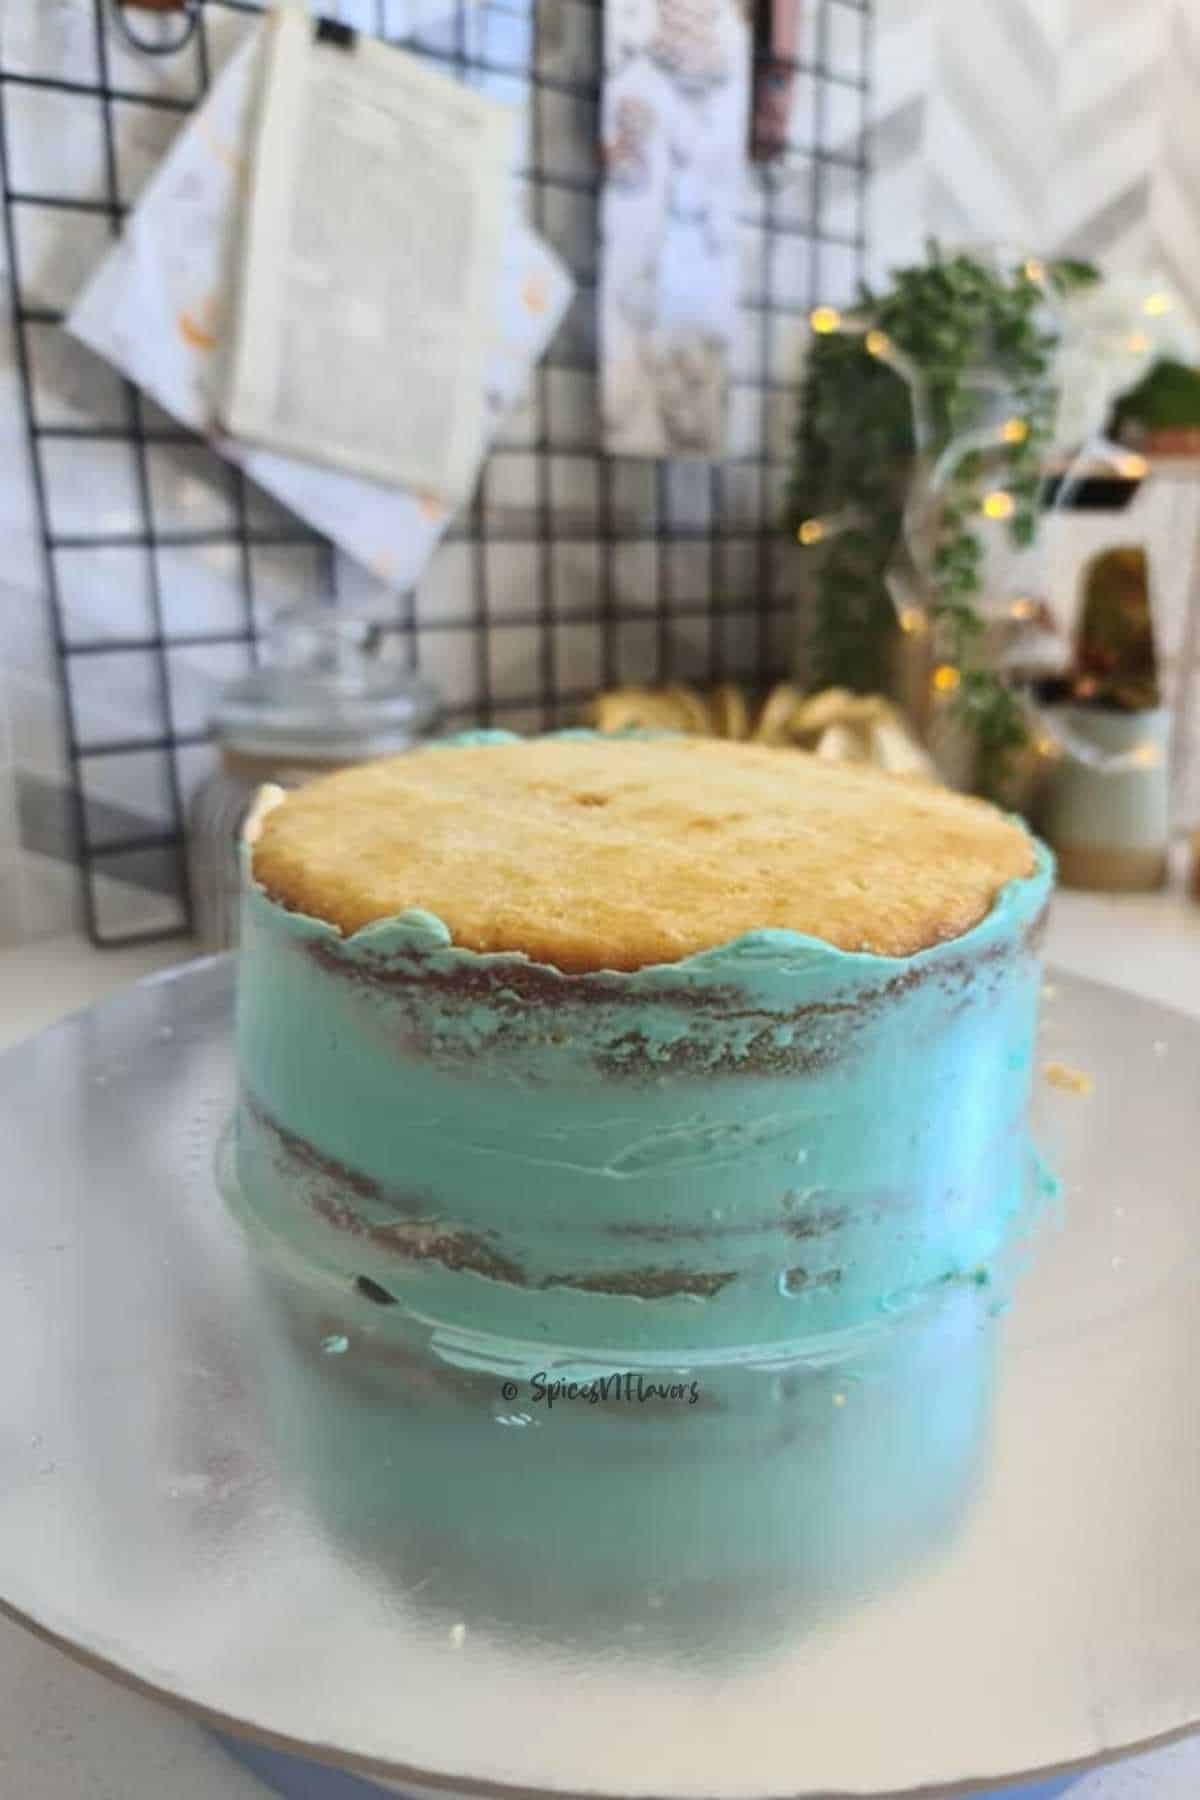
Before going on to the third layer I recommend you to crumb coat the sides first.
PRO TIP: That way you can be assured that you are stacking straight layers every single time. Bend a little and adjust the cake while crumb-coating.
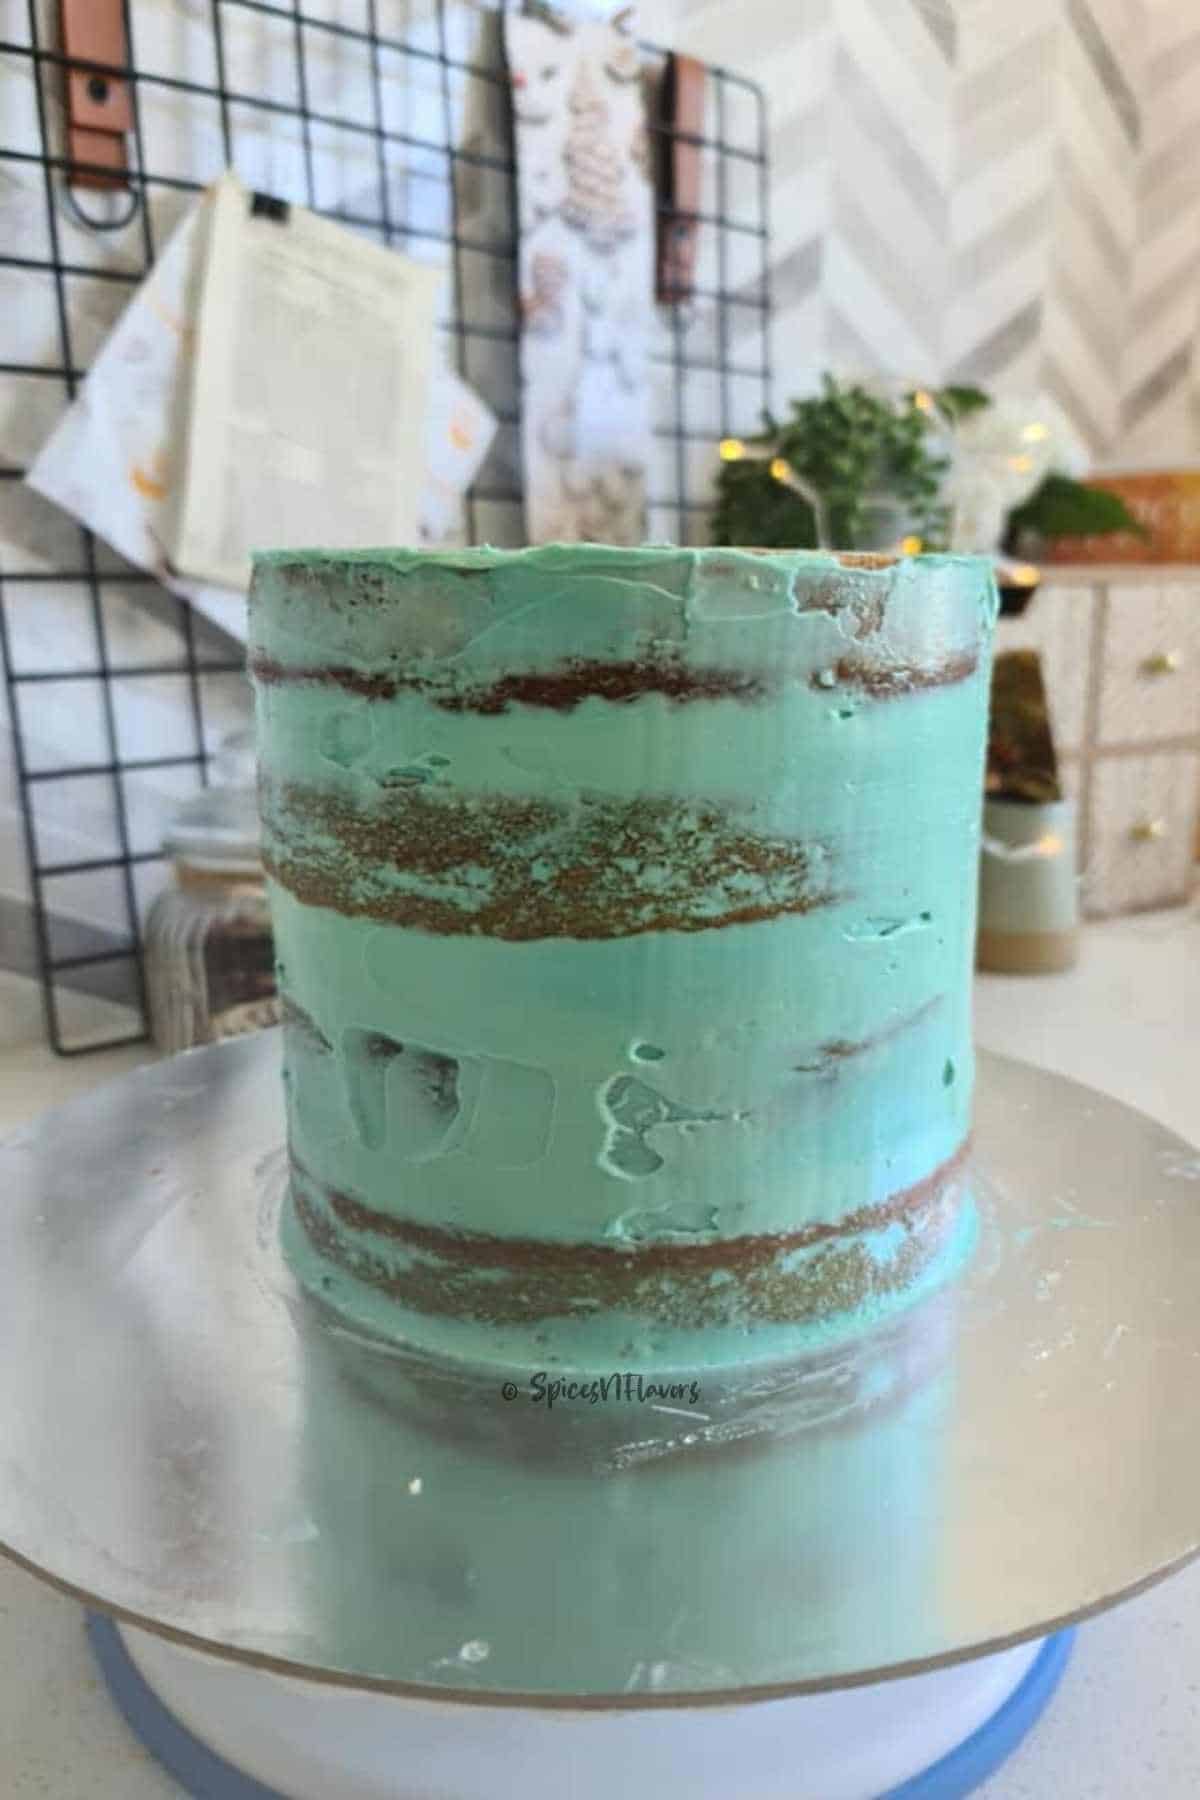
Place the fourth cake slice upside down so you get an even top layer and now crumb coat the entire cake and leave it in the fridge for 30 mins to 1 hour.
How do you make icing look like the sea?
Creating an ombre effect with shades of blue is the easiest way to make your icing look like the sea. The colours that I have used are turquoise and teal.
Steps to achieve the ombre wavy pattern on the sides of the cake
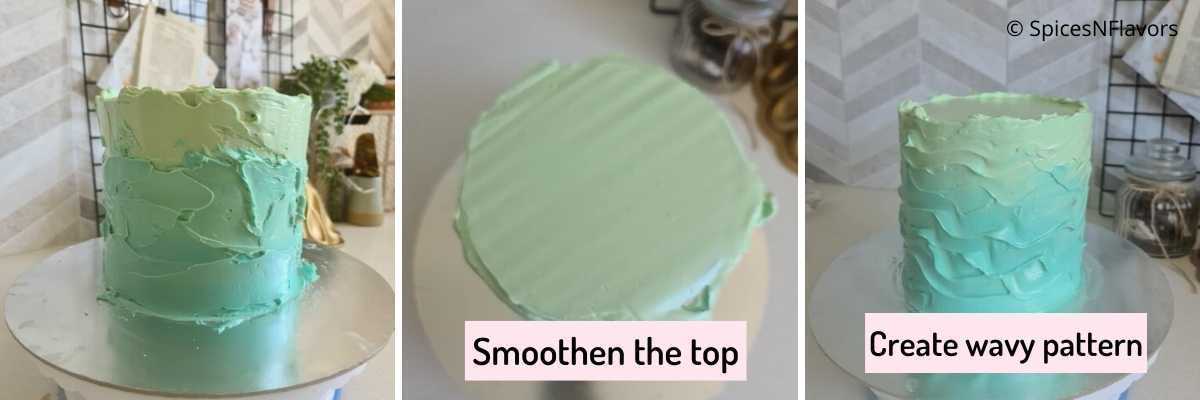
- Smoothen the top: Since we are giving a rustic finish to the cake we have to start with smoothening the top of the cake first. Use the lightest shade possible, add some frosting on top, spread and even it out. Spend some time here as we won't touch it once you are satisfied with the finish.
- Ombre effect: Create an ombre shading effect on the sides of the cake with the darkest shade at the bottom and the lightest to the top.
- Go up and down while smoothening the cake: Using a bench scraper smoothen the sides of the cake. Do not worry if it is uneven because that is exactly what we want. To give the wave pattern remember to do an up and down wavy motion instead of just horizontally across the surface as this will give it the oceanic wave pattern.
Do not worry if you accidentally scrape too much frosting revealing the cake beneath, you can always fix it later.
Add some frosting on top of it and repeat the wavy pattern. Since we are not aiming for sharp edges here, it becomes easy even for a beginner to fix it.
That's pretty much your blank canvas ready. You can now let it sit in the fridge overnight or for a couple of hours while you work on the decorations.
PRO TIP: You can now use this same cake base to do baby shark theme cake, sailor theme cake, under-the-sea theme cake etc by simply changing the decorations on top.
How do you make a mermaid out of icing
It is fairly easy to make your favourite character a mermaid in this case simply out of buttercream without using fondant using the buttercream transfer technique.
For this technique, you would need
- Parchment Paper
- Print out your favourite character from Google. I used this mermaid image for our today's tutorial
- Coloured buttercream as per the character. I used orange, pink, dark pink, black and skin colour for our mermaid.
Step by Step Tutorial
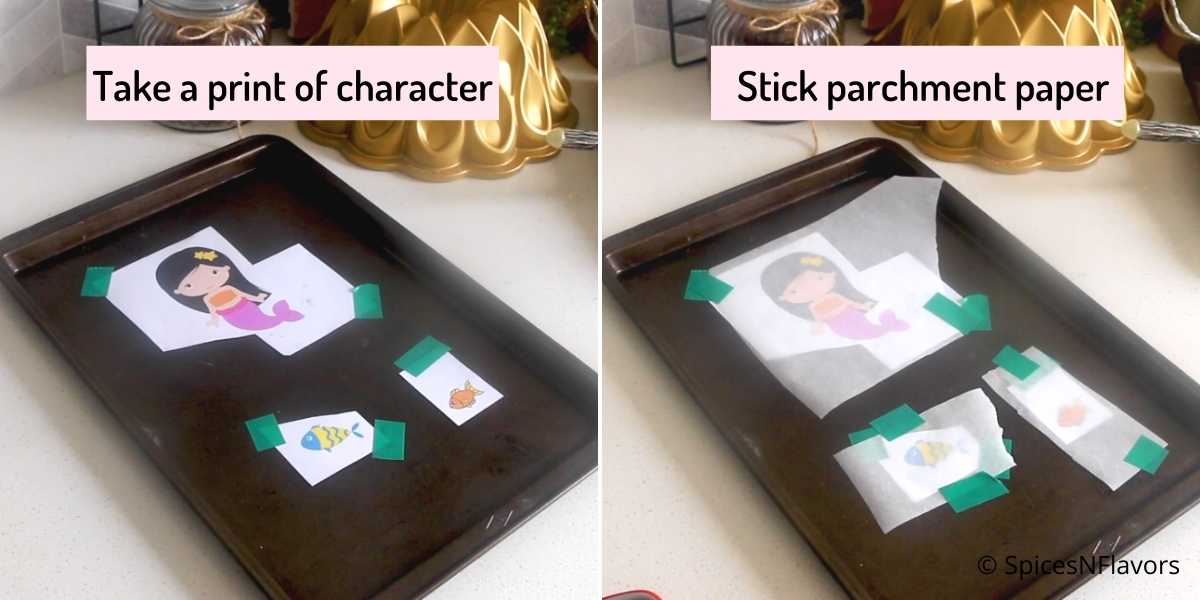
- Depending upon the height of your cake take a printout of the desired character.
- Stick it onto a baking tray so that it does not move. Stick parchment paper on top of the printout.
- You will start building your colours on this parchment paper starting with the details first and then proceeding to flood the colours.
- In this case, we will first do the eyes, ears, lips and the bow on her head. Chill the baking tray for 5 mins.
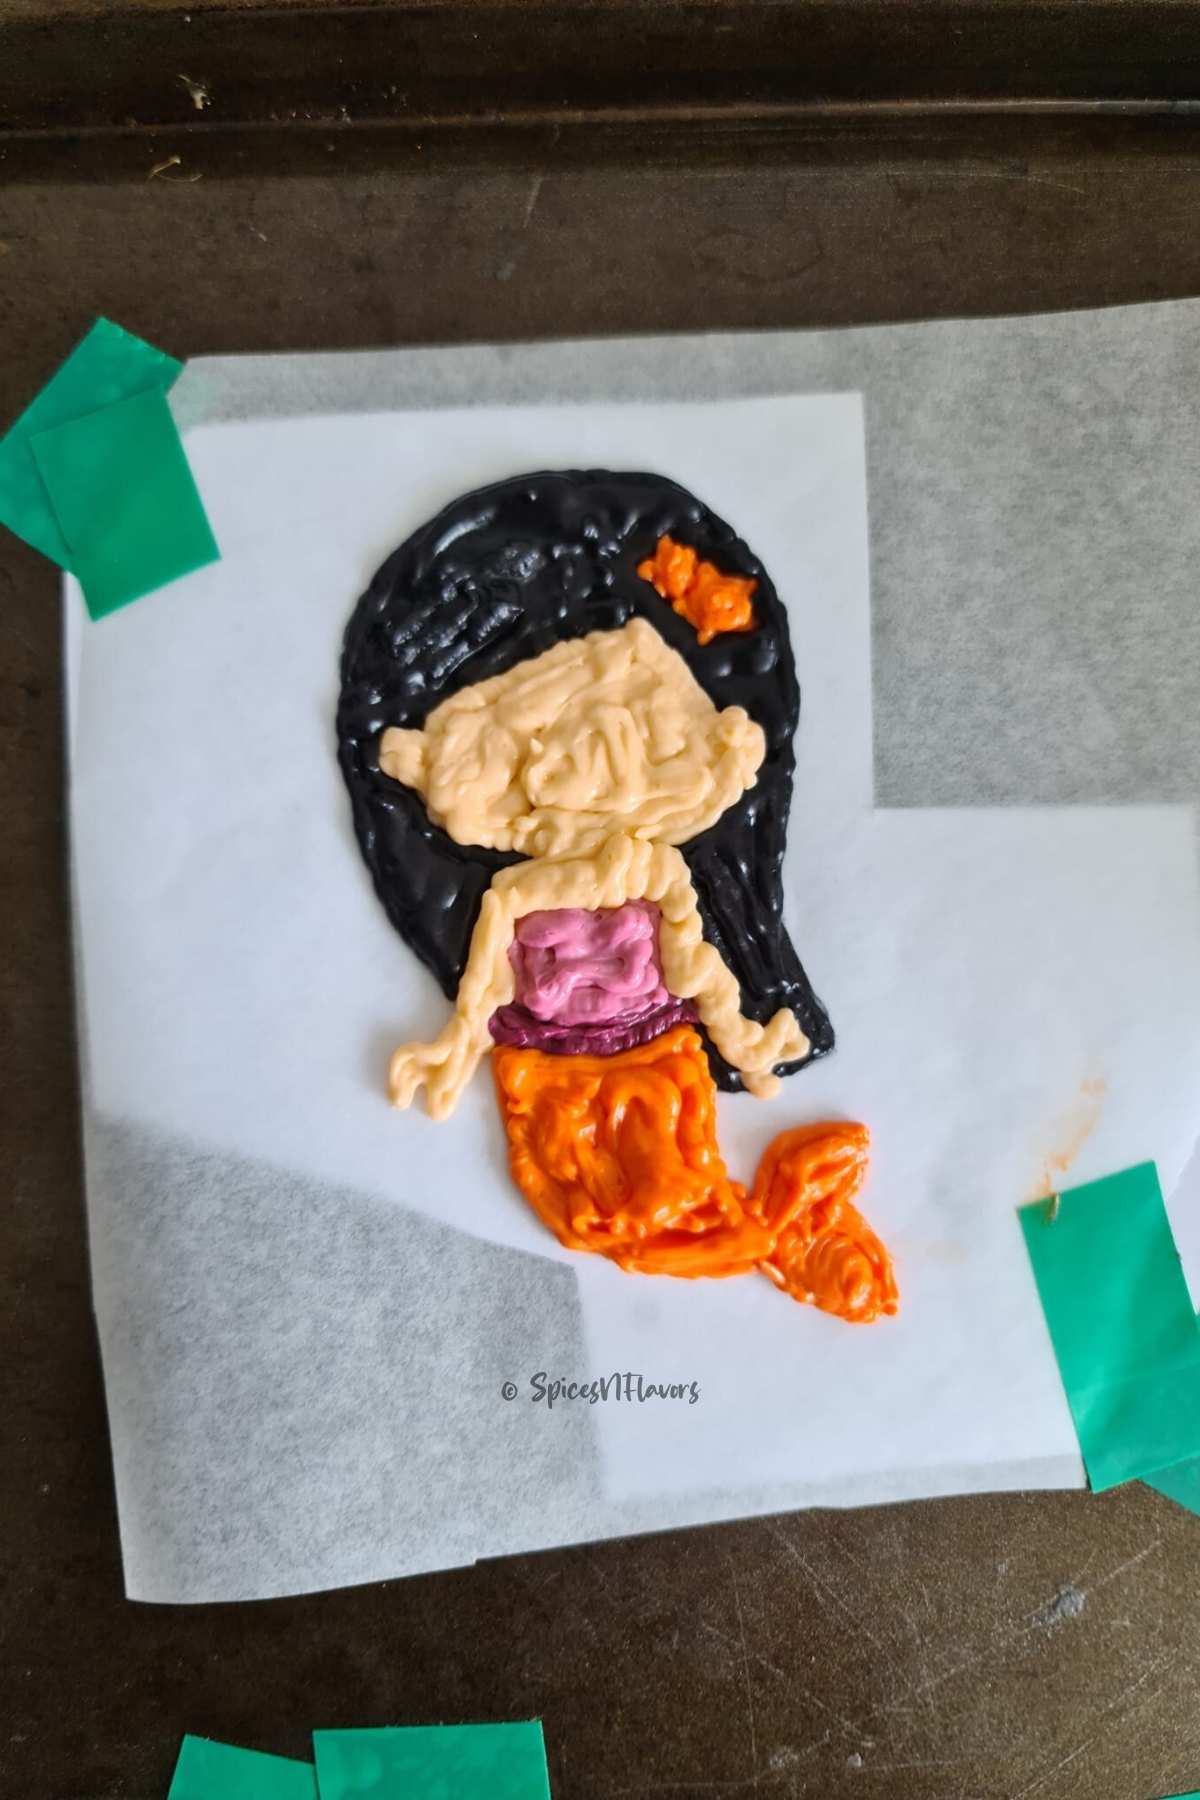
- Then flood the parchment paper with other colours that are her body, hair and skin which would cover the image entirely.
- Do not worry if it feels uneven to you, this is the portion that is going to stick onto the sides of the cake and hence would remain invisible.
- Release the parchment paper and immediately stick it on the chilled cake. Gently press the parchment paper onto the side of the cake so that the design sticks properly and gets transferred.
- Put the cake back into the refrigerator for 15 to 30 mins.
- After 15 20 mins, gently remove the parchment paper to reveal the design on the sides. If any air bubbles, adjust it with the same colour.
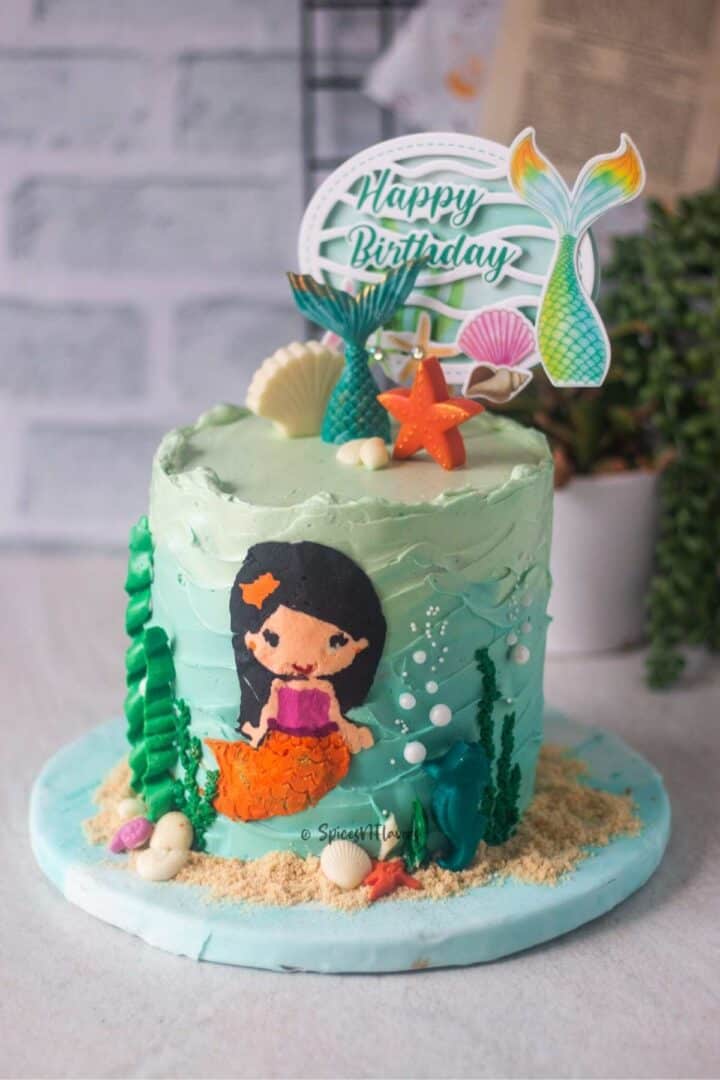
Chocolate Decorations
One of the easiest ways to make your design pop out is by using chocolate decorations.
Consider checking our post on How to melt chocolates the right way to make sure your melted chocolate does not seize.
You can also use the Instant Pot method of melting chocolates if you wish to.
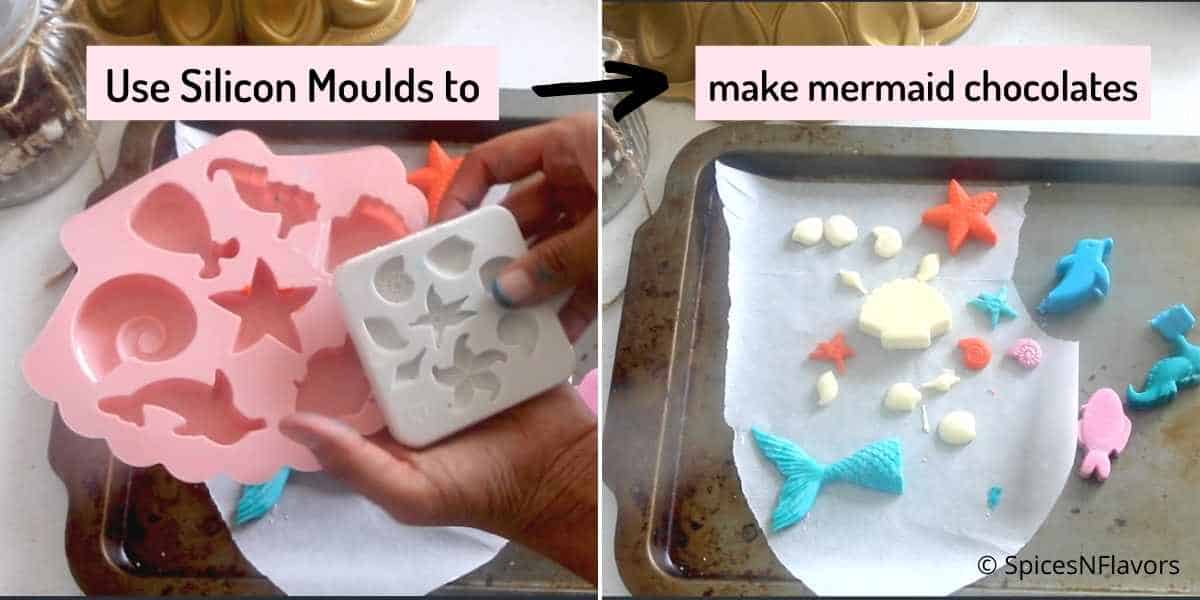
Once you have the melted chocolate ready, all you have to do is pour it into your silicon chocolate mold as per the theme, allow it to set and unmould to reveal the designs... crazy simple!!
Consider checking our Chocolate Pop it recipe for more details if you prefer.
I used this particular set of mermaid silicon moulds for today's cake.
To Assemble
I made some free-hand seaweeds next to the mermaid design for which fill a piping bag with green buttercream and make a small slit.
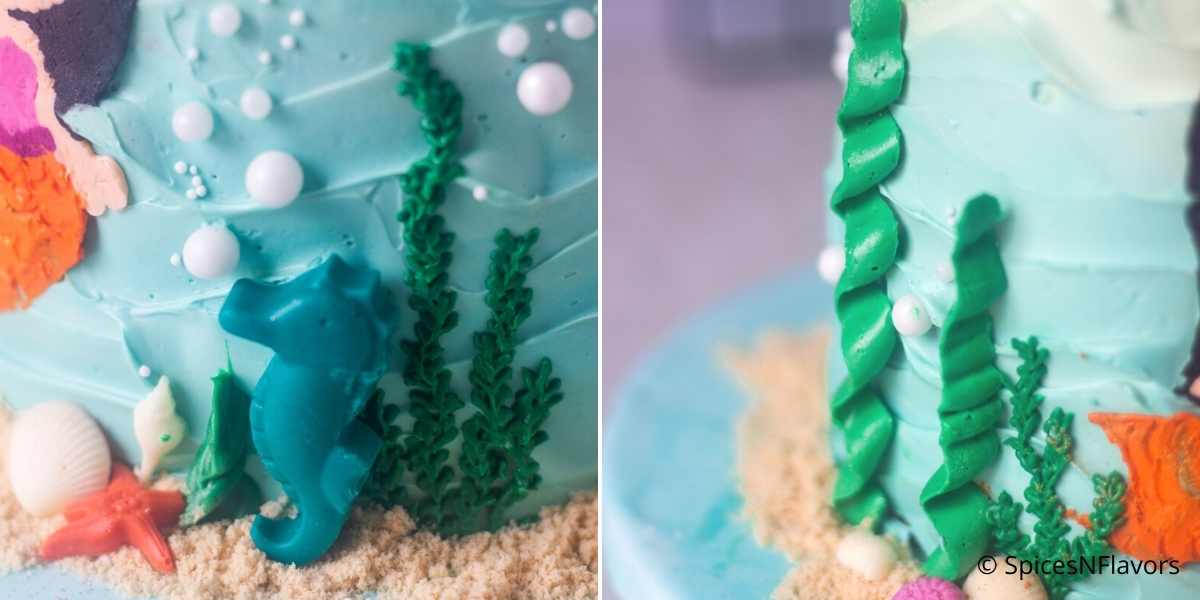
Draw a line and make small leaves on it.
For the other side, using a petal tip I drew a green strand on parchment paper and kept it in the freezer until the buttercream was frozen.
Once frozen, I simply took it and stuck it to the cake.
For the base, grind some golden oreo biscuits which resemble the white sand like the ones you see on a beach.
I added those to the base of the cake.
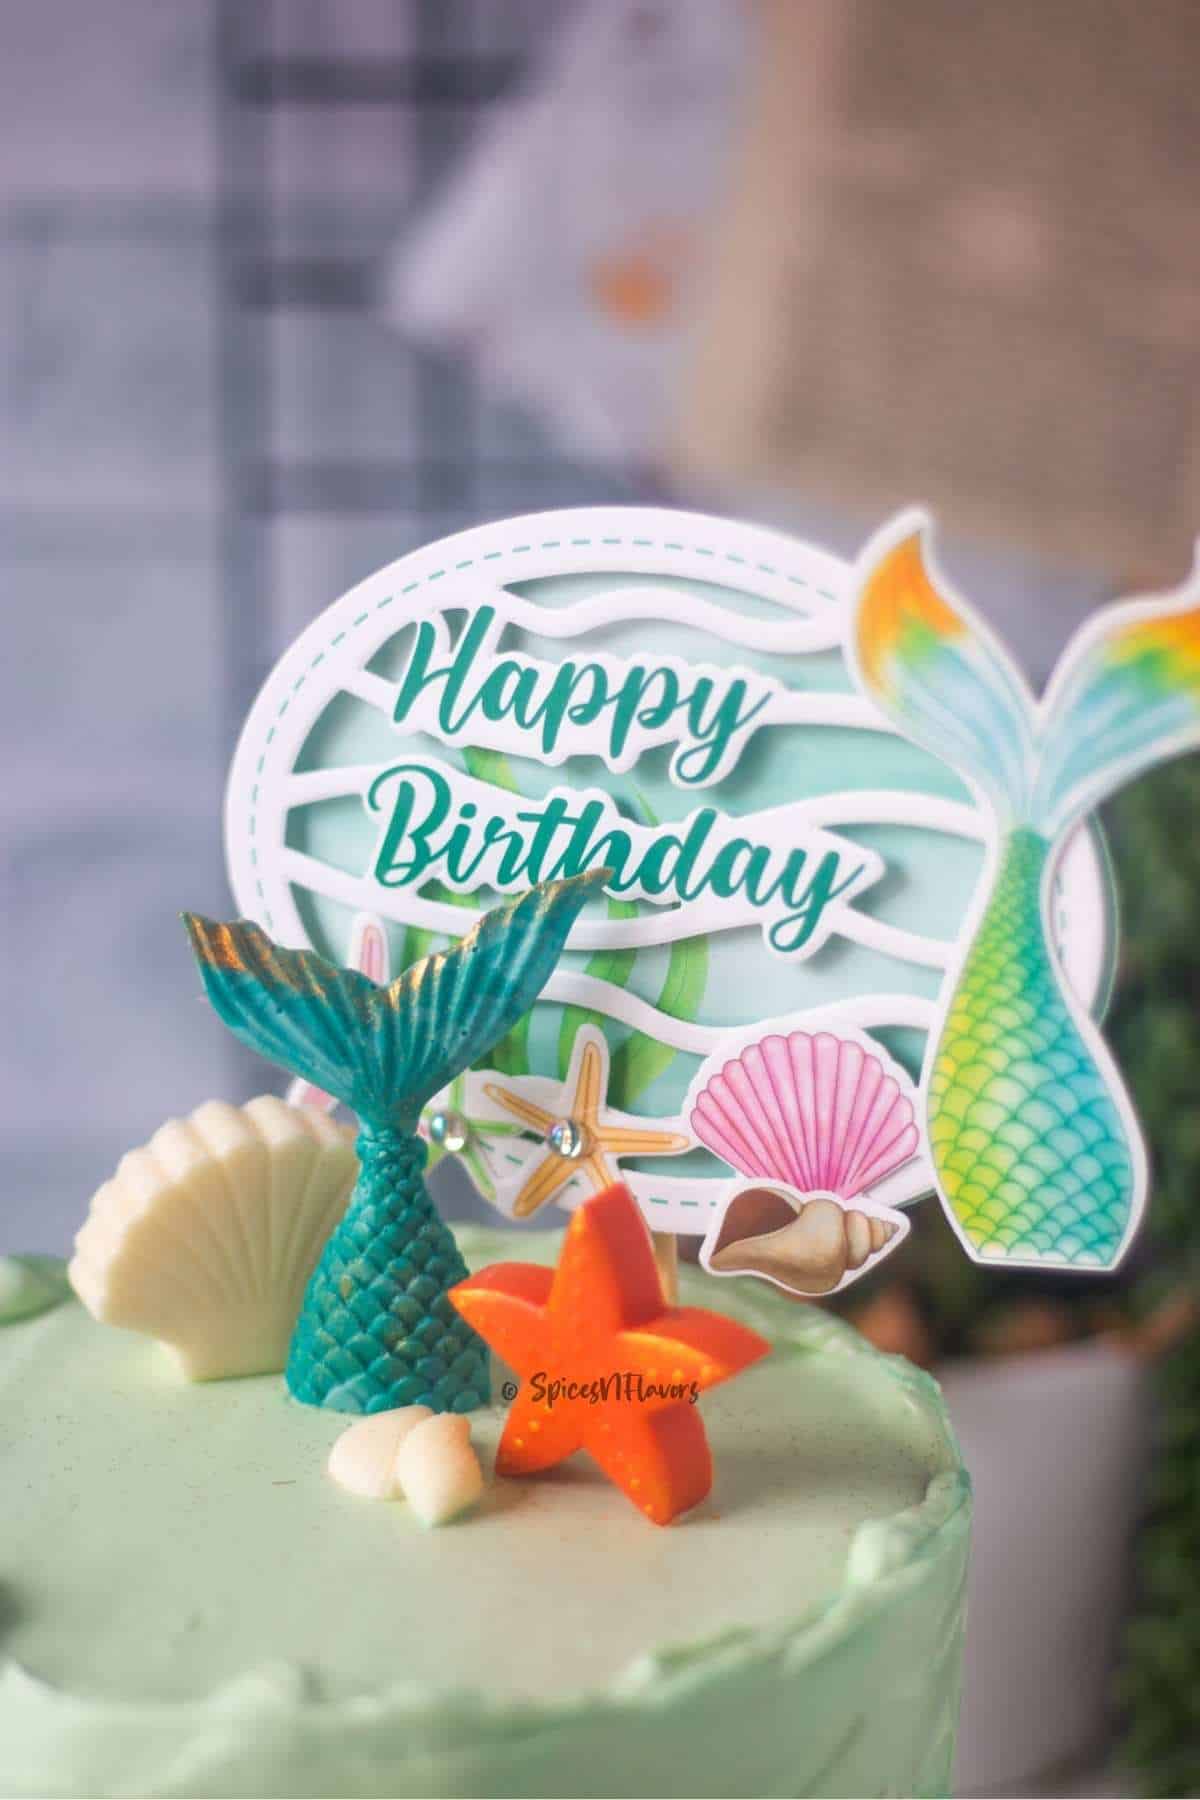
The mermaid chocolate designs were then placed on the cake where they went with the decor.
Also used some pearl sprinkles to replicate bubbles.
Placed a cake topper on top and voila our Mermaid Cake without fondant is ready. Doesn't that look pretty?
Time Sheet
Day 1:
- Bake the Cakes
- While the cake is baking, prepare the strawberry filling, sugar syrup and buttercream.
- Once baked wrap the cake base in cling film and keep in the refrigerator to cool (Stays good for up to a week and can also be frozen for 3 months).
- Stack, fill and frost the cake. Make the wavy pattern and let the cake sit in the refrigerator.
- Cover the buttercream separately with a cling film and keep it on your countertop.
Day 2:
- Start with the buttercream transfer technique.
- While it is chilling in the fridge, prepare chocolate decorations.
- Finally, assemble the cake.
Please note this is just the timeline for preparing the cake in 2 days.
However, the cake base, sugar syrup, strawberry filling, chocolate decorations and ground oreo biscuits can be made up to a week ahead and stored so you can consider making those in advance so that the amount of work you do in 2 days is reduced.
Storage Instructions
Since we have used fruit filling in this cake recipe, you will have to keep the cake in the refrigerator at all times.
This cake would last for about 5 days in the refrigerator.
Keep the cake in a cake box to avoid it from drying.
Baker's Tip
- When you bake the cake in advance, everything is already cooled down to room temperature. This will save time when you are decorating your cake. Also, consider making the sugar syrup, strawberry filling, chocolate decorations and ground oreo biscuits in advance too.
- Skip the strawberry filling if you are in a rush to finish it all. You can also consider using fresh strawberries instead of compote if you prefer.
- Crumb coat as you go for this cake recipe. Since you are making a tall buttercream cake, crumb coating at each cake base layer would ensure that you are stacking the cake straight on top of the other.
- Use gel food colouring for the best colouring effects. For colouring your chocolates prefer using powder colours.
- While tracing the buttercream designs on top of the printouts, make sure that the previous color has chilled down before proceeding further with other colors so as to make sure that the colours do not smudge.
- Do not bother if your design looks messy because this layer will be stuck to the cake and hence is practically invisible. Only take care to fill the designs without any air bubbles.
- Cover the cake board with fondant of blue colour or simply some vinyl stickers of the theme to make the cake pop.
Shortcut Mermaid Cake Without Fondant
If you feel that you won't have enough time to make everything from scratch, here are a few steps you can follow to reduce your amount of work.
- Use premix to make the cake base, or directly buy the cake base from the supermarket.
- Skip preparing the strawberry filling. You can use fresh strawberries instead or simply skip them altogether. Vanilla Cake base with vanilla buttercream alone will also taste yummy!
- Instead of going for the buttercream transfer technique simply decorate the cake with the chocolate moulds. There are so many options on Amazon like this fish tail, shells, sea weeds and sea horses or this cute little girl mermaid topper or these different mermaid girls set. The choice is endless just search for the ones you like.
- You can even choose to add simple edible mermaid cake decorations like this little mermaid topper on top of the cake or simply use several cupcake toppers.
- There is also no need to make tall buttercream cake as I did.. Two layers should also be fine. So just make one batch unlike doubling the recipe.
Variations
There are many variations to this cake, using different icing and colours.
One of the most popular is a unicorn mermaid cake, which can be done by just changing the colour of the sides of the cake to rainbow shades. You can also add hair and tail accessories like bows or ribbons.
You can also make a chocolate mermaid cake by simply switching to a chocolate cake base rather than an eggless vanilla cake base.
If you are ok with using fondant then making a fondant mermaid cake is the easiest. Simply roll the fondant using a rolling pin and cover the cake with it and make a fondant mermaid as part of the decoration.
For Mermaid Tail Cake simply place fondant mermaid tails on top. Use silicon moulds for perfection in your mermaid tail shape.
With such a detailed mermaid cake recipe, I am sure you are now ready to rock your mermaid party.
Frequently Asked Questions
If you have filled with perishable fruit filling like ours then definitely this has to be kept in the fridge at all times.
This cake would last for about 5 days in the fridge.
Butter-based cakes turn hard in the refrigerator because duh.. it's butter and it's solid when kept in the fridge. So simply get the cake back to room temperature before serving for which take the cake out and keep it at room temperature for 30 mins and it should be soft again.
You might not have soaked it well or kept it directly in the fridge without covering it. The cold temperature of the fridge pulls out moisture from the cake making it dry. To avoid this place the cake in the cake box and then store and remember to soak the cake layers well.
Related Recipes:
Wish to Join US for the love of BAKING? Subscribe to our Youtube channel. Follow along on Facebook, Instagram, and Pinterest for all the latest updates!

Eggless Mermaid Cake without Fondant
Ingredients
Cake Base
- 360 ml (1.5 cups) Warm Milk
- 2 tsp Vinegar
- 4 tsp Vanilla Essence
- 360 gms (3 cups) Plain Flour/Maida
- 3 tsp Baking Powder
- 1 tsp Baking Soda
- 1/2 tsp Salt
- 226 gms (1 cup) Butter softened
- 110 gms (1/2 cup) Caster Sugar
- 320 gms (1 cup) Condensed Milk
Sugar Syrup
- 1/3 cup Sugar
- 1/3 cup Water
Condensed Milk Buttercream
- 510 gms (4.5 cups) Butter softened
- 306 gms Condensed Milk
- 2 tsp Vanilla Essence
- Food Colouring of choice
Strawberry Filling
- 150 gms Strawberries fresh or frozen
- 7 tbsp Sugar
- few drops of lemon
Chocolate Decorations
- 70 gms Melted White Chocolate depends upon design of choice
Instructions
Prep Work
- Follow the condensed milk cake recipe for detailed instructions to make the cake batter. Divide into 4 - "6 inch" cake pans and bake as mentioned.
- To make the sugar syrup heat the sugar and water until the sugar dissolves completely. Transfer to a bowl to cool completely and then use on the cooled cake base.
- Follow the instructions from the Condensed Milk Buttercream post to make the buttercream and the strawberry filling for cakes to make strawberry filling.
How to Fill and Stack the Cake
- Take a cake layer that has been cooled down completely and soak it well with the now cooled sugar syrup.
- Add a layer of condensed milk buttercream on top and smooth it well followed by 1/3 of the prepared strawberry filling.
- Stack the second layer of cake. Crumb coat the sides of the cake with little buttercream and then repeat all the above layers until you reach the very top.
- Crumb coat the entire cake and allow it to sit in the fridge for a minimum of 30 mins.
Colouring the Buttercream
- I am using teal and turquoise colours by ChefMaster to colour the buttercream.
- To get the ombre colour, start by colouring the buttercream in the darkest shade that you prefer.
- Transfer a portion of this to another bowl and add more plain buttercream to create a little lighter shade than the previous shade. You can do this as many times as you want and each time you will end with a lighter shade than the previous one.
How do you make Icing look like the Sea?
- Smoothen the top: Since we are giving a rustic finish to the cake we have to start with smoothening the top of the cake first. Use the lightest shade possible, add some frosting on top, spread and even it out. Spend some time here as we won't touch it once you are satisfied with the finish.
- Ombre effect: Create an ombre shading effect on the sides of the cake with the darkest shade at the bottom and the lightest to the top.
- Go up and down while smoothening the cake: Using a bench scraper smoothen the sides of the cake. Do not worry if it is uneven because that is exactly what we want. To give the wave pattern remember to do an up and down wavy motion using the bench scraper instead of just going horizontally across the surface as this will give it the oceanic wave pattern.
Buttercream Transfer Technique
- Depending upon the height of your cake take a printout of the desired character. We are obviously using a Mermaid pattern today. Stick it onto a baking tray so that it does not move. Stick parchment paper on top of the printout.
- Use a muffin tray to make the different colours of choice as per your design requirement.
- You will start building your colours on this parchment paper starting with the details first and then proceeding to flood the colours. In this case, we will first do the eyes, ears, lips and the bow on her head. Chill the baking tray for 5 mins. Then flood the parchment paper with other colours that are her body, hair and skin which would cover the image entirely.
- Do not worry if it feels uneven to you, this is the portion that is going to stick onto the sides of the cake and hence would remain invisible.
- Release the parchment paper and immediately stick it on the chilled cake. Gently press the parchment paper onto the side of the cake so that the design sticks properly and gets transferred.
- Put the cake back into the refrigerator for 15 to 30 mins .After 15 20 mins, gently remove the parchment paper to reveal the design on the sides. If any air bubbles, adjust it with the same colour.
Chocolate Decorations
- Transfer the melted chocolate to fill the cavities in the silicon moulds of choice as per your designs.
- Allow it to set completely before demoulding.
To Assemble
- I made some free-hand seaweeds next to the mermaid design for which fill a piping bag with green buttercream and make a small slit. Draw a line and make small leaves on it. (You can also choose to use the silicon moulds of sea weed design too if you prefer)
- For the other side, using a petal tip I drew a green strand on parchment paper and kept it in the freezer until the buttercream was frozen. Once frozen, I simply took it and stuck it to the cake.
- For the base, grind some golden oreo biscuits which resemble the white sand like the ones you see on a beach. I added those to the base of the cake.
- The mermaid chocolate designs were then placed on the cake where they went with the decor.
- Also used some pearl sprinkles to replicate bubbles.
- Placed a cake topper on top and voila our Mermaid Cake without fondant is ready.
Video
Notes
- Eggless Condensed Milk Cake
- Condensed Milk Buttercream
- Strawberry filling for Cakes
- How to melt chocolates the right way
- How to melt chocolates in the Instant Pot
- When you bake the cake in advance, everything is already cooled down to room temperature. This will save time when you are decorating your cake. Also, consider making the sugar syrup, strawberry filling, chocolate decorations and ground oreo biscuits in advance too.
- Instead of using Eggless Condensed milk cake, I would recommend using my Eggless Hot Milk Cake which makes an excellent base for layered cakes.
- Skip the strawberry filling if you are in a rush to finish it all. You can also consider using fresh strawberries instead of compote if you prefer.
- Crumb coat as you go for this cake recipe. Since you are making a tall buttercream cake, crumb coating at each cake base layer would ensure that you are stacking the cake straight on top of the other.
- Use gel food colouring for the best colouring effects. For colouring, your chocolates prefer using powder colours.
- You can use this same wavy cake base pattern to do baby shark theme cake, sailor theme cake, under-the-sea theme cake etc by simply changing the decorations on top.
- While tracing the buttercream designs on top of the printouts, make sure that the previous color has chilled down before proceeding further with other colors so as to make sure that the colours do not smudge.
- Do not bother if your design looks messy because this layer will be stuck to the cake and hence is practically invisible. Only take care to fill the designs without any air bubbles.
- This technique can be used to make any character of choice like the dinosaur, peppa pig, spider man etc.
- Cover the cake board with fondant of blue colour or simply some vinyl stickers of the theme to make the cake pop.
- If all of this seems overwhelming then consider checking our shortcut tips mentioned in the post above to help you reduce the amount of work you need to do.
Leave a Reply