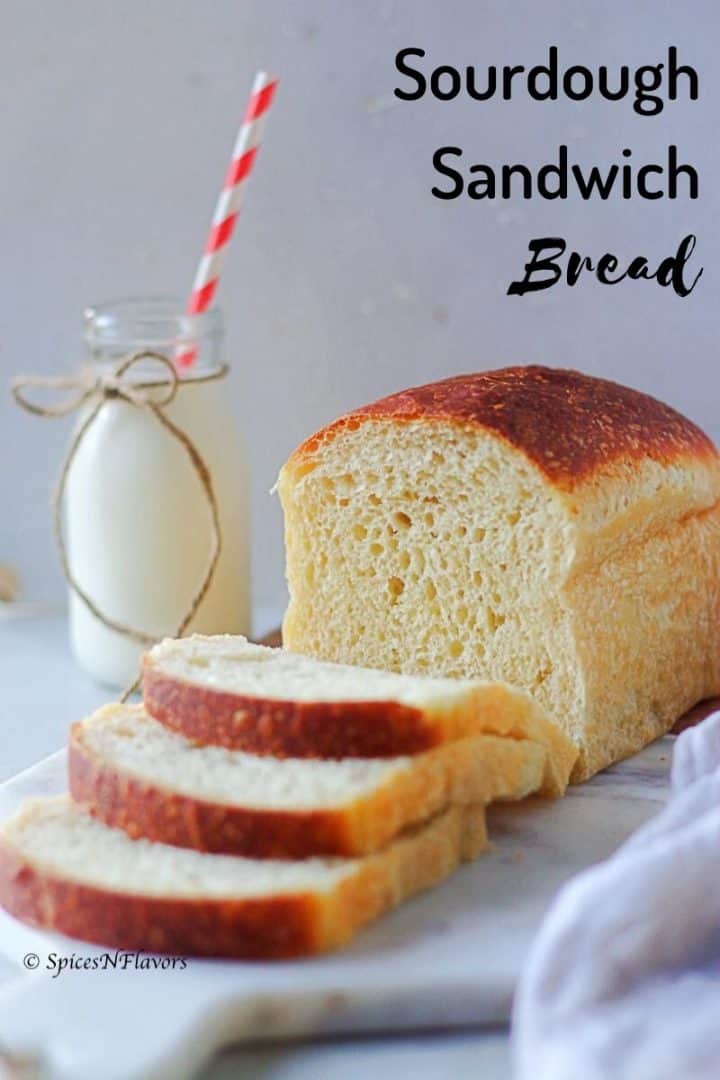
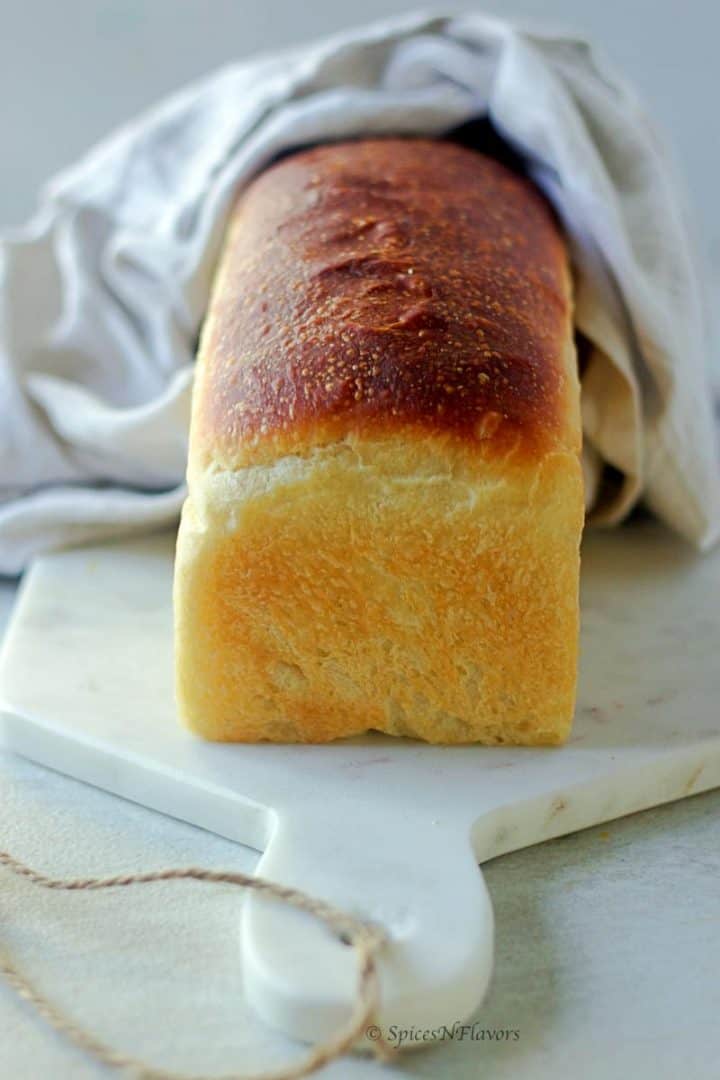
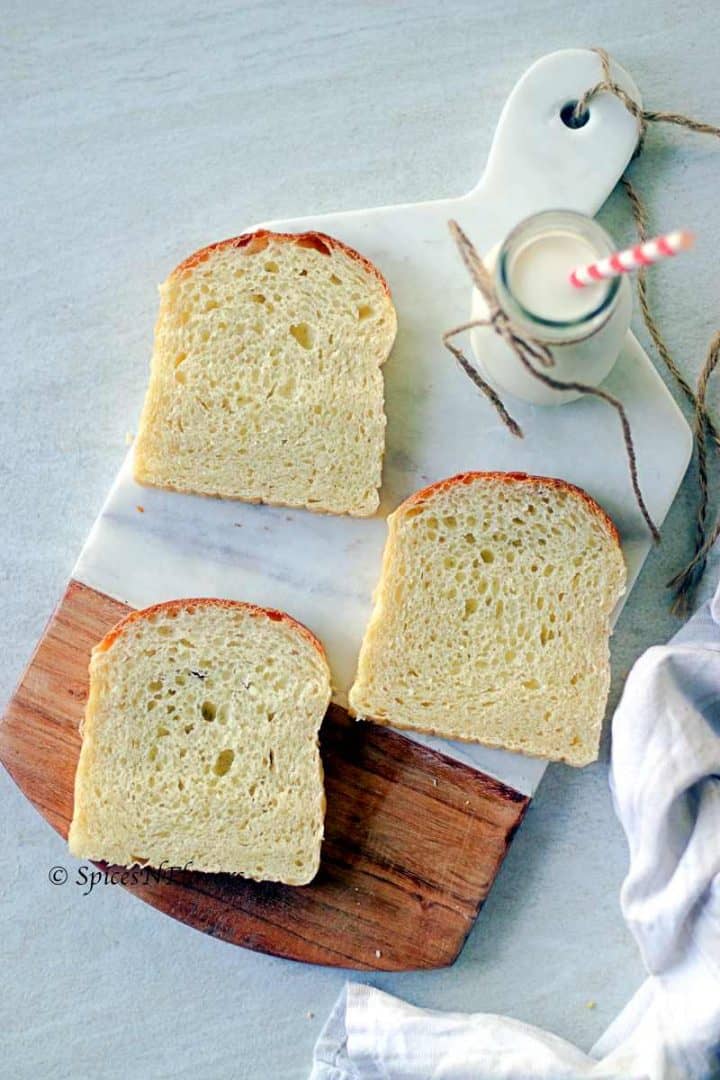
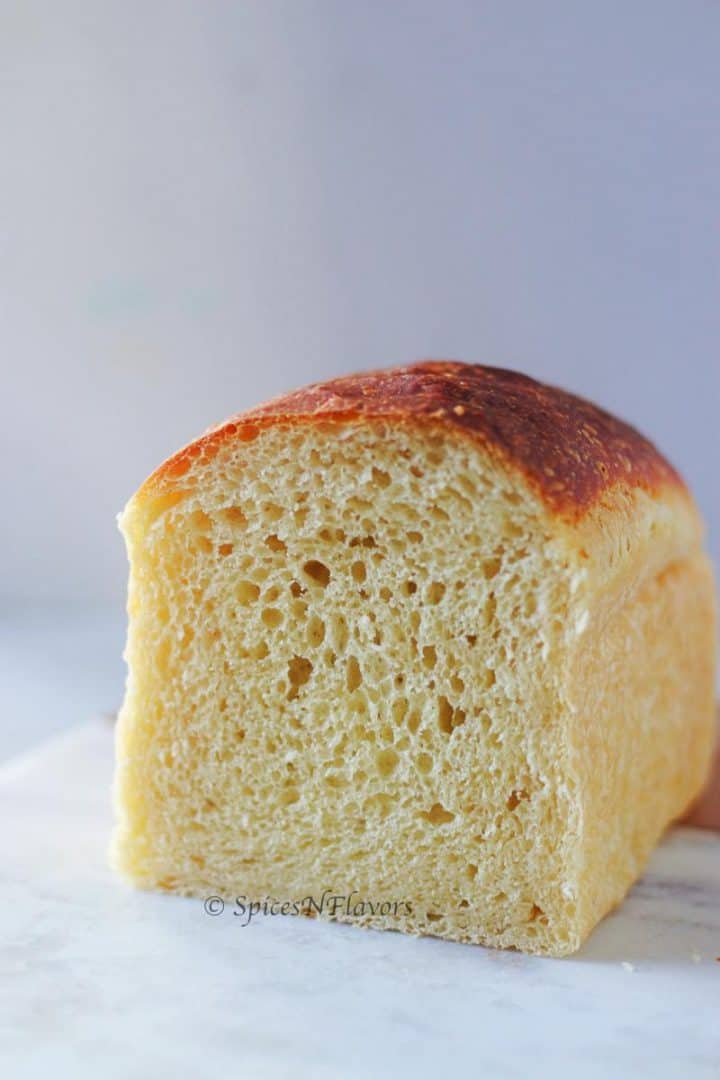
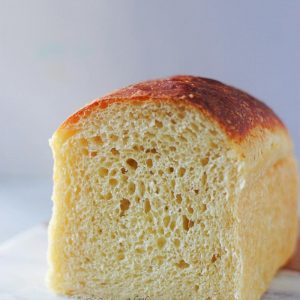
With a beautifully caramalized brown crust and soft and spongy crumbs, this Sourdough Sandwich Bread Loaf is my go to bread recipe for making sandwiches, toast and also to dunk in soups.
If you are a beginner in the field of using Sourdough Starter then this is the only recipe you need to try NOW!!!
Everyone is in need of a good basic white bread recipe.
I have always baked using commercial yeast, and only recently have started my very own Sourdough Starter..
And oh boy am I addicted??
Hell No, I am obsessed with it..
Its been the best thing I have done in the recent times.. apart from well conducting live sessions on Instagram for making Sourdough Starters.. and giving personal guidance on my DM's when fellow readers get stuck in making their starters.. and creating infographics on Sourdough Starters..
And..
Am I blabbering?? But you get it right!!
Here is why I absolutely love this recipe and you will too!!
Why I love this recipe?
- It is much much much healthier than store-bought whole grain or whole wheat bread or even homemade bread. That is what research says and I believe in too logically.
- You can adjust the timeline of making the bread to suit your regular routine.. you need not take time to make the bread specifically.
- It is a perfect beginner-friendly recipe even with 70% hydration you will be able to get the perfect loaf.
- Not much complicated ingredients - just few basic pantry ingredients.
I understand that baking a Sourdough bread needs patience, some pre planning but each step in here does not take much time and totally sets a calming and relaxing mood.
Pantry Staple Ingredients:
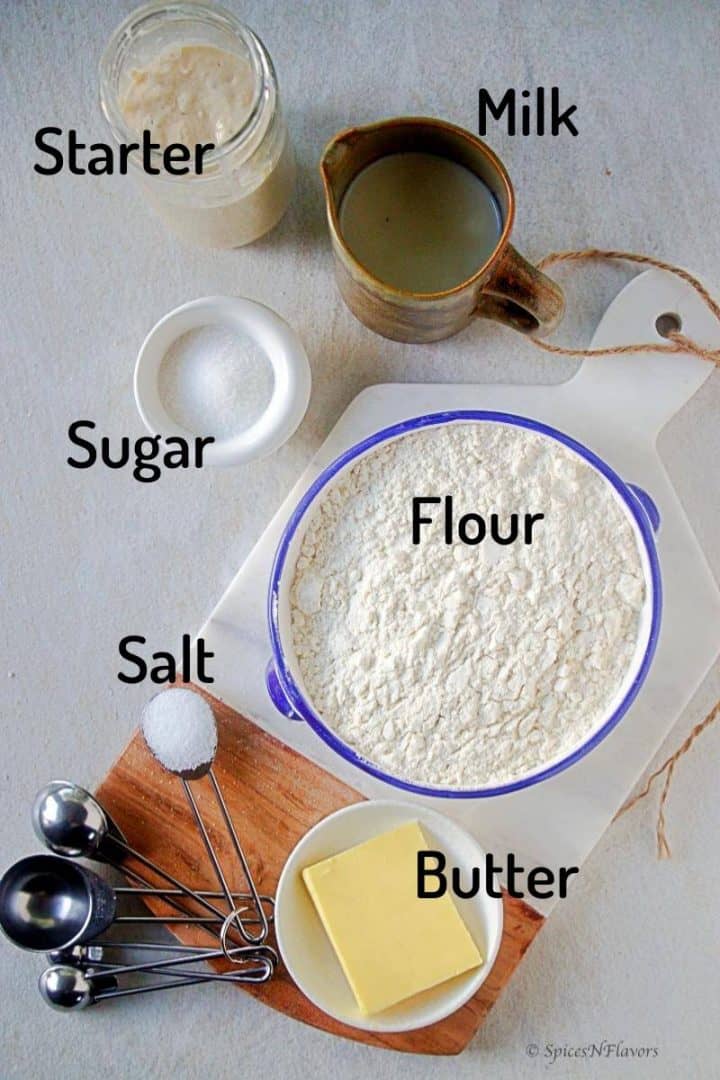
Flour:
It is always recommended to use Bread Flour to make bread as it has higher protein content.
That being said you can, of course, use All-Purpose Flour in this recipe.
I would recommend using 50:50 Plain Flour: Whole Wheat, if you want to use whole wheat in this recipe as 100 per cent whole wheat, would yield a little denser loaf.
If you are ok with it then definitely use it by all means.
Some people also like to add just a bit of whole wheat in their sourdough bread that is because it not only absorbs the liquid but also tends to give a nutty flavour.
Milk:
Using milk yields a softer and enriched bread loaf.
This bread can also be made using water.
I would recommend adding little bit of milk powder in that case to get a softer crumb.
Butter:
Just a little bit of butter to enrich the flavour quotient.
I have not tried substituting it with oil. If you do then please let me know about your experience in the comments below.
Sourdough Starter:
This is a no yeast bread recipe.
By no yeast I am referring to commercially bought yeast.
We are using home grown wild yeast instead.
Just remember to feed your starter beforehand and make sure that it is in its peak.
What is a peak stage?
I have written a detailed post on How to make your own Sourdough Starter from scratch? How to feed and when to use your Starter?
You can refer those for the details plus to understand any Sourdough Terminologies that you do not understand.
Other Basic Ingredients:
Sugar to cut the sour taste of the bread.
Salt to improve the flavour quotient.
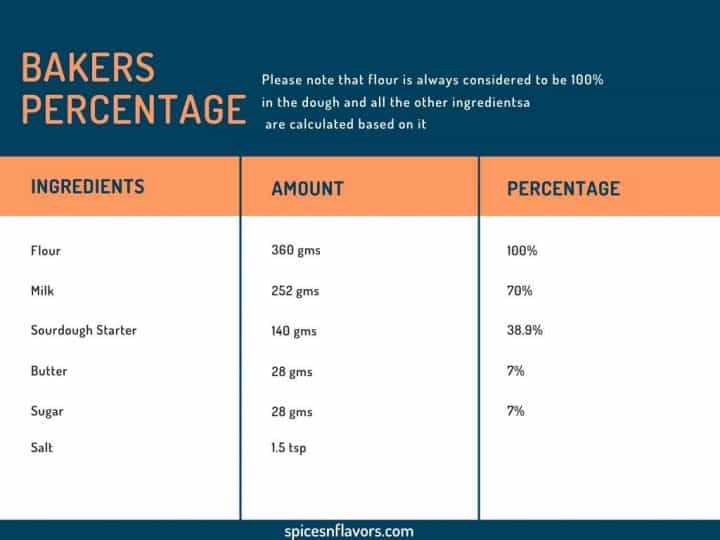
If you are interested to know the breakdown of ingredients in terms of percentage here is the list
How to make Sourdough Sandwich Bread from scratch?
Step 1: Build the Levain
Add the following ingredients into a clean glass jar and allow it to double in size with peculiar small and big bubbles and allow it to reach the peak stage.
It may take anywhere from 8 to 12 hours to reach that stage.
| Ingredients | Amount |
|---|---|
| Mother Starter | 35 gms |
| Bread Flour or APF | 35 gms |
| Whole Wheat Flour | 35 gms |
| Water | 70 gms |
Click here to learn how to build your levain or starter for any recipe.
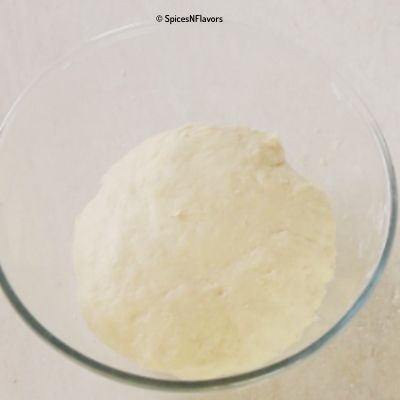
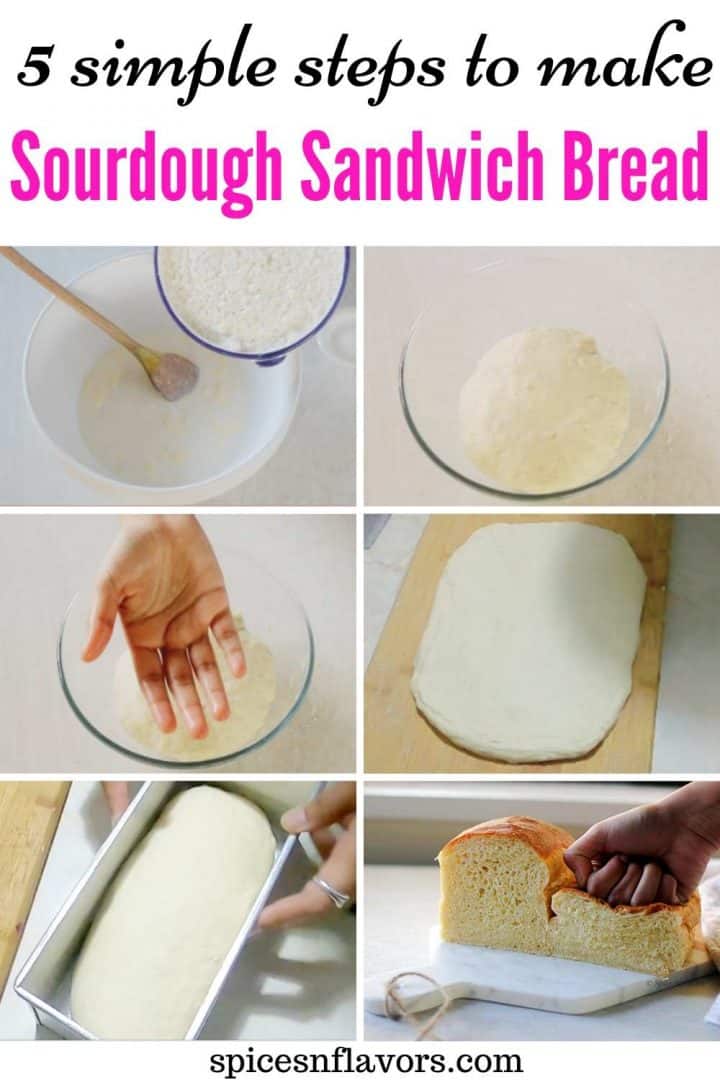
Step 2: Prepare the Dough
Once your starter is ready, in a wide bowl add in warm milk, starter and butter (step 1-3). Combine to mix the starter well.

Add in the flour, sugar and salt (step 4-6).
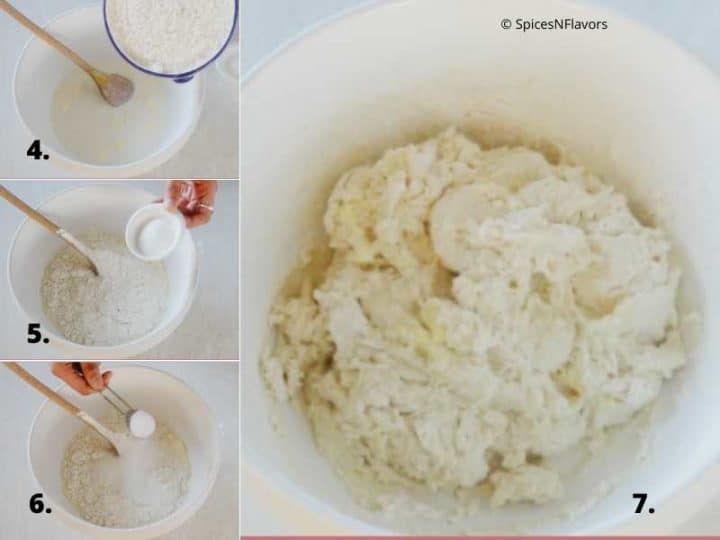
Mix with a wooden spoon to hydrate the flour and everything comes together (step 7).
Transfer it to your work station.
You don't have to knead the dough, but since this is going to be a sticky dough we would simply lift the dough using a bench scrapper and slap it back onto the work top.
I think referring to the quick video would be helpful here.
We do this to make the dough supple and manageable while the slap and fold technique since there is no kneading involved in this recipe.
Do this for a couple of minutes around 4-5 and you will observe the difference.
Transfer it to a bowl and forget for 30 mins.
At this stage you can also transfer it to your Instant Pot (if you own one) inner pot. Choose the yogurt setting and set the timer to 15 mins.
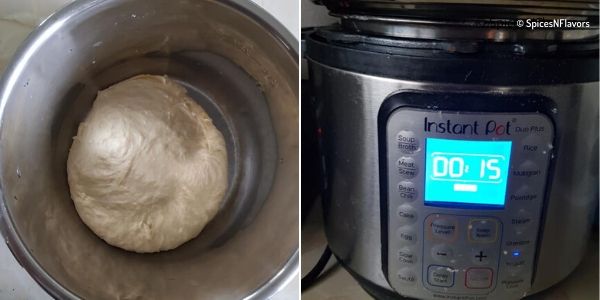
So it is resting the dough either on the counter top for 30 mins or in the Instant Pot for 15 mins.
Step 3 - Slapping and Folding.
After 30 mins let us do the slap and fold technique.
This is to strengthen the gluten structure.
Wet your hands (step 8). (The dough doesn't stick to your wet hands 😉 you might be knowing this trick from our Ciabatta Bread recipe).
Lift the dough with the side across you and bring it back to fold over (step 9 - 11).
Repeat this on all four sides.
And then I like to give it a round shape again (step 12).

Again the video might help in this case.
Then forget for another 30 mins.
Come back and repeat the slap and fold technique every 30 mins for 4 times.
So in a span of 2 hours you will be repeating the step "4" times.
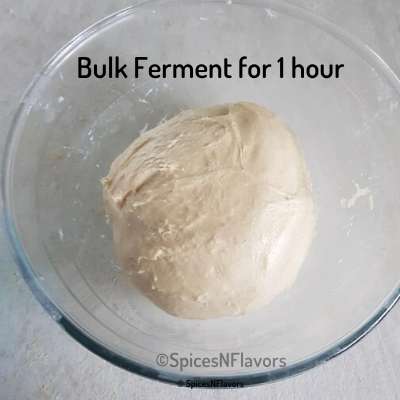
Then bulk ferment for 1 hour.
To avoid any confusion I have created a free printable template for you guys in a checklist manner so that you do not miss any step.
You can download it from below by simply entering your email address.
If you are using your Instant Pot then your time cuts down to 15 mins. So instead of 2 hours you will need just 1 hour to do this.
Slap and Fold every 15 mins - a total of 4 times in a span of 1 hour.
Then bulk ferment for 30 mins.
If you have never proofed bread dough in the Instant Pot before then this post on Can you Proof Bread Dough in Instant Pot would be a good read for you.
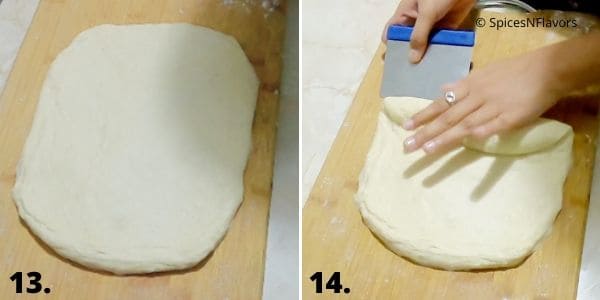
Step 4 - Shaping
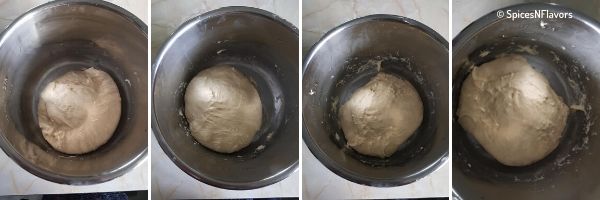
After the bulk fermentation process, take the dough onto your work station.
Start creating tension in the dough by pushing it away from you using a bench scraper and then pulling it towards you from the other side.
This is done to tighten the dough so that it rises well while baking.
Repeat the push and pull technique for a couple of times until you see the dough holding a nice round shape.
You could literally feel the bouncy dough at this stage and also would be able to make out from the smooth top that it creates on top.
It is like a magic happening and you would definitely smile looking at it.
Let me know whether you too felt that moment in the comments below.
Cover the dough with a tea towel and let it bench rest for 10 mins. This step is called Pre-Shaping.
After 10 mins, shape the dough into a log.
How to shape a loaf of Bread?
Flatten the dough to a rectangle and start rolling from one end.
Roll to shape it into a log.
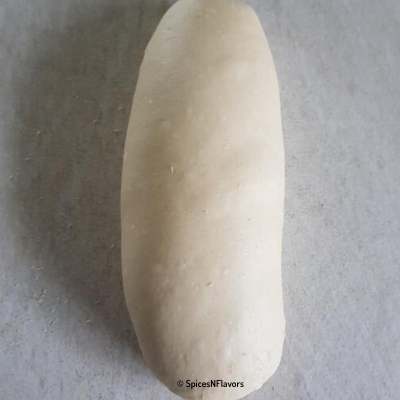
Transfer it to a 9x5 inches bread pan. I like to spray the pan with some oil first that ensures the bread does not stick to the pan.
Then allow the dough to proof till it reaches the brim.

It took me nearly 5 hours to reach this stage.
Please note that I live in New Zealand and it is winter here at the moment.
So I kept my loaf pan in the oven with lights on.
Do not go by the Proofing time mentioned here rather observe the dough.
You want it to reach the brim.
The time might vary depending upon the climatic conditions of where you live, altitude, how old or new your flour is and what flour you have used, what stage your starter was and various other factors.
Or the other thing you can do is put it into the fridge at this stage.
Next day take it out of the fridge and allow it to proof and reach till the brim and then bake.
Step 5 - Baking
Once it reaches the very top, bake the bread in a preheated oven of 180°C for 35-40 mins.
Once baked, brush the top with some butter - this softens the crust.
Let the bread sit in the pan for 5 mins.
Then invert on a wire rack and cool completely.
My top tips to make this Bread
- This is ideally not a tip but something I need to mention. Be PATIENT. Baking sourdough bread takes a really long time so patience is the key.
- If you are a Beginner and this is your first Sourdough bake then I would say go for 68% hydrated dough. I will mention the ingredient quantity in the recipe card for that.
- Do not skip the slap and fold step that is what builds the gluten structure and also makes the dough elastic. You can add additional slap and fold in case you find that the dough is still not ready.
- Create tension in the dough while pre-shaping that helps to rise the dough while baking
- Brush the top of the bread with butter while it is still warm, this ensures that the crust remains soft.
Some Variations to the Regular Bread that you can Try:
Sometimes eating the same old Plain Bread might seem boring.
Plus you might also be interested in increasing the nutritional value of the bread so here are some ideas for you guys.
Chia Seeds/Flax Seeds:
Right before you begin with slap and fold technique you can add some chia seeds and flax seeds say about a tbsp of each on top of the dough.
With each round of slap and fold technique the seeds would get incorporated into the bread.
For those of you are connected with me on Instagram - you might remember this from our bake along series 🙂
Cooked Quinoa:
Yes, you read it right.
Just like chia and flax seeds, you can also add cooked quinoa in your dough.
The method remains the same add it before the slap and fold technique to incorporate into the dough.
Pumpkin Seeds/Sunflower Seeds:
You can sprinkle some pumpkin or sunflower seeds right before baking on top of your bread.
So after the final proofing stage. Sprinkle the top with seeds of your choice.
Make sure to press it a bit so that it sticks to the dough.
And then bake. If you remember we did this in our No Knead Bread Loaf (easiest bread recipe ever!!!)
Whole Wheat Flour:
You can substitute anywhere from 10% to 50% of your bread flour in this recipe with whole wheat flour.
If you want to make a 100% whole wheat bread I would recommend increasing the hydration of the dough.
Some FAQ's (especially from my Instagram bake along session):
How long does it take the starter to reach the peak stage?
The time taken by the starter to double in size after the feed depends on four factors:
- What was the temperature of the water you used?
- How much amount of Mother Starter was used
- What are the climatic conditions at your place
- Was the mother starter taken out directly from the fridge or was it at room temperature.
If you want your starter to double up quickly then here are the things you can do:
- Use warm water to hydrate.
- Increase the amount of mother starter to speed up the process.
- Place the starter under oven lights with the oven off.
- Ensure that the mother starter is at room temperature.
So it really depends on all these factors. I would say do not go by the time duration as it would definitely differ from starter to starter.
Use the time duration as a guideline.
For this recipe it would take anywhere from 6-12 hours to build up the levain.
You can read more about when to use the starter from our Sourdough Starter FAQ session.
2. I feel the sourdough bread to be very sour? How to reduce the sourness?
As the name suggests this bread is going to be sour but pleasantly sour and not like having a lemon.
The sugar added in the recipe cuts down the sourness and we liked the bread.
If you feel it is too sour, you can increase the amount of starter in the recipe which would mean less time for the bread to rise and less amount of acid produced.
3. Is Sourdough bread good for sandwiches and toast?
Yes it is sturdy enough to be used in sandwiches and also to be toasted.
I have baked this bread three times now and have got consistent results.
Definitely this sourdough sandwich bread has replaced my regular bread for sure.
4. Why Sourdough Bread is healthier than a wholewheat or multigrain?
A simple answer could be that it is easily digested by the body.
For more details, I would encourage you to read up this article which would help you even more in understanding the concept.
5. Will it work if I substitute oil for butter?
I have not tried this recipe with any substitutions yet. But I do not see any reason why it should not work.
If you do give it a try please share your experience in the comments below.
6. Can I use Whole Wheat Flour in place of Bread Flour?
If I were you I would go for 50:50 whole wheat to bread flour.
A 100 percent whole wheat would yield a denser crumb. If you are used to that you can very well use.
Or you can also get the hydration to 75% and use whole wheat flour. If you are a beginner in the world of Sourdough then I would not suggest to go for such high hydrated dough.
A Timeline to make this bread:
I am sharing two timelines to make this bread. See what suits you.
7.00 am: Feed your starter
5.00 pm: Prepare the dough
5.45 pm: Start slap and fold technique
7.15 pm: Start pre-shaping
7.30 pm: Shape it into a log.
8.00 pm: Goes into the fridge
6:00 am: Take the bread out and allow to reach the brim
11.00 am: Bake the bread
Bake it the same day:
8.00 pm: Feed your starter
7.00 am: Prepare the Dough
7.45 am: Start Slap and Fold Technique
10.15 am: Pre-Shaping
10.30 am: Shape it into a log
3.30 pm: Bake the Bread
Now please note that the timing mentioned here is just a rough guideline so that you can plan your bake accordingly.
The timing will vary depending upon various factors like when your starter reaches peak stage, how long it takes for your to form the dough, how long it takes to proof etc.
I would recommend you to download the template and just follow the steps and observe the dough.
Wish to Join US for the love of BAKING? Subscribe to our newsletter and follow along on Facebook, Instagram, and Pinterest for all the latest updates!
Tag us on Instagram: @spicesandflavors to get featured on our stories.
Pin this for later:
Beginners Sourdough Sandwich Bread
Ingredients
Levain
- 35 gms Mother Starter
- 35 gms Bread Flour
- 35 gms Whole Wheat Flour
- 70 gms Warm Water
Bread Dough
- 252 gms Warm Milk
- 28 gms Butter
- 140 gms Active Starter
- 360 gms Bread Flour
- 28 gms Sugar
- 1.5 tsp Salt
Instructions
Step 1 - Build the Levain
- Mix all the ingredients mentioned under the levain and allow it to double in size. This would take anywhere between 8-12 hours.
Step 2 - Prepare the Dough
- Once your levain is ready (starter is active): in a mixing bowl add in the warm milk, butter and required amount of starter (140 gms) and stir together.
- Add in the flour, sugar and salt and combine it into a dough.
- Take it out on to your worktop, lift the dough using a bench scraper and thump it back. Repeat this for 3-4 mins until the dough becomes supple and smooth comparatively.
- Place it in a bowl, cover with a tea towel and forget for 30 mins.
- If you want to use your Instant Pot: Then transfer the dough into the inner pot. Cover with a lid and chose the Yogurt mode and set the time to 15 mins.
Step 3 - Slap and Fold Technique
- After 30 mins, wet your hands, lift the part of the dough across you, stretch it and fold it over to the centre. Repeat this on all four sides of the dough.
- Then give it a round shape again, place it in the bowl and forget for 30 mins.
- Reoeat this 3 more times. So we would be doing the slap and fold technique for a total of 4 times in an interval of 30 mins.
- If using an Instant Pot: The steps would remain the same just that the time interval would be reduced to 15 mins.
- After the final folding, let the dough rest for 1 hour on your counter-top. If using an instant pot then the timing here would be 30 mins.
Step 4 - Shaping
- After 1 hour, take the dough out on to your worktop, and then start builing tension in the dough by pushing the dough away from you and then pulling it back towards you.
- Repeat this until the dough tightens and becomes smooth.
- Cover with a tea towel and let it rest fo10 mins.
- After 10 mins, flatten the dough to form a rectangle and then roll it from one end to form a log shape.
- Transfer the dough to bread pan (9x5 inches) and allow this for a final proofing. This would take around 3-6 hours. The bread dough must reach 1 inch below the brim of the pan.
Step 5 - Baking
- Once proofed, bake it in a preheated oven of 180°C for 35-45 mins. The top must have a nice golden crust and the bottom of the bread sounds hollow.
- Once baked, apply some butter on top of your bread to soften the crust.
- Let it sit in the pan itself for 5 mins then invert the pan to release the bread and allow it to cool completely.
- Once cooled, slice and enjoy it plain, as a toast, as a sandwich or use to dunk in soups too.
Video
Notes
- Please be patient when it comes to making sourdough bread. It takes a really long time from building the levain, to proofing and baking. But each step is so rewarding and the end result is a healthier and tastier loaf of bread.
- Note that the timings mentioned in the recipe do not include the time taken to build the levain (that is the active starter) and also the proofing time, that is because each starter is different and would act in a different way so it is not possible to provide the exact time taken.
- This is a 70% hydrated dough. You can make this bread with 68% hydration too, in that case, the quantity of water to be used would be 245 gms and at the same time you can also increase the hydration to 75%, in that case, the quantity of water to be used would be 270 gms. I have tried all the three hydrations and got successful results with all of them.
- Do not skip the slap and fold step that is what builds the gluten structure and also makes the dough elastic. You can add additional slap and fold in case you find that the dough is still not ready.
- Create tension in the dough while pre-shaping that helps to rise the dough while baking
- Brush the top of the bread with butter while it is still warm, this ensures that the crust remains soft.
Some Useful Resources:
- How to make your own Sourdough Starter using just 2 ingredients.
- How to feed the starter for any recipe (building the levain)
- When to use the starter
- Sourdough Terminologies
Conclusion:
This Sourdough Sandwich Bread Loaf is my go to bread recipe for making sandwiches, toast and also to dunk in soups.
Made with no yeast; from homemade starter this bread has a caramalized brown crust with soft and light crumbs.
A best no knead bread recipe that you need to try NOW!!
I hope you enjoyed this bread recipe
I will see you soon in my next one
Until then
Hugs
Sushma
Natalie Rupert says
Let me start off by saying, I've tried EVERY sourdough sandwich bread recipe on the internet (and even in some books). But, none were soft enough or light enough, to be real sandwich bread. This recipe is absolutely AMAZING! I will never try another sandwich recipe again. It seems fairly fail-proof too, as the first time I made it, I only did 2 SF and then ran out, so I tossed in the loaf pan and threw in fridge overnight. The next day, I let it sit on counter, covered, until it reached top of pan and baked and it was perfect. Thanks for the Perfect recipe.
sushma iyer says
Hi Natalie.. I am so pleased to see you finally found what you were looking for. Glad the recipe lived upto your expectations. thank you for sharing your feedback, I truly appreciate it 🙂
arla says
Made this yesterday. It took quite a while to rise even in a warm oven but it was worth the wait! The bread is so tasty you don't even need butter. It slices perfectly too. Had it to dunk in soup yesterday and for toast this morning. I'll try it for sandwiches this afternoon but I know it will be amazing. I've never had such a perfectly hydrated peice of homemade bread. Many, many thanks for posting this!
sushma iyer says
Hey Arla.. I am glad to see this worked out so well for you.. Thank you for sharing your feedback 🙂
John Fernald says
Thank you for this wonderful recipe. I started baking sourdough bread in 2020 and have been looking for a loaf that works for sandwiches, toast and for my daughter who only likes store-bought bread. Your recipe looked like it would be worth a try, and it was. I live in Navasota, Texas, so I was not sure how our humidity would affect it, but it came out perfect on the first try.
sushma iyer says
Hi John.. That sounds wonderful. Thank you for taking the time to try and share your feedback with us.. appreciate it 🙂
John Fernald says
My daughter and her husband liked this bread so much that I baked another loaf yesterday to serve for Mothers' Day dinner. I got sidetracked during the process and had to do three quick stretch and folds before abandoning it for 4 hours. I was concerned that I had not waited more than 15 minutes between and only did three, but it came out beautiful. I cut it and served it when it was still very hot and it was terrific. Thanks again for a great recipe. This is going to be my go to loaf.
sushma iyer says
That sounds fantastic. Glad to see that it worked out beautifully even with the time difference. Thank you 🙂
Sherri says
Could this be made in. Bread machine?
sushma iyer says
Hi sherri.. I have not used bread machine till now.. sorry can't guide you on the same
Preethi says
I used this recipe today. Made a couple of mistakes initially as I forgot to add in the sugar. But managed to incorporate it along with some extra flour. The dough did feel sticky but a little extra flour helped. The loaf has turned out super soft. Yet to cut and taste but I know it will be good
sushma iyer says
Hi Preethi.. that is so good to know.. thank you 🙂
Karishma says
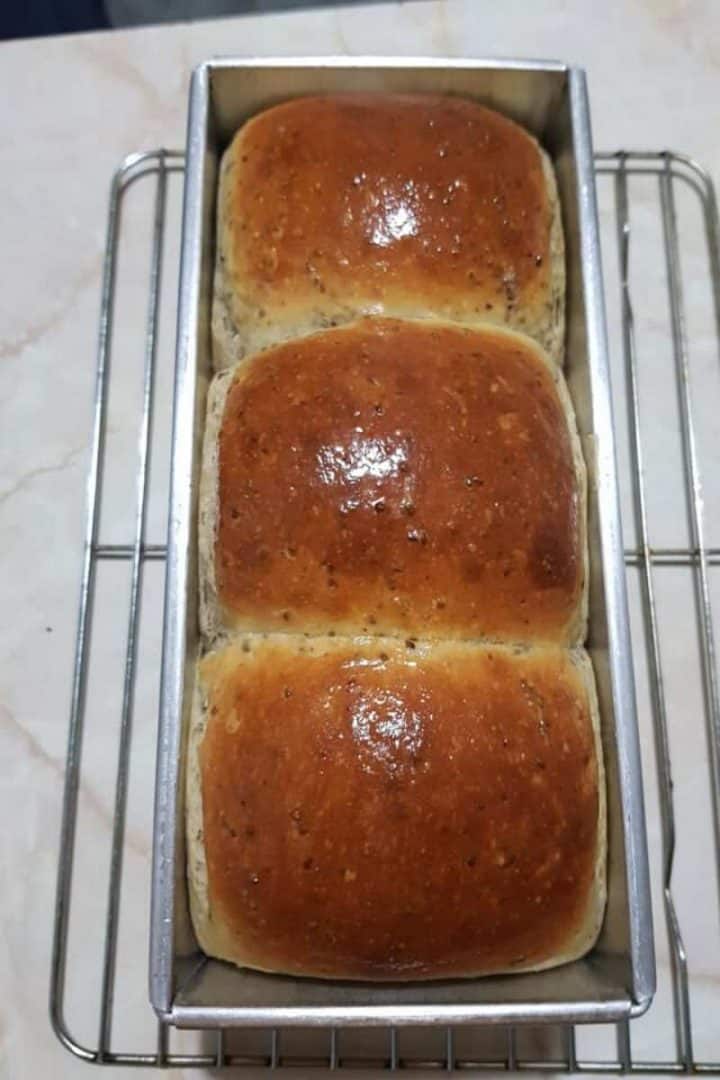
Thank you so much for this tutorial. It was incredible! I definitely struggled to keep up with the 12 hour feed times for the last few days and ended up doing a feed every 24 hours or 36 hours in some case. However, the sourdough recipe I did was od the loaf but in the form of mini buns. They are absolutely divine!
Thank you for making this feel so doable!
Michelle says
This really does make a wonderful sandwich bread, this is our favorite sourdough bread!
sushma iyer says
Wo Hoo!!! Thank you Michelle for your lovely feedback.. so pleased to know this 😀
Dan says
I've done the same-day bake schedule twice now with wonderful success. I had a late start recently and decided to put it in the refrigerator as suggested but wasn't able to get it to rise the next morning after several hours. Any idea what may have gone wrong? Everything up until it's time retarding felt identical to my successful loaves. Thanks!
sushma iyer says
Hi Dan.. That is good to know.. thank you so much for sharing your wonderful feedback with us. Is it winters in your part of the world? If yes a lot depends upon the temperature too..
Regards
Sushma
julie beveridge says
My initial dough seems much stickier than yours. I followed the recipe exactly by weight. It did get better the more folds I did and is now proofing in the fridge. I have a starter that is 100% hydration could that be why mine was so much more sticky??
sushma iyer says
Hi Julie.
My starter is also 100% hydrated. So no that is not the issue here. It could be a couple of reasons: humidity, season, how old or new the flour is etc. So next time may be you can try a little less hydrated dough and see how it goes.
Choti says
Hi Sushma, Love your recipes.
I just wanted to ask about this bread recipe. The bread (I take WWF) came out nice every time I make but the sourness of the bread is always there. First day when it is baked , it tastes very good but second day onwards it is sour in taste. How can we make the sourness better and how long the bread should stay in the freeze ,I mean number of days of consumption .The longer it stays more sour it becomes.
Also when I make normal bread not a sourdough, it is all good but has cracks on the outside after baking.. I use oil, yeast and whole wheat, sugar, salt and egg and seeds in the bread. Please let me know if you can help me with both of the breads in anyways. Thanks
sushma iyer says
Hi Choti.. For your normal bread query I have an entire video explaining the errors in bread baking. You can check that more detailed explanation. HEre is the link: https://www.youtube.com/watch?v=ljyXvC-HUJ4&t=745s
For Sourdough.. This recipe does not turn out sour.. To avoid the sourness what you can do is: 1. Use a matured starter, the older the starter the less sour it would be 2. Do not allow to ferment too much, the more the starter ferments the more alcohol it produces which causes the sourness. 3. Try to increase the quantity of sugar to reduce the sourness.
Hope this helps 🙂
KayDee says
Hello, thank you for the very well done and thorough video. I am new to this whole sourdough thing and unfortunatly mine did not look smooth and nice like yours did after you were pushing it forward and back with the the bench knife??????? It looks like the gluten stretches open rather than being smooth, what did I do wrong? any thoughts. I followed the recipe exactly but obviously I did not do something right.
Thank you sooo much!
sushma iyer says
Hi Kay Dee.. Reading your comment I feel that you were applying too much pressure which caused the gluten to stretch and tear.. Do not apply that much pressure and if that happens allow the dough to rest for 5 mins and then come back and do the stretch. Hope this helps
Regards
Sushma
KayDee says
Thank you for your reply! Okay I am trying again today, I will do less pressure. The bread turned out not as puffy as yours , more dense. flavor is still delicious though. Thank you again for your help.
Betsy says
Hi Sushma,
Would it be fine to shape the dough like a traditional sourdough bread (round) or does it have to bake in a loaf pan?
sushma iyer says
Hi Betsy.. You can shape it a like a boule too just make sure that it is shaped well 🙂
Regards
Sushma
Betsy says
Thanks! Didn't know the round shape is called boule!
sushma iyer says
Hi Betsy..
Yes we all learn something or the other each day.. 🙂
Medi says
How much would 252 gms of milk be in ml ?
sushma iyer says
Hi Medi..
Though I cannot give you an exact measurement here I would say around 1 cup
Linda says
Hi Shuswap,
This is my first time making this recipe. I am fairly new to sourdough.
I am using the instant pot.
My dough seems very wet and sticky. It is not as pliable as yours in the video. Can you add more flour in each if the four proofing steps? Is it the instant pot heat making this too wet?
sushma iyer says
Hi Linda..
No the instant pot won't make the dough wet.
.
You can try increasing the slap and fold technique by a couple of times say 6 instead of 4 the recipe calls for to develop the gluten structure and make the dough elastic. Plus since this a loaf bread even if your dough is sticky it would still come out well unlike the boule. So just go for it there are very less chances to mess it up..
Adding more flour would ruin the texture.
Since you are a beginner I would recommend you to try this recipe with 68% hydration as mentioned in the notes section as sometimes handling the dough with higher hydration becomes a bit difficult.
Hope this helps. Did you proceed further?? At what stage are you now??
Linda says
The bread is in the oven as we speak. I did add more flour but it is rising so I’ll keep you posted.
Good advice going forward.
sushma iyer says
Hi Linda..
Hope it all went well..
Regards
Sushma
thankyou says
This is such an EASY+SOFT+MOIST sourdough bread! Thank you so much sushma. I really appreciated 🙏🏻
I've been trying to bake and introduce sourdough bread to my family (cos it's healthier!) but they didn't like it so much until I baked this Sourdough Sandwich Bread last night. My family is so in love with it. I might need to bake another batch very soon cos it's so soft and delicious.
I modified some of the ingredients
-butter --> veggie oil = sunflower oil (for vegan family members)
-bread flour 360g --> bread flour 300g + whole wheat flour 60g (simply becos I ran out of bread flour)
the dough turned out a little bit sticky. it's a little bit hard to shape it. but the bread turned into a beautiful and lovely loaf itself even I couldn't manage to give it a hand!
Thank you once again sushma,
hope you have a wonderful day.
sushma iyer says
Hi Kizkhatz.. Sorry for addressing you with your email id user name.. I would love to know your name please if you are reading this reply.
.
A heartfelt thank you for taking the time out to try this recipe and more than that sharing your amazing feedback with us.. I appreciate the time and efforts you put it..
.
I can totally relate to introducing sourdough to your family. Been there too.. Plus I know how addictive sourdough baking is 😉
.
Glad to learn about the substitutions.. Thank you for sharing it with us I am sure many others reading through this would be benefitted. If you dough is sticky you can try reducing some liquid content here just a bit may be. And next time you can also think about trying 50:50 bread flour:whole wheat that would turn out good.. Also try with some chia seeds or flax seeds to make it more nutritious. 😀
.
Thank you for the warm wishes.. I am so grateful to see your presence in this small space.. 🙂
Regards
Sushma
Vivian says
Just had a slice from my first loaf. It is delicious! I love how explicit your instructions are. Very easy to follow. My bread didn't seem to rise as tall as yours, but I used a loaf pan that was 1/2 inch larger for both width and length. I'm hoping that is the reason that my loaf was only 3 inches tall and not a problem with my starter. What do you think? About how tall is your loaf? , how do you store the bread if it is not consumed in one day? Thank you so much for this recipe!
sushma iyer says
Hi Vivian..
I don't see both the bread tin or the starter as the problem here.. I think you did not allow it to reach till the brim in the final proofing..
Just leave it an inch less than the bread pan that way when it goes into the hot oven gets an oven spring and would rise tall. hope this helps.. Coming to storing the bread you can store it in an airtight container for about 3 days. You can also freeze the bread if you like.
Regards
Sushma
Vandana says
Hi Sushma thanks for the wonderful recipe. The result was too good. Had fun making n baking the bread. I am now just in love with this sourdough starter. N want to bake every weekend. I tried your recipe with a twist with adding whole wheat flour n apf. I was bit worried but after the result I was very happy n my family also loved it. Thanks once again. This will be my every weekend baking.Eager to try more recipes.😊
sushma iyer says
Hi Vandana
That is amazing.. So generous of you to take the time out and share your wonderful feedback with us.. Appreciate it.. And yes 50:50 APF:Whole Wheat would work too.. I would also recommend you to go through the variations section and you can use chia seeds or flax seeds or cooked quinoa too to increase the nutritional value of your bread 🙂
Regards
Sushma
Divya Nair says
The Sourdough Sandwich bread recipe is just awesome. I followed the recipe to the T and could create an exact replica of Sushma’s bread. Thank you Sushma once again for the wonderful recipe. It’s surely a keeper
sushma iyer says
Hi Divya..
I am so pleased to read through your comment.. Thank you so much for taking the time out to try the recipe and then also share your wonderful feedback with us.. Appreciate it.. So pleased to learn that you found all the details helpful..
Regards
Sushma