Tender crumb with a sweet crust, totally egg-free, these Challah Rolls would definitely outshine any main dish; I promise. You’re going to love this bread recipe! So fluffy, soft and chewy, these Challah Buns are truly addictive!!

What is Challah Bread?
Pronounced as haa-lul or halla ("c" being silent); Challah Bread is a type of (kosher) braided enriched yeast dough made using eggs, milk and sugar as the enriching ingredients. Challah Rolls or Challah Buns are essentially the same dough, but made into individual bread rolls to be eaten as a side.
Characterised by yellow tint and a crusty dark golden brown colouration on top, soft and fluffy interiors, the fresh challah bread or individual challah rolls are a delight to eat.
Why try this Recipe?
- Totally Eggless Bread Rolls recipe making it perfect for anyone who is allergic to eggs, vegetarians or anyone who do not consume eggs.
- Mini Challah Buns freezes so well, so you can definitely make them ahead of time.
- Great grab and go sweet challah rolls making it the perfect recipe for busy mornings.
- Can be used as a challah bagel or even as a base for challah hamburger buns.
Apart from the recipe also find tips and tricks to avoid your bread smelling yeasty, splitting of the challah knots, bread turning dense and lot more in the recipe.
Ingredients:
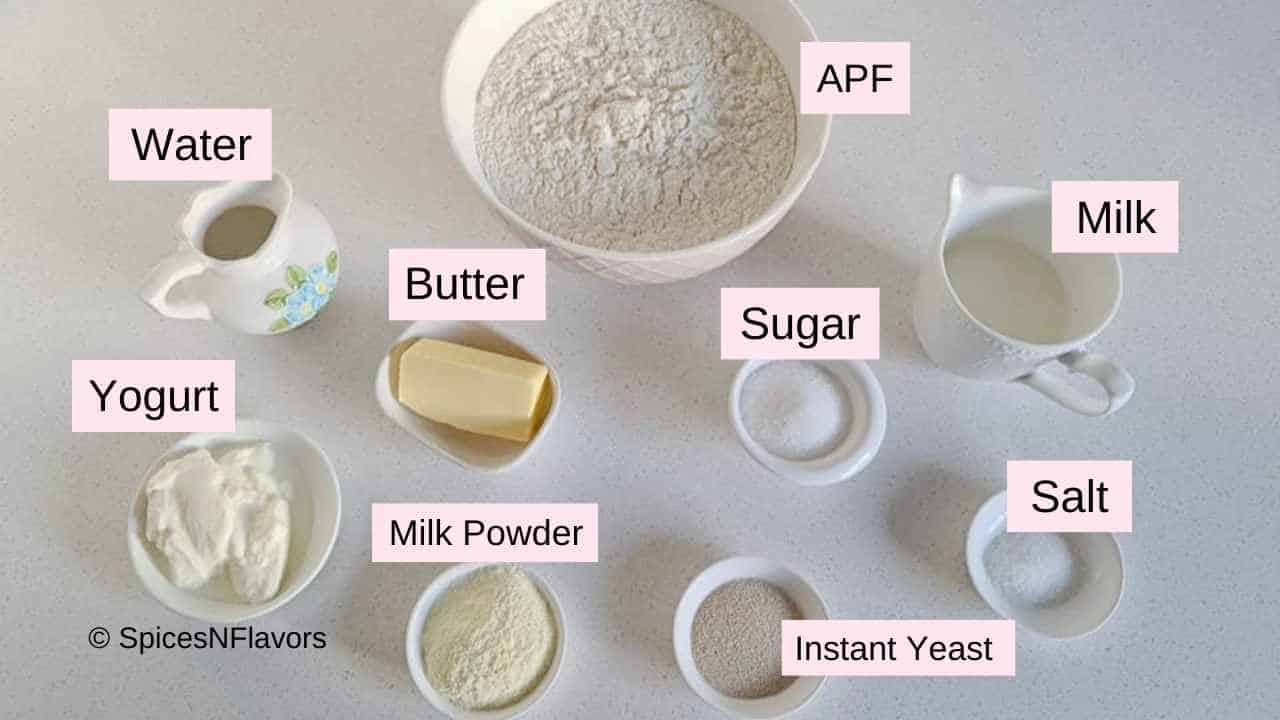
- Flour: Since this is an enriched dough, using Bread Flour would be ideal. But if you do not have it handy All Purpose Flour works perfectly fine.
- Milk Powder: Acts as an enrichment and makes the end product softer, if you do not have it feel free to skip it.
- Yeast: I prefer using Instant Yeast, in all my bread recipes as it does not require any kind of activation and can be directly added to the flour.
- Yogurt: Acts as an egg substitute. In place of yogurt you can use 2 eggs.
- Butter: Original recipe calls for vegetable oil, since we are making it eggless I am swapping the oil with butter. Please feel free to use equal amounts of oil if you prefer or if you are using eggs.
Step by Step Instructions:
Step 1 - Preparing the Roux
I agree this is an additional step but this would make our dough incredibly soft specially in this case where we are not adding any eggs.
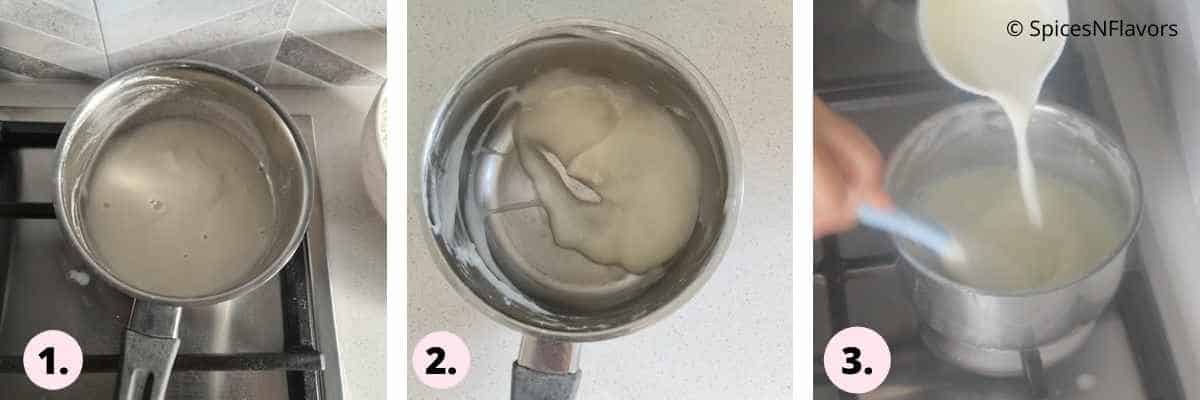
To a saucepan add 4 tbsp of flour from the measured out 4.5 cups and all of the measured out water. Dissolve the flour completely (image 1).
Switch on the flame and cook till it thickens to form a paste (image 2).
Once thickened switch off the flame and whisking continuously add the cold milk (image 3).
This is a simple trick to reduce the temperature of the roux. Obviously you cannot combine the roux with the rest of the ingredients when it is so hot, as it would kill the yeast right.
And that is why we add the cold milk to reduce the temperature.
This technique is same as the one we used for Hokkaido Milk Bread aka Japanese Bread.
Step 2 - Prepare the Dough

In a mixing bowl combine the dry ingredients starting with salt, flour, milk powder, yeast and sugar (image 4).
Mix them and create a well in the centre. Add the yogurt or eggs (whatever you are using).
Finally dump the roux into it. Just make sure it is warm to touch and not hot as that would kill the yeast (image 5).
Then combine into a shaggy mass of dough.
Oil your workspace a bit. Transfer the dough and start kneading (image 6).
Tip: Oiling as opposed to dusting the workspace would ensure that the dough doesn't dry out. Addition of flour at this stage that is while kneading is what makes your Challah Bread Dense
Watch the youtube tutorial to understand how to knead challah rolls.
After 10 mins, start incorporating a little butter at a time into the dough (image 7) and then knead again for another 10 mins to form a soft and elastic dough (image 8).
How to Knead the dough in stand mixer?
Make sure that the roux is warm to touch and then dump all the ingredients except butter in the stand mixer and knead for 8 mins and then add the butter and knead again for another 3 to 4 mins.
Step 3 - First Proofing
Grease a bowl with oil.
Place the kneaded dough into it. Grease the top of the dough with oil too.
Cling wrap and let it proof for 1.5 hours.
How to Proof Dough in Instant Pot?

If proofing in an Instant Pot then choose the yogurt mode and set the time to 45 mins. Once you understand the Instant Pot Bread Proofing technique, making bread dough would be so much easier.
Step 4 - How to Shape Challah Buns
Shaping Challah Rolls is actually pretty easy even though it looks intimidating.
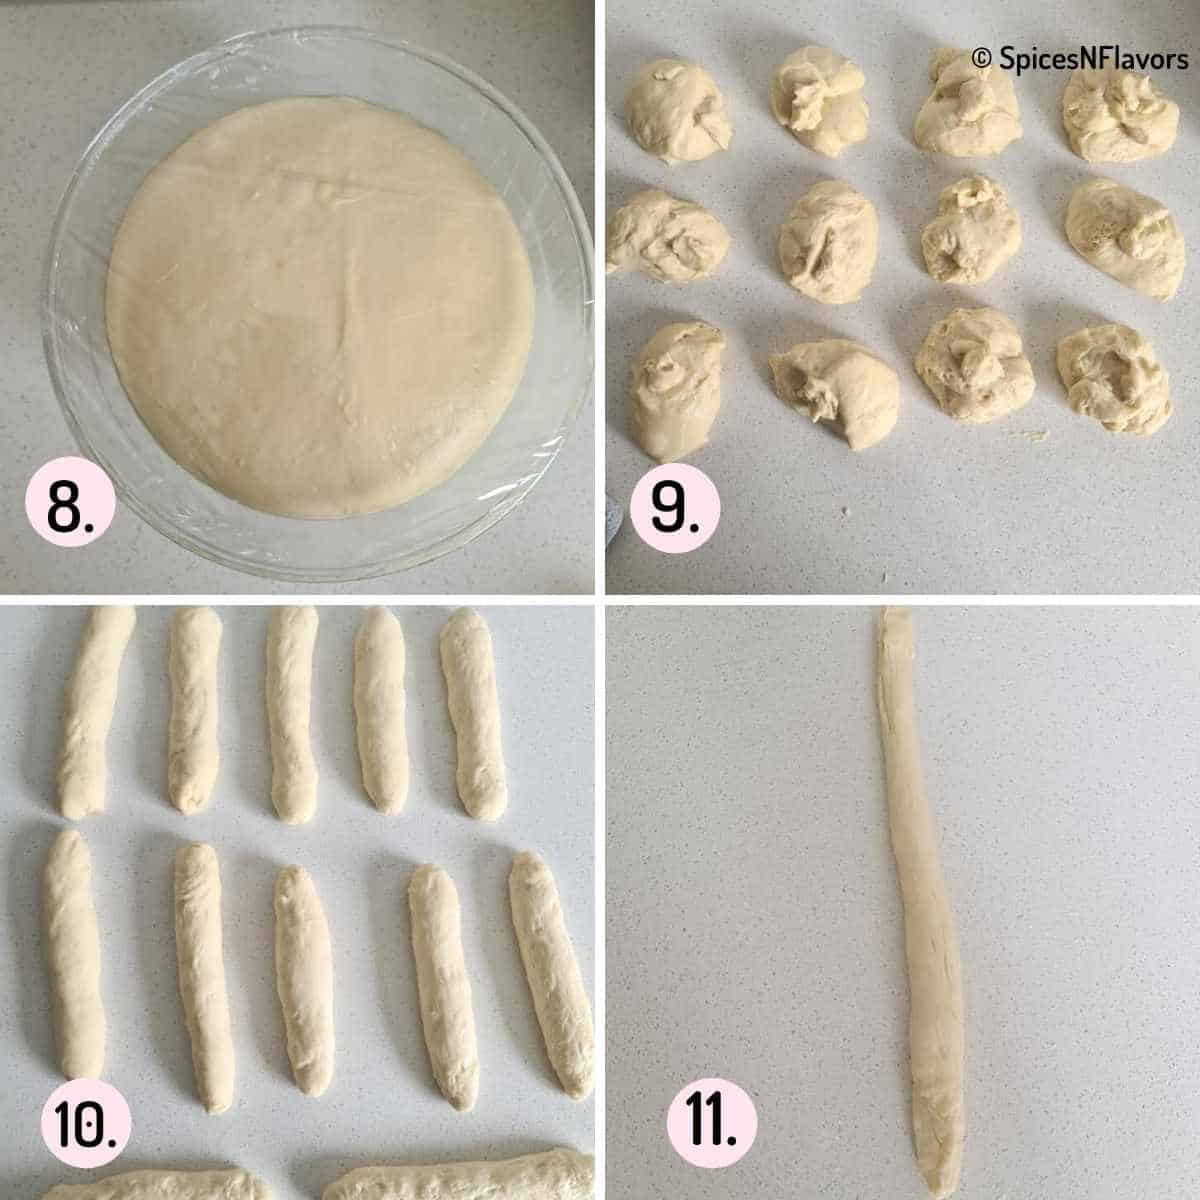
Once proofed, punch down the dough gently to release the gas bubbles then divide the dough into 12 equal portions (images 8 and 9).
Take one portion, roll it into a rope of roughly 15 cms in length (image 10).
Gluten has the tendency to shrink back the more you roll. So the trick here is to roll it a defined measurement then let it rest and roll again.
So roll all the 12 portions to roughly 15 cms rope (image 10). At all times do remember to keep the dough covered.
How do you tie a challah knot?
Then take the 1st rope you made. Stretch and roll to form a 30 cms long rope (image 11).
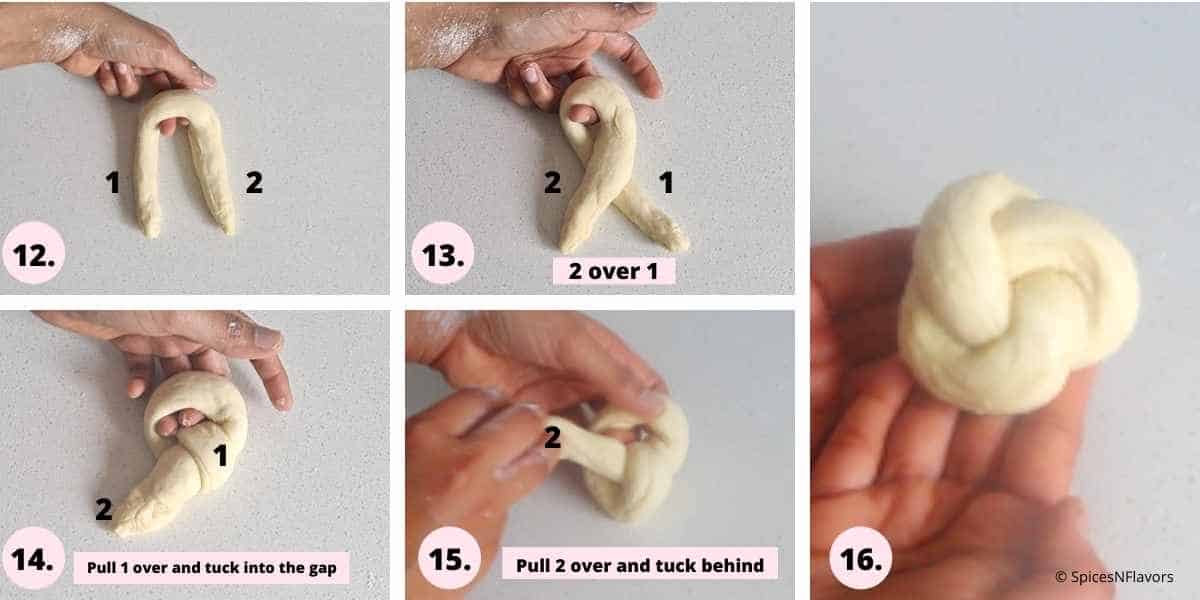
Hold it at the centre. Let us name the two sides as 1 and 2 to make it easy for understanding. (image 12)
Cross the end 2 over end 1 (image 13).
Take the end 1, pull over and pass it through the gap in the centre to tuck behind (image 14).
Now pull the end 2 to the back and join both the ends at the back to seal so that they do not open up while second proofing.
If you do not press and seal both the ends to the back of the dough well, it might loosen up while second proofing and stretch and split apart while baking. So challah rolls braiding is a crucial step for the dough to hold its shape while baking.
This is how you make challah knot rolls.
Line 6 shaped buns in a tray that is pre-lined with a parchment paper.
Cover with a tea towel and allow for second proofing.
Proof the dough for roughly 40 mins.
The dough should have doubled in volume and should resemble a soft and bouncy dough.
Step 5 - Baking the Challah Bread Rolls
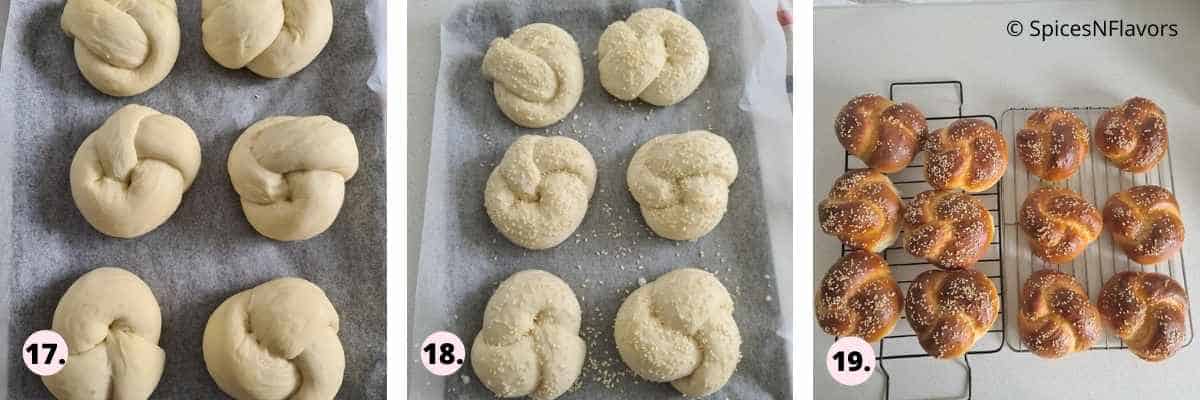
Once proofed, give the dough a milk wash gently taking care not to deflate them (image 17).
Sprinkle some sesame seeds on top (image 18) and bake in a preheated oven of 180°C for 25 mins (image 19).
You would know your challah is done when you get a characteristic yellow tint around the knots and dark golden brown colouration on top and the bottom of the bread sounds hollow. And it would have visibly doubled in volume and would bounce back on touch.
Let it sit in the pan for another 3 mins, then transfer to a wire rack to cool for at least 10 mins before serving.
Please note that the Jewish Origin Challah Bread is a type of kosher, meaning there is no use of dairy in it.
However in this challah rolls recipes, being egg-free I have done some modification to achieve the classic yellow tint and the softness and texture of a regular bread.
I will leave the modifications in the recipe card for the classic version too.
Hope you learned how to braid challah into rolls like a pro with this recipe and technique.
Storage (Make Ahead Instructions)
Once the bread is cooled completely, store them in an air tight container for up to 2 days at room temperature. Never store bread in refrigerator.
Can we Freeze Challah Bread Rolls?
Absolutely. Once cooled, place it in a baking tray and put into freezer for 2 hours. Once frozen you can keep them in a ziplock bag well dated, and store for up to 3 months.
To unfreeze, preheat oven to 170°C and bake frozen rolls for 5 to 8 minutes
Since Challah rolls freezes so well, feel free to double the recipe to always have a delicious fresh bread just few minutes away!
That being said I would recommend freezing only the baked braided rolls and not the dough because some times the dough takes a really long time to re-activate.
But here are the steps if you wish to try it.
Can you let Challah Rise Overnight?
After the first rise, when the dough has doubled, store it inside your fridge covered with cling wrap. The next morning, leave dough at room temperature for 1 hour and then resume shaping.

Baker's Tips:
- Make sure that the roux is lump-free or else it won't bind properly with the dough.
- The roux should be warm when you mix it with the rest of the ingredients specially the yeast, as hot roux can kill the yeast and your bread won't rise.
- Since the dough takes a really long time to knead, if you get tired in between then cover the dough with a tea towel and leave it for 5 mins and then come back and knead again.
- Oiling the worktop as opposed to adding dry flour while kneading would ensure that your dough does not turn dense.
- If you are finding it difficult to knead the dough, then feel free to grease your hands with little oil and then continue kneading.
- Don’t forget to pinch the ends of the knotted dough under itself that is on the back of the dough while shaping. Doing that prevents the shaped challah rolls from unraveling or splitting while baking.
- Your oven must be pre-heated before baking. If you put the dough in a cold oven the bread would remain under-cooked and smell yeasty.
- Always make it a point to cool the bread completely before slicing.
Variations:
You can use the same dough and serve in different variations by making slight changes:
- Challah Buns for Burger: Slice the challah buns in half and stuff with your favourite sauce, salad leaves and patties and enjoy as a burger bun.
- Challah Bagels: This dough would work great as base for making homemade bagels if you want to take a break from the New York Style Bagels.
- Pull Apart Challah Rolls: While second proofing place the buns close to each other so that they stick while proofing and baking. So once baked you can pull it like dinner rolls.
- Challah With Raisins: Being slightly sweet, these buns pair well with raisins. Once the bread dough is kneaded, add the raisins and fold using hands. Stand mixer would squish the raisins so fold with hands and continue with the first proofing step.
- Challah Rolls in Muffin Tins: Once shaped place the challah buns in a greased muffin tin and allow for second proofing. The bun will take the shape of the muffin tin and once baked would look like a muffin with a braided top.

Recipe FAQ's
Challah is very similar to brioche, only difference being brioche uses a lot of dairy products in the form of eggs, butter, milk powder and milk whereas a classic challah bread recipe does not call for dairy products except for eggs. So a brioche is much more richer than a challah bread.
Yes it is a slightly sweet bread as the recipe calls for a little more sugar than a regular bread recipe.
Yes that is how the bread stands out. Whether you are making a 6 strand braided challah bread or mini challah bread rolls, the characteristic feature of this Jewish egg-enriched bread, lies in its braid.
1. You would have used wrong type of yeast which means the quantities would change causing the use of too much yeast giving out yeast smell.
2. Your oven was not pre-heated, so the yeast was not activated and the dough remains undercooked and raw in the centre.
3. Oven was too hot, killing the yeast so the challah remains dense.
4. Watch our bread baking queries video to understand more in depth about various bread related problems.
Related Recipes:
Wish to Join US for the love of BAKING? Subscribe to our newsletter and Youtube channel. Follow along on Facebook, Instagram, and Pinterest for all the latest updates!
The best Challah Rolls (Challah Buns) Recipe
Ingredients
- 4.5 cups (540 gms) Plain Flour/APF/Maida
- 1/2 cup (120 ml) Water
- 1/2 cup (120 ml) Milk cold
- 1.5 tsp (9 gms) Salt
- 2 tbsp (14 gms) Milk Powder
- 2 tsp (8 gms) Instant Yeast
- 2.5 tbsp (40 gms) Sugar
- 3 tbsp (45 gms) Yogurt (refer notes)
- 3 tbsp (40 gms) Butter, softened (refer notes)
- milk for brushing the top
- sesame seeds for sprinkling
Instructions
Step 1 - Preparing the Roux
- To a saucepan add 4 tbsp flour out of the measured out 4.5 cups and all of the measured out water. Dissolve the flour completely. Then switch on the flame and cook till it thickens.
- Once thickened switch off the flame and whisking continuously add the cold milk. Set this aside
Step 2 - Preparing the Challah Dough
- In a mixing bowl combine the dry ingredients starting with salt, the rest of the flour, milk powder, yeast and sugar. Mix them and create a well in the centre.
- Add the yogurt and all of the prepared roux into it. Just make sure the roux is warm to touch and not hot as that would kill the yeast. Then combine into a shaggy mass of dough.
- Oil your workspace. Transfer the dough and start kneading.
- After 10 mins, start incorporating a little butter at a time into the dough and then knead again for another 10 mins to form a soft and elastic dough.
- How to Knead in a Stand Mixer: Make sure that the roux is warm to touch and then dump all the ingredients except butter in the stand mixer and knead for 8 mins and then add the butter and knead again for another 3 to 4 mins.
Step 3 - First Proofing
- Grease a bowl with oil. Place the kneaded dough into it. Grease the top of the dough with oil too.
- Cling wrap and let it proof for 1.5 hours.
- How to Proof in an Instant Pot: Grease the inner pot with some oil. Transfer the well kneaded dough into it. Choose the yogurt mode and set the time to 45 mins.
Step 4: How to knot a Challah Bread (Shaping)
- Once proofed, punch down the dough gently to release the gas bubbles then divide the dough into 12 equal portions.
- Take one portion at a time, roll it into a rope of roughly 15 cms in length. Always keep the dough covered while you work on rolling the rest.
- Take the first rope that you made, stretch and roll to form a 30 cms long rope.
- Hold it at the centre and cross over the ends one over the other just like tying a shoe lace.
- Take the rope from below, pull over and pass it through the gap in the centre to tuck behind.
- Now pull the other end to the back and join both the ends at the back to seal so that they do not open up while second proofing. This is how you make challah knot rolls.
- Line 6 shaped buns in a tray that is pre-lined with a parchment paper. Cover with a tea towel and allow for second proofing.
- Proof the dough for roughly 40 mins. The dough should have doubled in volume and should resemble a soft and bouncy dough.
Step 5 - Baking
- Once proofed, give the dough a milk wash gently taking care not to deflate them.
- Sprinkle some sesame seeds on top and bake in a preheated oven of 180°C for 25 mins
- You would know your challah is done when you get a characteristic yellow tint around the knots and dark golden brown colouration on top and the bottom of the bread sounds hollow. And it would have visibly doubled in volume and would bounce back on touch.
- Let it sit in the pan for another 3 mins, then transfer to a wire rack and wait for a at least 7 to 10 mins before enjoying the challah dinner rolls.
Video
Notes
- The Jewish Origin Challah Bread is a type of kosher, meaning there is no use of dairy in it. However in this challah rolls recipes, being egg-free I have done some modification to achieve the classic yellow tint and the softness and texture of a regular bread.
- The classic recipe uses eggs, so in place of yogurt you can use 2 eggs. Vegetable Oil in place of butter and water in place of milk. The quantities remains the same. You can also skip adding milk powder if it is not handy.
- Make sure that the roux is lump-free or else it won't bind properly with the dough.
- The roux should be warm when you mix it with the rest of the ingredients specially the yeast, as hot roux can kill the yeast and your bread won't rise.
- Since the dough takes a really long time to knead, if you get tired in between then cover the dough with a tea towel and leave it for 5 mins and then come back and knead again.
- Oiling the worktop as opposed to adding dry flour while kneading would ensure that your dough does not become dense.
- If you are finding it difficult to knead the dough, then feel free to grease your hands with little oil and then continue kneading.
- Don’t forget to pinch the ends of the knotted dough under itself that is on the back of the dough while shaping. Doing that prevents the shaped challah rolls from unraveling while baking.
- Your oven must be pre-heated before baking. If you put the dough in a cold oven the bread would remain under-cooked and smell yeasty.
- Once the bread is cooled completely, you can store them in an air tight container for up to 2 days at room temperature. This bread freezes well for up to 3 months.
- Watch this video on bread baking queries to troubleshoot common bread problems that you might be facing.

Leave a Reply