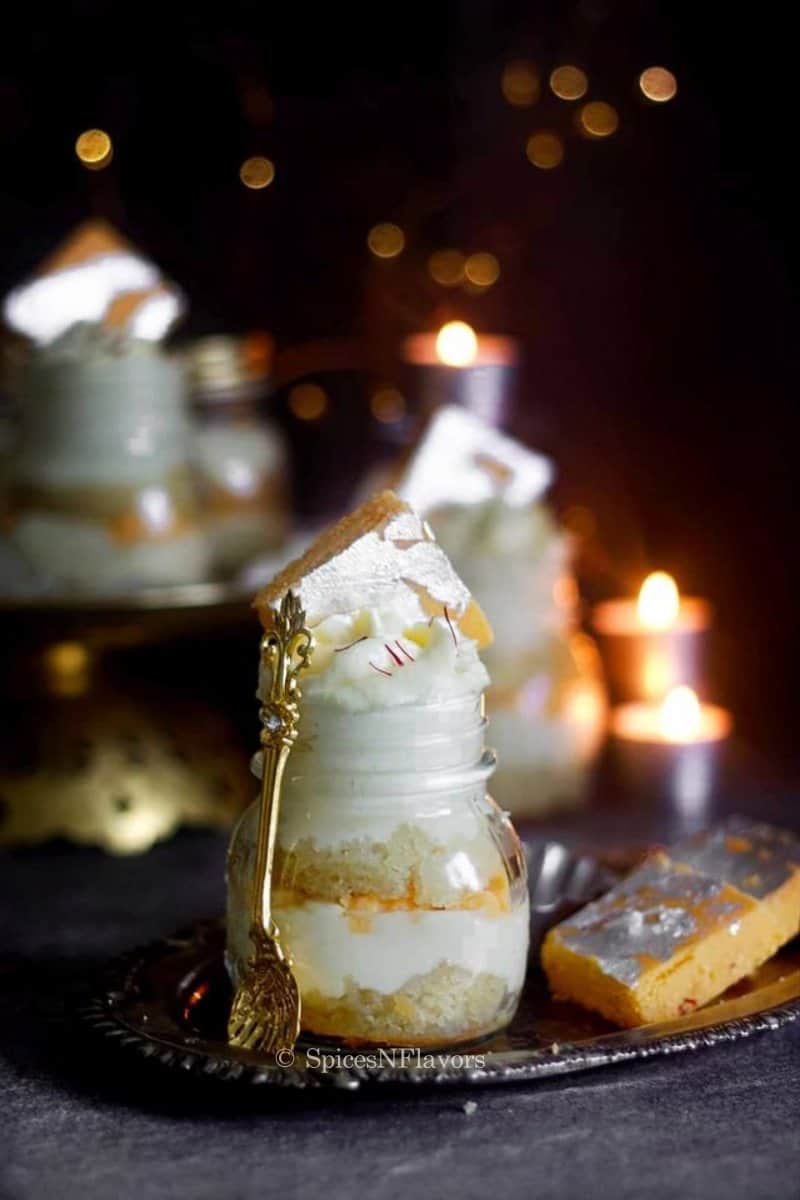
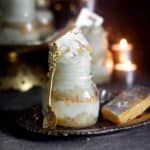
Burfi Cake Jars is a fun and interesting Indian Fusion Dessert recipe with layers of nutty spongy cake topped with burfi mousse and homemade burfi.
What is Burfi Cake?
Burfi or Barfi is a milk based Indian sweet recipe that is usually made during celebrations. The term is derived from a Persian word Barf which means snow. Basically it is a white coloured milky fudge. Using this Indian sweet as an inspiration I have combined the flavours along with a cake to make this Indian inspired dessert - Burfi Cake or Barfi Cake.
And instead of making a traditional layered cake, I have today decided to serve them in jars; who doesn't love having dessert in jars?
Well I am for sure kicking myself for not making this cake in a jar kind of desserts because it is sooo good and OMG so freaking easy!!!
These Burfi Cake Jars
- are so much easier to make than a traditional layered cake (you need not worry about frosting them!!!)
- portable, individually portioned
- makes an excellent edible gift idea
- perfect to be included in Diwali/Holi/Christmas Hampers
- excellent make-ahead dessert idea for any kind of celebrations - Diwali, birthdays, anniversary, Christmas just any for that matter.
- the joy of scooping the dessert in a spoon is something else!!!
- being served in glass, this not only has a longer shelf life but it is one of those homemade food gifts that ships really well.
Even though I have made so many cheesecakes in jars like a New York Style, Mint Cheesecake, Pumpkin Cheesecake and even Cinnamon Roll Cheesecake in jars but never really a cake in a jar.
But not any more as these mini desserts are going to become my thing soon 😀 Can't wait to share many more recipes in the future.
And to be very honest even for this one I started to make a regular cake but a recent comment on Youtube video encouraged me to turn this into a jar cake.
Things needed:
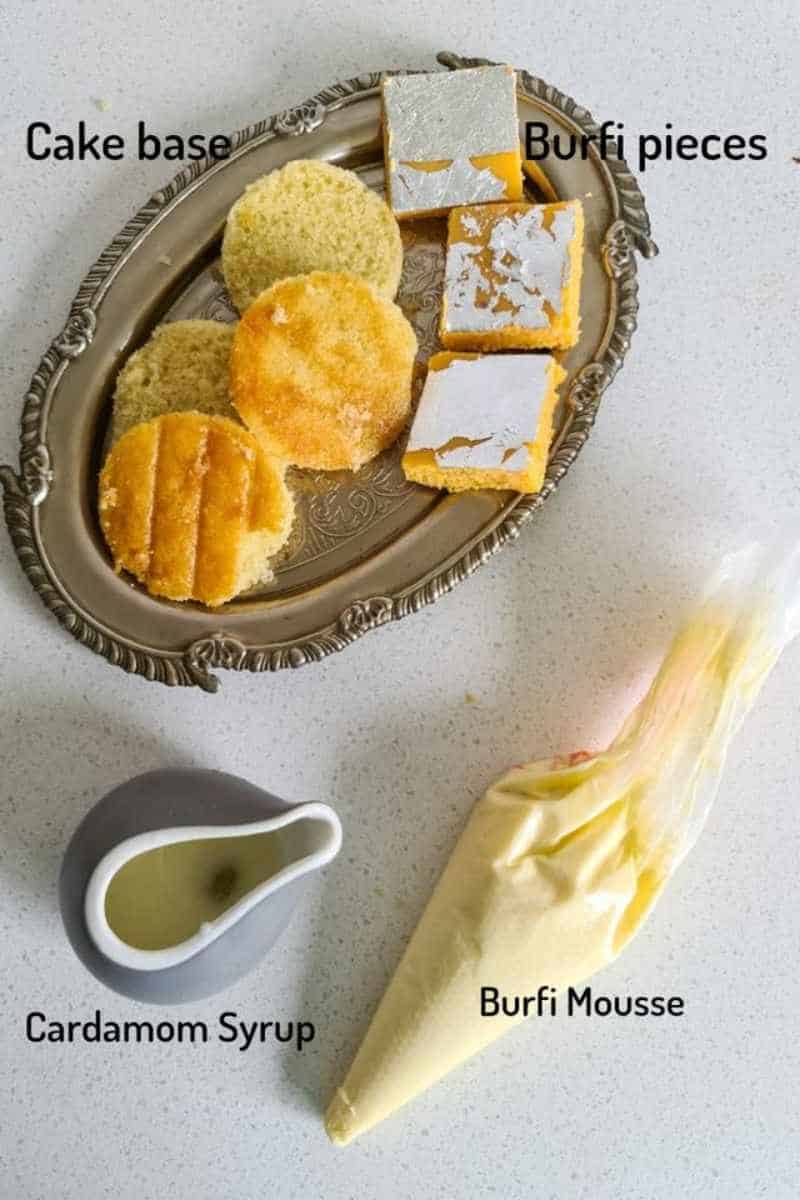
I usually make everything from scratch but if you are running short of time you can consider making this a semi-homemade dessert too.
- Cake Base: I have used a cardamom based recipe to make this cake. If you are running short of time you can consider buying a sponge cake from the market. It would work just fine.
- Cardamom Syrup: Super easy to make with milk and sugar and cardamom pods.
- Burfi Mousse: Homemade Burfi mixed with Whipped Cream.
- Kesar Barfi: Again made from scratch. But you can consider buying this from the market too.
Step by Step Instructions
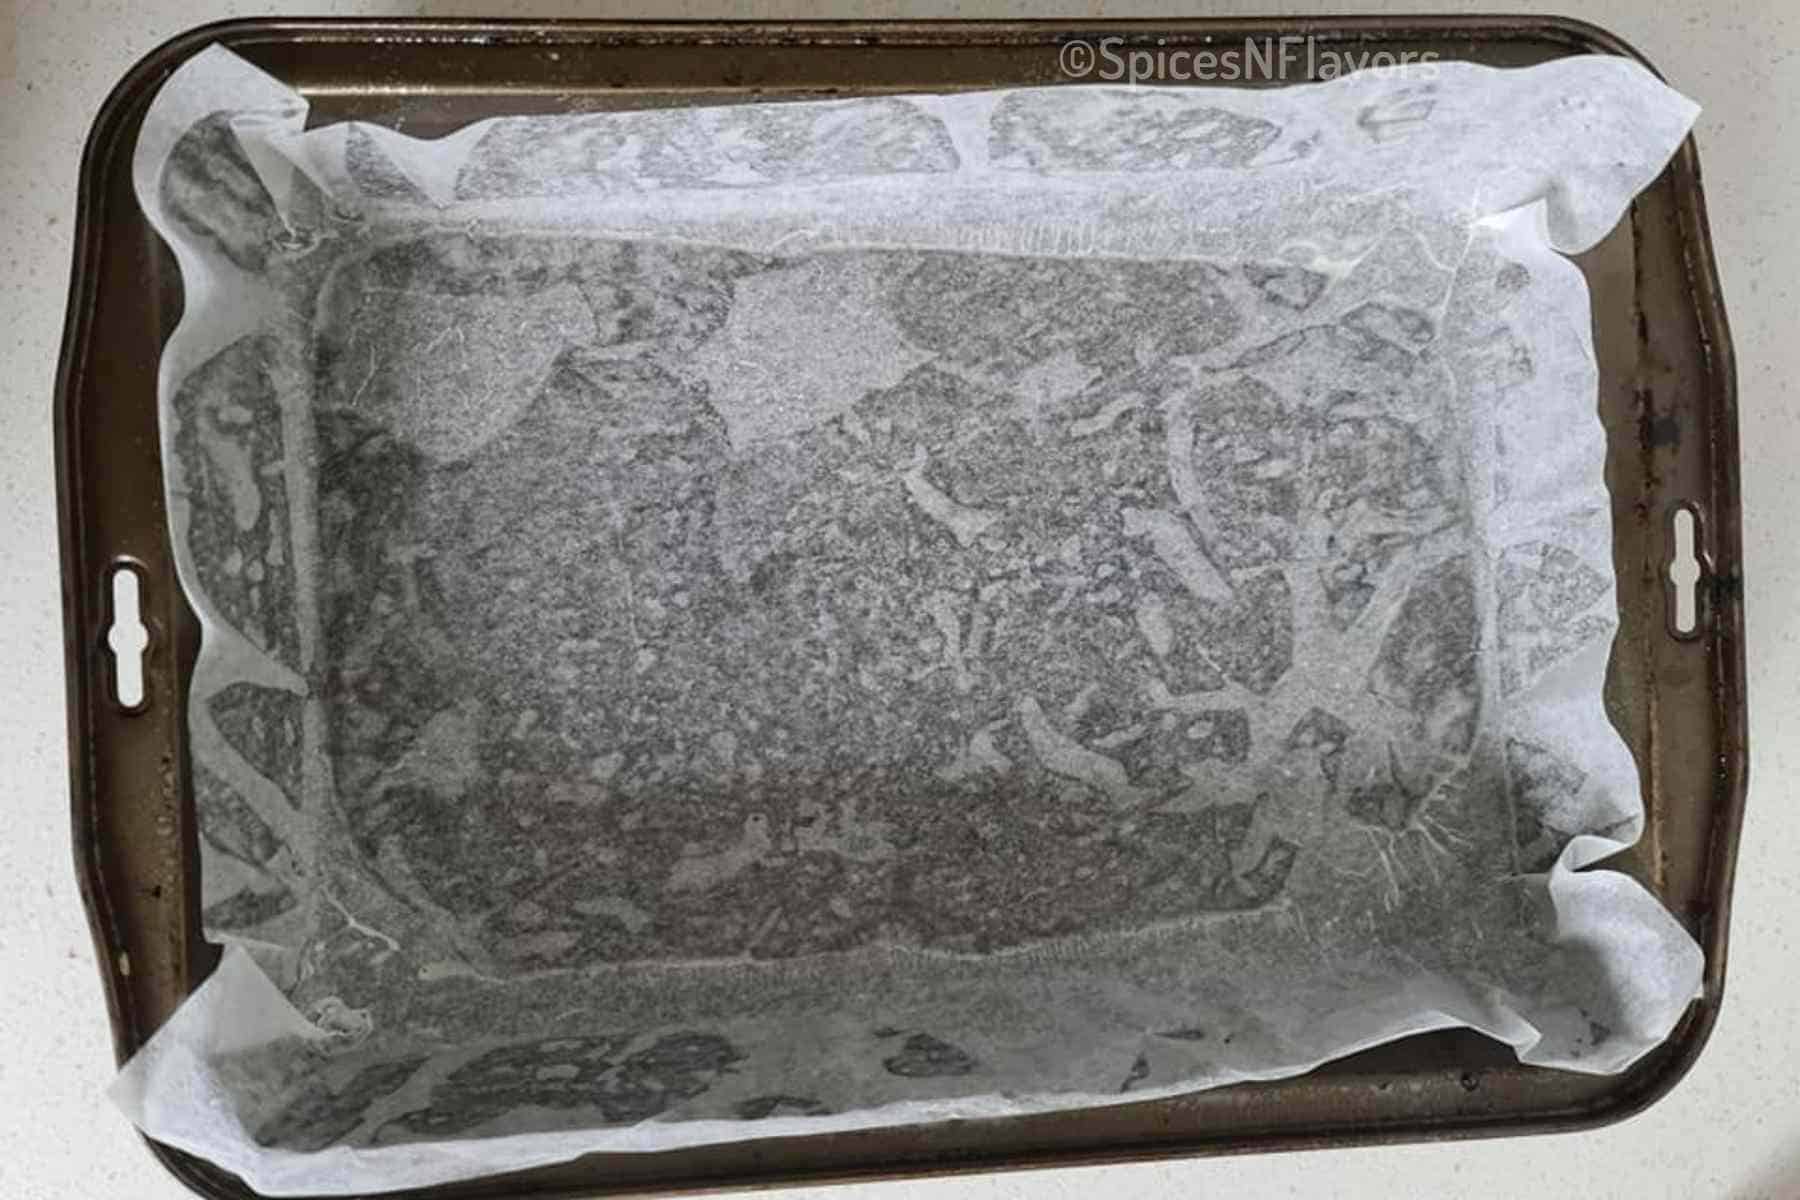
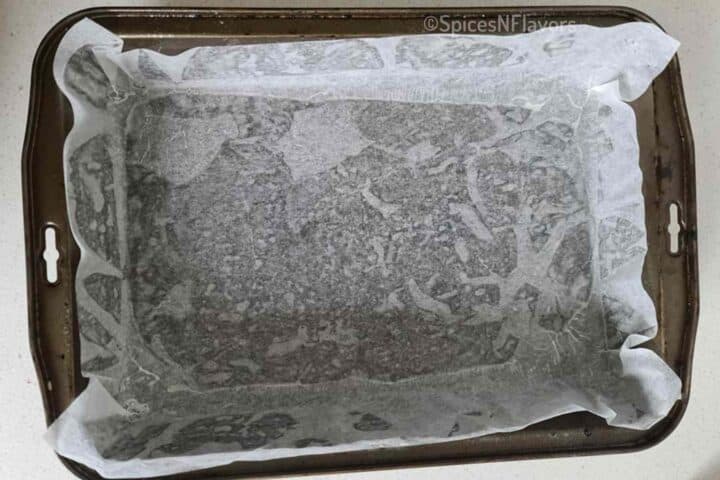
- Start by lining your cake pan for which simply grease an 9X13 inch cake pan with oil or butter and place a parchment paper on top.
- Also preheat your oven to 180°C
Step 1: Prepare the Cake Base

- Sift together plain flour, almond meal, baking powder, baking soda and salt in a bowl and set aside.
- Heat the butter and milk until the butter melts and the milk just begins to boil. Set this aside.
- Whisk together the yogurt and sugar until homogenous (image 1).
- Start alternating between the dry and wet ingredients starting and ending with dry ingredients. So you add 1/3 of the sifted dry ingredients give it a mix and when you can still see some bits of flour remaining add half of the milk and butter mixture. Mix again. Repeat till you get a smooth cake batter like consistency (image 2-4).
- Pour it into the prepared cake pan and bake in a preheated oven of 180°C for 16-18 mins (image 5-6). (If baking in an 8 inch cake pan you would need around 30 to 40 mins of bake time).
Step 2 - Burfi Mousse
- This step is adapted from our Classic Milk Powder Burfi recipe, only tweaking the timings here to make it easier to mix with the frosting.
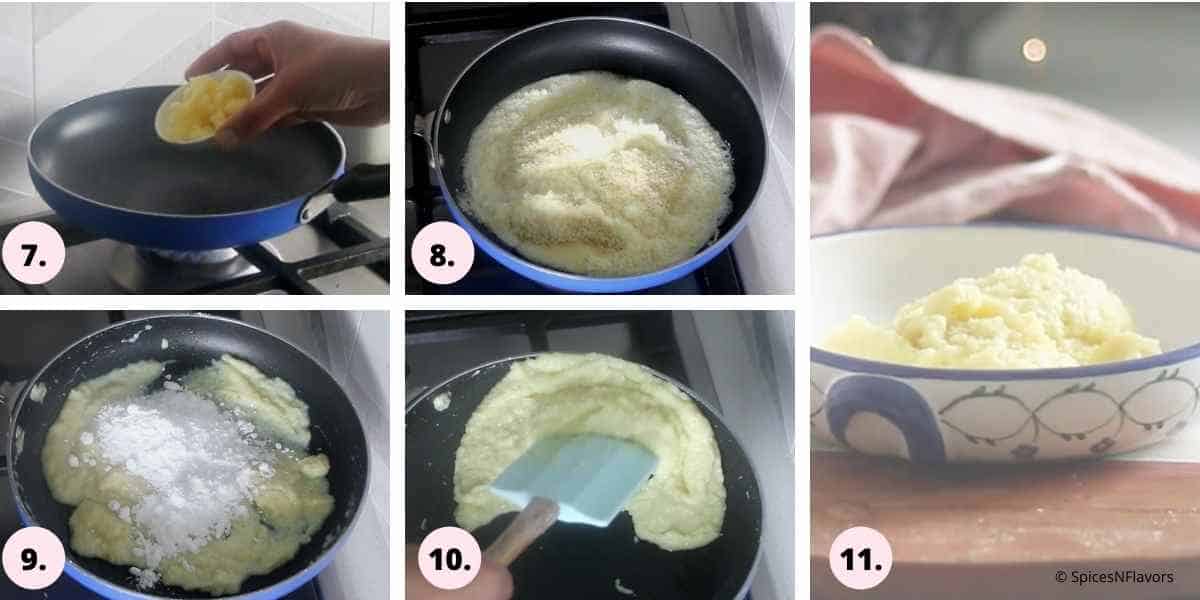
- Add ghee to a fry pan (image 7). Once it melts, switch off the flame and then add milk powder, almond meal and milk. Give a mix and switch on the flame (image 8).
- Cook until it thickens a bit about 2 3 minutes.
- Then add the icing sugar and cook until the mixture starts rotating in the pan. This would take another 2 3 minutes (image 9 - 10).
- Before switching off the flame, add cardamom powder and give a final mix then transfer to a bowl to cool completely (image 11).
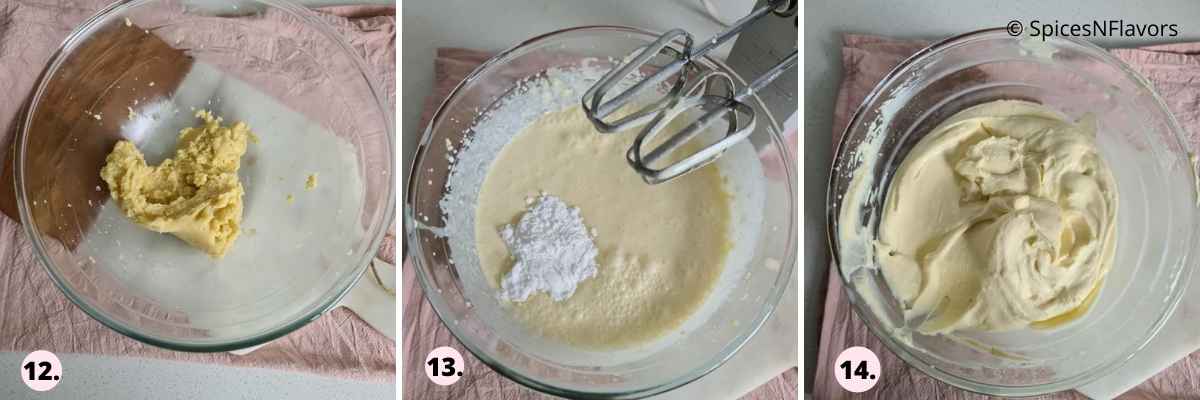
- Once the burfi cools down, mix with a spoon to loosen it a bit then transfer to a mixing bowl andbeat with a whisk to make it pasty (image 12).
- With the help of a beater, whisking continuously add the whipping cream and icing sugar (if using). Whisk to form stiff peaks (image 13-14).
- Transfer to a piping bag and set aside.
Step 3 - Cardamom Syrup

- Crush the cardamom pods and add it to the milk and sugar in a saucepan (image 15).
- Heat this mixture until the sugar dissolves completely (image 16).
- Transfer to a separate container and allow it to cool completely.
- Filter it out only before applying it on the cake.
Step 4 - Assemble the Cake Jars
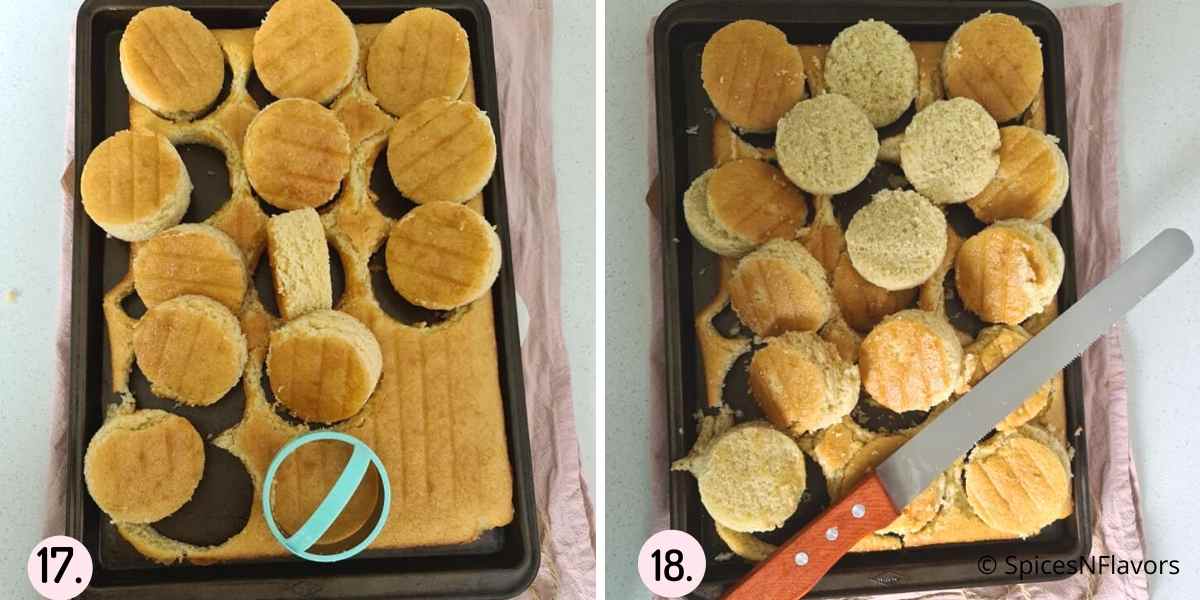
- Once the cake is cooled completely cut it using a round cookie cutter that fits your jars and then slice horizontally to form two layers. (If using an 8 inch cake pan then first slice the cake into two layers and then cut using a cookie cutter)
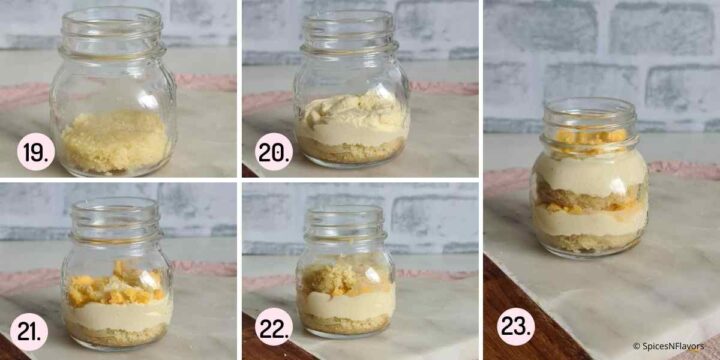
- This is the first layer of your jar cake. So add it to the base of the jar. (image 19)
- Add 2 to 3 tsp of prepared Cardamom Syrup on top to soak the cake. (image 19)
- Using the piping bag, pipe a layer of the Barfi Mousse on top (image 20).
- Crush some burfi pieces on top (image 21). I prepared my own by following the basic Milk Powder Burfi recipe from our channel. Just used Saffron infused Milk in place of plain Milk to give our jars a pop of colour.
- Then repeat the layers till you reach the very top (image 22-23).
- If making it for selling or gifting purposes then leave some breathing space so that you are able to close the lid on top or else you can continue like I did in terms of decoration.
I loved assembling this burfi cake jars because it is so much time saver than making a regular cake.. lol..
Shortcut Method
- You can use store bought sponge cake instead of preparing the cake from scratch. Or use vanilla cake box and add cardamom powder or essence to it and prepare.
- Use store bought burfi to layer in between
Storage Instructions (Shelf Life)
Always store the cake jars in the refrigerator. It will stay good for 5-7 days unlike a regular cupcake or cake slices.
The logic behind is very simple, since it is sealed well there is no transfer of moisture and hence stays fresh for little longer.
MAKE AHEAD INSTRUCTIONS:
- You can bake the cake base a week or months ahead of time. Store it in the fridge for a week or freeze in the freezer for up to a month.
- The Barfi Mousse can also be made a day ahead of time and stored in the fridge in a bowl that is cling wrapped well in a way that the wrap touches the top of the mousse so there is no skin formation on top. Please note the texture would vary but since we are piping it in the jars it won't affect much.
Baker's Tips:
- For making cake jars always prefer using a sheet pan to bake the cake layer as it gives even layers and also takes less time to bake comparatively. The one that I am using is 9x13 inches. If you do not have one you can use an 8 inch cake pan too bake it for 30 to 40 mins.
- The butter and milk mixture needs to be hot while mixing with rest of the ingredients to make the cake batter.
- The reason for alternating between dry and wet ingredients is just to avoid over-mixing of the batter. (This and 9 other tips has been explained in my baking ebook tips, which you can download for free by subscribing to our weekly newsletter).
- Do not cook the burfi mixture for long in step 2 as we want to combine it with cream later. Cooking too long would cause it to set like a traditional burfi which we do not want.
- Do not overbeat the frosting or else it will lose its texture and split.
- Always store the jar cakes in the refrigerator.
- Do not throw away the leftover cake scraps. You can use it to make cake pops or cakesicles. Spread it on a baking tray and bake again to form cake crumbs. Use it to top on ice-creams or freeze it for later.
- To make the jar cakes it is always a good idea to use a wide mouth jar to assemble easily. However I did not have one so I am using a narrow mouth jar.
- Consider checking my Cake Pricing Guide post to understand how much to price for this Burfi Cake Jars.
RECIPE FAQ'S:
Yes you can. Use equal amount of plain flour instead. You can also skip the almond meal in step 2 as well.
This totally depends on the size of the jars you are using to set the burfi cake in. I am using a 5oz jar to make this burfi cake jars and I could make 8 jars out of this recipe. You would have enough cake slices to make 3-4 more jars which you can freeze for later or use 300 ml whipping cream in place of 200 ml whipping cream mentioned in the barfi mousse ingredient list in step 2 to make 12 cake jars.
Yes absolutely. All the bake timings for a cake layer are mentioned in the post. Soak it with cardamom syrup and use the Barfi Mousse as the filling recipe top it with burfi pieces just like we did. However to frost the cake I would recommend you to use our Stabilized Whipped Cream Frosting with cardamom essence.
You can follow any of these recommendations:
1. Freeze it for later
2. Make cake pops or cakesicles.
3. Crumble it and layer it on top of a baking tray. Bake again for around 5 mins (keep a close eye) to form cake crumbs. Top it on top of ice-creams.
4. Check our Youtube Tutorial to understand how to layer it in wine glasses.
5. Add it to a mixer along with vanilla ice-cream and milk to form milk shake.
Yes you can. Bake for 30 to 40 mins. Cool completely. Then slice into two and cut with the cookie cutter that would fit the size of your jars.
RELATED RECIPES:
Wish to Join US for the love of BAKING? Subscribe to our newsletter and Youtube channel. Follow along on Facebook, Instagram, and Pinterest for all the latest updates!
Burfi Cake Jars
Ingredients
Eggless Cake Base
- 180 gms (1.5 cups) APF/Maida
- 72 gms (2/3 cup) Almond Meal
- 1.5 tsp Baking Powder
- 1/2 tsp Baking Soda
- 1/2 tsp Salt
- 113 gms (1/2 cup) Butter (cubed)
- 150 gms (2/3 cup) Milk
- 120 gms (1/2 cup) Yogurt
- 200 gms (1 cup) Sugar
- 1 tsp Cardamom Essence
Burfi Mousse
- 1/8 cup Ghee
- 1 cup Milk Powder
- 2 tbsp Almond Meal
- 40 gms (3 tbsp) Milk
- 1/2 cup Powdered Sugar
- 1/2 tsp Cardamom Powder
- 200 gms Whipping Cream
- 2 tbsp Icing Sugar (optional)
- 1/4 tsp Cardamom Essence
Cardamom Sugar Syrup
- 1/4 cup Milk
- 1/4 cup Sugar
- 3-4 Cardamom Pods
10-15 Burfi Pieces
Instructions
- Start by lining the cake pan for which first grease the pan with oil or butter and then place a parchment paper on top. Also preheat your oven to 180°C

Step 1: Prepare the Cake Base
- Sift together plain flour, almond meal, baking powder, baking soda and salt in a bowl and set aside.
- Heat the butter and milk until the butter melts and the milk just begins to boil. Set this aside.
- Whisk together the yogurt and sugar until homogenous.Start alternating between the dry and wet ingredients starting and ending with dry ingredients. So you add 1/3 of the sifted dry ingredients give it a mix and when you can still see some bits of flour remaining add half of the milk and butter mixture. Mix again. Repeat till you get a smooth cake batter like consistency.
- Pour it into the prepared cake pan and bake in a preheated oven of 180°C for 16-18 mins or until a skewer inserted in the centre comes out clean. Let it cool in the pan for another 5 mins and then invert on a wire rack to cool completely.
Step 2 - Burfi Mousse
- Add ghee to a fry pan (image 7).
- Once it melts, switch off the flame and then add milk powder, almond meal and milk.
- Give a mix and switch on the flame (image 8).Cook until it thickens a bit about 2 3 minutes.
- Then add the icing sugar and cook until the mixture starts rotating in the pan. This would take another 2 3 minutes. Before switching off the flame, add cardamom powder and give a final mix then transfer to a bowl to cool completely.
- Once the burfi cools down, mix with a spoon to loosen it a bit then beat with a whisk to make it pasty.
- With the help of a beater, whisking continuously add the whipping cream and icing sugar (if using). Whisk to form stiff peaks.
- Transfer to a piping bag and set aside.
Step 3 - Cardamom Syrup
- Crush the cardamom pods and add it to the milk and sugar in a saucepan. Heat this mixture until the sugar dissolves completely (no need to boil).
- Transfer to a separate container and allow it to cool completely. Filter it out only before applying it on the cake.
Step 4 - Assemble the Cake Jars
- Once the cake is cooled completely cut it using a round cookie cutter that fits your jars and then slice horizontally to form two layers.
- This is the first layer of your jar cake. So add it to the base of the jar.
- Add 2 to 3 tsp of prepared Cardamom Syrup on top to soak the cake
- Using the piping bag, pipe a layer of the Barfi Mousse on top.
- Crush some burfi pieces on top.
- Then repeat the layers till you reach the very top.
- Garnish as desired.
Video
Notes
- For making cake jars always prefer using a sheet pan to bake the cake layer as it gives even layers and also takes less time to bake comparatively.
- Please note the after assembling 8 cake jars you will be left out with some cake slices which you can freeze for later or consider using it in the alternate ways mentioned in the post. If you wish to make all the cake jars then use 300 ml of whipping cream in place of 200 ml cream mentioned in the Burfi Mousse Ingredient list in Step 2
- Always cube your butter so that it melts faster as we do not want any loss of moisture in the form of steam.
- The butter and milk mixture needs to be hot while mixing with rest of the ingredients to make the cake batter.
- The reason for alternating between dry and wet ingredients is just to avoid over-mixing of the batter. (This and 9 other tips has been explained in my baking ebook tips, which you can download for free by subscribing to our weekly newsletter).
- Do not cook the burfi mixture for long in step 2 as we want to combine it with cream later. Cooking too long would cause it to set like a traditional burfi which we do not want.
- Do not overbeat the frosting or else it will lose its texture and split.
- I used homemade burfi pieces, crushed it and added it to the filling. The recipe is adapted from our Milk Powder Burfi post just used Saffron infused Milk in place of Plain Milk.
- Always store the jar cakes in the refrigerator.
- Do not throw away the leftover cake scraps. You can use it to make cake pops or cakesicles. Spread it on a baking tray and bake again to form cake crumbs. Use it to top on ice-creams or freeze it for later.
- To make the jar cakes it is always a good idea to use a wide mouth jar to assemble easily. However I did not have one so I am using a narrow mouth jar.
- Consider checking my Cake Pricing Guide post to understand how much to price for this Burfi Cake Jars.
Yuv says
Thank you for the interesting recipe. Can this be made GF by replacing APF with Almond meal as well?
sushma iyer says
Hi Yuv.. sorry I have not tried gf version